Version 6.33
Feature Descriptions
Verified Returns in POS Pro V6
Build 6.33.154: PRO-2636
It is now possible to perform verified returns in the POS Pro V6 app.
Purpose
In Teamwork Commerce Pro, the verified return functionality allows for creating a return transaction for previously purchased merchandise as well as some other items such as gift cards.
A verified return is linked to the original sale transaction thus allowing for easy verification that the merchandise was sold to the customer. Also, linking to the original sale allows for transferring item details to the return. For example if fees or discounts were applied to items in the original sale, in the return transaction, any fees or discounts are automatically included in the return.
Verified Returns help the retailer by ensuring the merchandise was purchased from them, uses the exact price paid (fees or discounts), keeps the customer’s purchase history accurate, and provides a smoother and faster experience for the customer in returning and exchanging merchandise.
How to start a verified return
In POS Pro, starting a verified return is possible from the following areas:
- Sales Receipt
- Customer
- Sales History
Starting a verified return from the Sales Receipt area
In the Sales Receipt area, to find the original transaction, use the Find Receipt functionality to quickly scan the physical sales receipt or search by information from it.
The Find Receipt functionality is also helpful when no customer record was linked to the original sale thus making it impossible to find the required transaction in the customer’s history.
To start a verified return via the Find Receipt option:
- On the Home Screen, tap New Sale.
- In the Sales Receipt area, tap Find Receipt.
Depending on your custom settings, the Find Receipt button can be located at the top of the right-side panel (A in the screenshot below) or in the menu (B in the screenshot):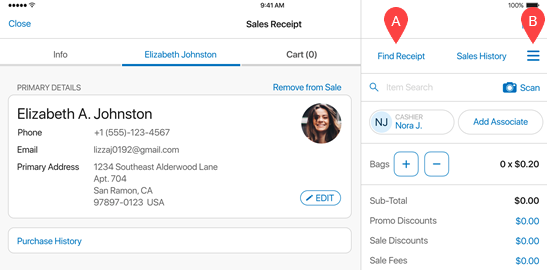
- In the Find Receipt area, find the original receipt by:
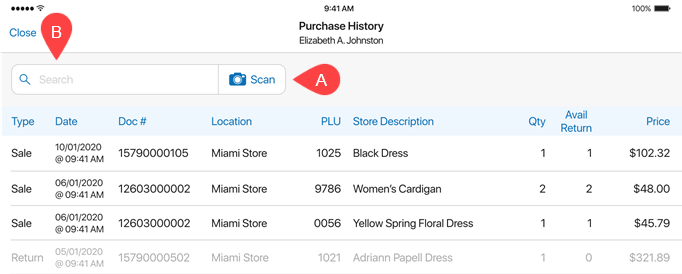
- tapping Scan (A in the screenshot below) and scanning the physical receipt with the camera, or
- manual entry in the Search field. You can choose by what criteria to search by tapping the button next to the search bar (B in the screenshot)
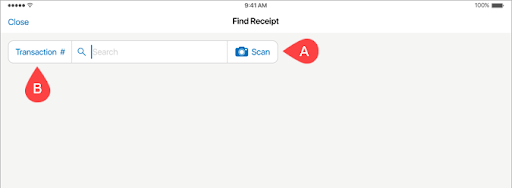 When the receipt is found, the Return area opens where it’s possible to complete the transaction.
Starting a verified return from the Customer area
To initiate a verified return from the Customer area, find the original sale transaction in the customer’s purchase history. Finding the original sale in the purchase history is possible with or without the physical receipt on hand.
To do so:
- On the Home Screen, tap Customer.
Depending on your custom settings, the Customer button can be located in the navigation bar at the bottom (A in the screenshot) or in the More menu (B in the screenshot):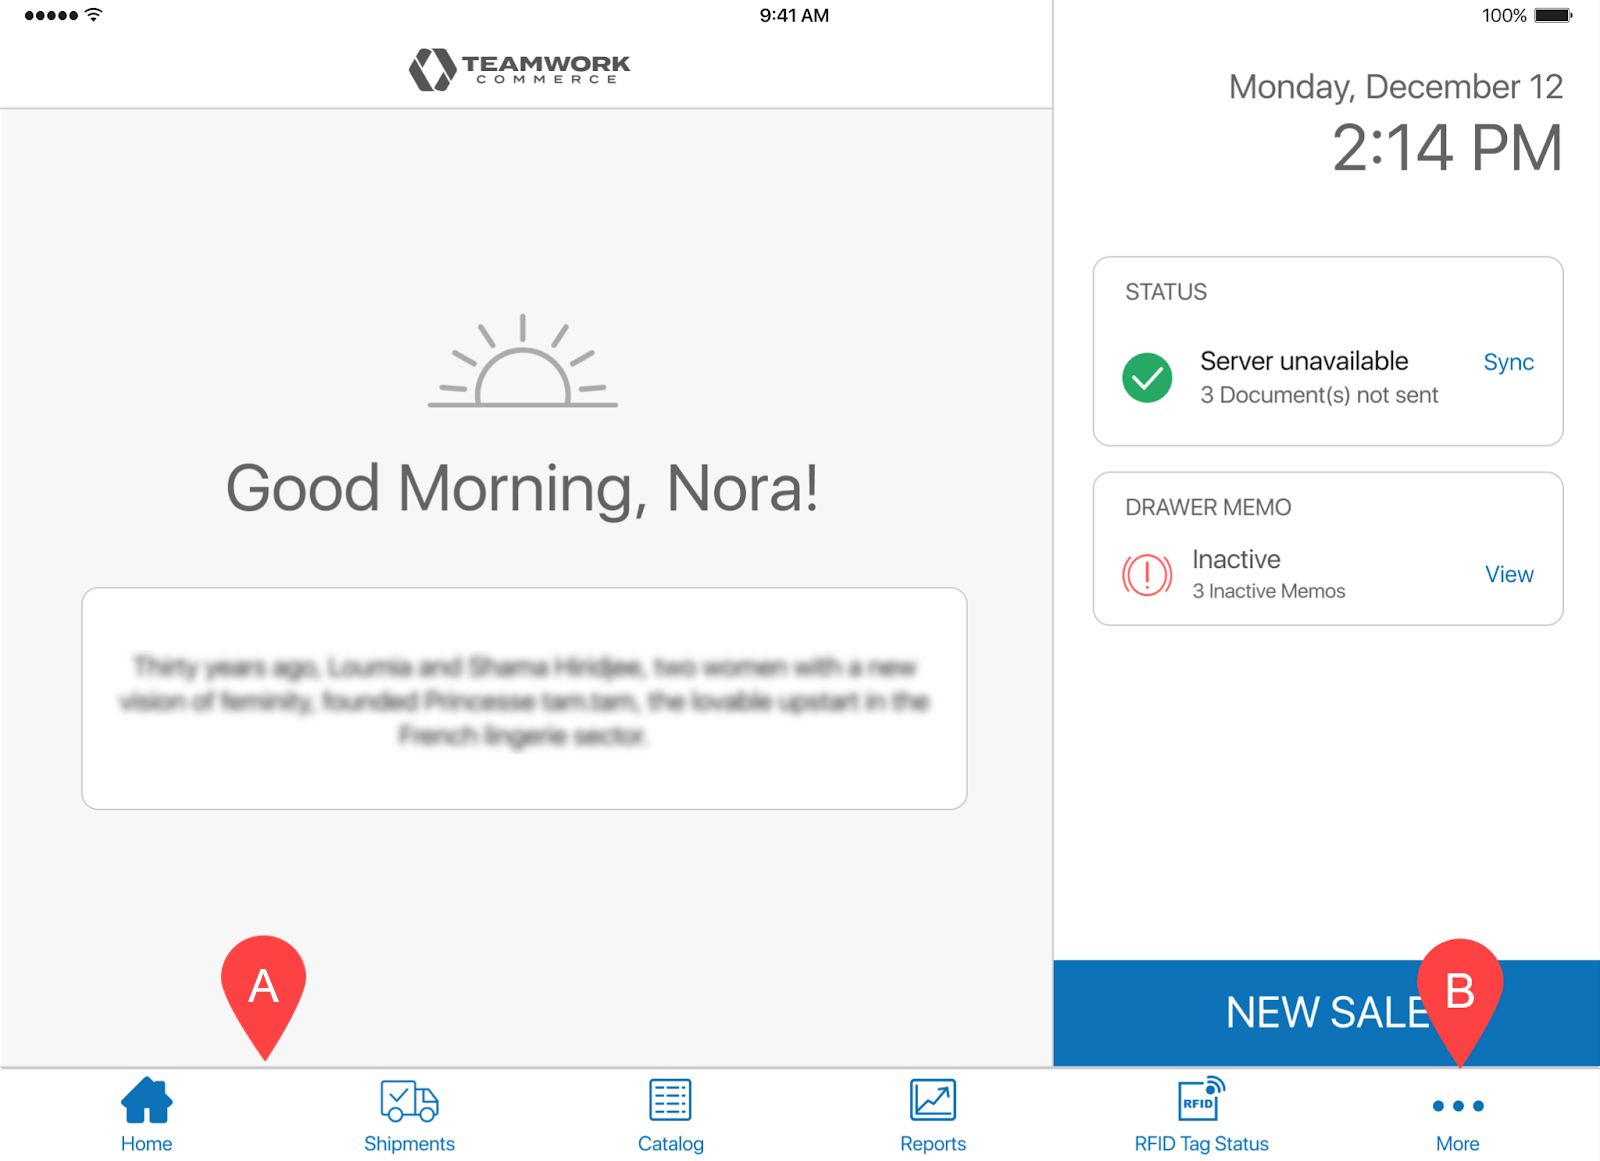
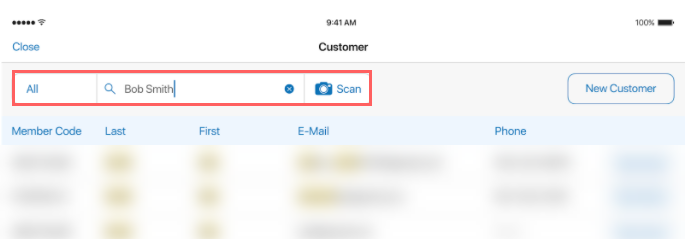
- In the Customer area, tap See More next to the required customer record.
If the required customer is not visible on the first page, use the Search field at the top to find the record:
- In the Customer Preview, tap Purchase History at the bottom.
- In Purchase History, scroll through the area or use the pagination controls at the bottom to find the required sale.
Also, if you have the physical receipt, you can use the search functionality:
If multiple search results are available, tap the required transaction to open the Return area (see How to complete a verified return for further steps).
The user must have the Sales Receipts – Allow returns security right to open the Return area. If the user doesn’t have this right, the Insufficient Rights message appears with the Manager Override option.
Also, it is not possible to make a verified return of the merchandise that was sold at a location in a different SVS zone (typically this means a store in a different country). In Purchase History, if you tap a transaction completed in another SVS zone, the Return Not Available message appears.
It’s not possible to make a verified return against a receipt for which a tax refund voucher was issued via WestID. To make such a return, first, the respective tax refund voucher must be voided.
Voiding a tax refund voucher is possible via the WestID web page. To open this web page for a particular Sales Receipt, under Sales Receipts > Sales History > [selected Sales Receipt], tap Options in the Tax Refund Voucher field.
Starting a verified return from Sales History
The Sales History area contains the history of finalized Sales Receipts stored in the cloud.
If no customer was assigned to the original transaction, it is possible to start a verified return by finding that transaction in the sales history.
In Sales History, filters can be applied to the list of transactions to quickly find the required record. For example, if the customer remembers the store location where the original sale occurred, it’s possible to apply the location filter as well as the customer’s first or last name filter.
To do so, in POS Pro:
-
On the Home Screen, tap Sales Receipt.
Depending on your custom settings, the Sales Receipt button can be located in the navigation bar at the bottom (A in the screenshot) or in the More menu (B in the screenshot):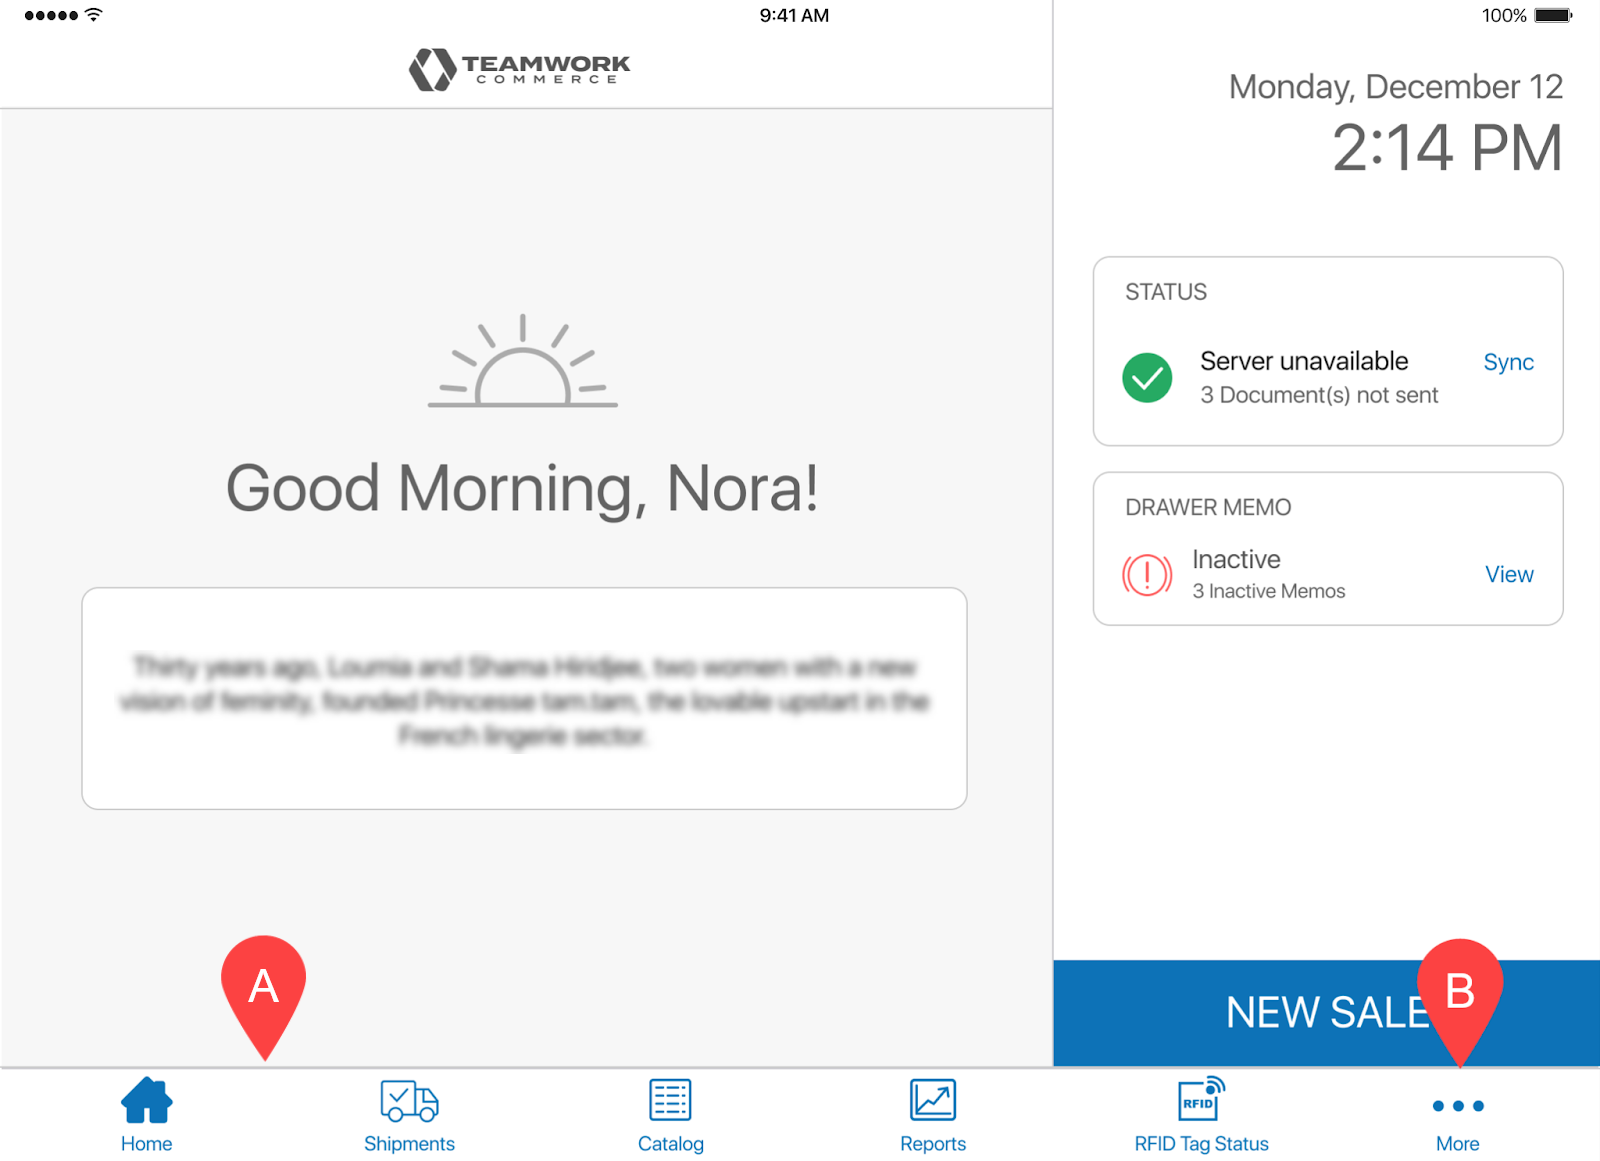 Alternatively, if you have a new Sales Receipt open, tap Sales History at the top of the right-side panel (A in the screenshot) or in the fly-out menu (B in the screenshot):
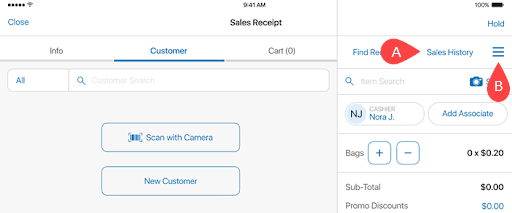
To make the Sales History button available in the Sales Receipt area of POS Pro, in CHQ under
settings > company settings > v6 App Designer > Point of Sale v6 > iPad > Sales Receipt > Receipt Options, make sure that Sales History is placed under layout. -
In the Sales Receipts area, tap the Sales History tab at the top.
-
Find and tap the required transaction. To do so, you can apply the following filters by tapping Filter at the top-left:
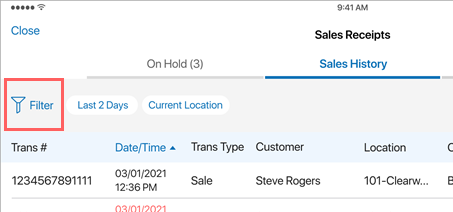
- Date
- Location
- Customer First Name
- Customer Last Name
- Credit Card Last 4
Additionally, you can tap the Date/Time column header to sort the transactions by date and time. Tapping once changes the sort from ascending to descending.
Alternatively, if more search options are required, tap Find Receipt at the top-right:
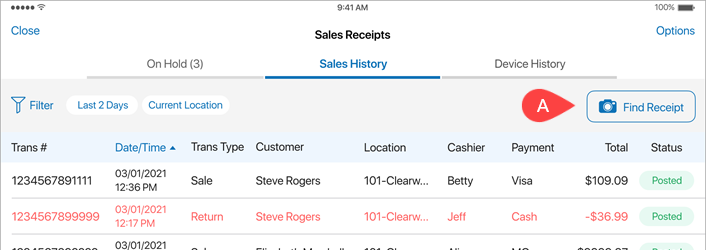
In the Find Receipt area, it is possible to scan the physical receipt or search by Transaction #, Web Order #, or RMA Code.
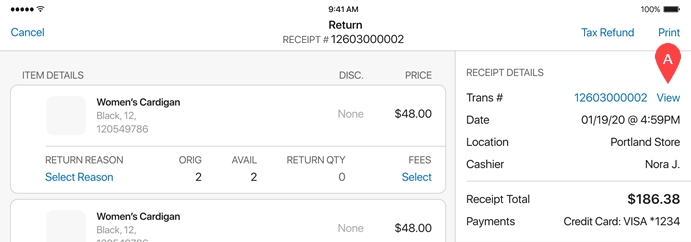
In the Return area, to view transaction details first, tap View in the Trans # field:
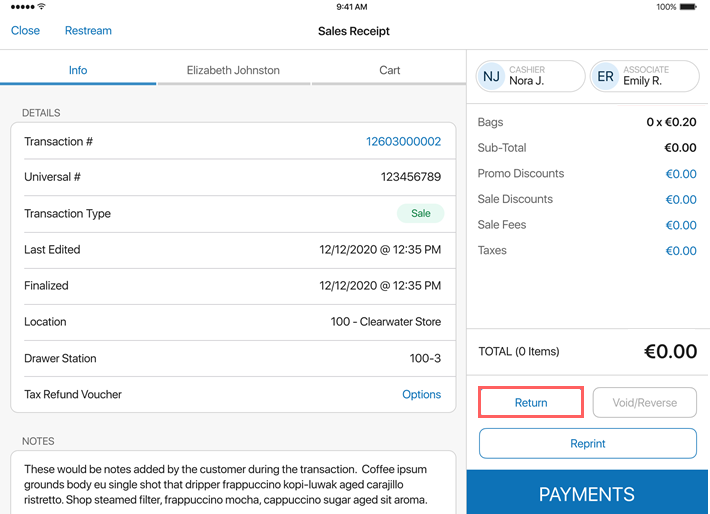
 In the finalized Sales Receipt area, tap Return to start a verified return:
If the original sale was made via the same POS device, it’s possible to search for that sale under Sales Receipts > Device History. Device History stores only Sales Receipts finalized on that device.
How to complete a verified return
Once the original sale record is tapped or opened automatically after scanning the physical receipt, the Return area opens.
In the Return area, all items associated with the original transaction are listed in the left-side panel:
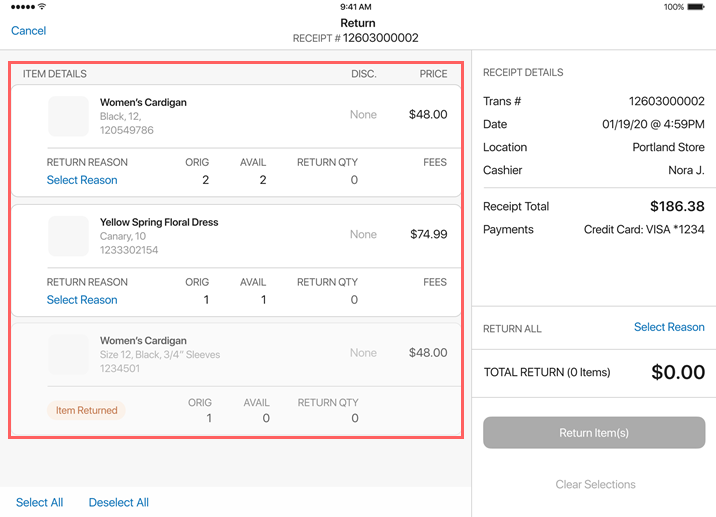 Please note that items not available for return appear as half-transparent rows with orange tags, for example:
 Items not available for return were either already returned earlier or marked as “final sale”.
An item is considered “final sale” if in CHQ under inventory > styles & items > [your item] > general the final sale checkbox is selected.
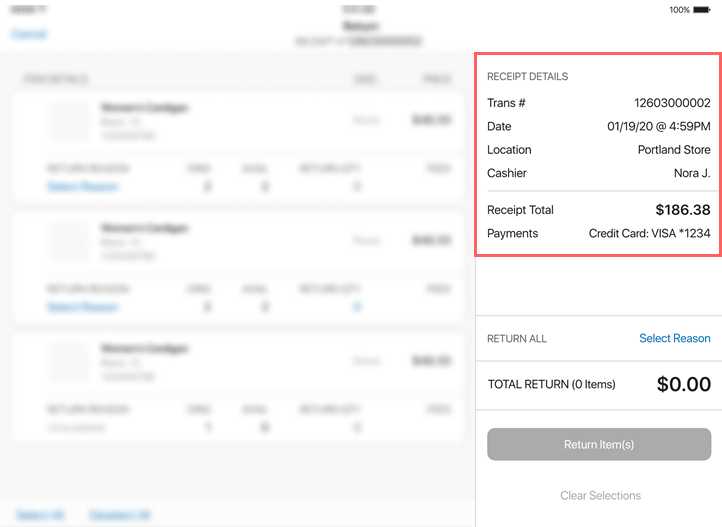 To complete the verified return, in the Return
area:
- In the left-side panel, tap the items that should be returned. Items included in the verified return display as blue rows with a checkmark icon.
- Once an item is tapped, the Return Reason pop-over appears where it’s required to select a return reason for that item.
- To edit the return quantity, tap the RETURN QTY field in the item’s row. By default, the qty is set to the original sale qty.

- Once the return reason is selected, the FEES value is calculated automatically based on the fees from the original sale. To edit the fees or apply additional fees, tap the value in the column:

Fees are automatically added to the verified return if the return with item checkbox is selected for those fees in CHQ. Please note that global (transaction-level) fees will be proportionally distributed among the return items.
In CHQ, to configure the return with item checkbox for a fee, go tosettings > sales > fees > [selected fee].
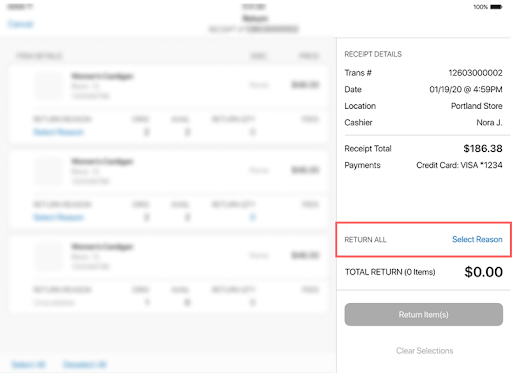
Alternatively, to return all eligible items, tap Select Reason in the RETURN ALL field and then select the required reason:
 2. Tap Return Item(s) at the bottom-right. Tapping Return Item(s) returns you to the Sales Receipt area where:
- all items from the verified return appear under the RETURN(s) section (see the screenshot below)
- in the right-side panel where totals display, the Return Sub-Total and Return Taxes fields appear
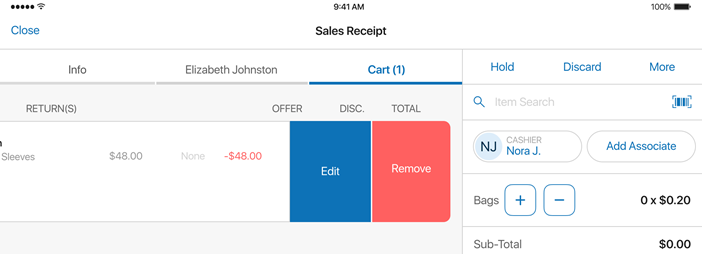
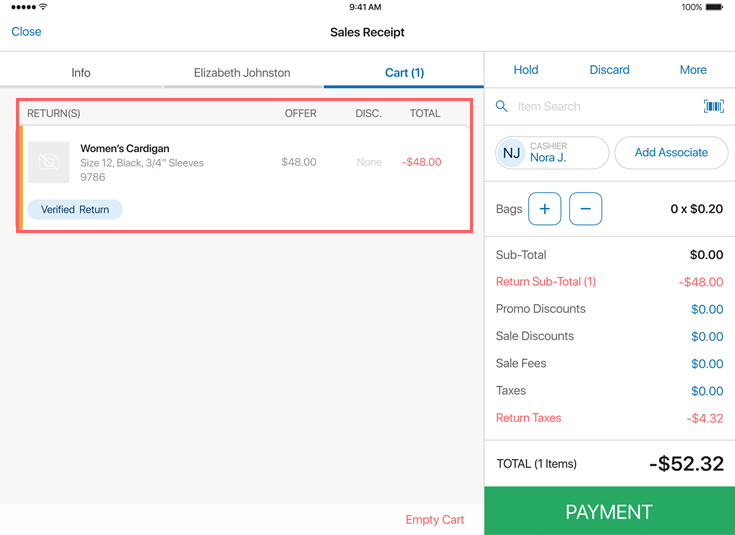 Additionally, to edit the return details again or remove return items from the Cart, swipe left the required item row and then select the required option:
- Tap Payment at the bottom-right. In the Payment area, choose the required refund method and complete the refund.
- Tap Finalize at the bottom-right.
How to return a Gift Card
In POS Pro version 6, it is possible to return Gift Cards using the Verified Returns functionality.
Returning Gift Cards is possible only if in CHQ under settings > company settings > stored value services > SVS zones > [required SVS zone] > the gift cards tab the allow verified return option is selected in the general section.
If the option is not selected, Gift Cards are marked as “Non-Refundable” in POS.
The Gift Card can be returned if:
- it is active, and
- it is non-expired or within the grace period, and
- it has a positive balance.
Also, the user performing the return must be granted the Allow gift card return security right.
Please be advised that if all the above conditions are met, the current Gift Card balance is refunded, NOT the original price of that Gift Card.
To return a Gift Card:
- In POS, find the original sales transaction. For information on how to do so, see How to start a verified return.
- Tap the original transaction record to open the Return area (or, if you scan the original Receipt, the area will open automatically).
In the Return area, Gift Cards display in a separate GIFT CARD(S) section: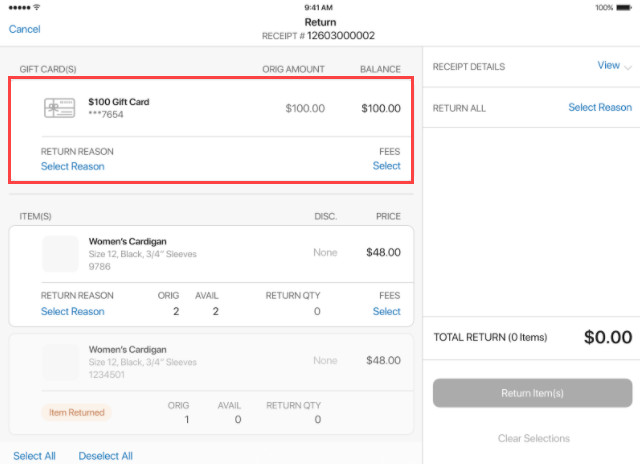
- Tap to select the required Gift Card and then select the return reason:
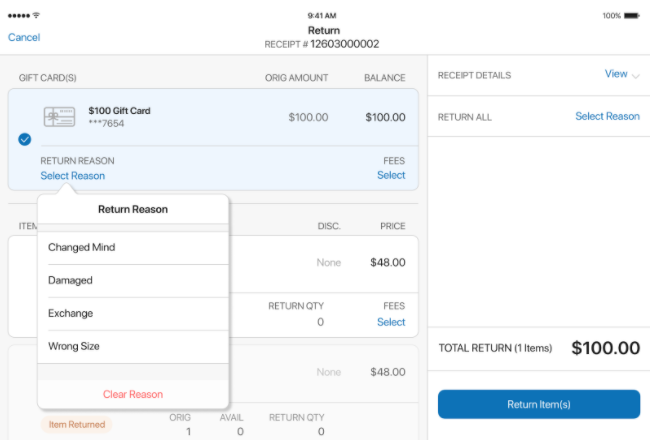
- Tap Return Item(s) at the bottom-right. Tapping Return Item(s) takes you to the Sales Receipt area, where returned gift cards are available under the GIFT CARD RETURN(S) section:
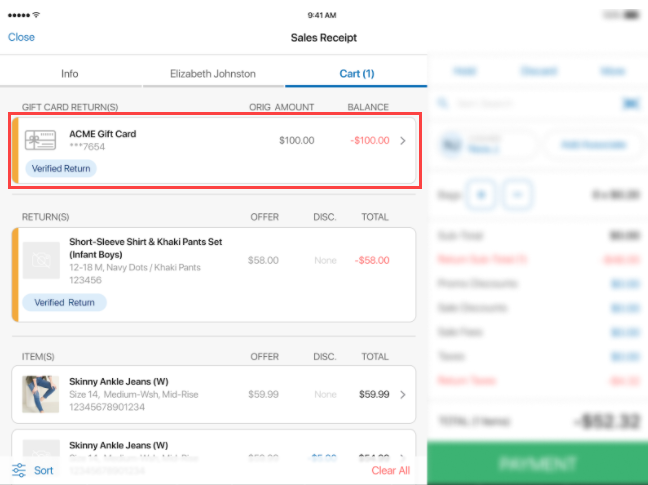
- Tap Payment at the bottom right and then Finalize to complete the return process.
See also
- V6.33 CHQ Release Guide
- Mobile Quick Reference Guides in Teamwork Confluence
Verified Return: Making a refund to a credit card
Build 6.33.154: PRO-2721
If a customer makes a verified return of the merchandise, POS Pro V6 now allows for making a refund to the customer’s credit card or multiple credit cards.
How to make a refund to a credit card
In the case of a verified return, refunding to the customer’s credit card is only possible if the original purchase was paid with a credit card. Also, money will be automatically returned to the card used in the original transaction – there’s no option to choose a different credit card.
Please note that a credit card refund cannot be undone or voided after processing.
To complete a credit card refund, in POS Pro:
- In the Sales Receipt area, once return items are added to the Cart (see the How to complete a verified return section of this guide), tap Payment at the bottom-right.
- In the Payment area, tap Return Value to Card:
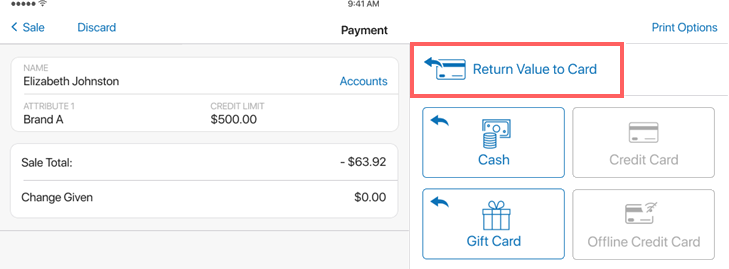
- Note that POS Pro will present the card(s) used for the transaction and available to return amount. In the Return Value to Card(s) dialog that opens, enter the amount to be refunded in the AMOUNT field:
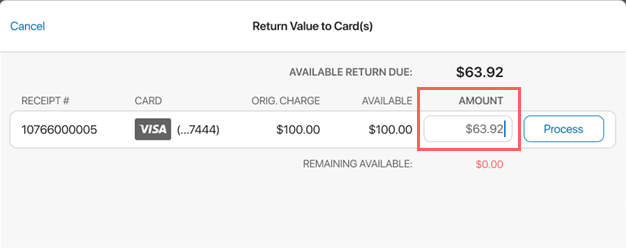 Also, in the Return Value to Card(s) dialog:
- the Orig. Charge field shows the amount charged on the sell receipt
- the Available value is calculated as Orig. Charge minus previous returns
- the Remaining Available value is calculated as Available Return Due minus user-defined Amount
- Tap Process.
- In the confirmation dialog, tap Yes:
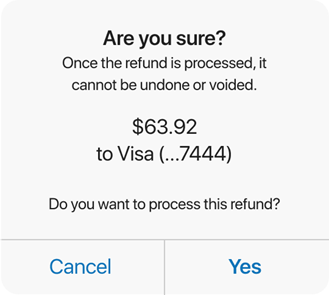 After confirming, the credit card processing screen appears:
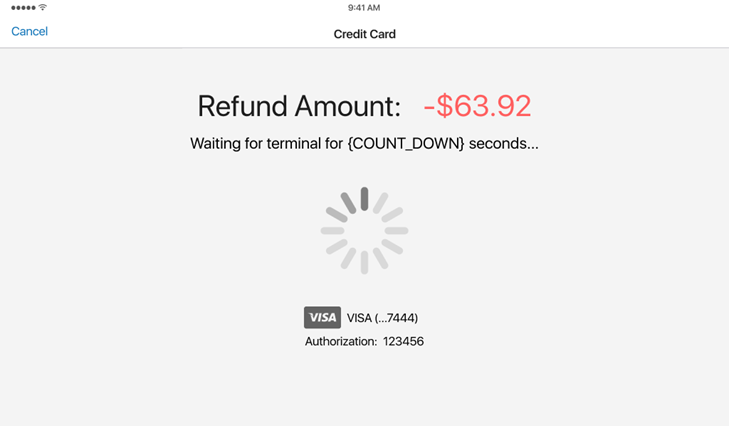
- After the transaction is approved, tap Close on the Approved screen:
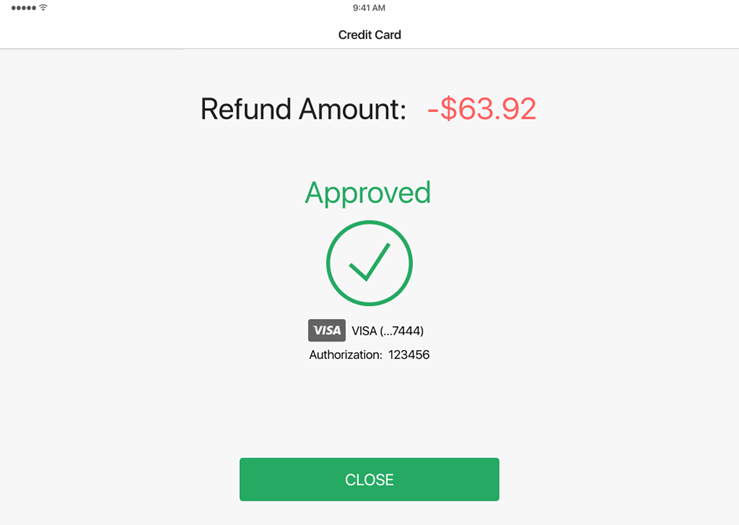
- Back in the Payment area, tap Finalize at the bottom-right.
How to make a refund to multiple credit cards
In POS Pro, it’s possible to return money to multiple credit cards if, in the original transaction, several credit cards were charged.
Please note that a credit card refund cannot be undone or voided after processing.
- In the Sales Receipt area, once return items are added to the Cart (see the How to complete a verified return section of this guide), tap Payment at the bottom-right.
- In the Payment area, tap Return Value to Card:

- Note that POS Pro will present the card(s) used for the transaction and available to return amount. In the Return Value to Card(s) dialog that opens, define how much is to be refunded to each credit card.
To do so, fill out the Amount field: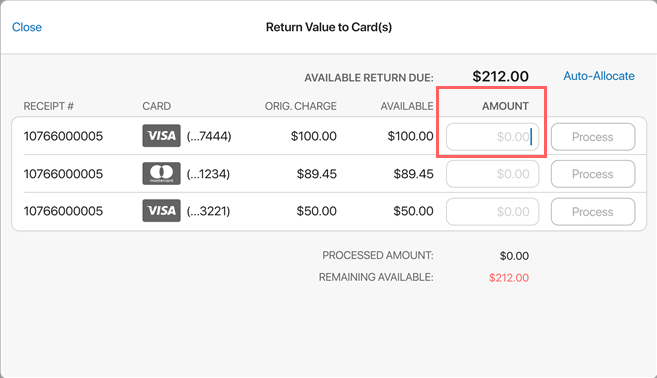
Please note that the Amount value cannot exceed the Available value for that card. For example, in the screenshot above, the Visa card in the first row cannot be refunded more than 100$.
- Alternatively, tap Auto-Allocate to automatically distribute the Available Return Due amount among the unprocessed card:
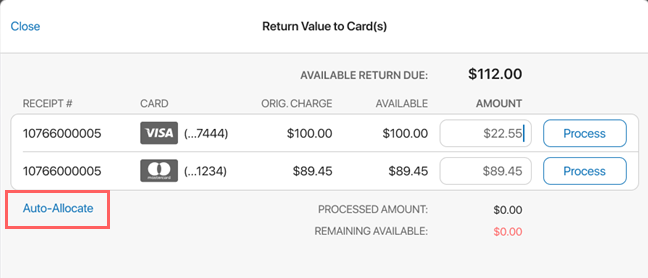 The order of allocating the return amount is based on the Available value of the cards. For example, in the screenshot above, the Available Return Due of 112$ is to be distributed.
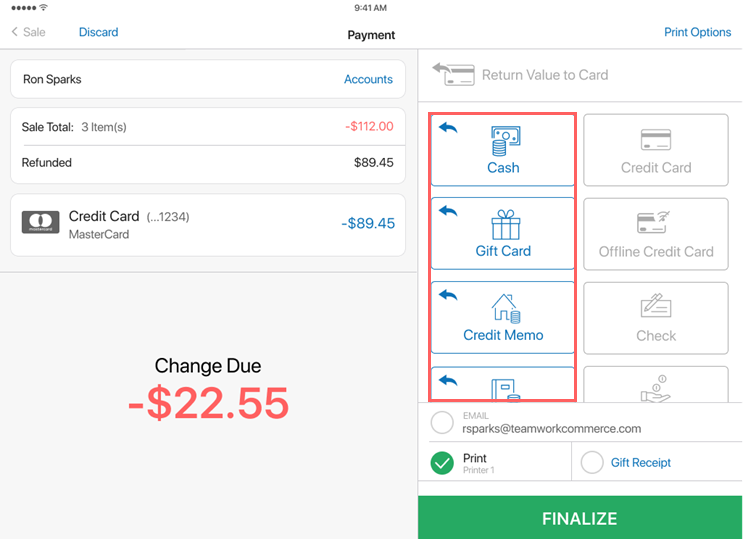
On tapping Auto-Allocate, 89.45$ will be put on the Mastercard (…1234) card as this is the card with the lowest Available amount. Then, the remaining 22.55$ will be assigned to the Visa (…7444) card.
- Alternatively, tap Auto-Allocate to automatically distribute the Available Return Due amount among the unprocessed card:
- Then, tap Process. Only one Process button can be tapped at a time.
- In the confirmation dialog, tap Yes:
 After confirming, the credit card processing screen appears:

- After the transaction is approved, tap Close on the Approved screen:
 Tapping Close returns you to the Return Value to Card(s) dialog.
 - In the Return Value to Card(s) dialog, repeat steps 3–6 for each remaining credit card.
Cards that have been successfully processed display with theProcessedicon.- Alternatively, if processing has failed, the respective card will display with the
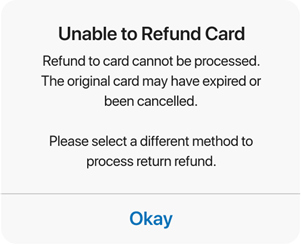
Failedicon. Additionally, the red message will appear at the top (A in the screenshot):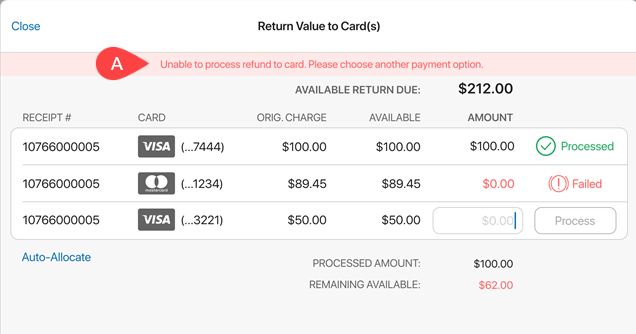 If card processing has failed, when finished processing the remaining cards, choose a different refund method back in the Payment area.
- Alternatively, if processing has failed, the respective card will display with the
When all the cards have been processed and there’s no Remaining Available amount to return, tapping Close on the Approved screen returns you to the Payment area.
- Back in the Payment area, tap Finalize.
See also
- V6.33 CHQ Release Guide
- Mobile Quick Reference Guides in Teamwork Confluence
Updated Sales Receipts area
Build 6.33.154: PRO-2405
To improve user experience as well as accommodate the new verified returns functionality, we’ve made updates to the Sales Receipts area of POS Pro. The updates include:
- new actions in the Sales Receipt area
- a new Find Receipt area that provides a functionality for searching finalized receipts
- now available Sales History tab
- a new Device History tab
- new fields and actions in the finalized Sales Receipt view
Updates in the Sales Receipt area
We’ve made the following updates to the Sales Receipt area:
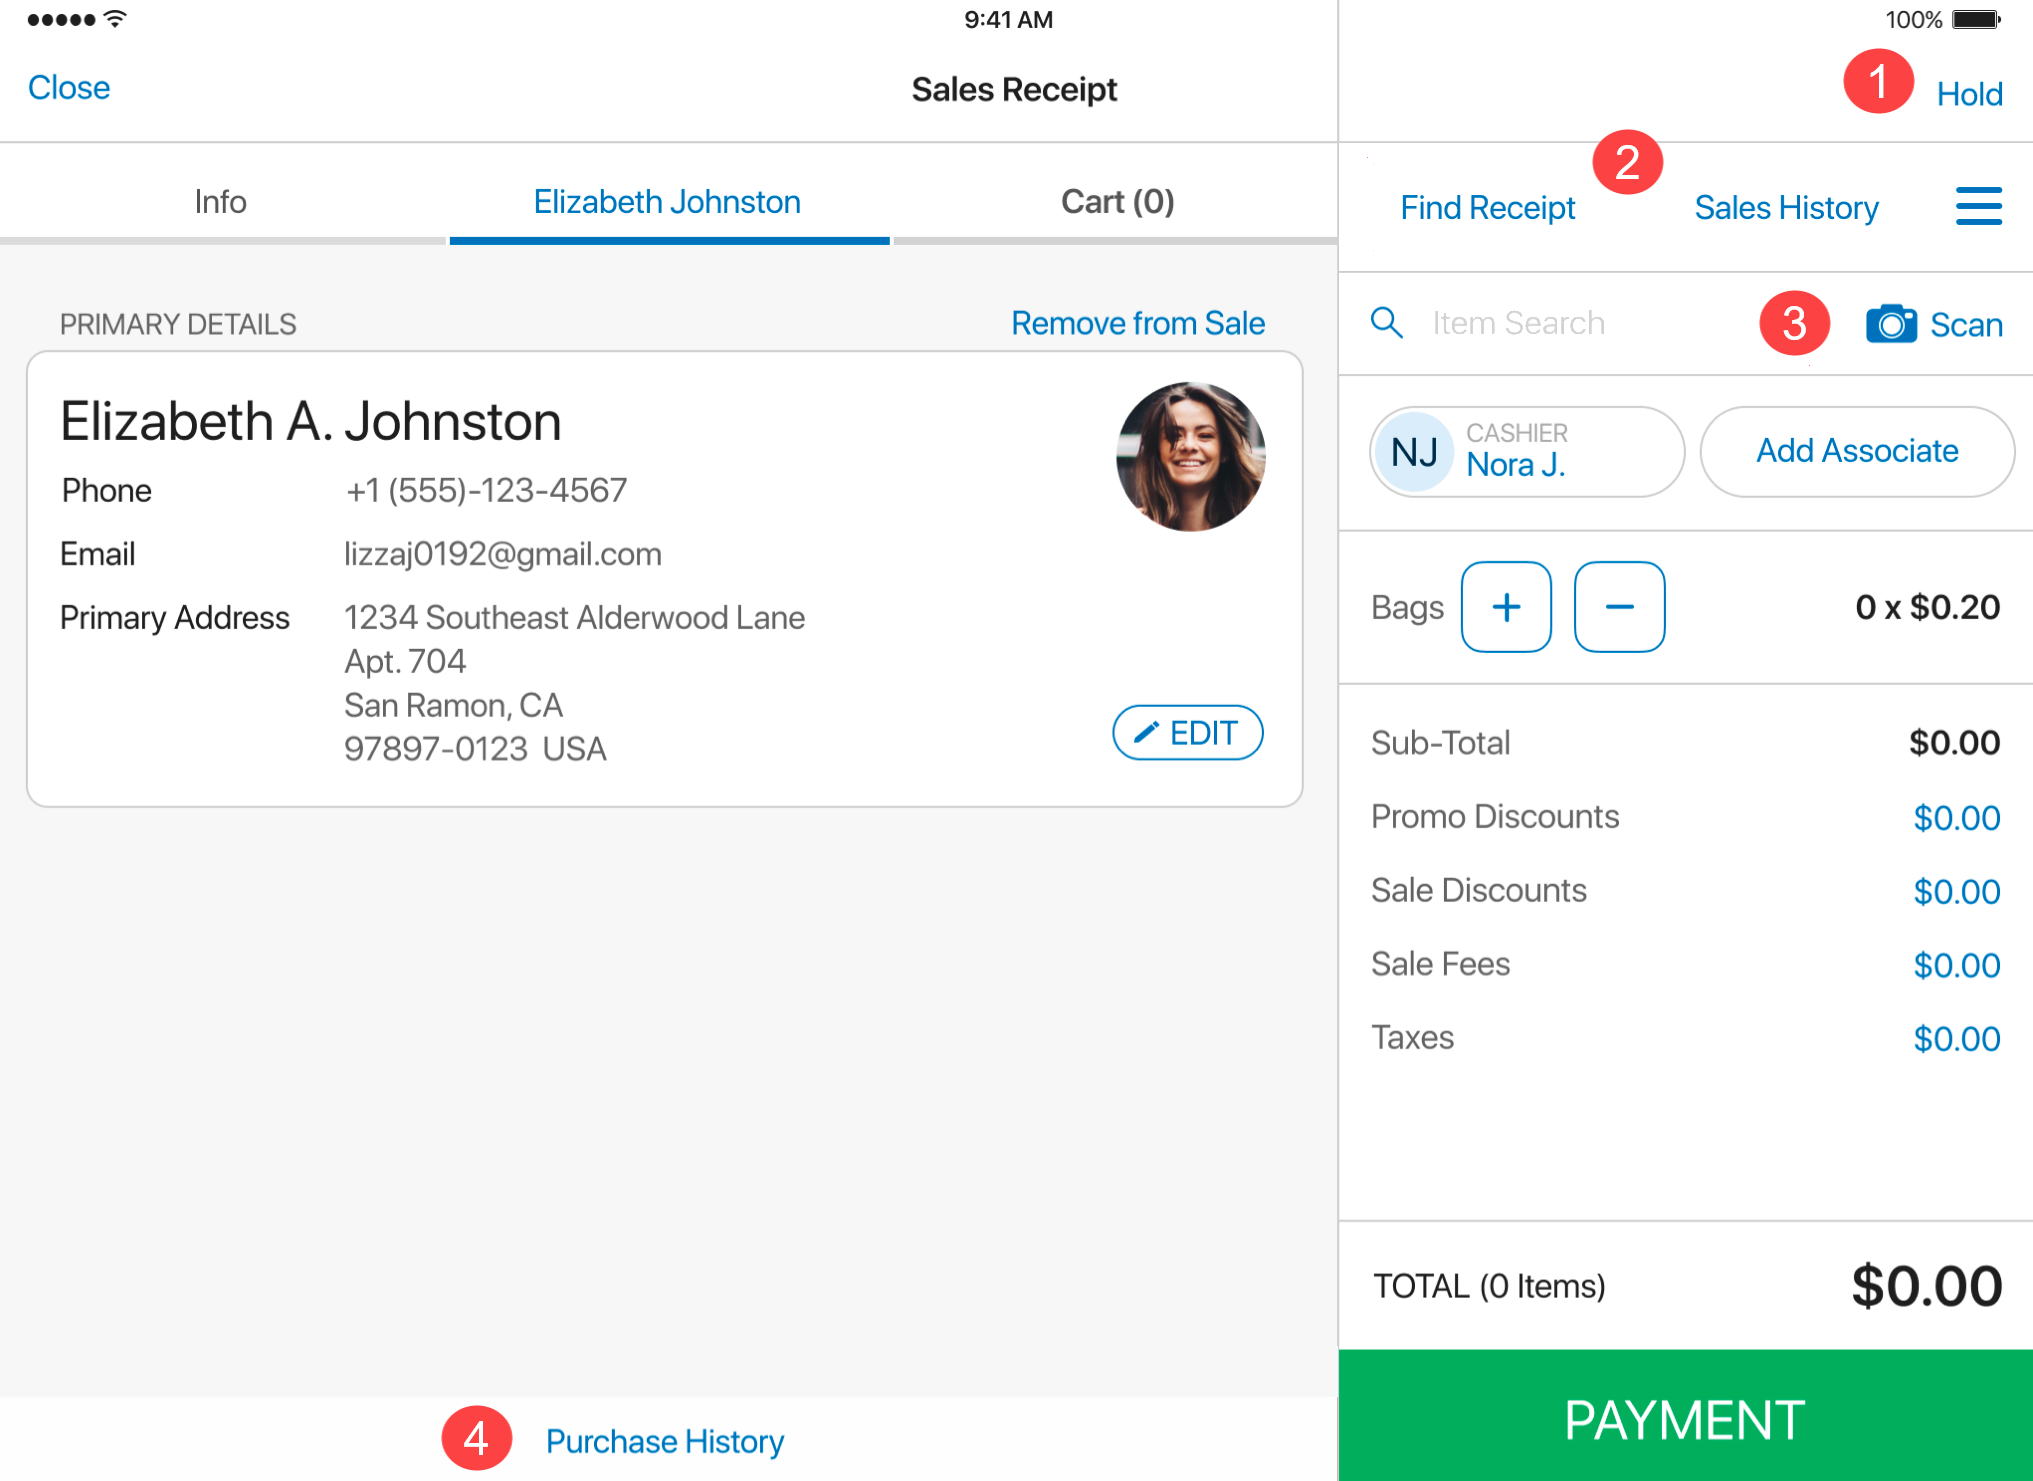
- the Hold button is now available at the top-right 1 . Tapping the button puts the Sales Receipt on hold
- the More menu button at the top-right was replaced with an icon
- the Find Receipt and Sales History buttons are now available for display at the top of the right-side panel
2
. That allows an easy access to finalized Sales Receipts as well as the receipt search functionality
For the Find Receipt and Sales History buttons to display at the top of the right-side panel, in CHQ under
settings > company settings > v6 App Designer > Point of Sale v6 > iPad > Sales Receipt > Receipt Options, make sure the Find Receipt and Sales History labels are placed at the top of the list under layout. - the scanning icon that opens the camera interface has been updated 3
- in the Customer tab, if a customer record is added to the sale, the Purchase History button now displays at the bottom 4
New Find Receipt area
A new Find Receipt area is now available in POS Pro. This area provides extended search options for finding a finalized sales receipt.
Opening the area is possible by tapping Find Receipt
1
in the Sales Receipt area or tapping the More menu icon
2
and selecting from there:
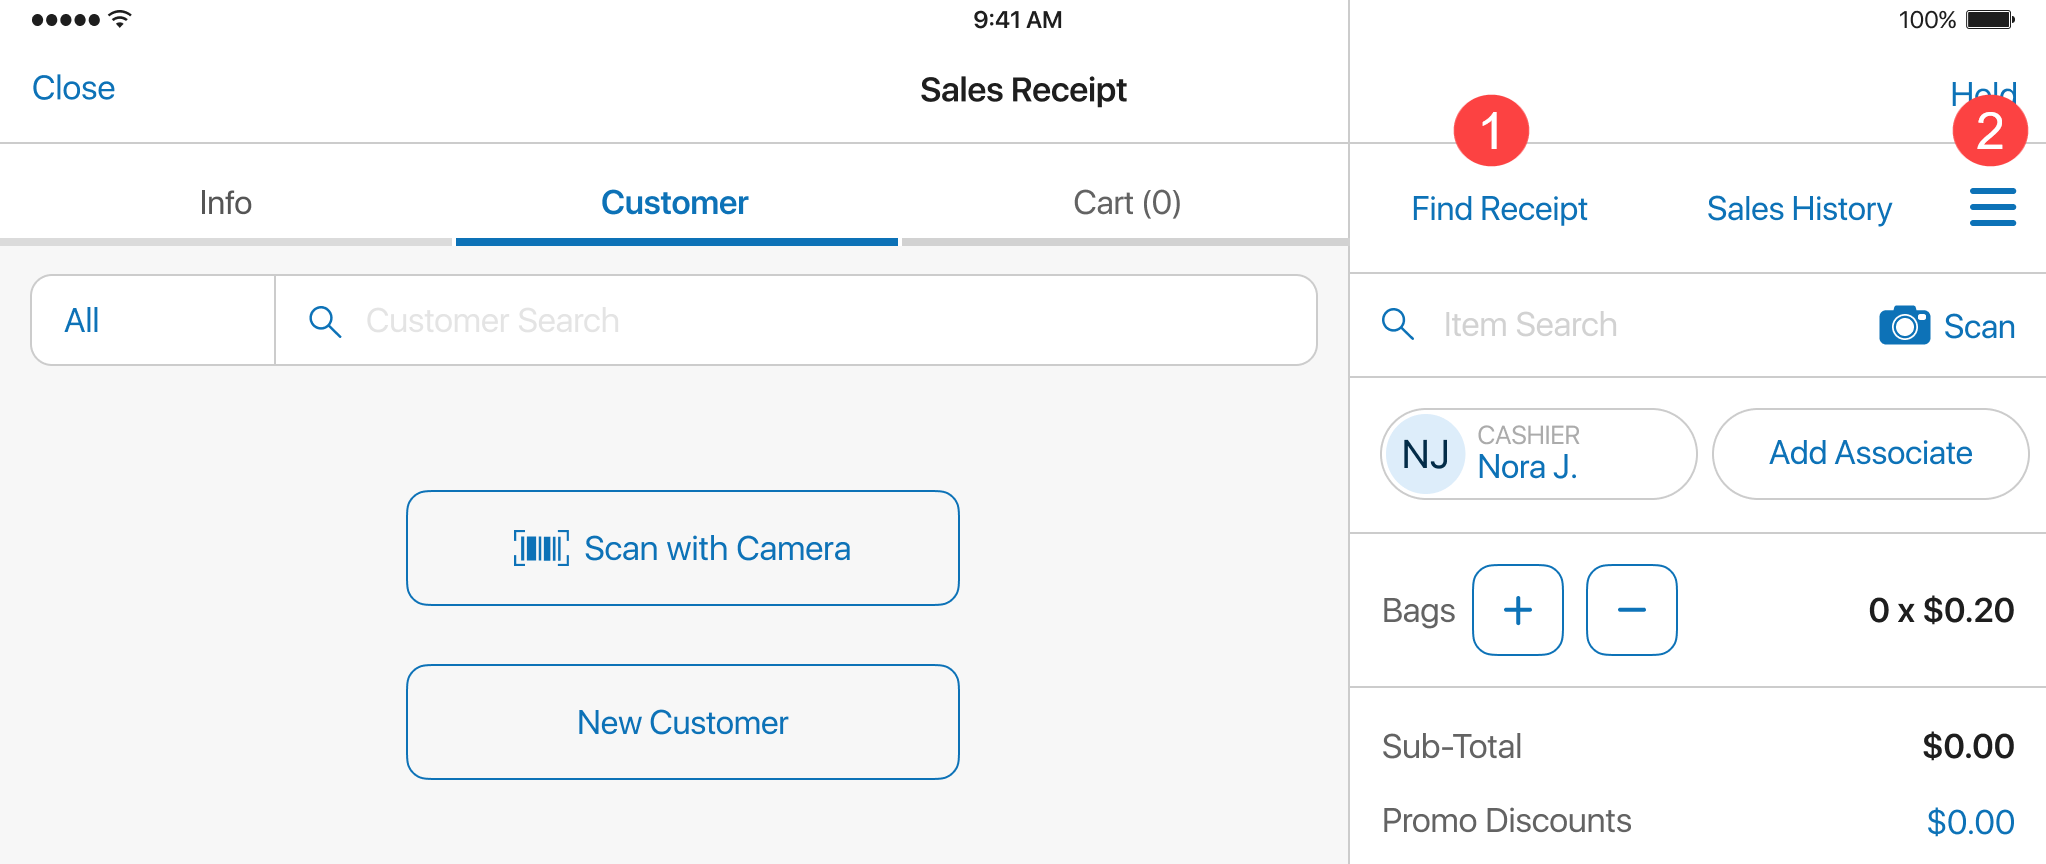
To make the Find Receipt button available in the Sales Receipt area of POS Pro, in CHQ under settings > company settings > v6 App Designer > Point of Sale v6 > iPad > Sales Receipt > Receipt Options, make sure that Find Receipt is placed under layout.

- tapping Scan 1 to scan the physical receipt, or
- entering the Transaction #, Web Order #, or RMA Code from the receipt into the Search field 2
Finding an exact match or tapping one of the found results opens the Return area where it’s possible to:
- start a verified return against that receipt
- reprint the receipt
- open the WestID webpage if tax refund service is set to
WestID
Updated Sales History
We’ve made available the Sales History tab
1
located in the Sales Receipts area.
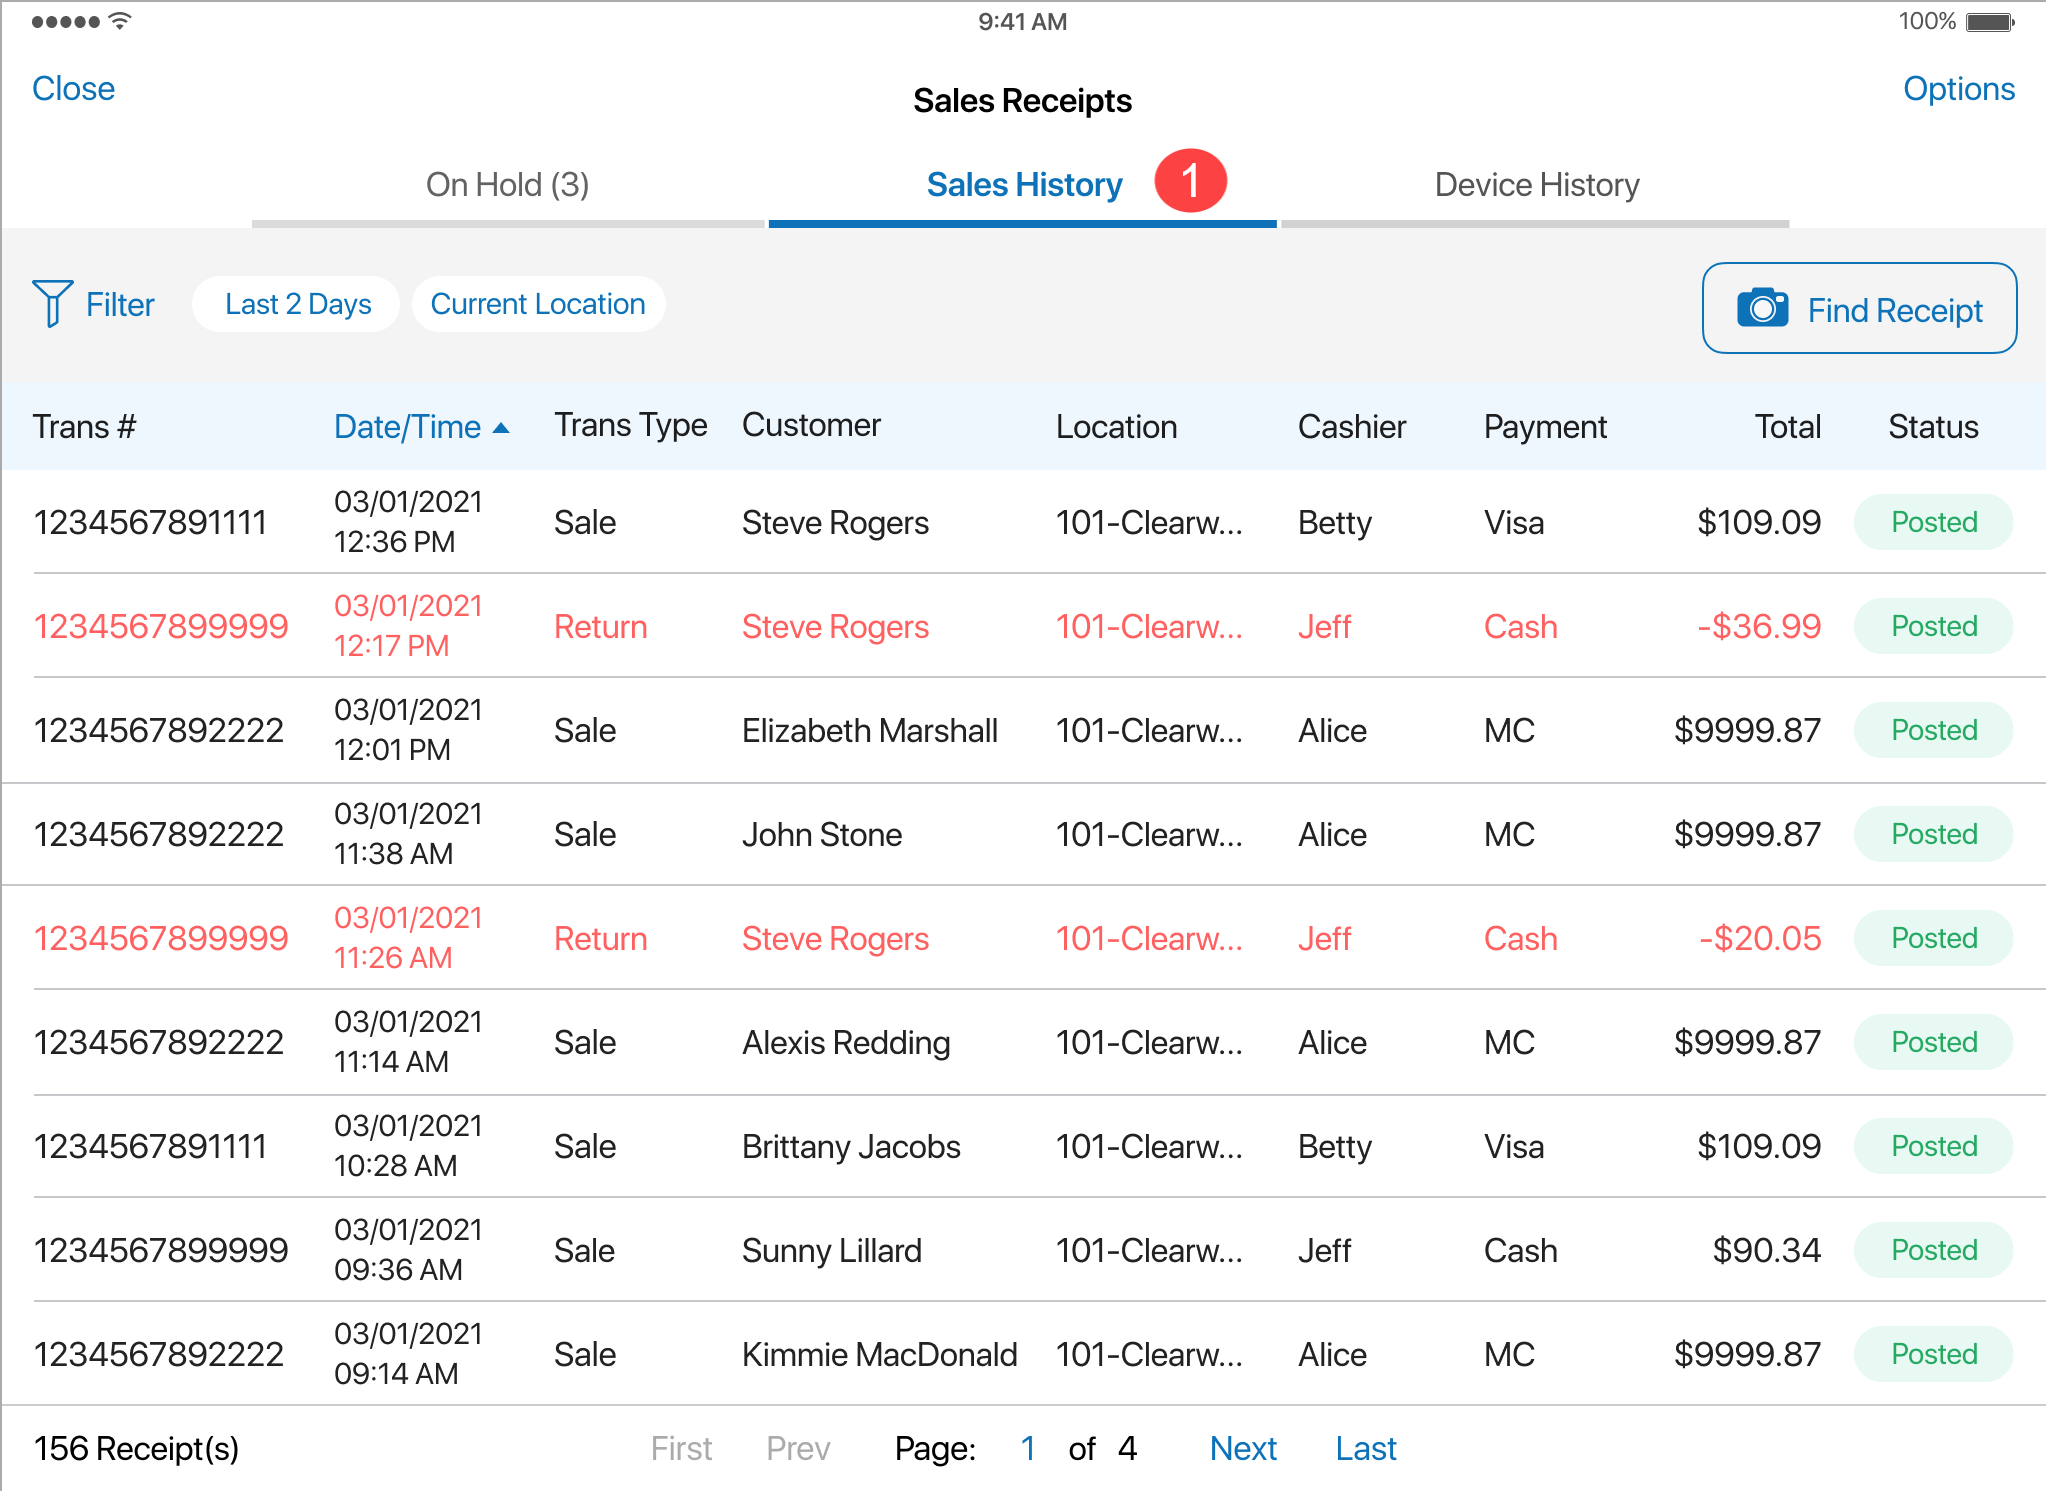 This tab contains the history of finalized transactions. Searching for a specific transaction is possible via:
- applying filters
- using the Find Receipt functionality
To apply a filter to the records in the area, tap Filter at the top-left. Alternatively, to quickly filter the receipts by date or/and location, tap Last 2 Days or Current Location respectively
2
:
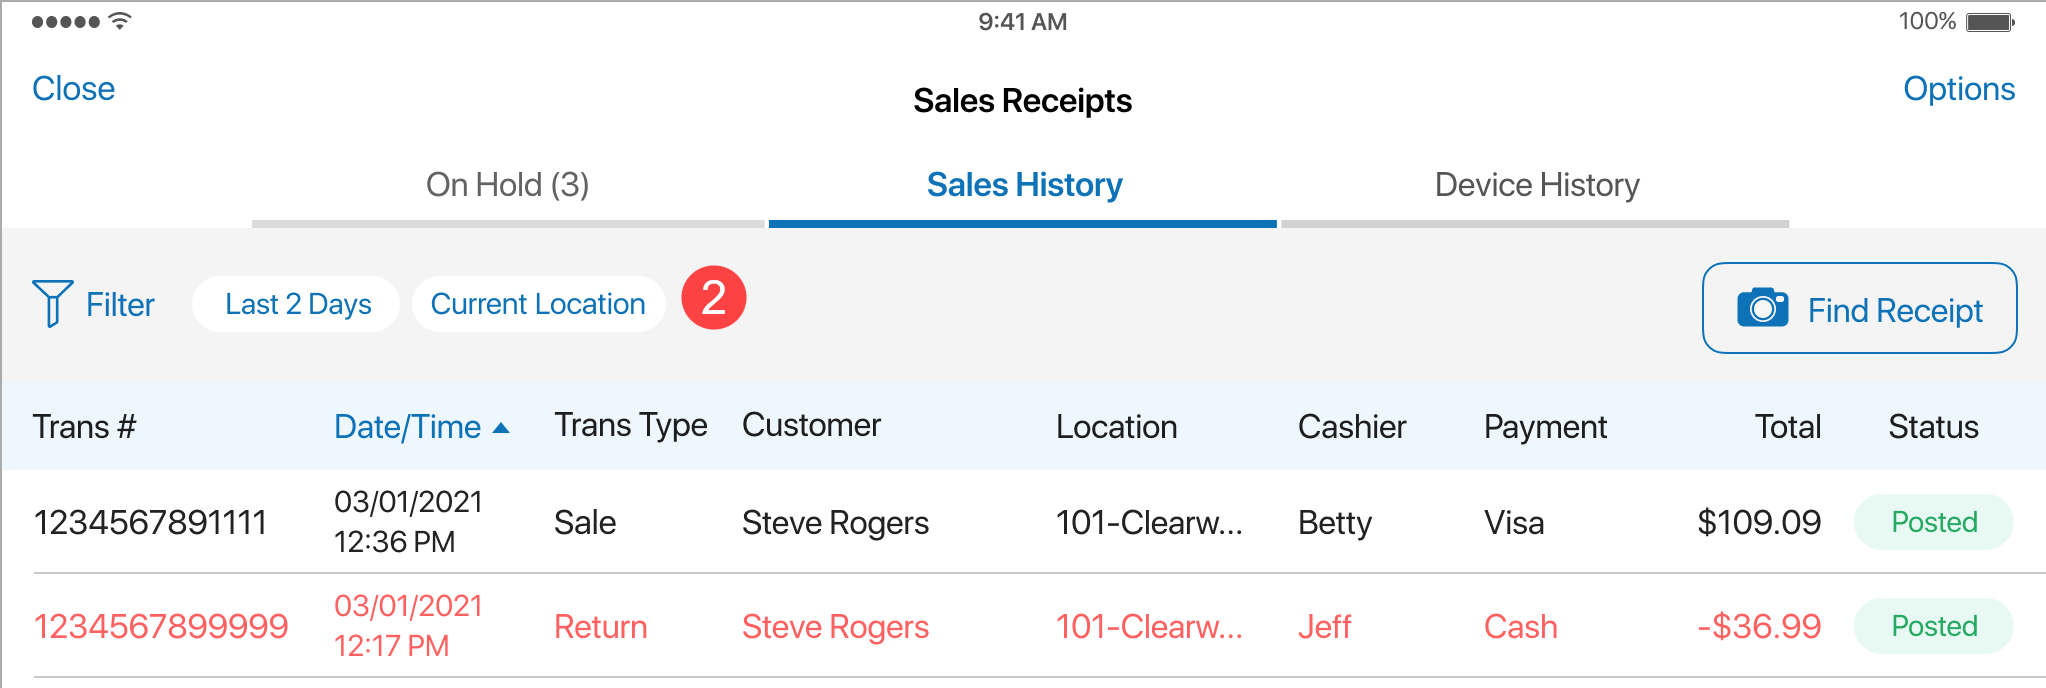
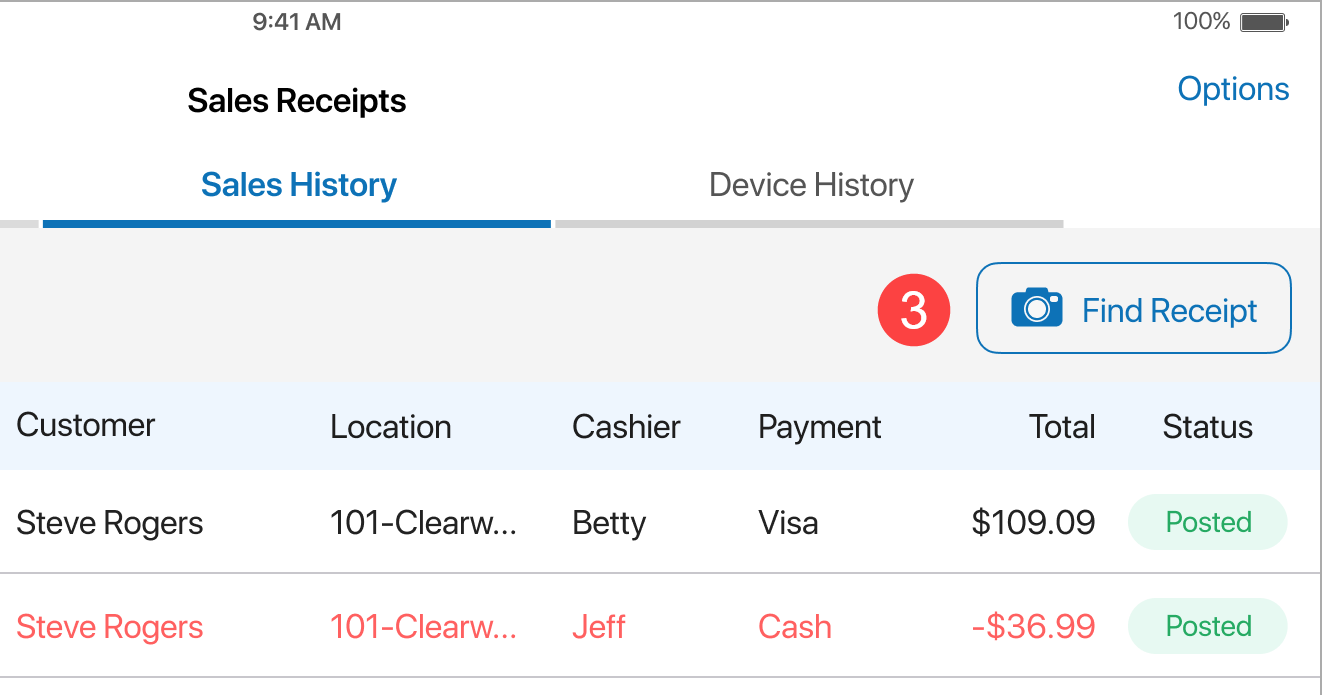
If scanning a physical receipt or searching by information from the latter is required, tap Find Receipt at the top-right
3
:
Also, sorting by the Date/Time column is available. Tap that column header once to change the order from ascending to descending.
Tapping a transaction in the Sales History tab opens the Return area from which it is possible to:
- start a verified return of the merchandise
- reprint the receipt
- open the WestID webpage if the tax refund service is set to
WestID - open the finalized receipt to view details
New Device History tab
In the Sales Receipts area, a new Device History tab is available:
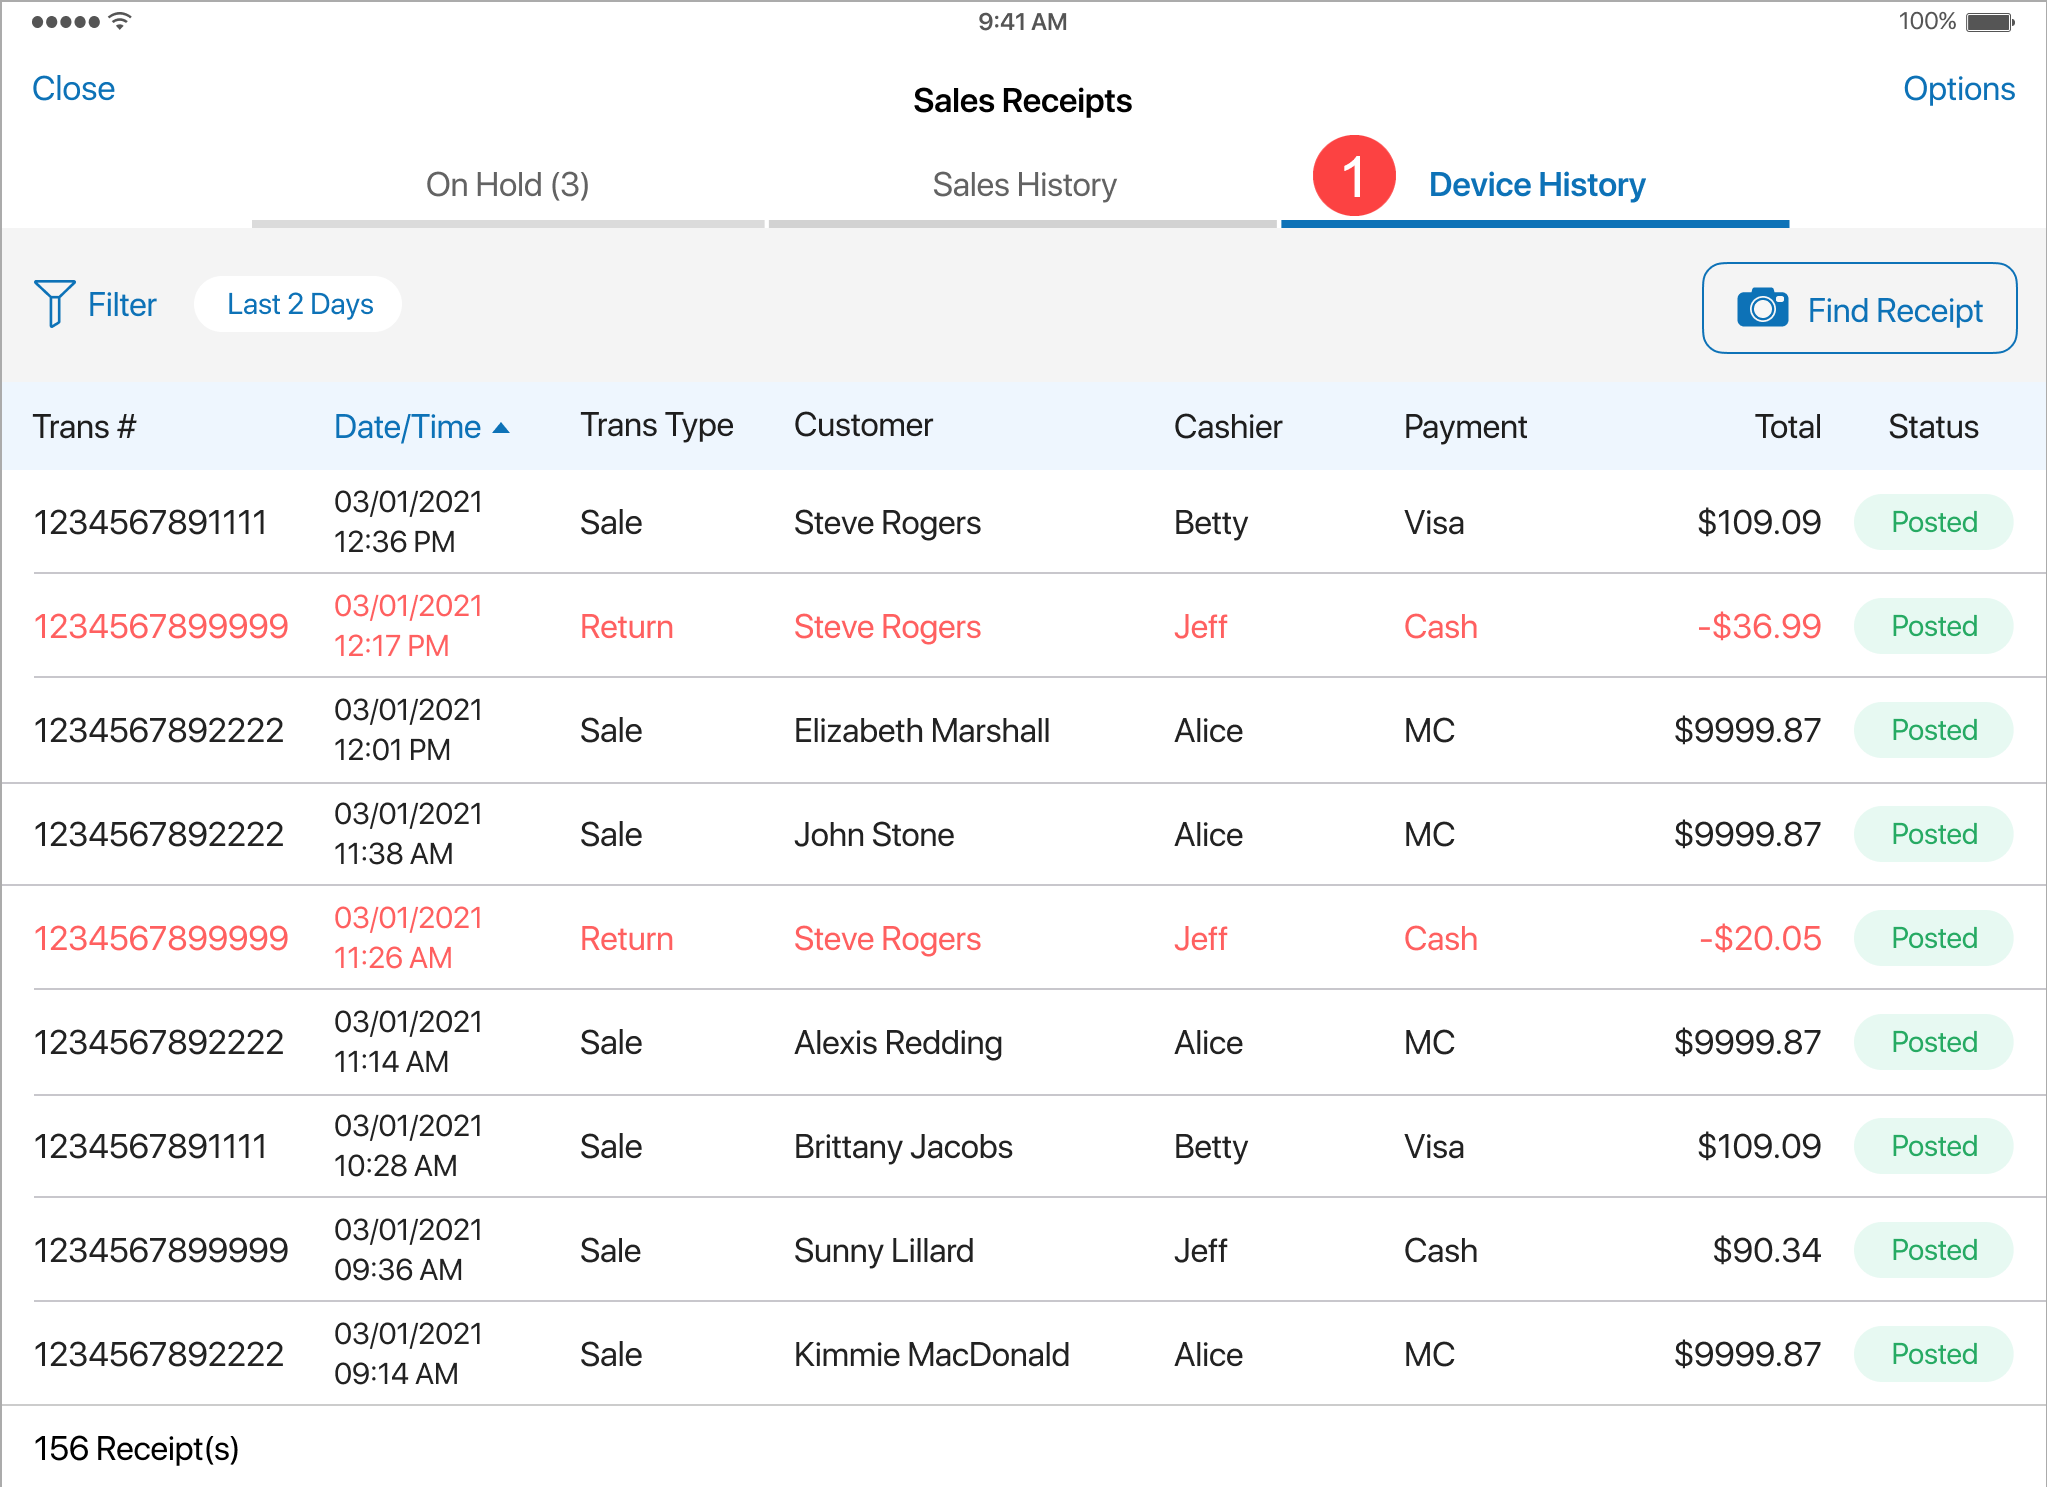 The tab contains only those documents that were finalized on the current POS device. Using Device History may speed up searching for a transaction if the user knows that the latter was completed on that device.
The layout of the area as well as available actions are the same as described in Updated Sales History.
Updated finalized Sales Receipt
Opening a finalized Sales Receipt is now possible by tapping the Transaction # in sales receipt related areas of POS Pro, for example, Sales History:
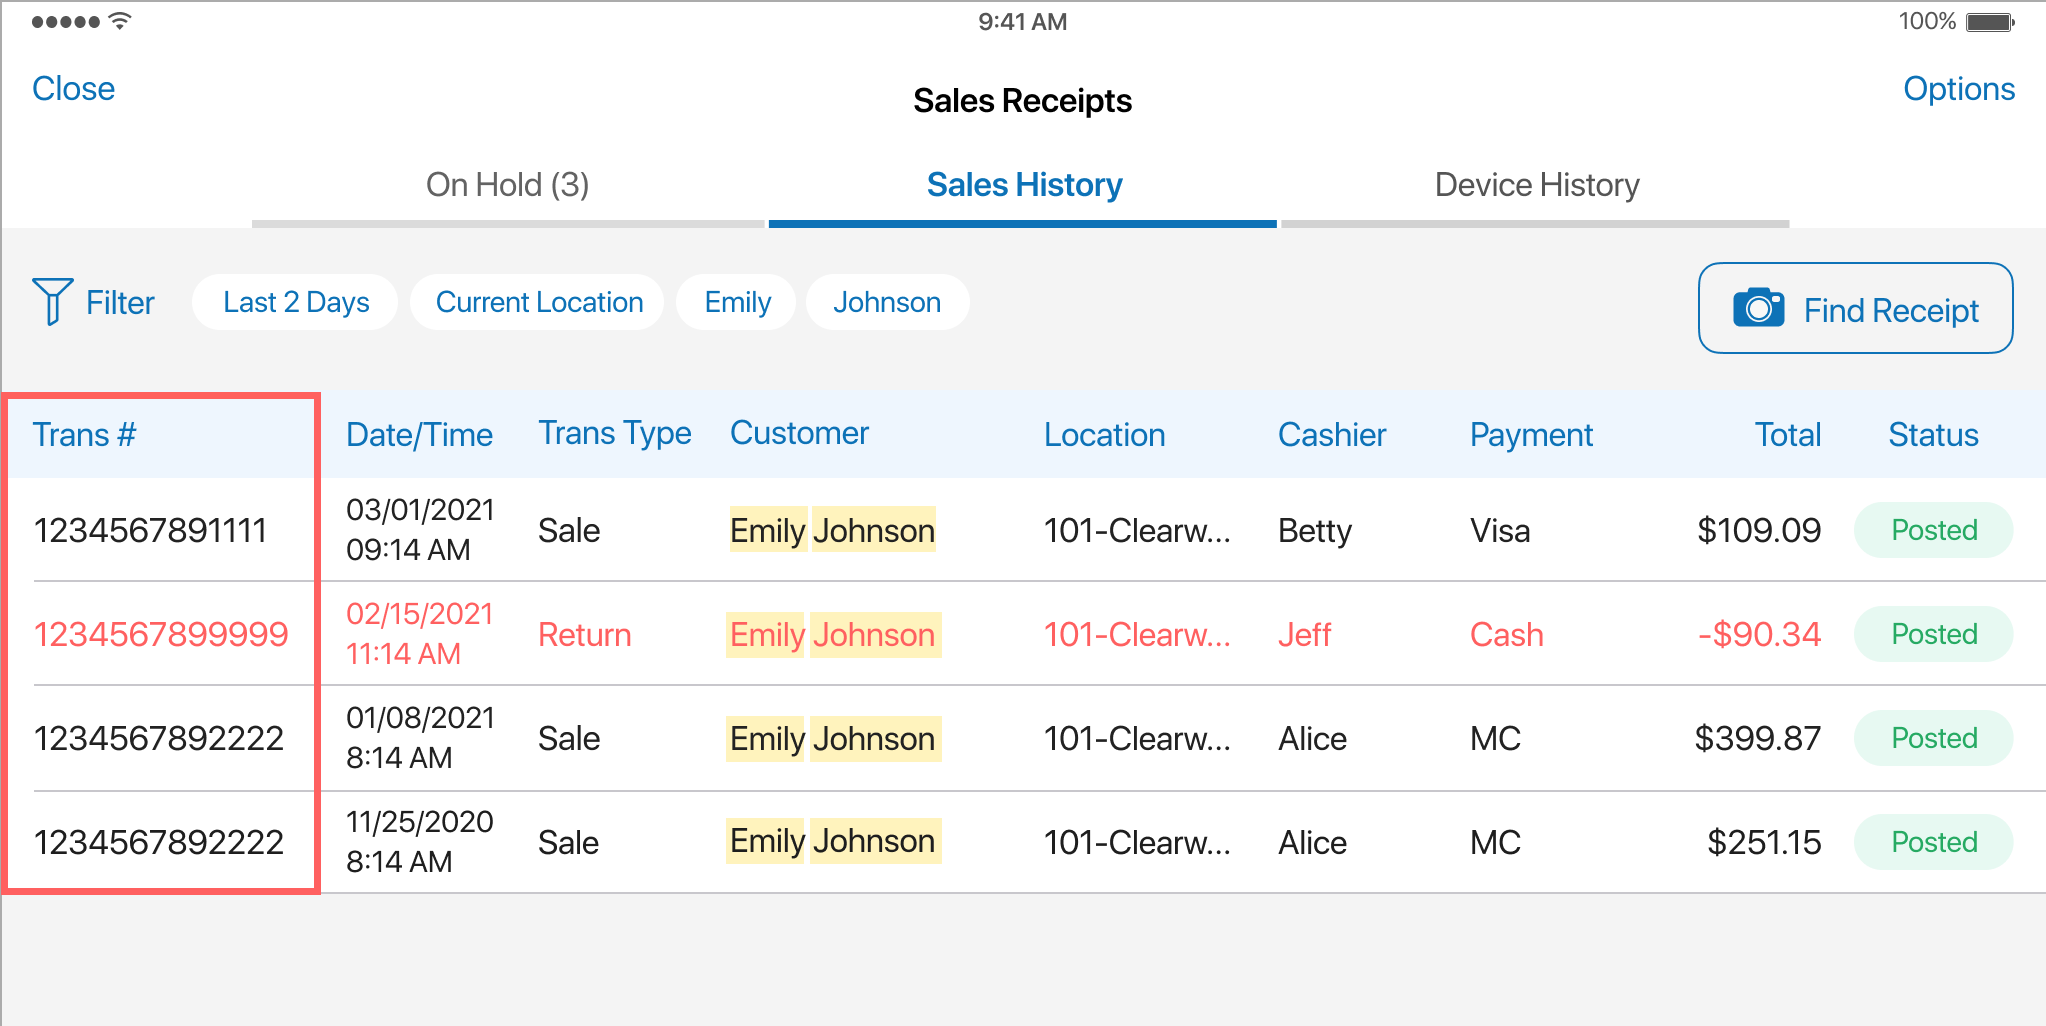 In the finalized view, the Info tab was extended with the following fields:
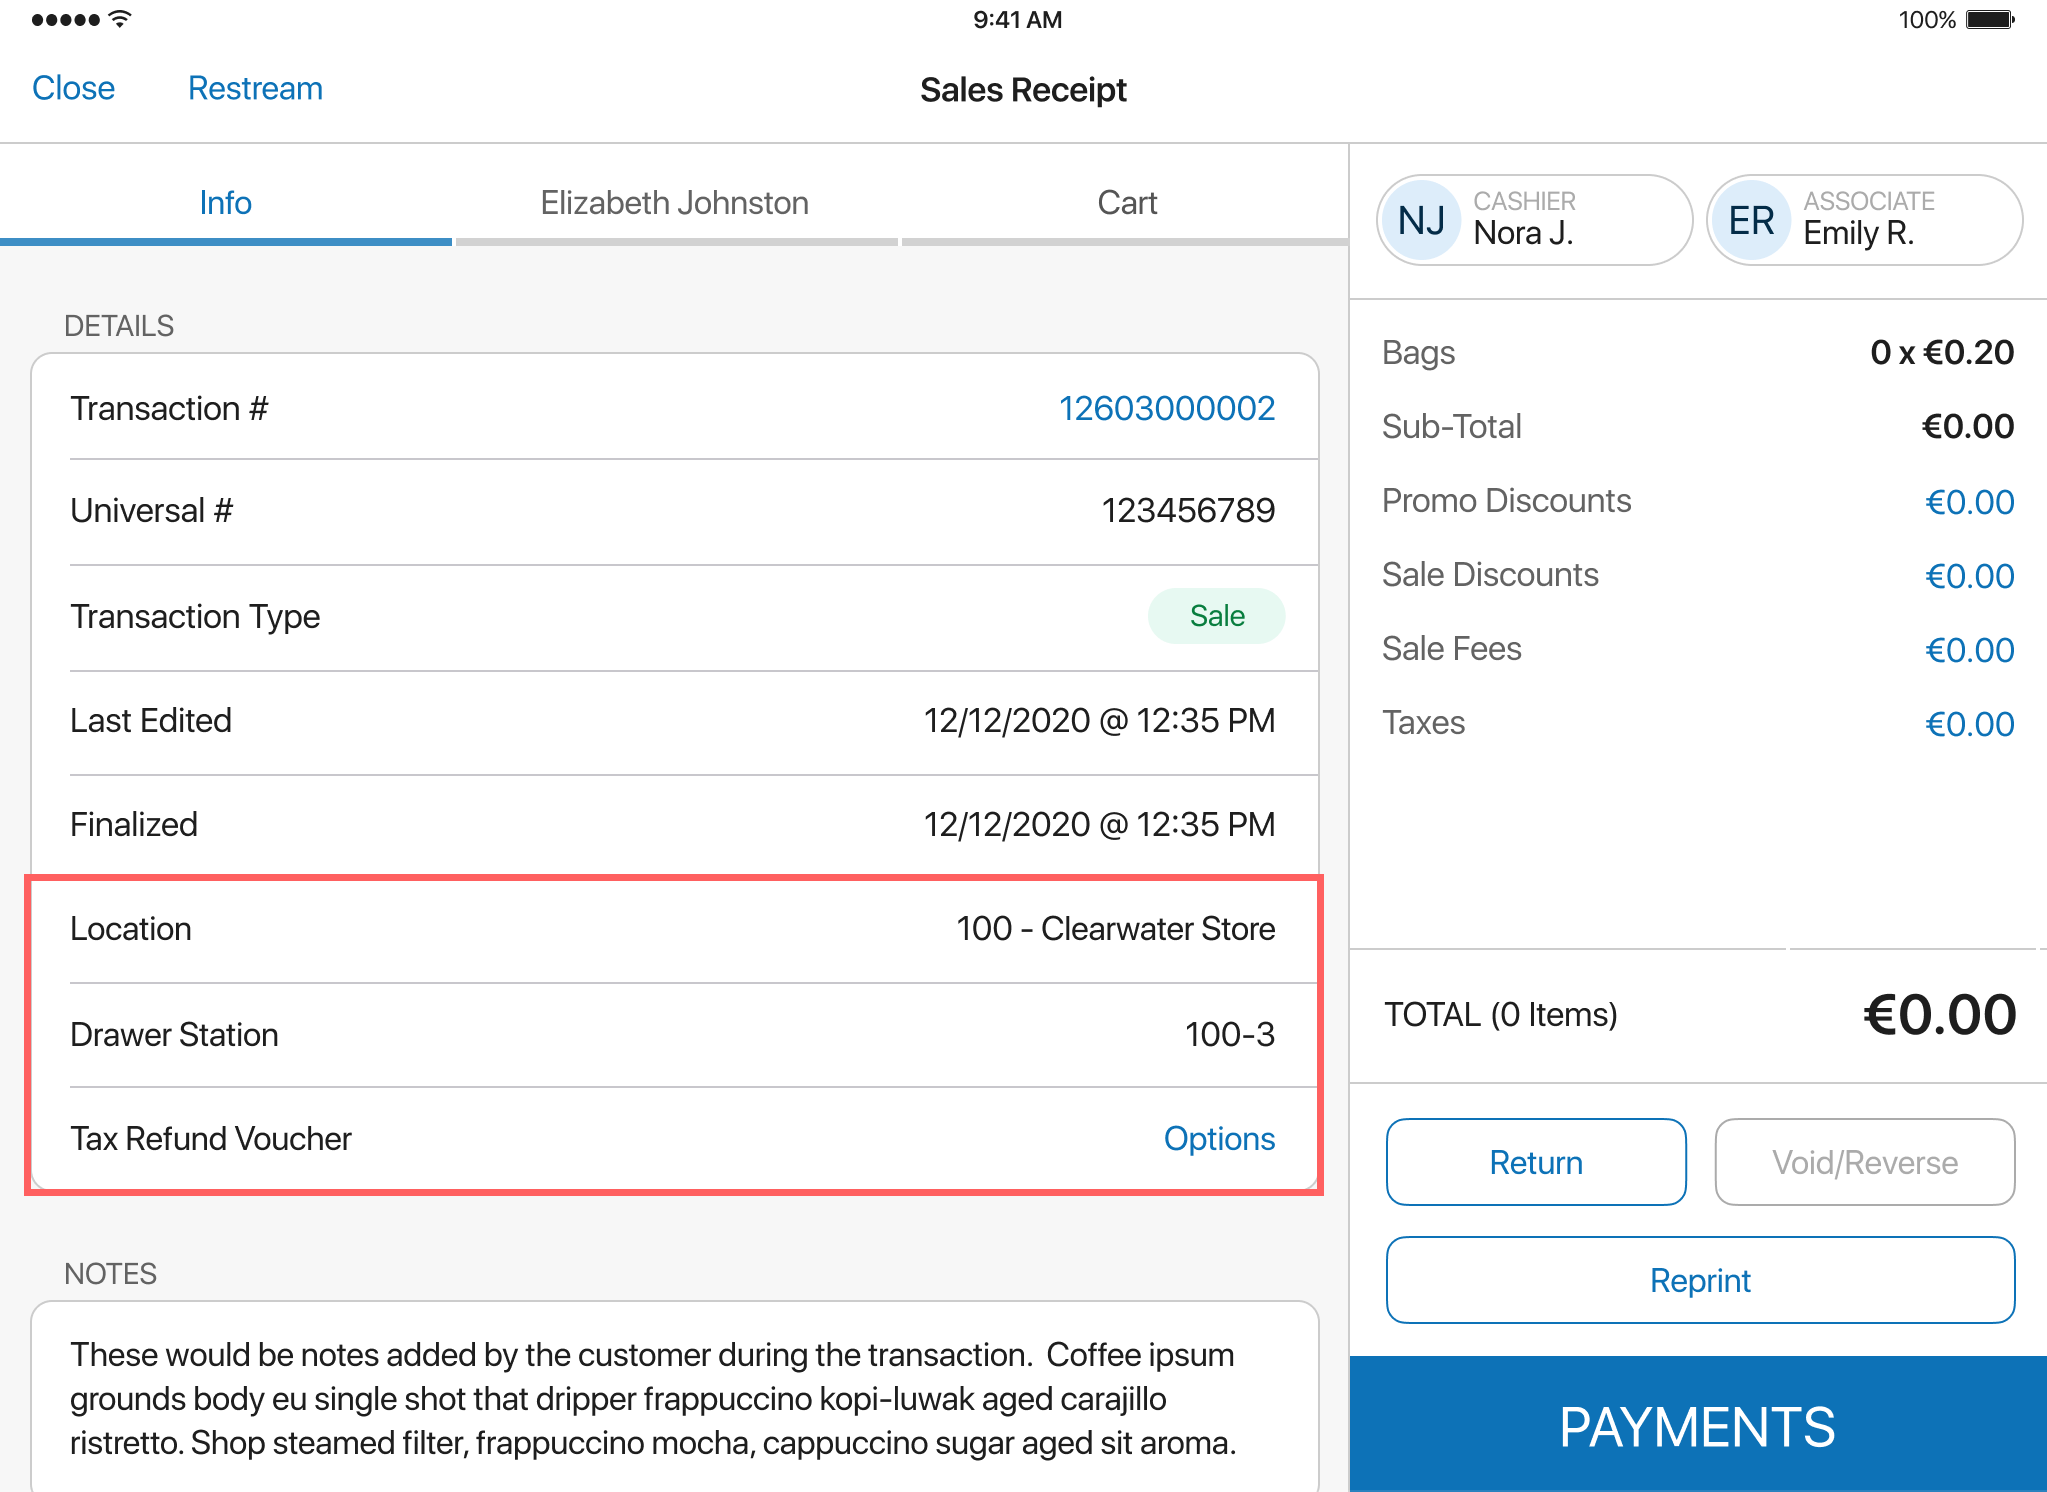
- Location: the location where the receipt was created
- Drawer Station: the drawer station where the receipt was created
- Tax Refund Voucher: visible only if the tax refund service is set to
WestID. Tapping Options in the field opens the WestID webpage where the user can check the status of the tax refund voucher, issue a voucher or void an existing voucher
Additionally, the following buttons are now available in the finalized view:
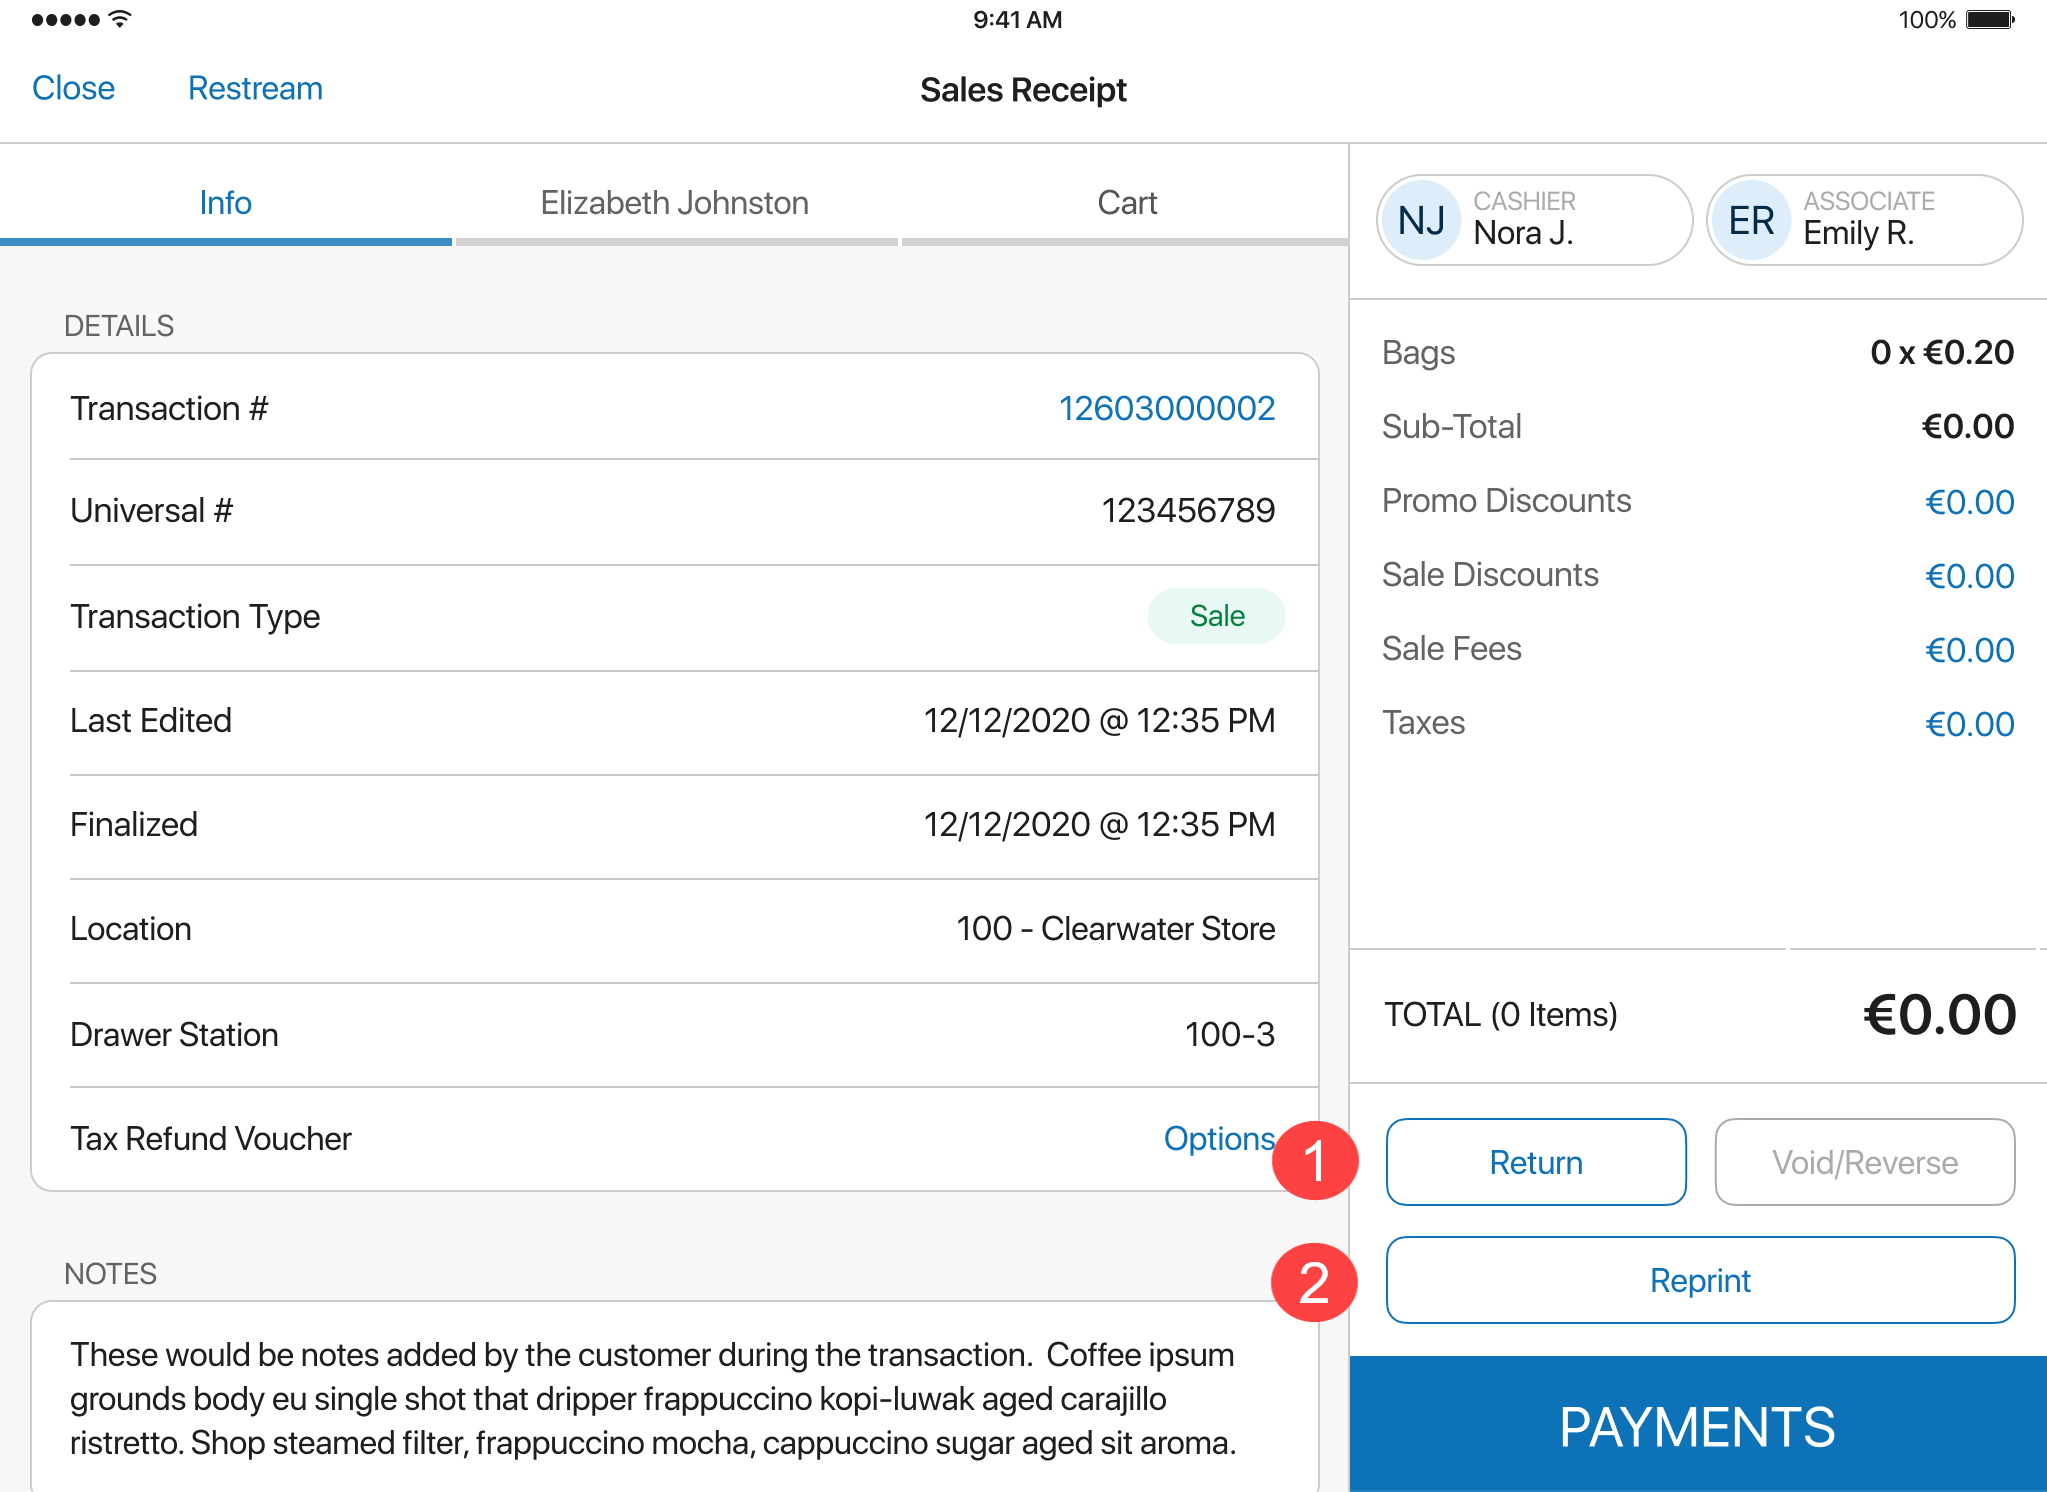
- Return 1 : opens the Return area where it’s possible to start a verified return against the receipt
- Reprint 2 : opens the printing dialog for the receipt
See also
- V6.33 CHQ Release Guide
- Mobile Quick Reference Guides in Teamwork Confluence
Allowing exchanges on sales receipts and invoices
Build 6.33.154: PRO-5638
POS Pro now respects the sale receipt - allow sales and returns on the same transaction and sale invoice - allow sales and returns on the same transaction settings configured at the country level.
Purpose
The new settings allow retailers to configure if exchanges can be made within a single transaction. Now, this can be configured separately for:
- sales receipts
- invoices
Typically, a customer may request an invoice instead of the regular sales receipt when shopping on behalf of a company. Companies can use invoices as proof of business expense to claim a VAT tax deduction.
Compared to the regular sales receipt, an invoice will contain extended information on the company providing the goods and services, the customer or the customer’s company, details about the goods and services provided, payment terms, and tax rates.
For example, if the sale receipt - allow sales and returns on the same transaction checkbox is selected in CHQ, in POS Pro,the user can add both the item that’s being returned AND the exchange item to the same sales receipt.
At the same time, the sale invoice - allow sales and returns on the same transaction checkbox can be cleared. Then, in POS Pro, different sale invoices must be created for the return and exchange items.
Configuration in CHQ
In CHQ, the settings are available under settings > company settings > countries/regions > [selected country] > POS:
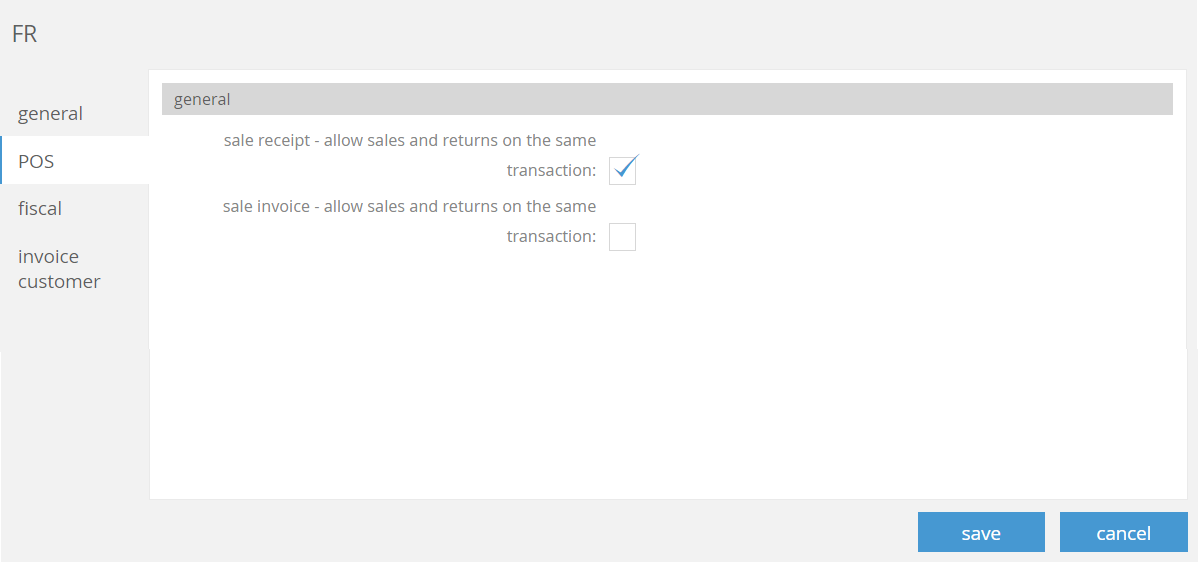
As of version 6.33.154, the following is the recommended configuration of the sale receipt - allow sales and returns on the same transaction and sale invoice - allow sales and returns on the same transaction settings for countries that have fiscalization related features in Teamwork:
| Country | sale receipt - allow sales and returns on the same transaction | sale invoice - allow sales and returns on the same transaction |
|---|---|---|
| France | selected | cleared |
| Spain | selected | cleared |
| Germany | selected | cleared |
| Italy | disabled | disabled |
Restriction of exchanges in POS Pro
In POS Pro under Sales Receipt > Cart, if sales and returns on the same receipt are NOT allowed, the Sales and Returns Cannot be Combined error message appears if:
- sale items are added to the Cart, and
- the user tries to mark an item as an Open Return
or
- return items are added to the Cart, and
- the user tries to mark a return item as a sale item
Also, under Sales Receipt > Payment, if sales and returns on the same invoice are NOT allowed, the Sales and Returns Cannot be Combined error message appears if:
- sale and return items are added to the receipt, and
- the user tries to turn on the Issue Invoice switch to change the receipt type to invoice
Respectively, if sales and returns on the same receipt are NOT allowed, the error message appears if:
- sale and return items are added to the invoice, and
- the user tries to turn off the Issue Invoice switch to change from invoice to sales receipt
See also
- V6.33 CHQ Release Guide
- Mobile Quick Reference Guides in Teamwork Confluence
European fiscal compliance: Configuring fiscalization related features for individual store locations
Build 6.33.154: PRO-4563
Starting from version 6.33.154, it’s now possible to define if fiscalization related features should be enabled for a particular store location.
This update may be useful if the retailer’s business is located in a country with fiscal regulations but where certain types of stores are exempt from these regulations. The retailer can now have the fiscalization functionality enabled at the country level but disabled for certain locations.
For the fiscalization related features to be disabled for a store location, in CHQ under settings > location settings > locations / location settings > [selected location] > details the fiscal checkbox must be cleared.
When a new location record is created, the fiscal checkbox is cleared by default. However, please note that for locations with country = France, Germany, Italy, and Spain the fiscal checkbox is always selected automatically.
In CHQ, once the fiscal checkbox is selected and the location record is saved, the fiscalization functionality cannot be disabled again for that store location.
If the fiscal checkbox is cleared for a store location in CHQ, in POS Pro, the respective fiscalization related features will be disabled for devices initialized at that location.
See also
- V6.33 CHQ Release Guide
- Mobile Quick Reference Guides in Teamwork Confluence
European fiscal compliance: Invoices for store locations in France
Build 6.33.154: PRO-4769, PRO-3725
We’ve added the capability to issue invoices for store locations with country = France.
Purpose
Issuing an invoice may be required on the customer’s request, for example, if the customer is making a purchase on behalf of a company. Compared to Teamwork’s regular sales receipt, the invoice will contain extended customer or company information.
For store locations in France, the invoice form can be configured for two types of customers – professional and individual.
The professional type includes customers shopping on behalf of a business whereas the individual type – customers making a personal purchase. In CHQ, it is possible to define what customer/company fields will be required in POS Pro for each type.
Configuration in CHQ
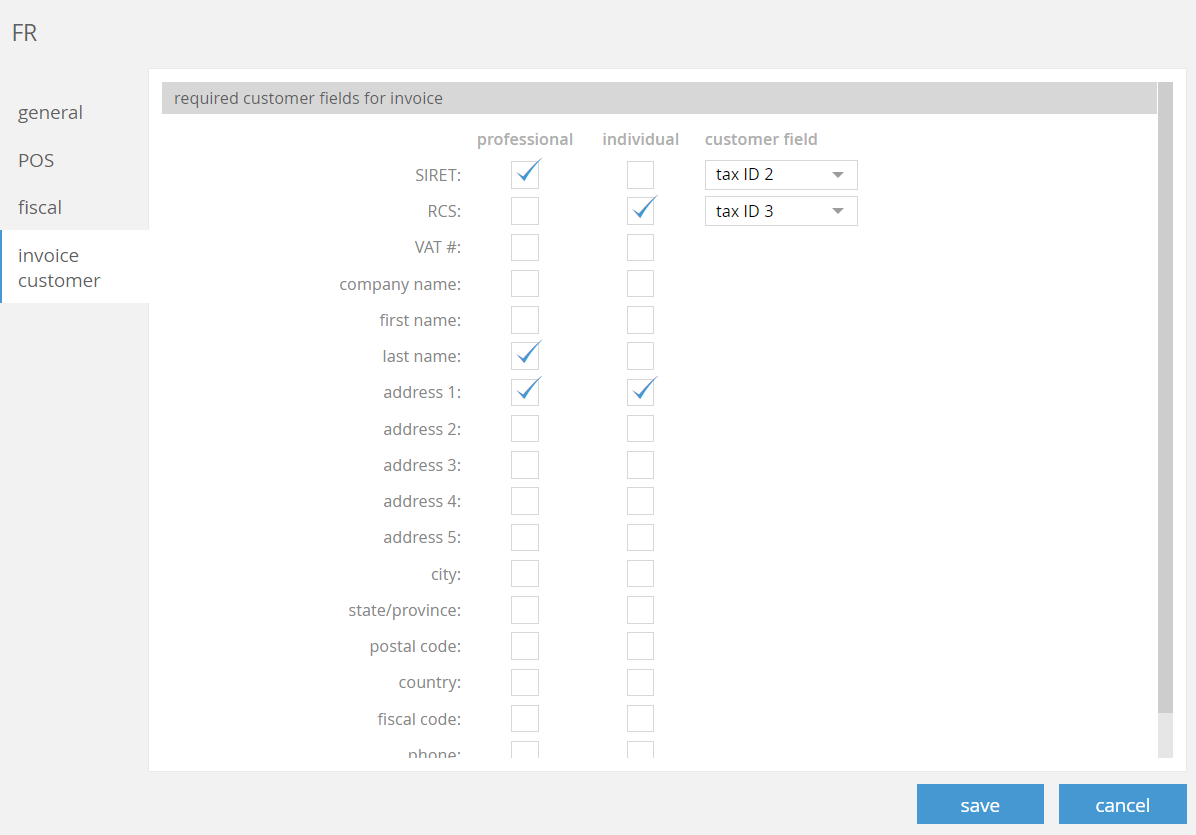
In CHQ, it is possible to define what customer/company fields should be required when filling out the customer/company information in the Invoice Information dialog in POS Pro.
To do so, under settings > company settings > countries/regions > [your France country record] > invoice customer, select the checkboxes next to those fields that should be required. Selecting the checkbox in either the professional or individual column makes that field required for the respective type of the invoice.
Issuing an invoice
To issue an invoice in POS Pro:
- On the Home Screen, tap New Sale.
- In the Sales Receipt area, add a customer and items to the sale.
- Tap Payment at the bottom-right.
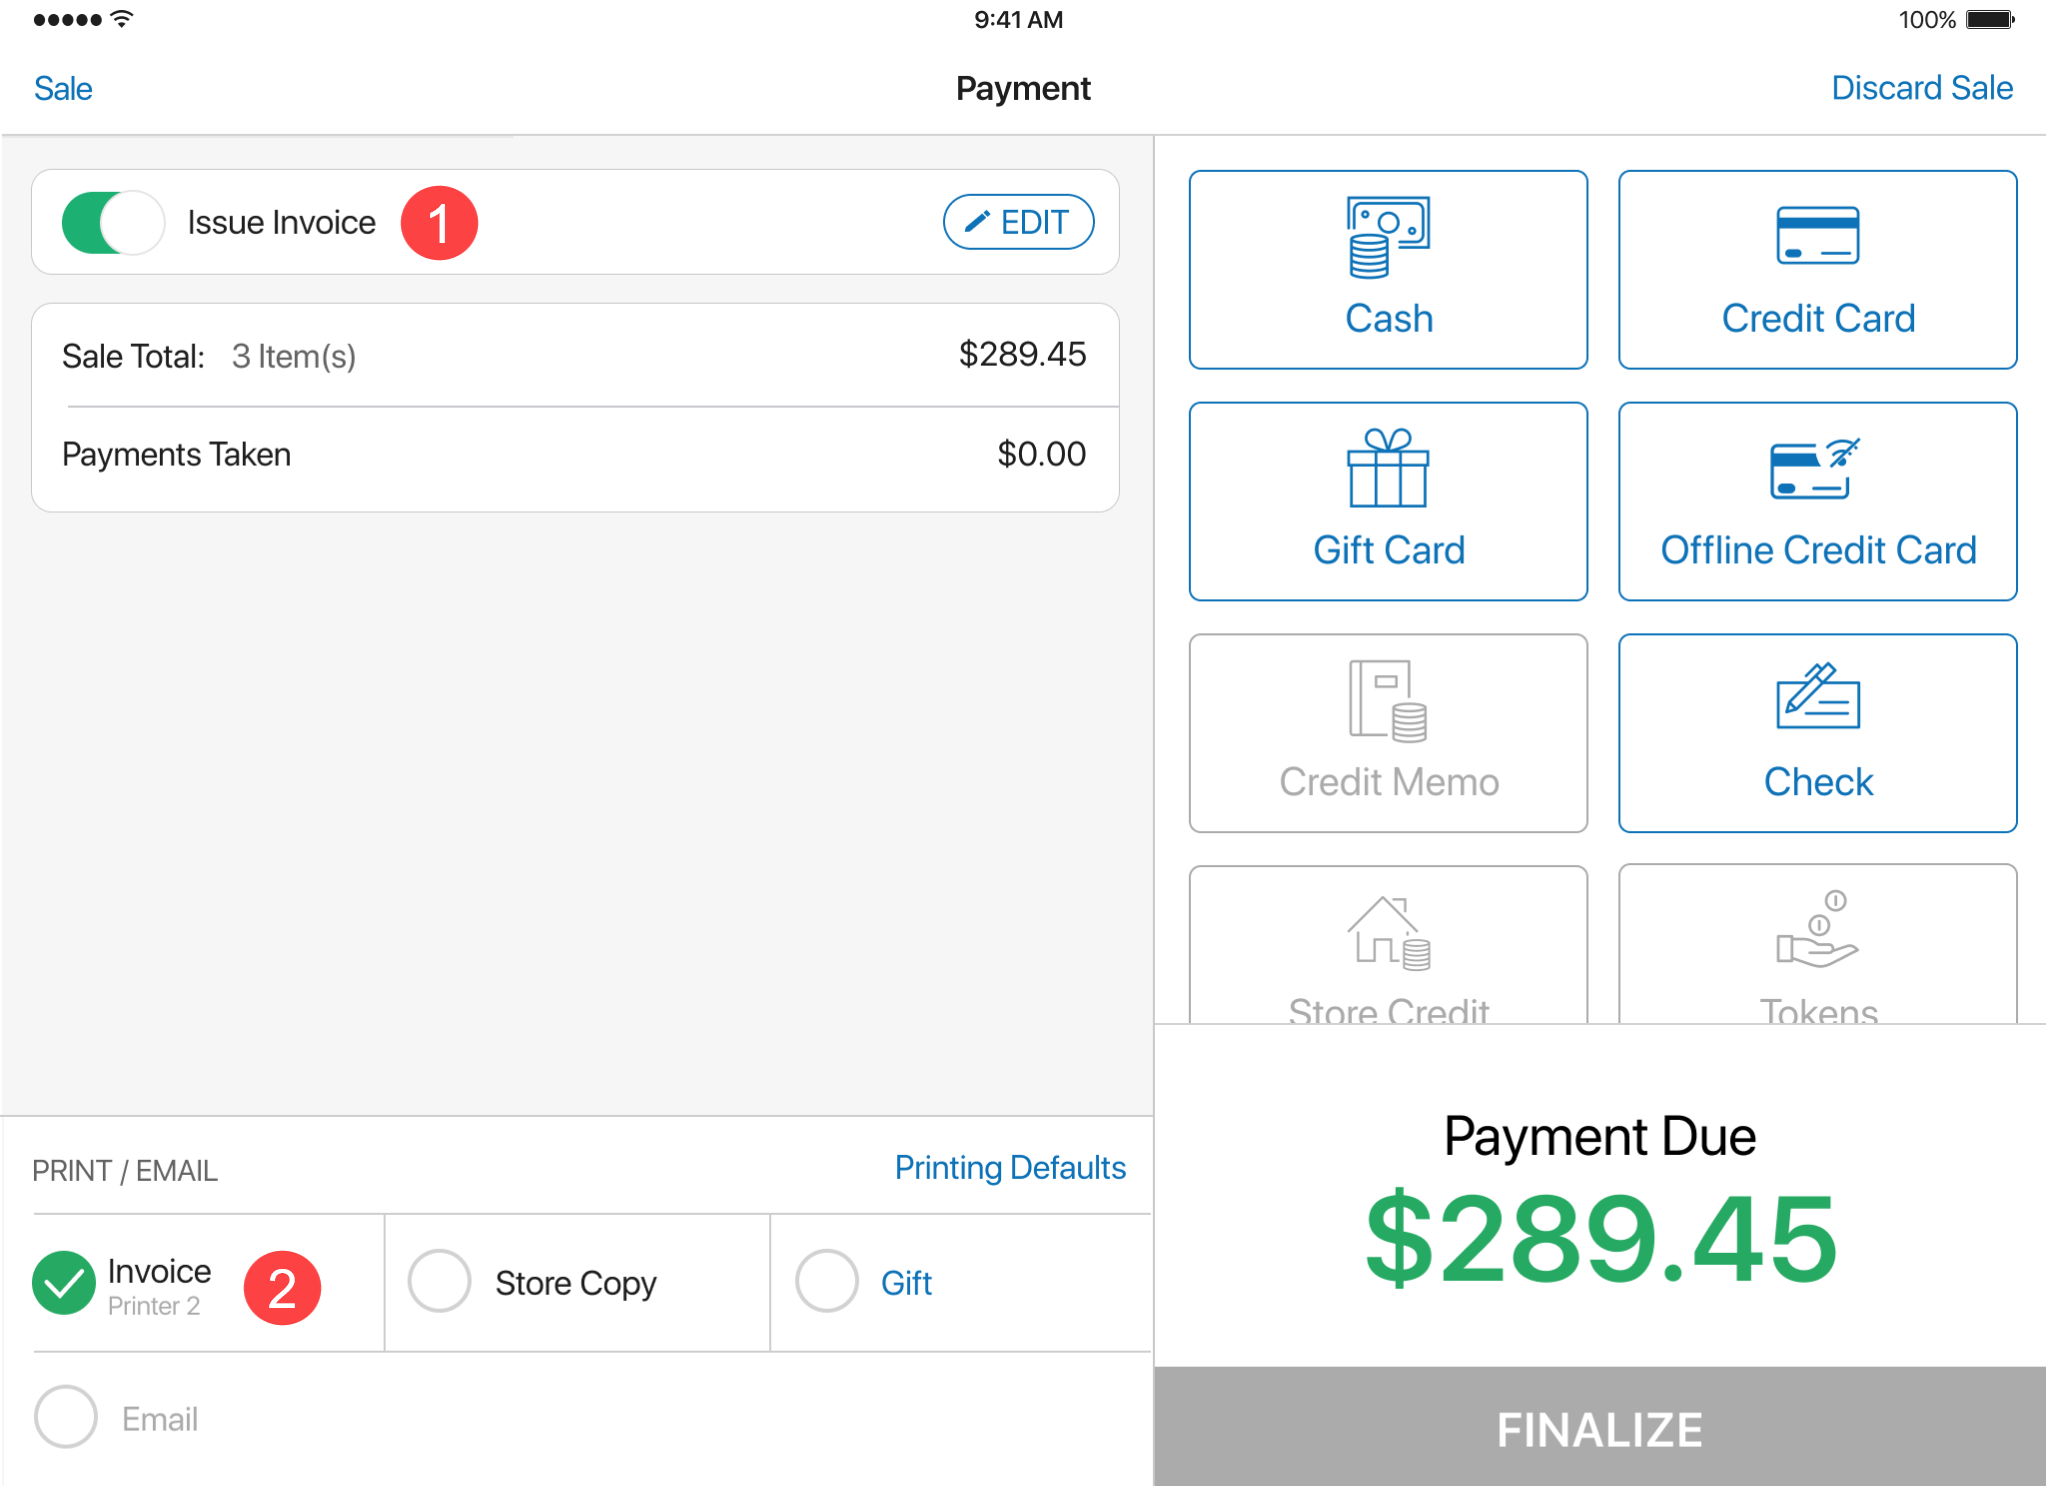
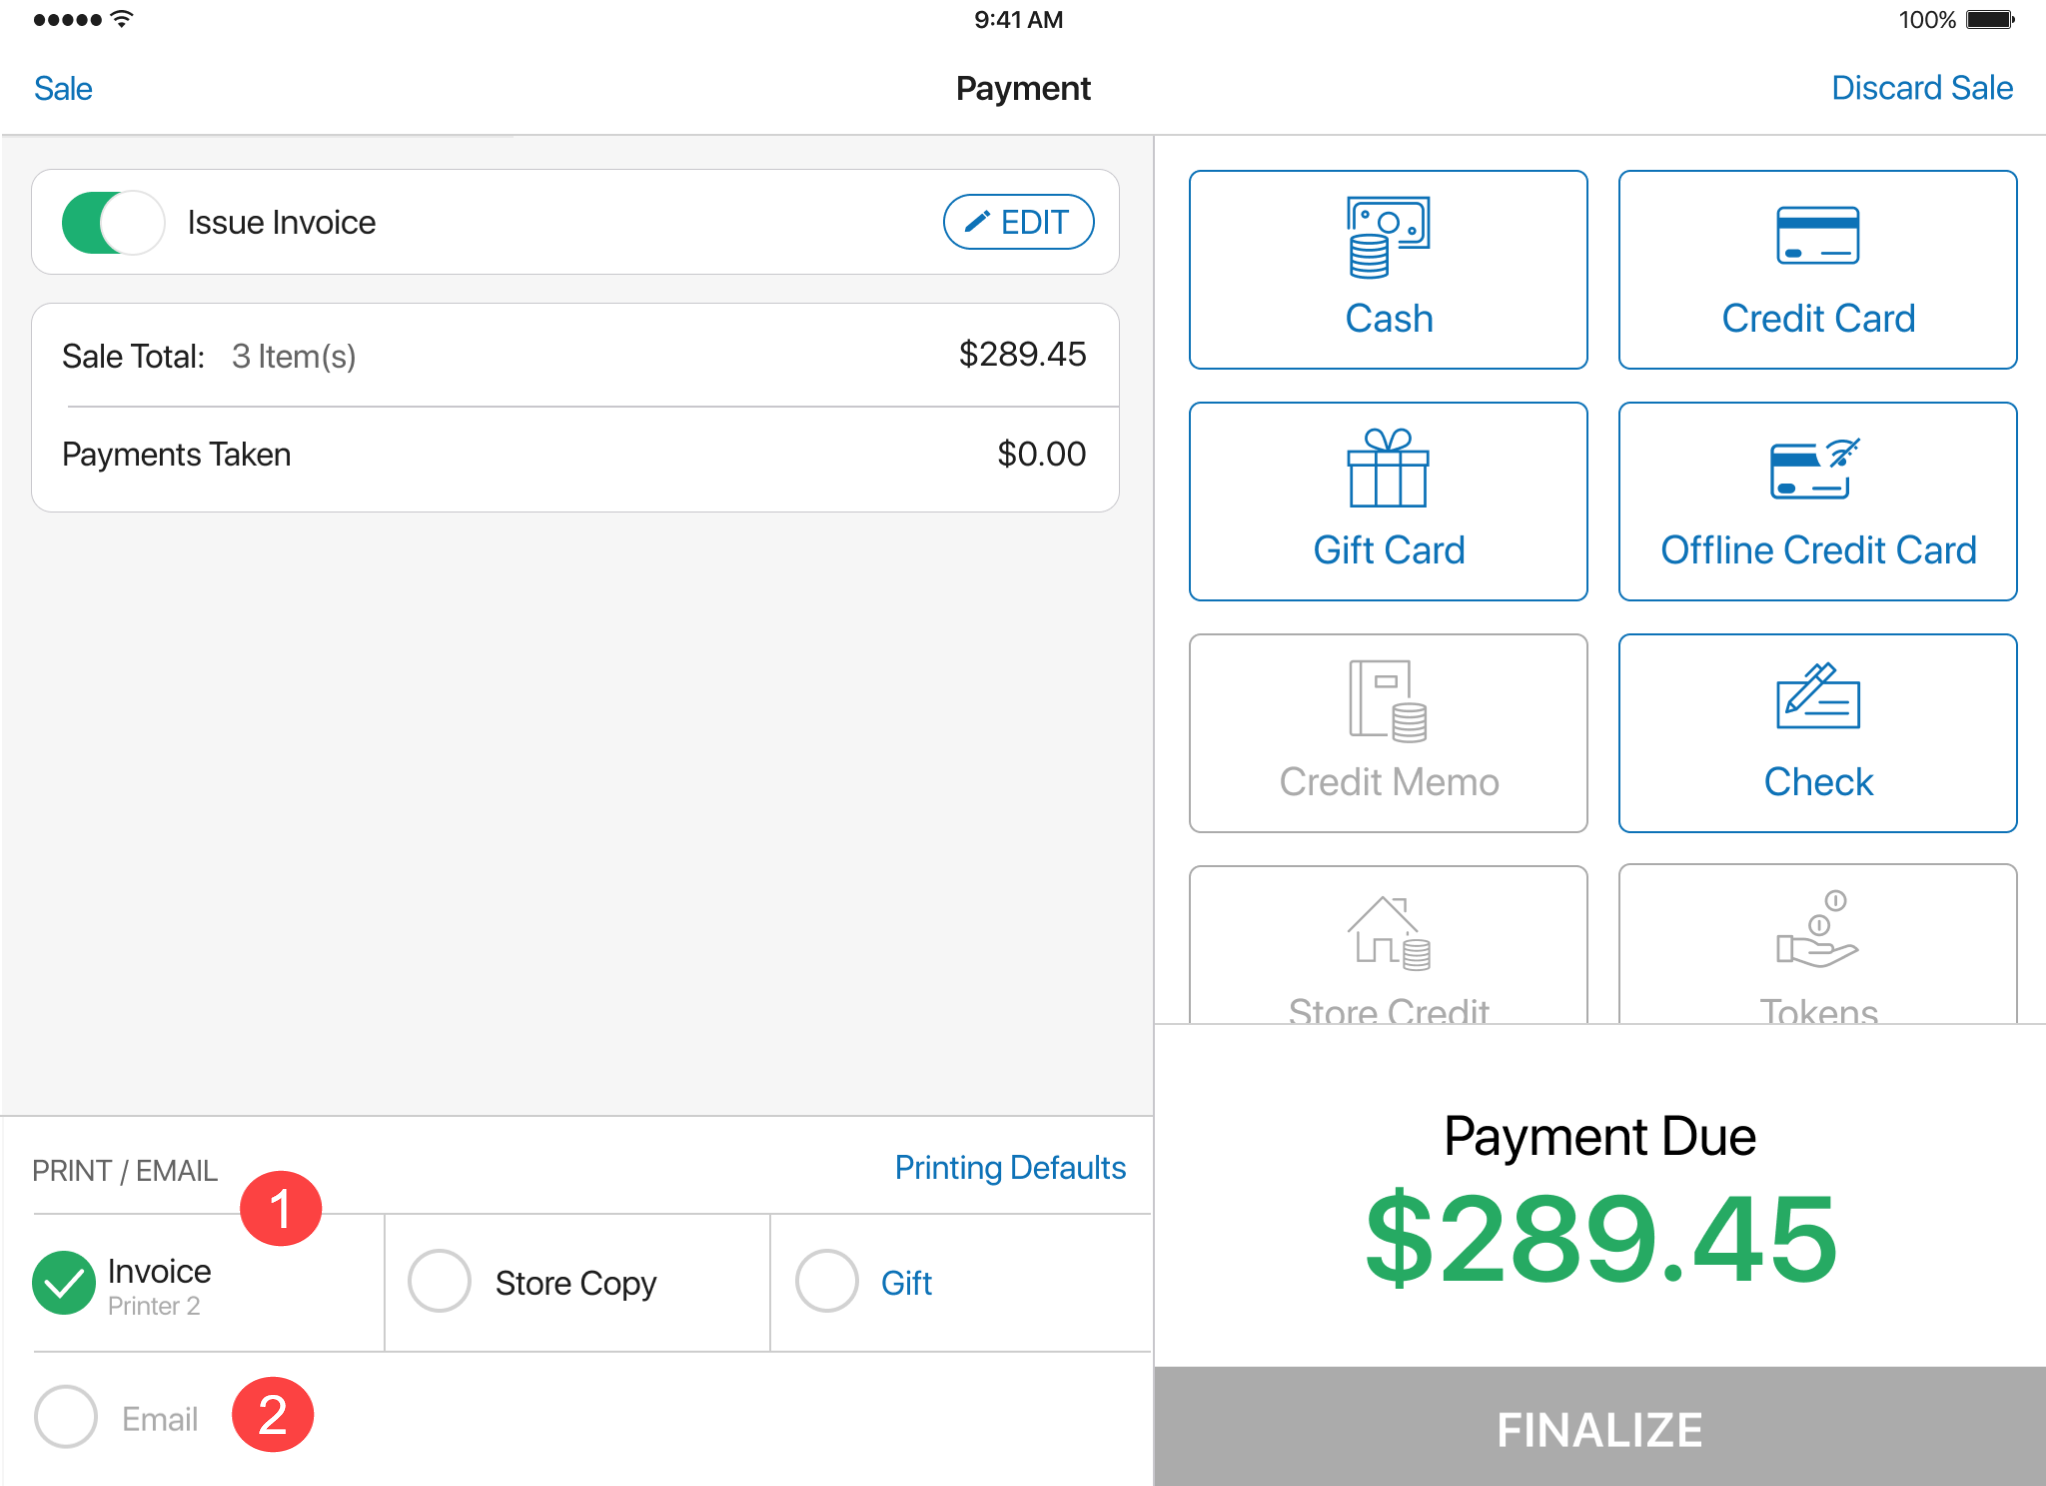
- In the Payment area, turn on the Issue Invoice switch
1
at the top. Please note that the Receipt printing option automatically changes to Invoice
2
meaning that the invoice will be printed on finalization.
- In the Invoice Information dialog that opens, first configure the options at the top:
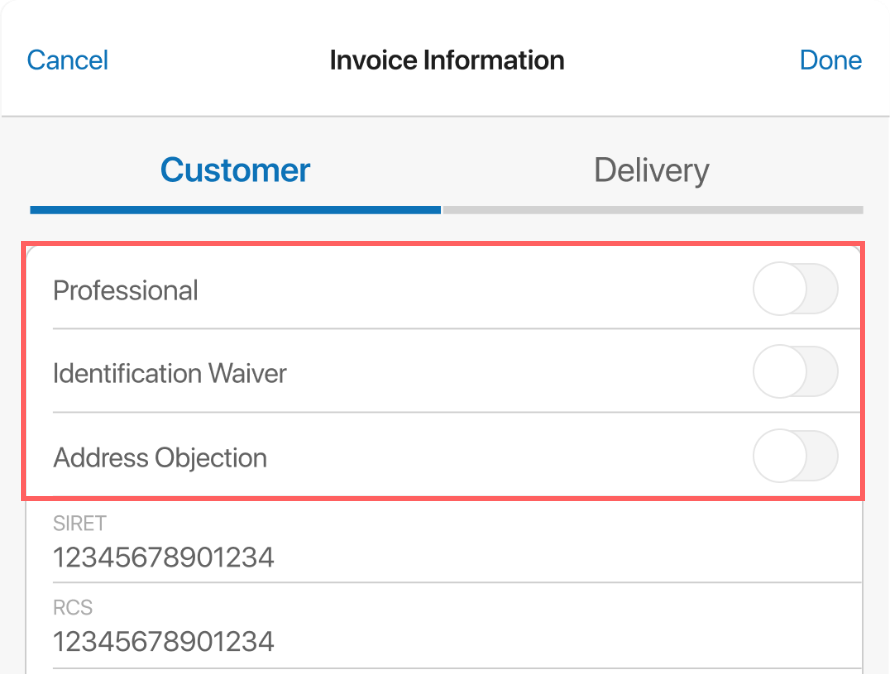
Option Description Value Professional if turned on, the customer is making a purchase on behalf of a business. Depending on your custom settings, the fields required for the professional and individual invoices may differ Turned off by default if no customer record is added to the sale. If a customer is added to the sale, and the Company field is populated in the customer’s record, turned on by default Identification Waiver if turned on, the customer is choosing not to provide personal or company information. The Company, First, and Last fields in the dialog will be changed to optional Turned off by default Address Objection if turned on, the customer is choosing not to provide personal or company address. The Address 1 field will be changed to optional Turned off by default
Then, fill out the customer fields below.
Additionally, if at least one item on the receipt is marked as a ship item, the Delivery tab is also available in the dialog:
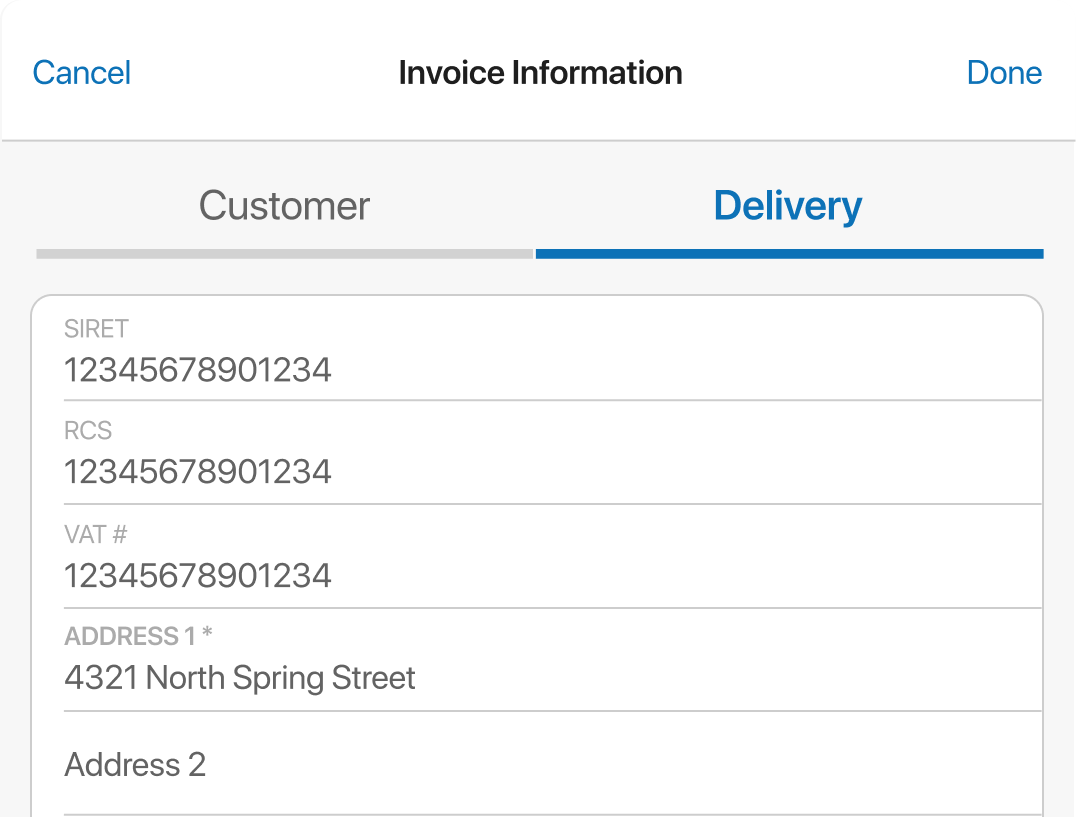 In the Delivery tab, fill out the customer and ship-to fields as required.
Only one ship-to address is allowed per invoice. If sale items must be shipped to different addresses, it’s required to assign the items to different invoices.
-
When the customer information is filled out, tap Done in the upper right corner.
-
Back in the Payment area, to define what documents should be printed on receipt finalization, configure the options in the PRINT / EMAIL section 1 . If the invoice should be emailed to the customer, tap the Email option 2 .
-
Choose a payment method and accept the required amount.
-
Tap Finalize at the bottom-right. The invoice will be printed or emailed to the customer according to the user’s configuration.
See also
- V6.33 CHQ Release Guide
- Mobile Quick Reference Guides in Teamwork Confluence
European fiscal compliance: Invoices for store locations in Germany
Build 6.33.154: PRO-4444
We’ve added the capability to issue invoices for store locations with country = Germany.
Purpose
Issuing an invoice may be required on the customer’s request, for example, if the customer is making a purchase on behalf of a company. Compared to Teamwork’s regular sales receipt, the invoice will contain extended customer or company information.
Configuration in CHQ
In CHQ, it’s possible to define what fields should be required when filling out the customer/company information in the Invoice Information dialog in POS Pro.
To do so, under settings > company settings > countries/regions > [your Germany country record] > invoice customer, select the checkboxes next to the fields that should be required.
The company name, first name, and last name fields are not available for selection. These fields have a distinct requirement logic in POS Pro where either company name or the first name and last name are required when saving the Invoice Information dialog.
Issuing an invoice
To issue an invoice in POS Pro:
-
On the Home Screen, tap New Sale.
-
In the Sales Receipt area, add a customer and items to the sale.
-
Tap Payment at the bottom-right.
-
In the Payment area, turn on the Issue Invoice switch 1 at the top. Please note that the Receipt printing option automatically changes to Invoice 2 meaning that the invoice will be printed on finalization.

-
In the Invoice Information dialog that opens, fill out the company/customer fields as required and then tap Done in the upper right corner.
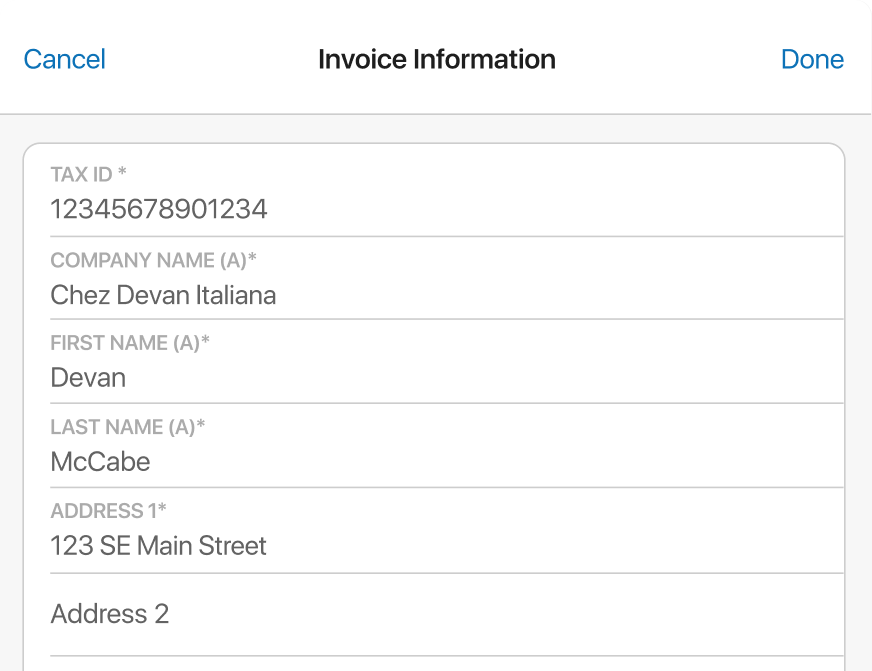
To save the Invoice Information dialog, it’s required to fill out either the Company name OR the First name and Last name fields. For example, if the Company name is filled out, the First name and Last name become optional. Also, all three fields can be populated.
-
Back in the Payment area, to define what documents should be printed on receipt finalization, configure the options in the PRINT / EMAIL section 1 . If the invoice should be emailed to the customer, tap the Email option 2

-
Choose a payment method and accept the required amount.
-
Tap Finalize at the bottom-right. The invoice will be printed or emailed to the customer according to the user’s configuration.
See also
- V6.33 CHQ Release Guide
- Mobile Quick Reference Guides in Teamwork Confluence
European fiscal compliance: Updated numbering of fiscal documents for Spain
Build 6.33.154: PRO-5379
To ensure compliance with the fiscalization requirements in Spain, we’ve updated the logic behind numbering receipts and invoices that contain both sale and return items.
At the database level, each fiscal document is assigned a sequential number. For Spain, four separate sequences are used to track the following documents:
- sales receipts
- return receipts
- sale invoices
- return invoices
- for sales receipts that contain no return items, the sales receipt sequence is used
- for sales receipts that contain sale and at least one return item, the return receipt sequence is used
- for invoices that contain no return items, the sale invoice sequence is used
- for invoices that contain sale and at least one return item, the return invoice sequence is used
In POS Pro, the type of the document is visible under Sales Receipts > On Hold or Sales Receipts > History in the Type column
1
:
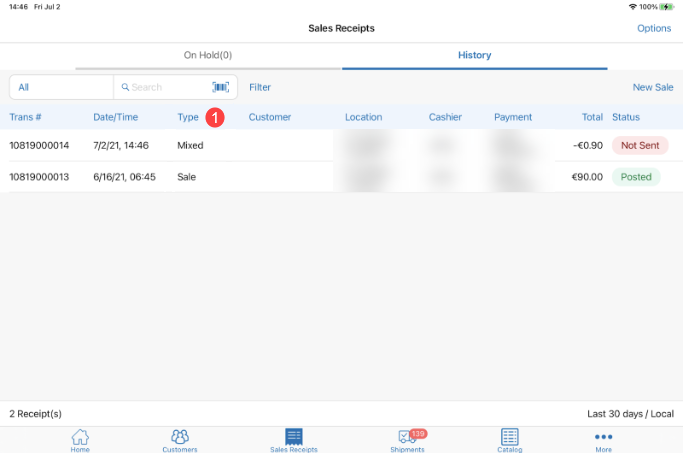
Saleindicates that all items on the document are sale itemsReturnindicates that all items on the document are return itemsMixedindicates that there are both sale and return items on the document
Sales Receipt: New Custom payment method
Build 6.33.154: PRO-4428
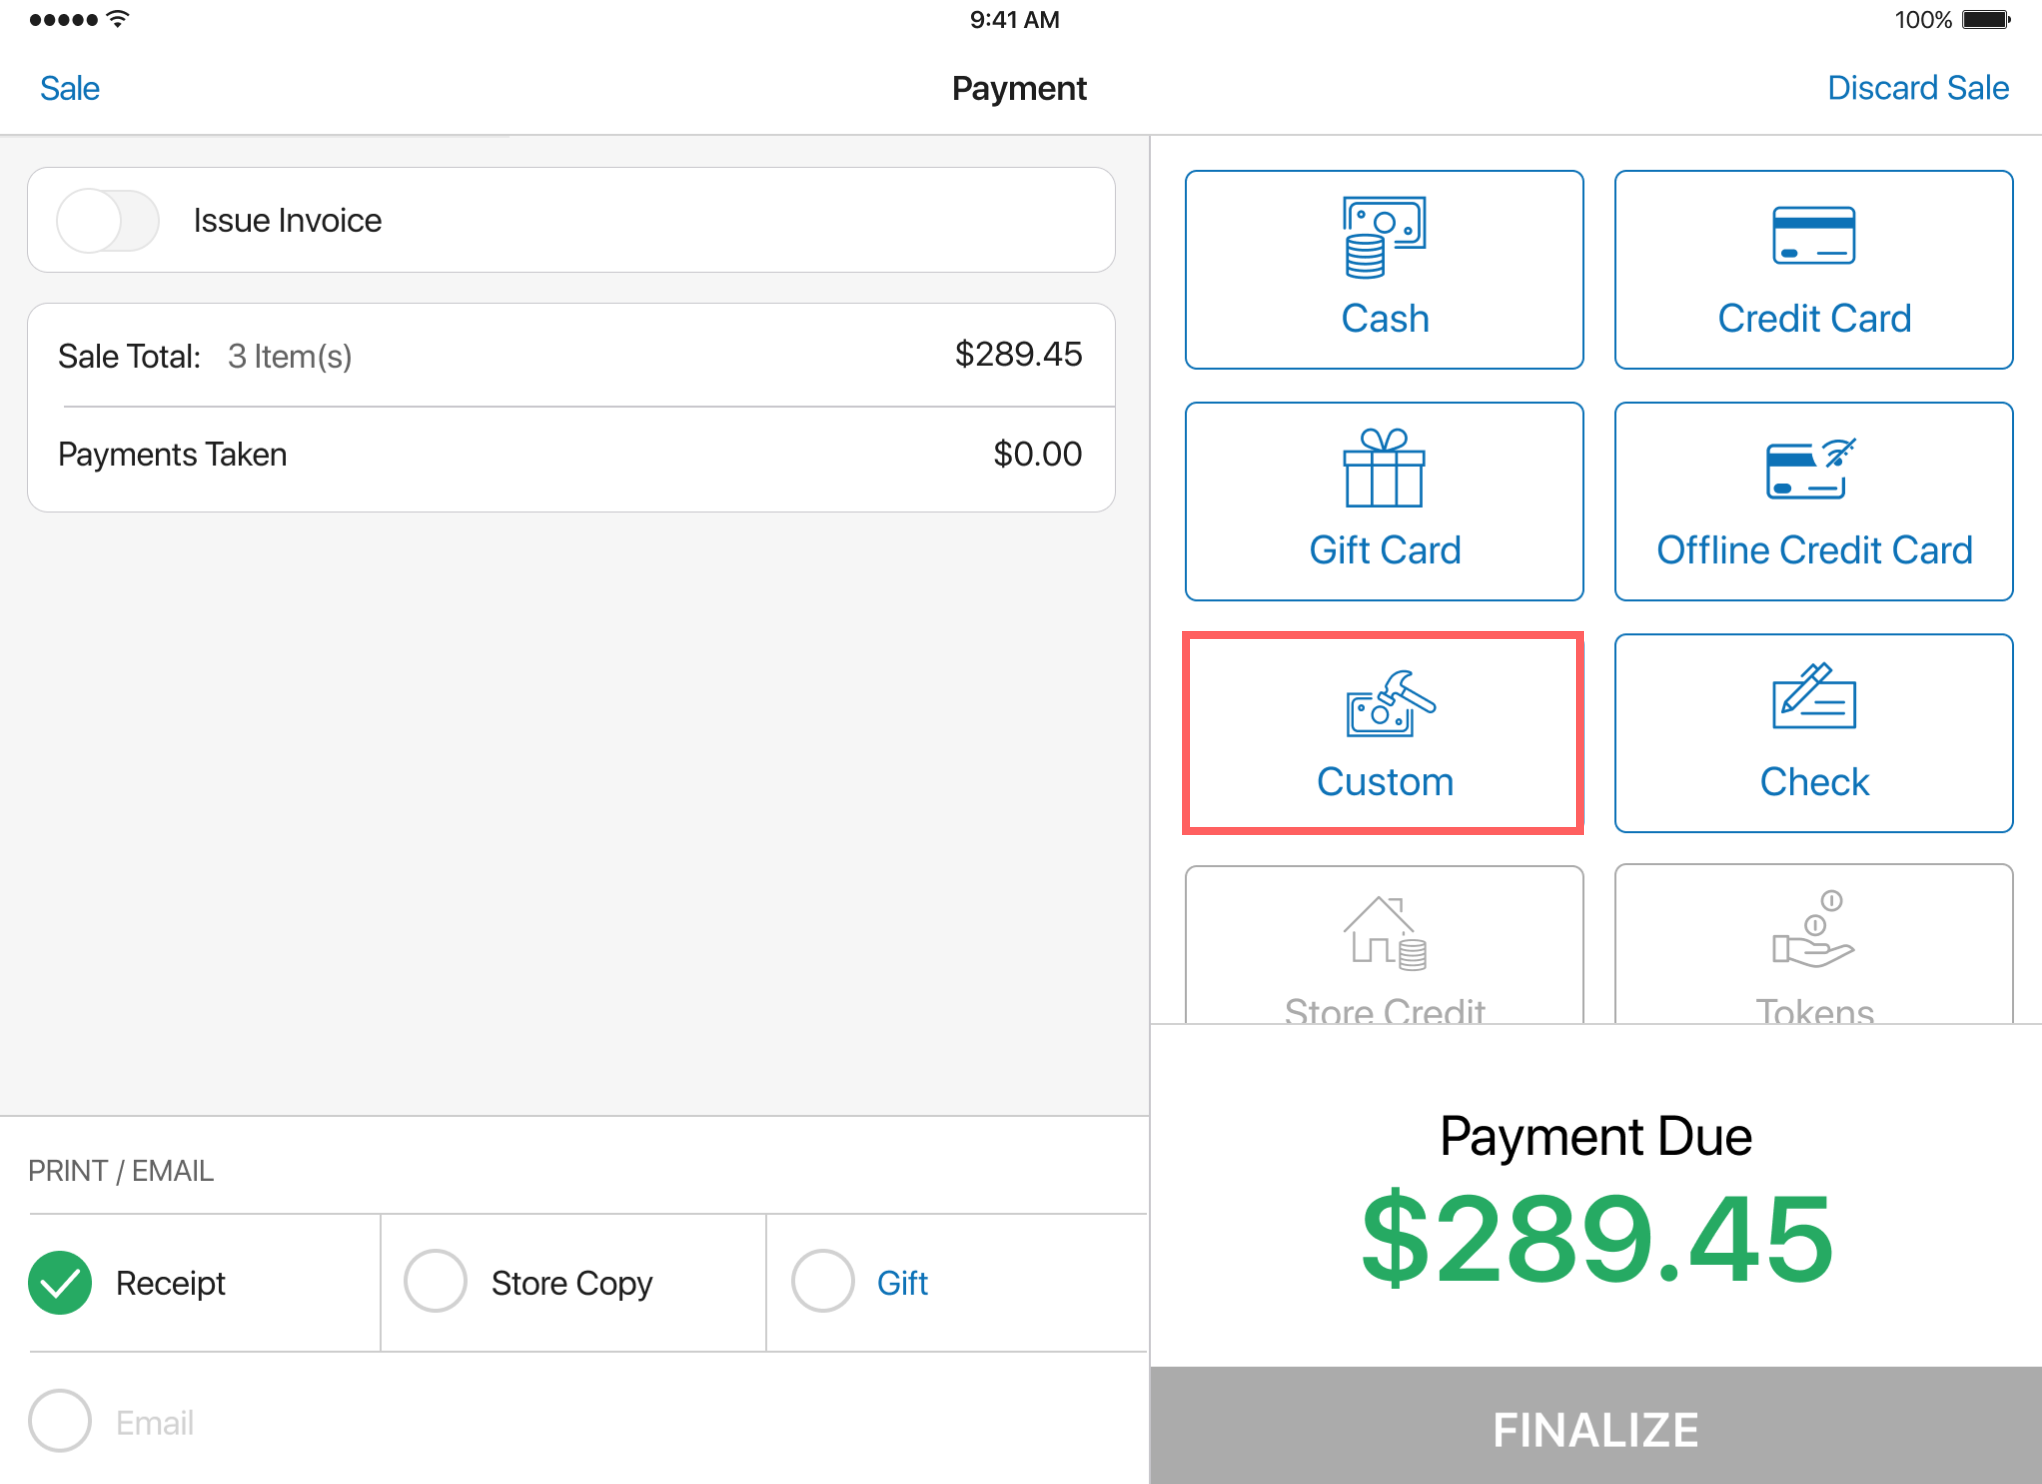
We’ve added the Custom payment method to POS Pro V6.
Purpose
This update allows retailers to set up payment types unique to their business. Via the Custom workflow, store associates can accept payment methods other than those listed by Teamwork while allowing POS Pro to keep track of funds and update inventory appropriately.
The Custom payment method also can be employed in the case where the retailer wants to reduce inventory using Sales Receipts. Then, Custom would be used as a “dummy” payment method allowing to finalize the transaction.
Configuration in CHQ
For the Custom payment method to be available in POS Pro, in CHQ, this method must be set up under settings > sales > payment methods.
Also, under settings > sales > payment methods > select [your Custom payment method] and then click location settings > [selected location], the visible checkbox must be selected.
To set a name for the Custom payment method, under settings > sales > payment methods > [your Custom payment method], define the code field. The entered value will display as the name of the payment method in POS Pro.
For details on how to configure the Custom payment method in CHQ, see V6.33 CHQ Release Guide.
Using the Custom payment method
To finalize a Sales Receipt in POS Pro using the Custom payment method, do the following:
-
On the Home Screen, tap New Sale.
-
In the Sales Receipt area, add sale items and a customer to the receipt.
-
Tap Payment at the bottom-right.
-
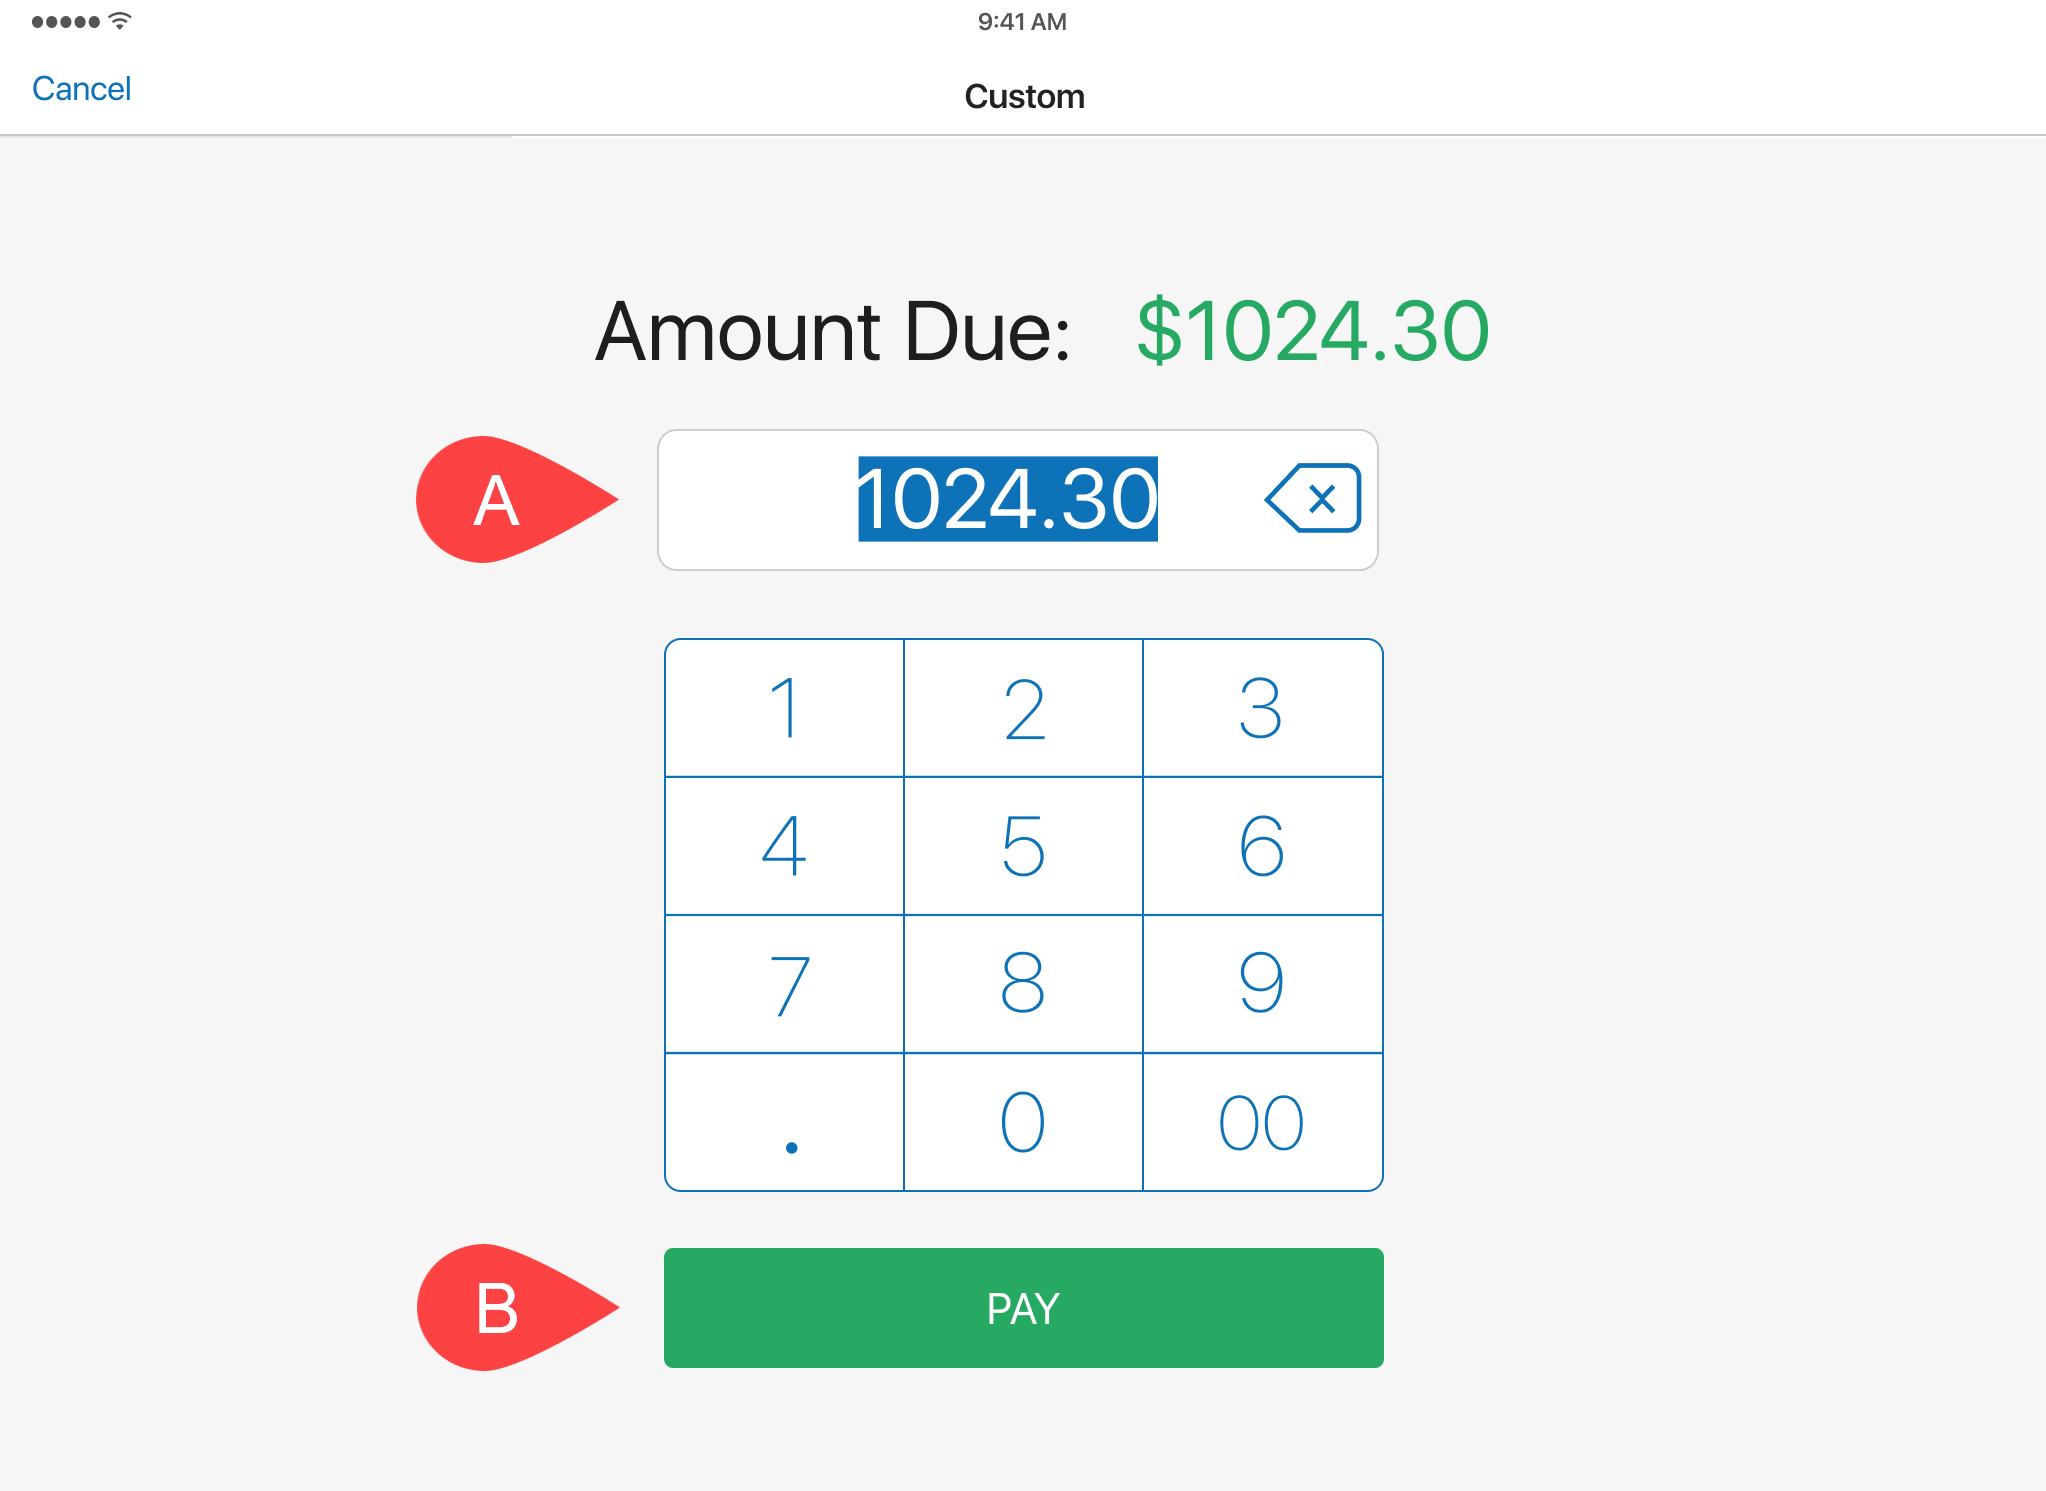
In the area that opens, make sure that the correct payment amount is set in the field (A in the screenshot below) and then tap Pay (B in the screenshot below):
-
In the Custom Field dialog, enter the required payment information in the Custom Text Label field (A in the screenshot below) and then tap Done (B in the screenhot):
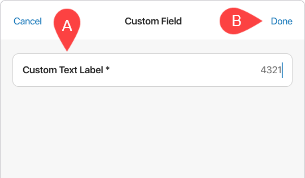
The Custom Field dialog appears in POS Pro only if in CHQ under
settings > sales > payment methods > [your Custom payment method], the payment custom entry field is set torequiredoroptional. If the field is set tonot shown, the user is returned to the Payments area at once.Also, under
settings > sales > payment methods > [your Custom payment method], it’s possible to set a custom name for the Custom Text Label field in POS Pro. To do so, define the custom entry label field. -
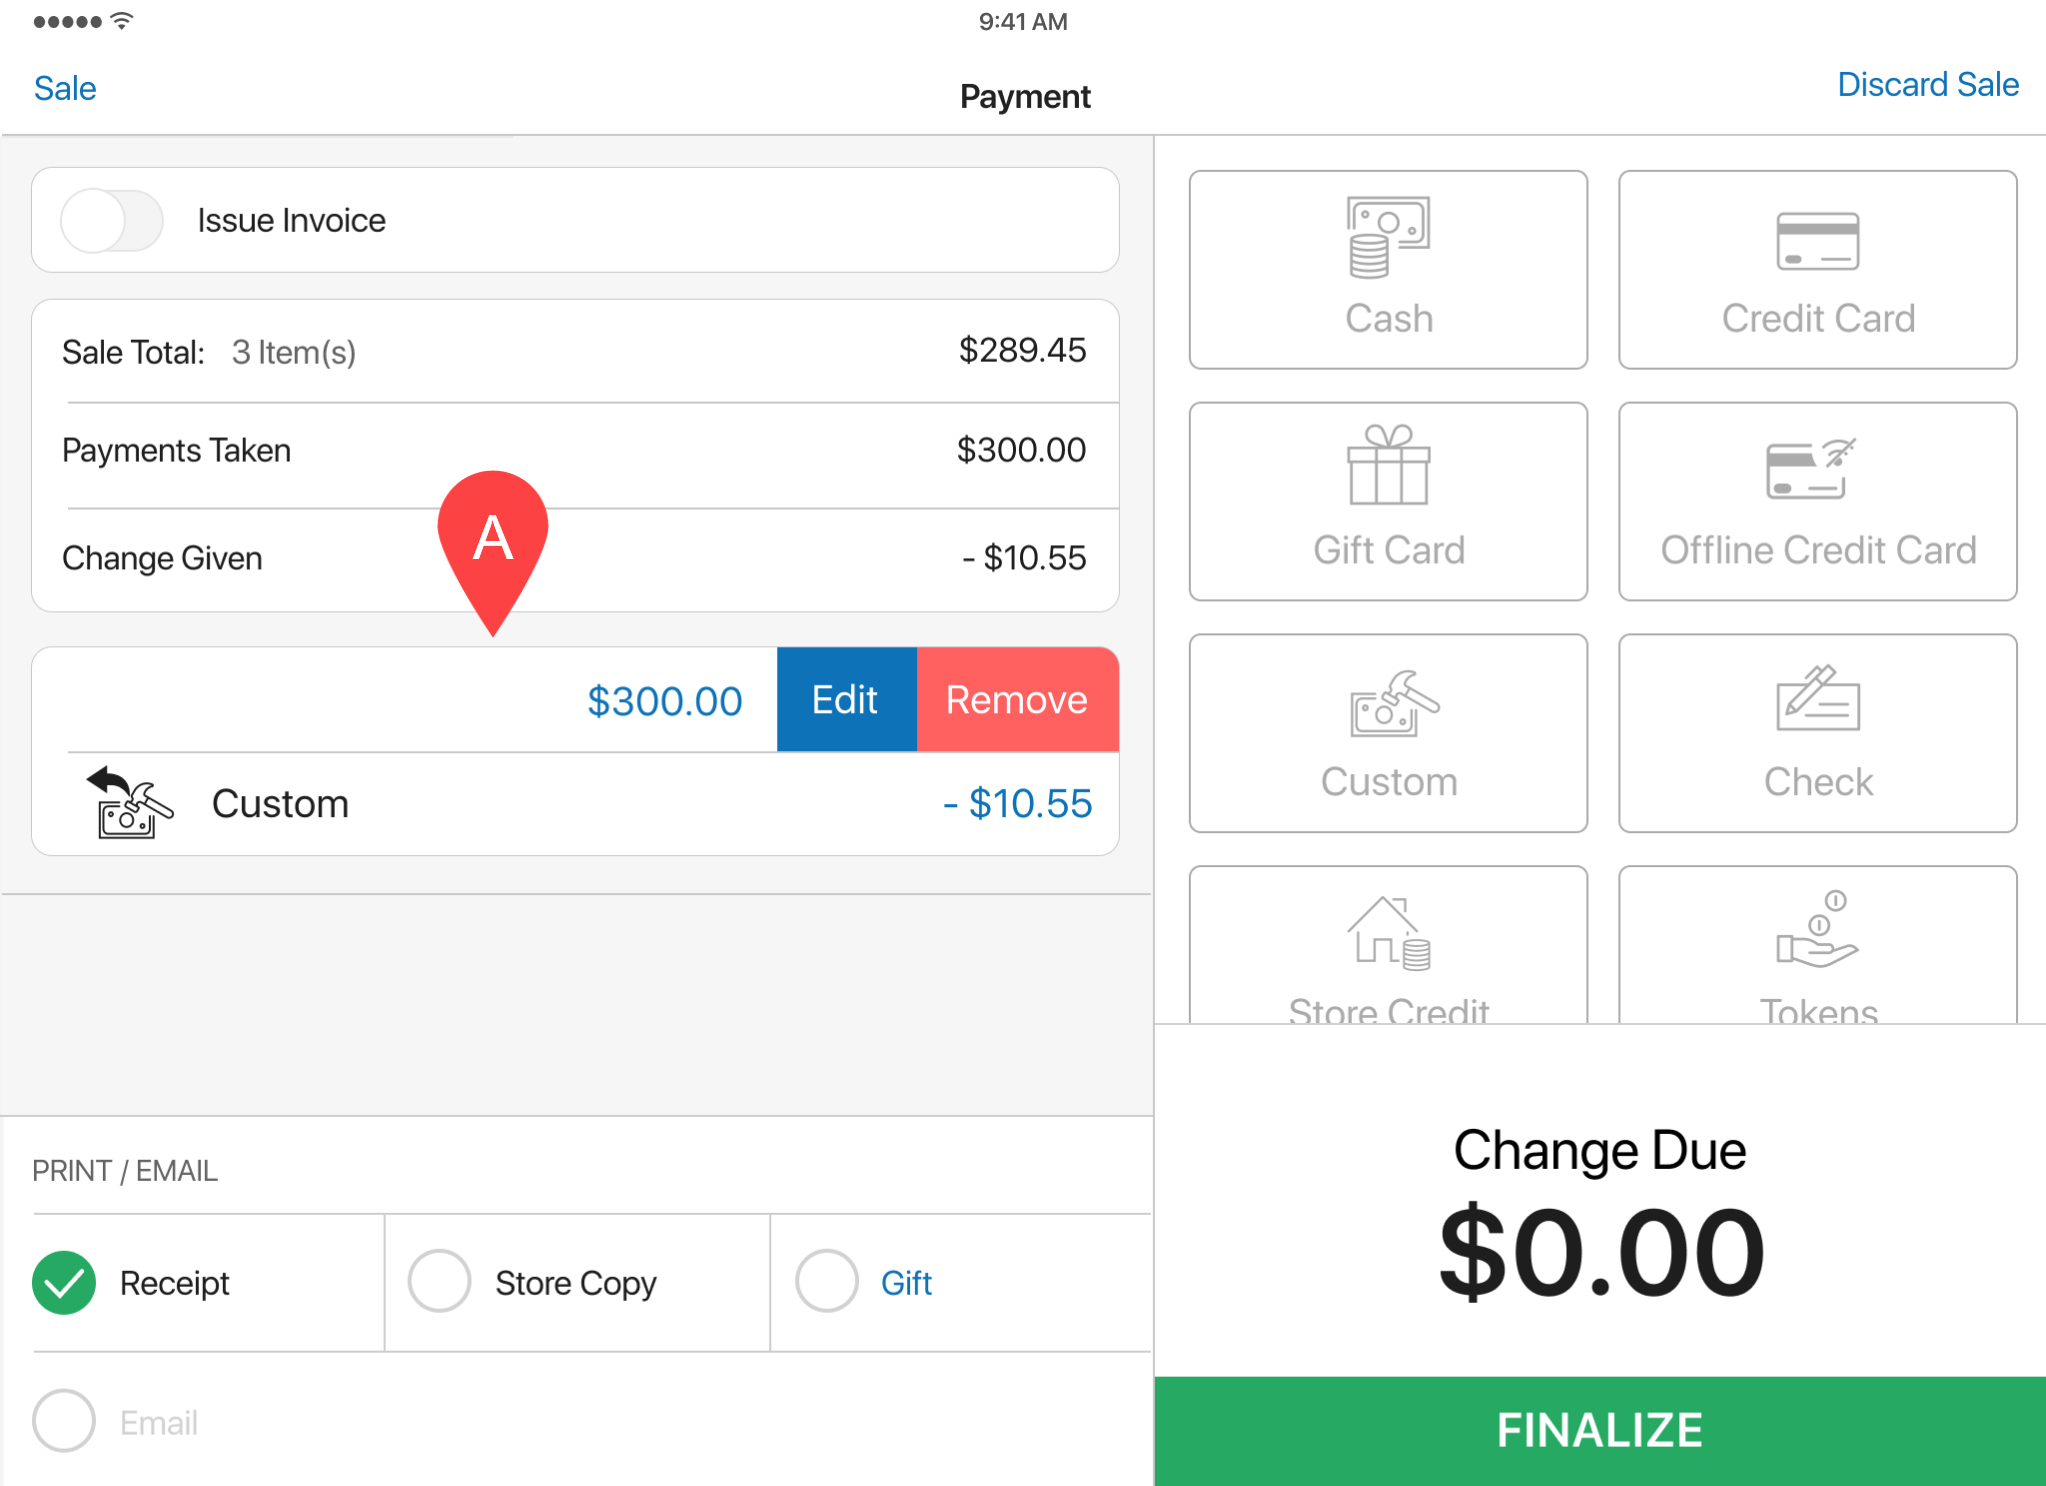
Back in the Payments area, to edit the Custom payment record or remove it from the receipt, swipe left that record and then select the required option (A in the screenshot):
-
Once the required payment amount is accepted, tap Finalize at the bottom-right.
Custom payments in the End of Day area
Under Drawer Memo > End of Day, a new Custom section (A in the screenshot below) now displays under PAYMENTS if any Custom payments were recorded against that Drawer Memo:
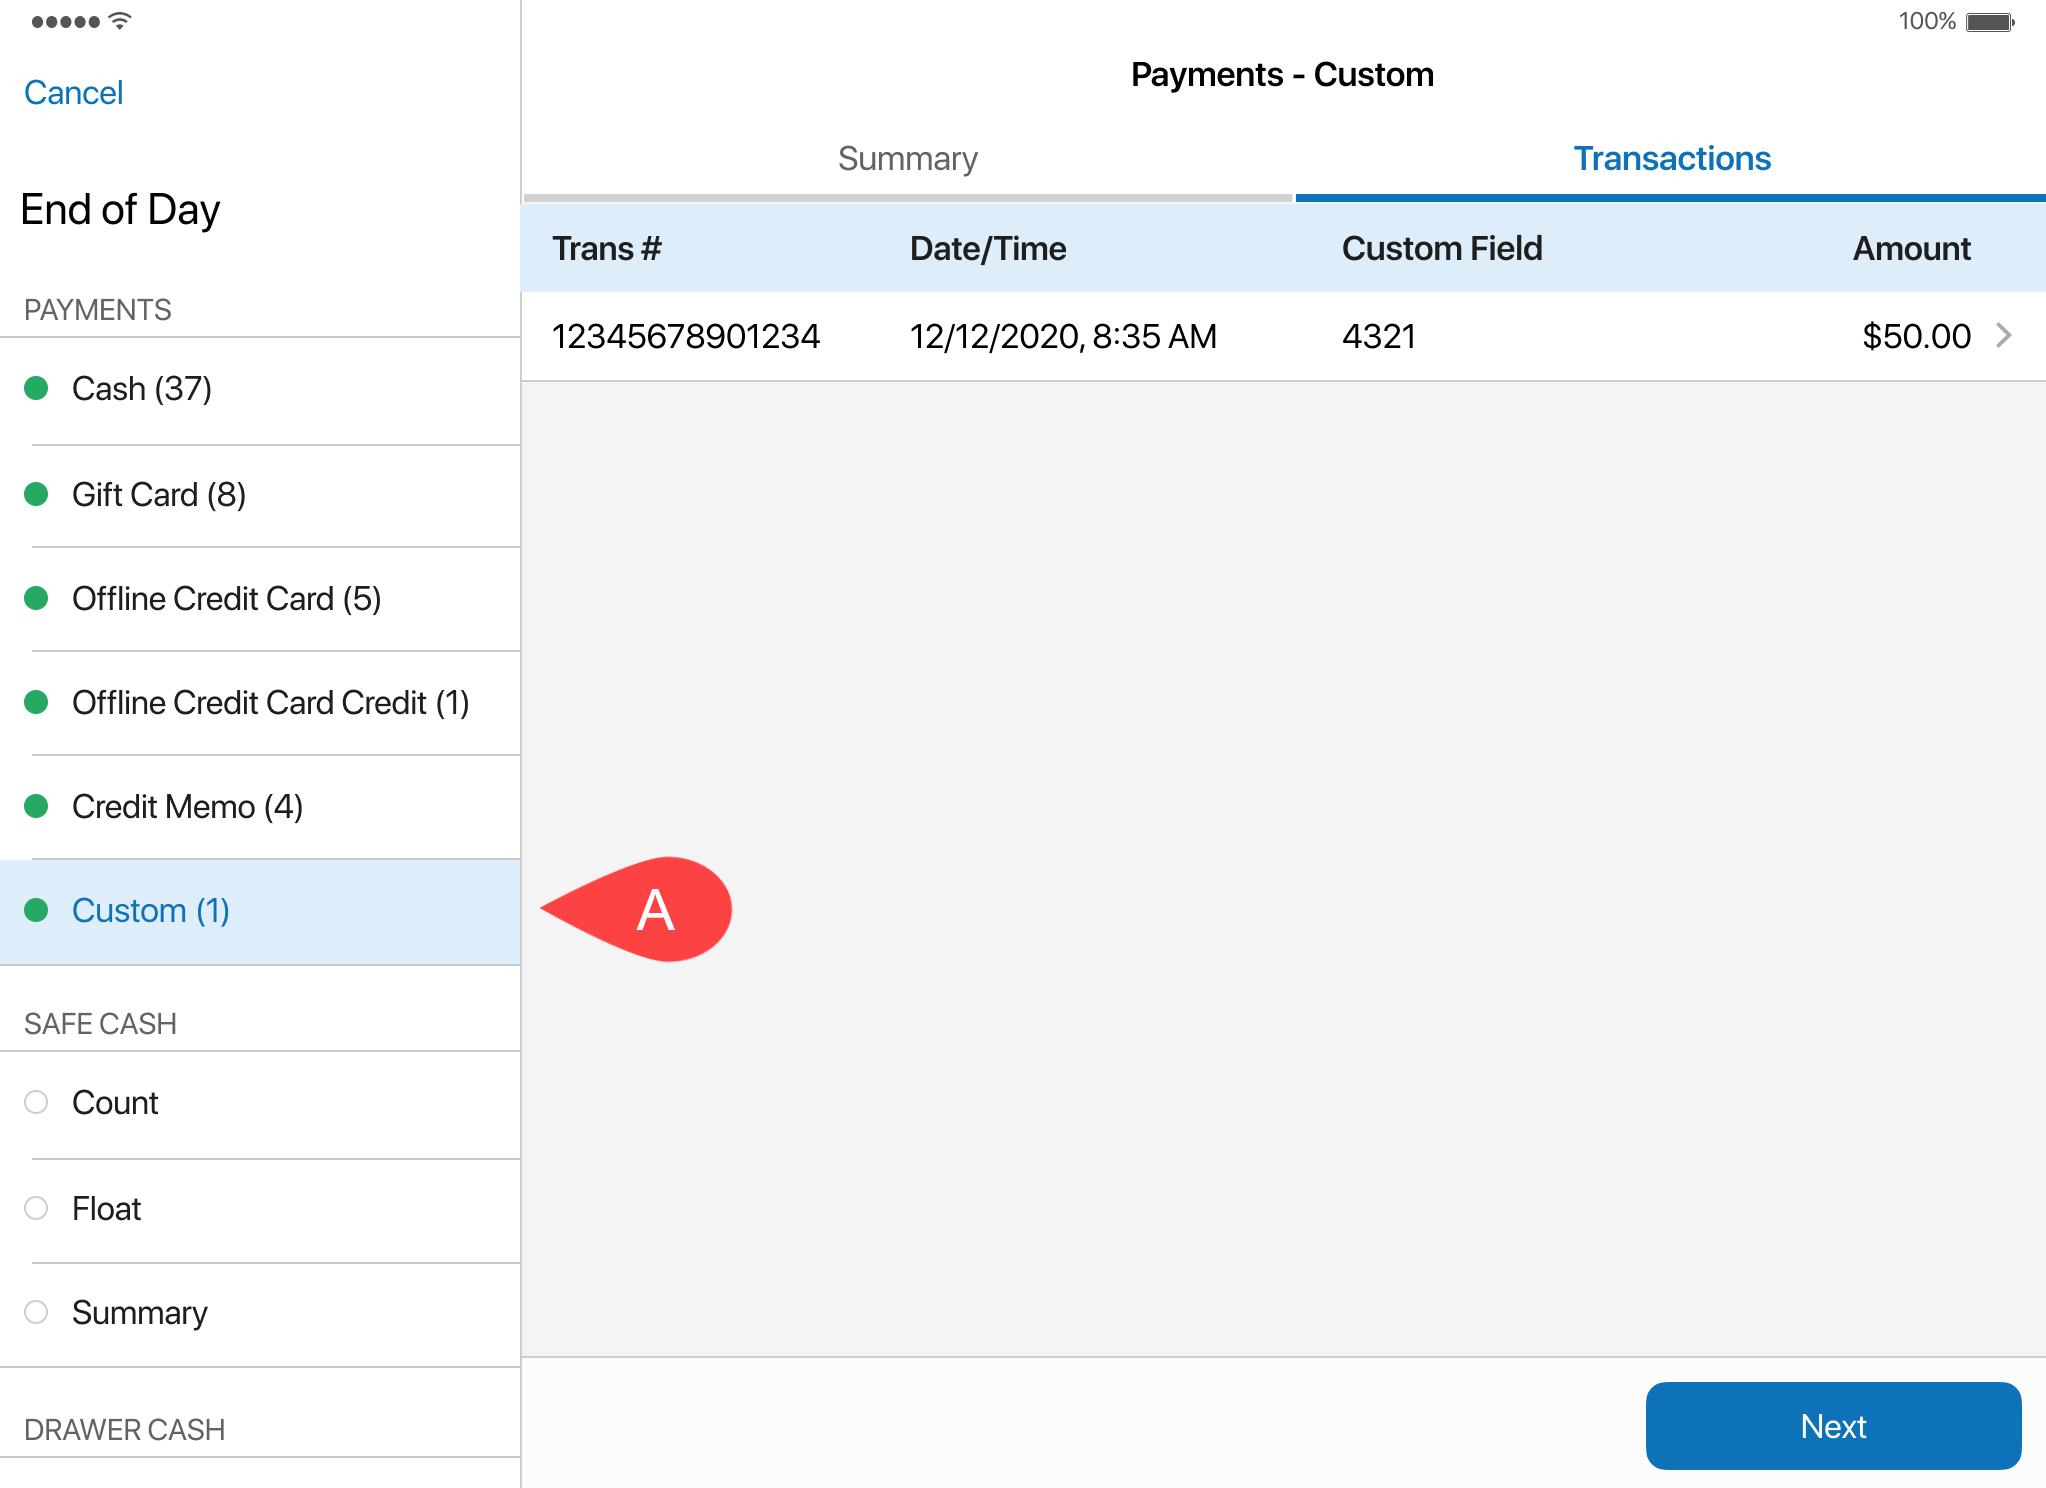
Under Custom, in the Summary tab, it’s possible to see an overview of Custom payments made during the day.
In its turn, the Transactions tab (see the screenshot above) shows the details of each Custom type transaction.
See also
- V6.33 CHQ Release Guide
- Mobile Quick Reference Guides in Teamwork Confluence
Drawer Memo: New SAFE DEPOSITS section in the End of Day area
Build 6.33.154: PRO-4143
Under Drawer Memo > End of Day > Finalize, we’ve added a new SAFE DEPOSITS section. The previously existing DEPOSIT section was removed.
The SAFE DEPOSITS section is only visible if in CHQ under services > device controller > [selected location] > [selected device] > general the safe management checkbox is selected. This checkbox enables safe related fields and actions in the Drawer Memo area of POS Pro.
Purpose
The new SAFE DEPOSITS section shows all the cases recorded against the Drawer Memo where money from the store safe was deposited at the bank, including deposits made during the End of Day process.
Changes in the End of Day area
Under Drawer Memo > End of Day > Finalize, in the SAFE DEPOSITS section, each deposit is shown as a separate row:
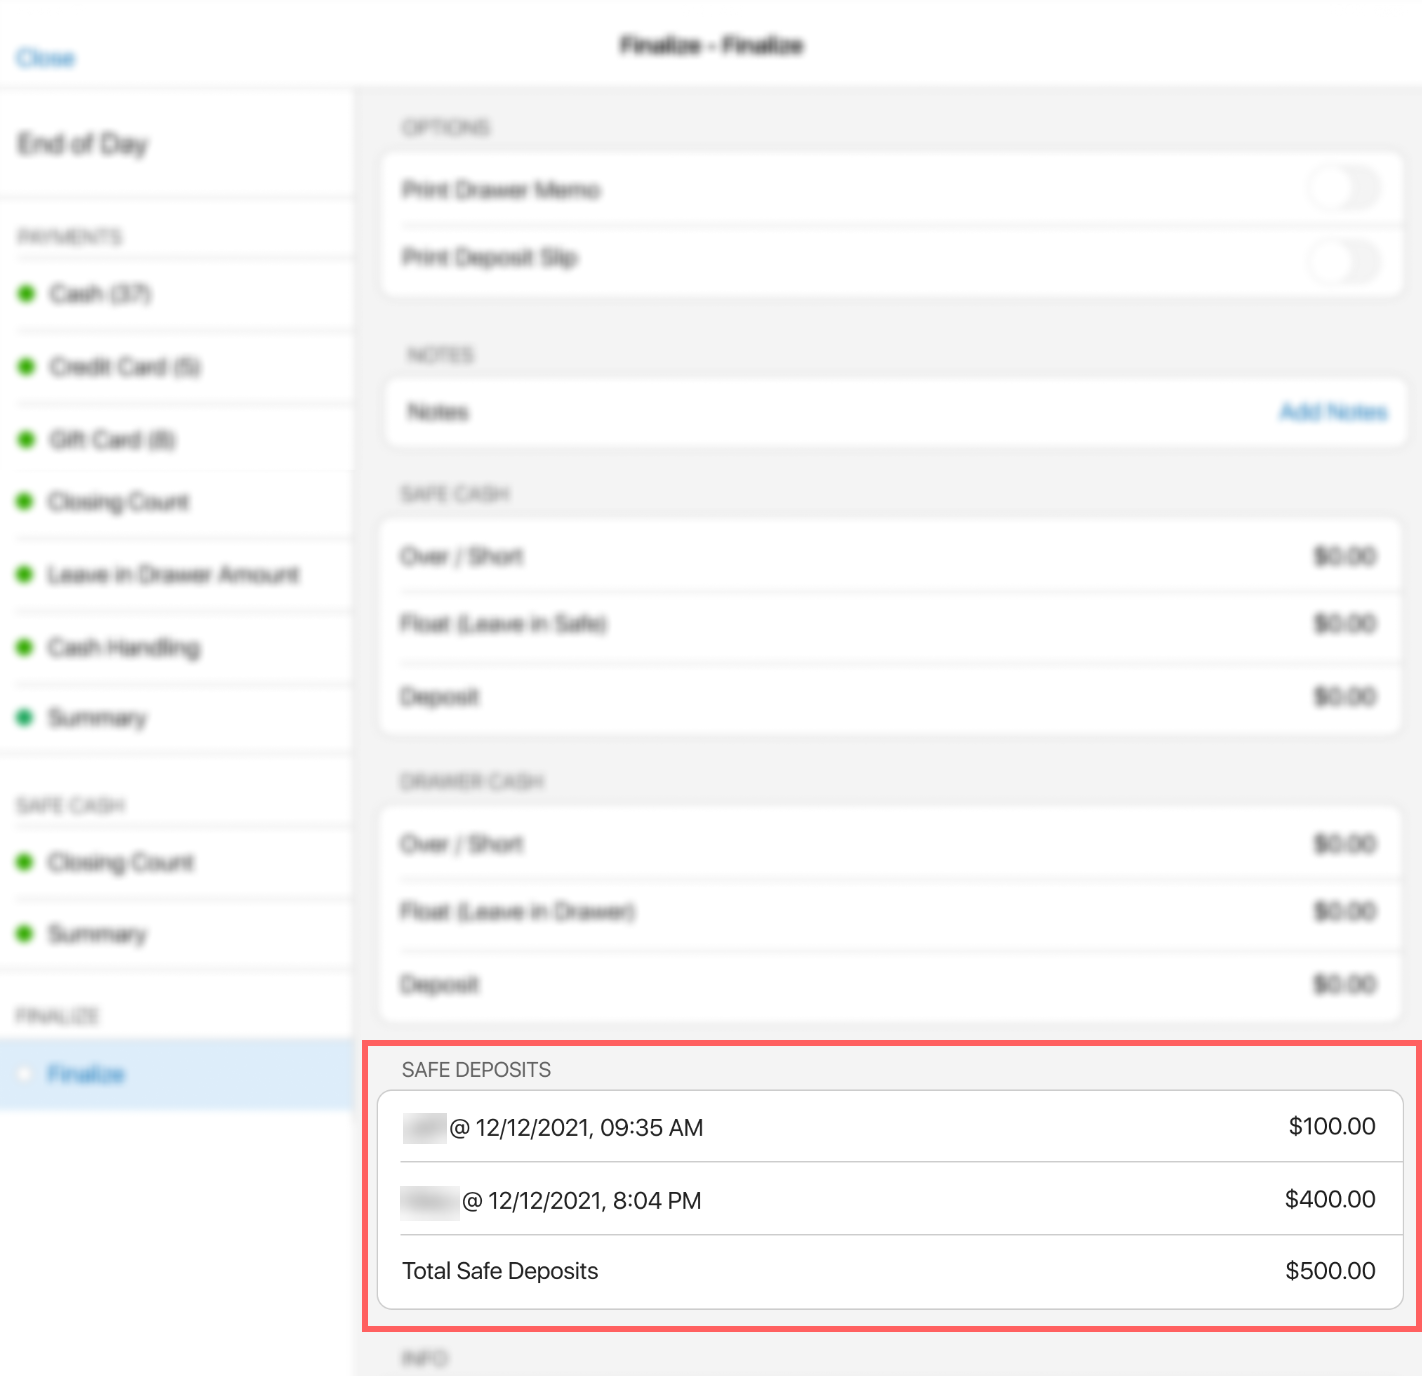 In each row, the following information is available:
- employee who made that deposit
- when the deposit was made
- deposit amount
Additionally, the Total Safe Deposits field at the bottom of the section shows the total of all recorded deposits.
See also
- V6.33 CHQ Release Guide
- Mobile Quick Reference Guides in Teamwork Confluence
Sales Receipt: Updated management of item and receipt discounts
Build 6.33.154: PRO-4176
In Teamwork Commerce Pro, it’s now possible to configure if a particular discount can be combined with other discounts when applied to an item or the whole receipt.
Purpose
This update allows for a more accurate management of discounts within one sale. For example, it’s possible to prohibit applying item discounts along with receipt discounts, or combining a particular type of item discounts with another type of item discounts.
The update also adds the capability to define if an item or receipt discount can be applied more than once.
Configuration in CHQ
In CHQ, existing discounts can be configured under settings > sales > discount reasons > [selected discount] > general by clicking edit in the allow combining discounts with field.
Checks during discount application
In POS Pro, the following checks are now done automatically when the user applies a discount to an item under Sales Receipt > Cart or multiple items under Sales Receipt > Edit Many:
- if the discount can be combined with other discounts on that item
- if the selected discount has been already applied to the item and if it can be applied more than once
- if the discount can be combined with the discounts applied to the whole Sales Receipt
Also, when the user applies a discount to the whole receipt, the following checks are done automatically:
- if the discount can be combined with other discounts on that receipt
- if the selected discount has been already applied to the sale and if it can be applied more than once
- if the discount can be combined with the discounts applied to individual sale items
If the checks are passed, the discount is successfully applied.
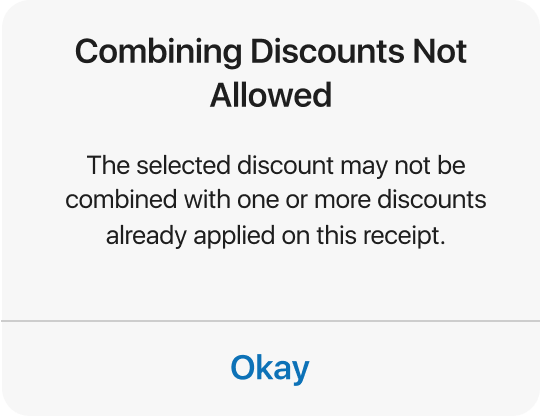
If the discount cannot be applied, the Combining Discounts Not Allowed message appears:
See also
- V6.33 CHQ Release Guide
- Mobile Quick Reference Guides in Teamwork Confluence
Sales Receipt: New Disc Amt / % column
Build 6.33.154: PRO-3963
In POS Pro, a new Disc Amt / % column is now available for displaying under Sales Receipt > Cart (A in the screenshot below):
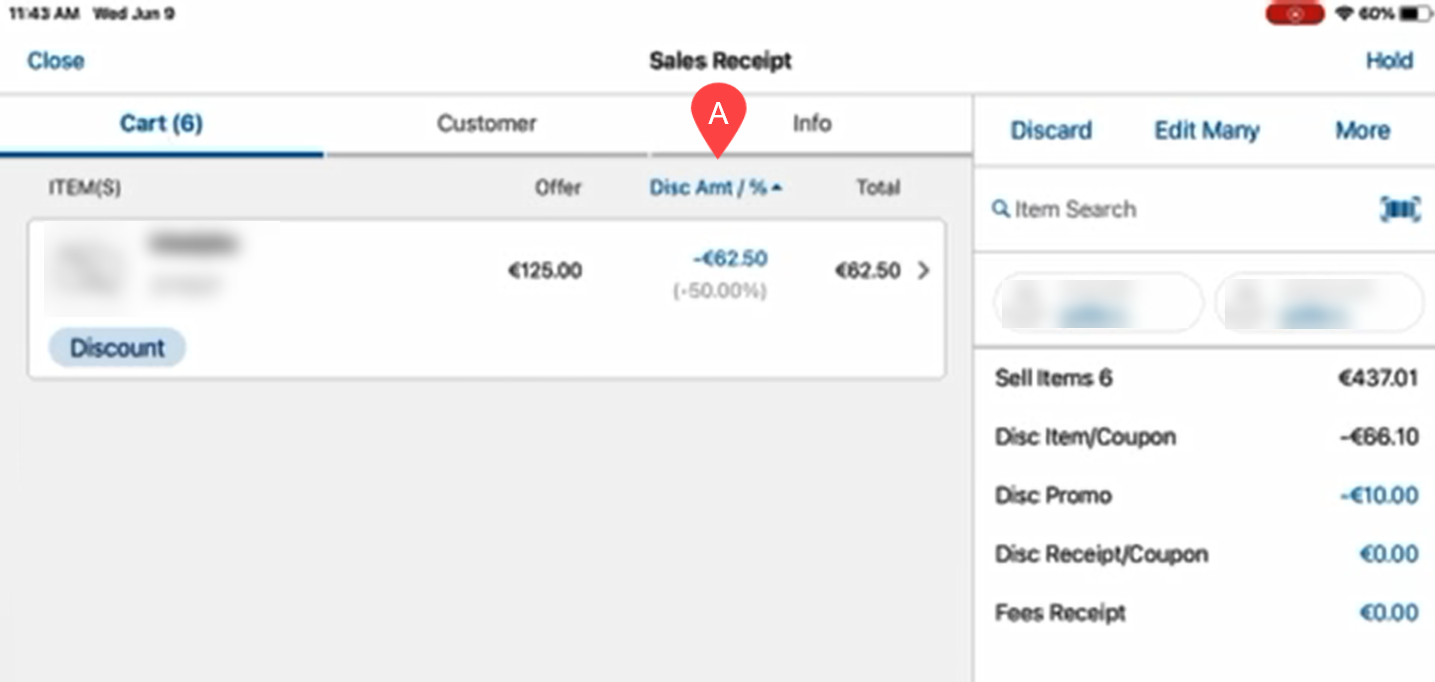 The Disc Amt / % column allows for displaying the following in two rows:
- total discount amount. The value includes all item and receipt discounts as well as promotions applied to that item
- the total discount amount converted to percentage
Tapping the discount amount value opens the [item name] - edit dialog where it’s possible to see the details of the applied discounts.
The Disc Amt / % column does not appear in POS Pro on the initial installation. To make this column visible, in CHQ under settings > company settings > v6 App Designer > Point of Sale v6 > iPad > Sales Receipt > Cart Columns, press and drag the Disc Amt / % label from the available fields to the layout section. For details, see V6.33 CHQ Release Guide.
Customer: Updated Loyalty Program Opt-In field
Build 6.33.154: PRO-4695
We’ve updated the Loyalty Program Opt-In field located under Customer > [existing customer record] and Customer > New Customer (A in the screenshot below):
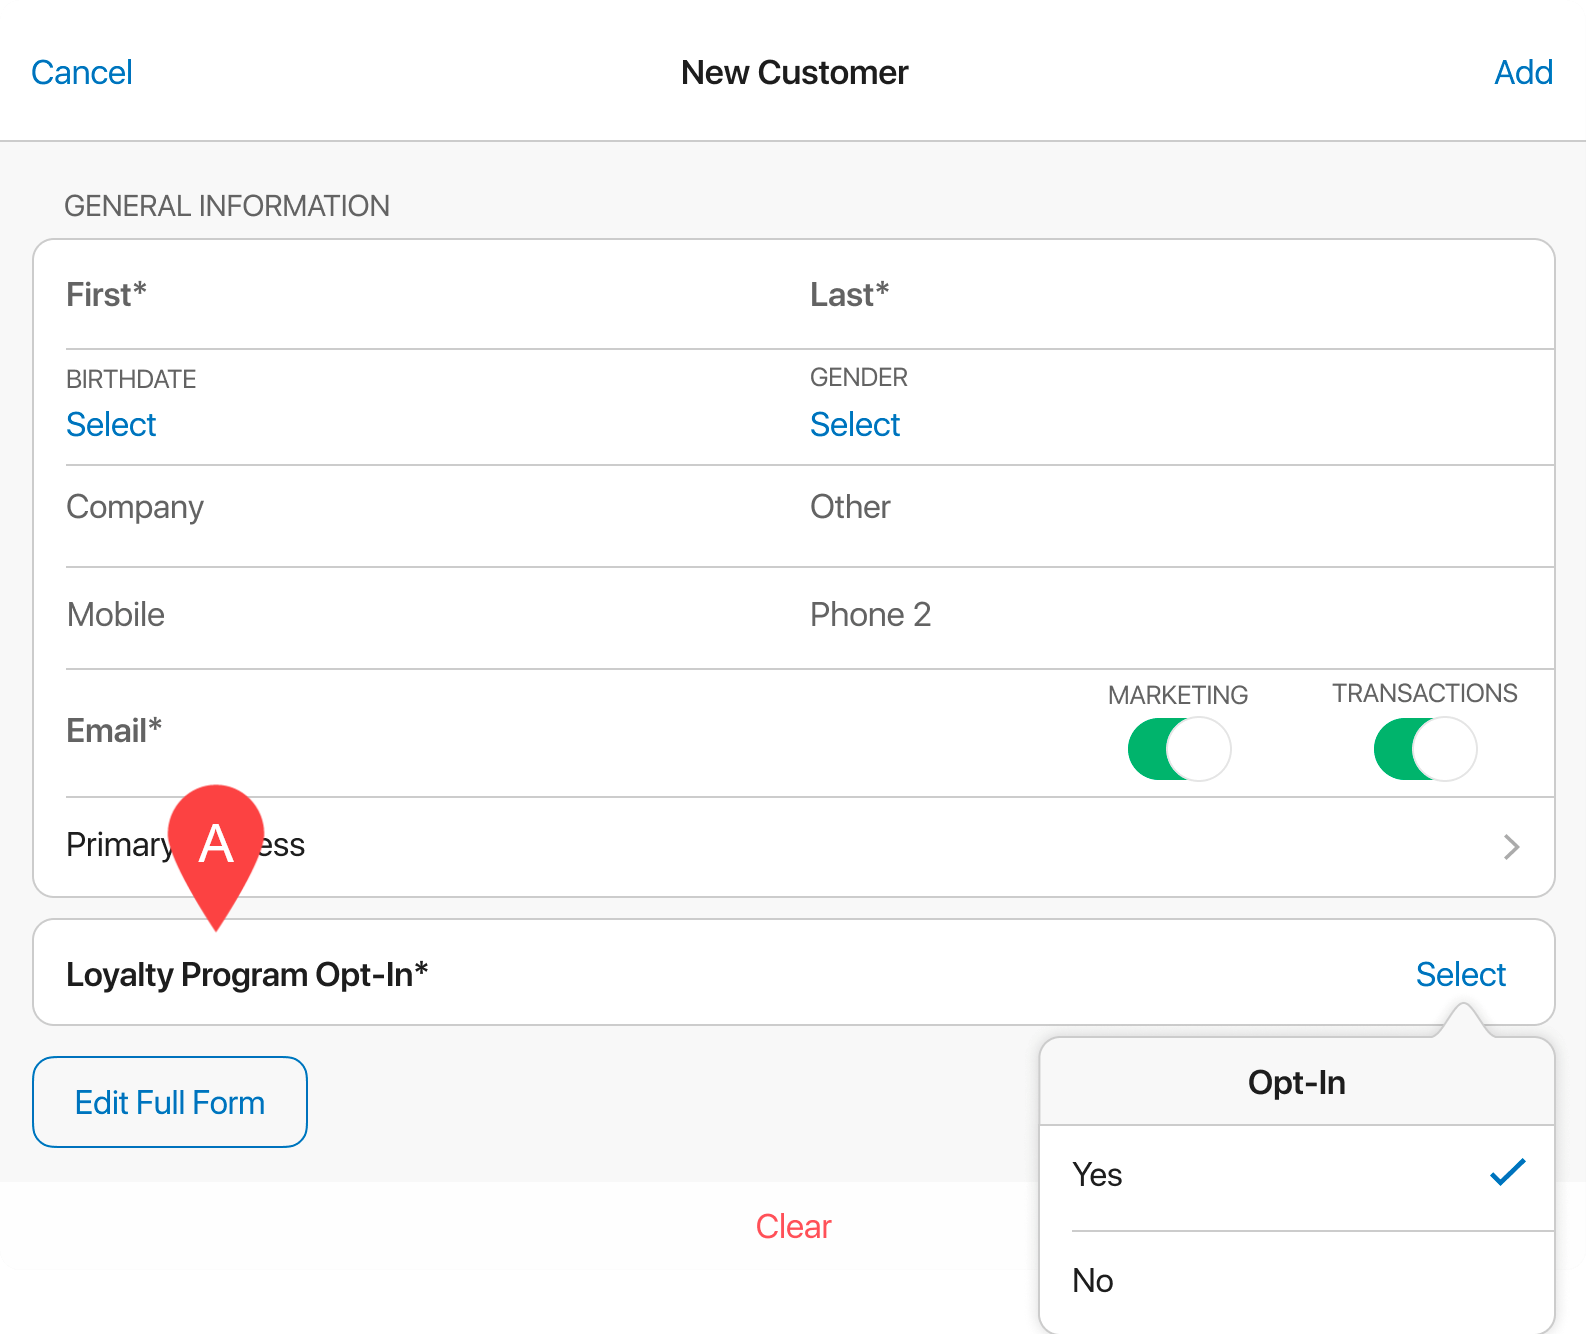
The Loyalty Program Opt-In field allows for indicating if the customer has chosen to participate in the retailer’s loyalty program.
empty(default): the customer has not specified their choice. When the field is empty, the Select option displaysYes: the customer wants to participate in the loyalty programNo: the customer doesn’t want to participate in the loyalty program
Additionally, if in CHQ under settings > location settings > locations / location settings > [selected location] > sales the prompt customer loyalty opt-in if empty checkbox is selected, in POS Pro, the Loyalty Program Opt-In field will be required (shown in bold and with an asterisk *).
If required and the field is empty on saving the customer record, the Loyalty Program Opt-In dialog appears:
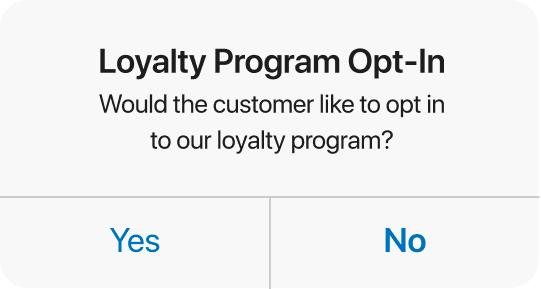 Tap Yes or No to update the Loyalty Program Opt-In field respectively.
See also
- V6.33 CHQ Release Guide
- Mobile Quick Reference Guides in Teamwork Confluence
Updated search functionality
Build 6.33.154: PRO-1001
We’ve made updates to the search workflow in all areas of POS Pro V6 where the search field is available.
Please note that this update is not applicable to the search functionality in the Sales Receipt area.
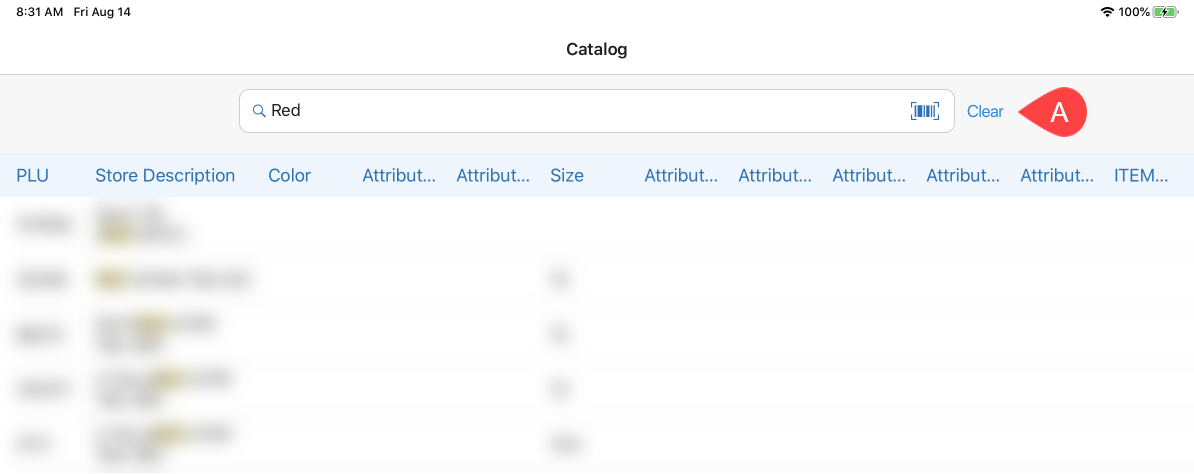 On tapping Clear:
- all the text in the search field is cleared
- the list of search results is cleared
If no search results are shown in an area, the magnifying glass icon now appears with the area-specific text, for example, Search for customers in the Customer area:
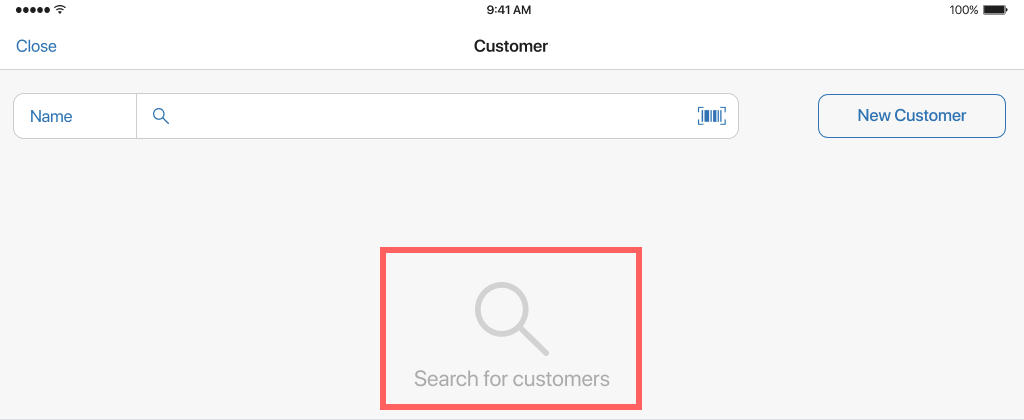
Also, now, if the user starts searching in one area of POS Pro and then switches to another area from the navigation bar at the bottom, any search results will be cleared.
See also
- V6.33 CHQ Release Guide
- Mobile Quick Reference Guides in Teamwork Confluence
Multi-language attribute aliases
Build 6.33.154: PRO-3900
We’ve added the capability to set up multiple translations for item attribute aliases that are available in the following areas of POS Pro:
- Catalog
- Sales Receipt
- Purchase History
- Shipments
- Count Memos
- Adjustments
An alias is the alternative name of an item attribute. For example, if the retailer has configured the Attribute 1 column to show numeric codes of colors in POS Pro, the Attribute 1 Alias column may be configured to show the actual names of colors. That would help store associates to correctly identify colors when working with inventory in POS Pro.
Please be advised that an alias translation must first be set up in CHQ by clicking the globe icon under settings > inventory / catalog > attributes > the attributes section next to the required alias. Once a translation is defined in CHQ, in POS Pro, it’s required to change the user interface language under Settings > Administration for the translation to be visible.
Prevent device locking when POS backup is in progress
Build 6.33.154: PRO-4144
Prior to version 6.33.154, manually started backup procedure in POS Pro could be interrupted when the device went into the sleep mode. Now, the device can no longer enter the sleep mode when the backup procedure is in progress.
The State/Province field clears automatically if Country was changed
Build 6.33.154: PRO-4248
In all areas of POS Pro where it’s possible to fill out the Country and State/Province fields, we’ve updated the State/Province field to clear automatically if the value in the Country field has been changed.
Automatic voiding of detached credit card payments
Build 6.33.154: PRO-5460
As of version 6.33.203, automatic voiding of detached payments has been deferred and is currently unavailable in the POS Pro app.
In version 6.33.154, we’ve re-introduced the automatic voiding of detached credit card payments.
Purpose
A detached payment is a payment that went through on the payment terminal but doesn’t have an associated finalized Sales Receipt in POS Pro.
Detached payments can occur if the connection between POS and the payment terminal was lost. If the connection was lost, the terminal may fail to pass the correct payment status to the POS Pro app (the user cannot see a finalized Sales Receipt for the purchase). This may lead to a situation where the payment for the same purchase is processed twice.
To avoid double-charging the customer, POS Pro now automatically reviews and voids detached credit card payments:
- during the End of Day process, and
- after restarting the POS Pro app
The payment voiding process
POS Pro checks for existing detached payments when:
- in the Drawer Memo area, the user starts the End of Day process and opens the Payments – Credit Card tab
- the app has been restarted. This may be helpful if the app has shut down (crashed) prior to the restart leading to the lost terminal connection
When checking for detached payments, the respective notification appears in POS Pro:
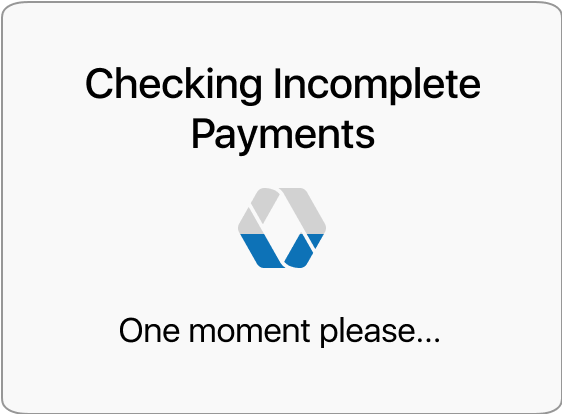 If detached payments are found, POS Pro begins automatic voiding:
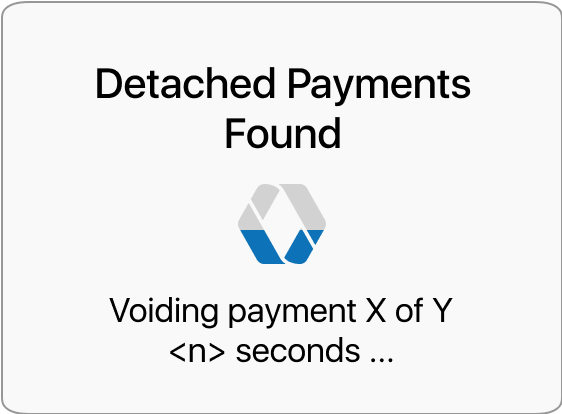 Once voiding is complete, the Incomplete Payments dialog appears where it’s possible to review all processed payments. In the dialog, the following details are available:
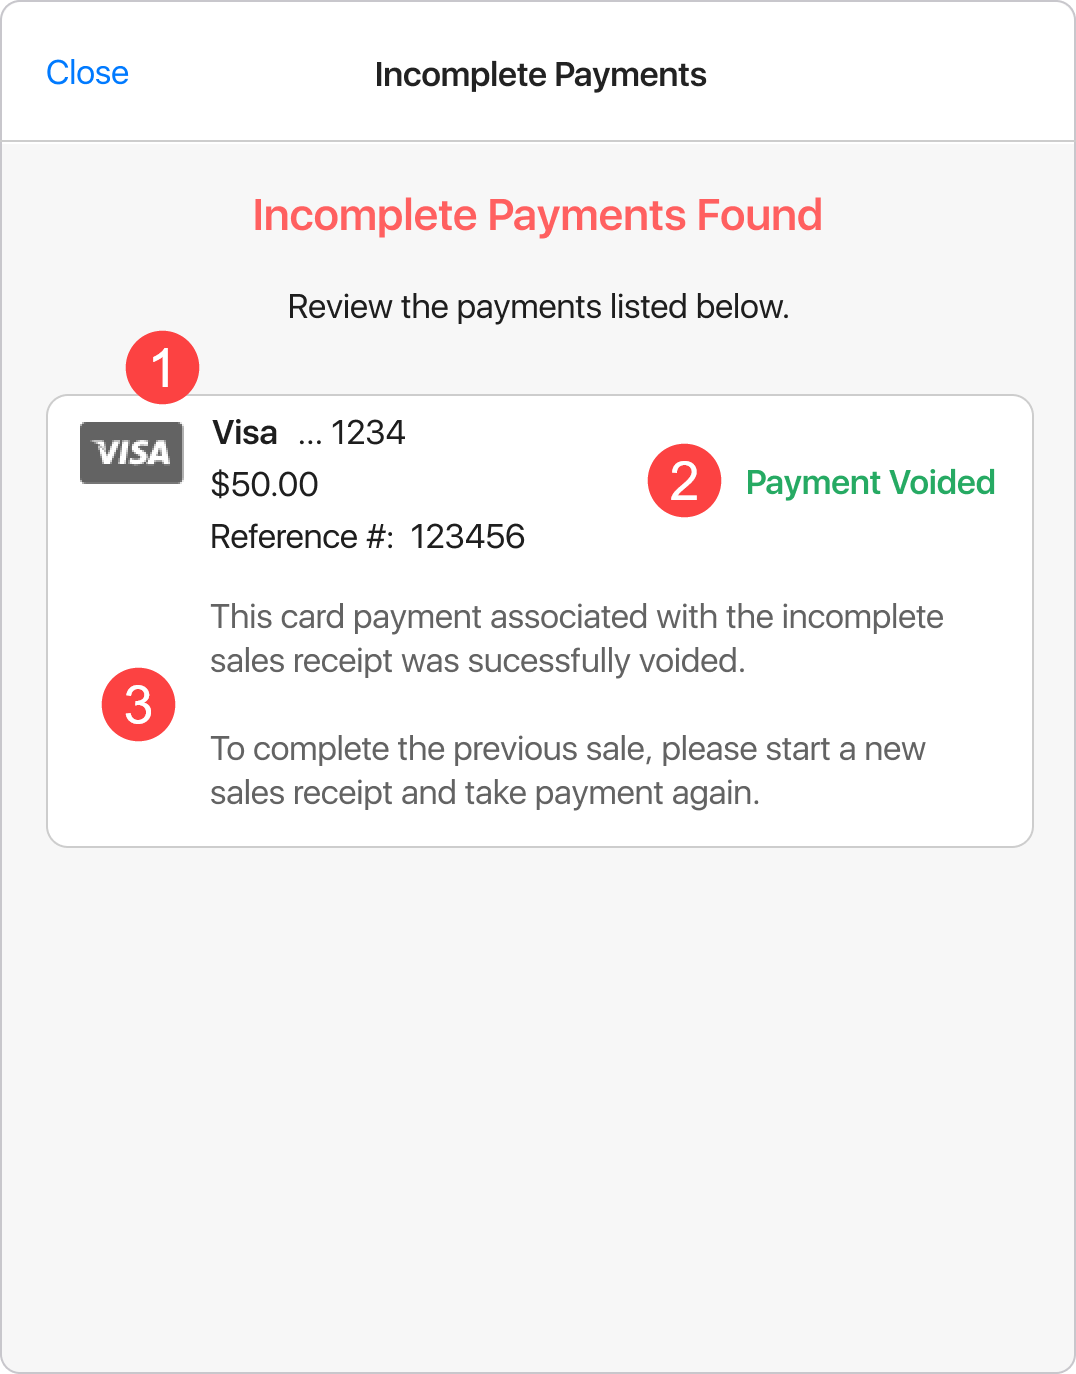
- 1 credit card information
- 2 result of the voiding process
- 3 recommended actions
Additionally, the Detached tab is now available under Drawer Memo > End of Day > Payments – Credit Card:
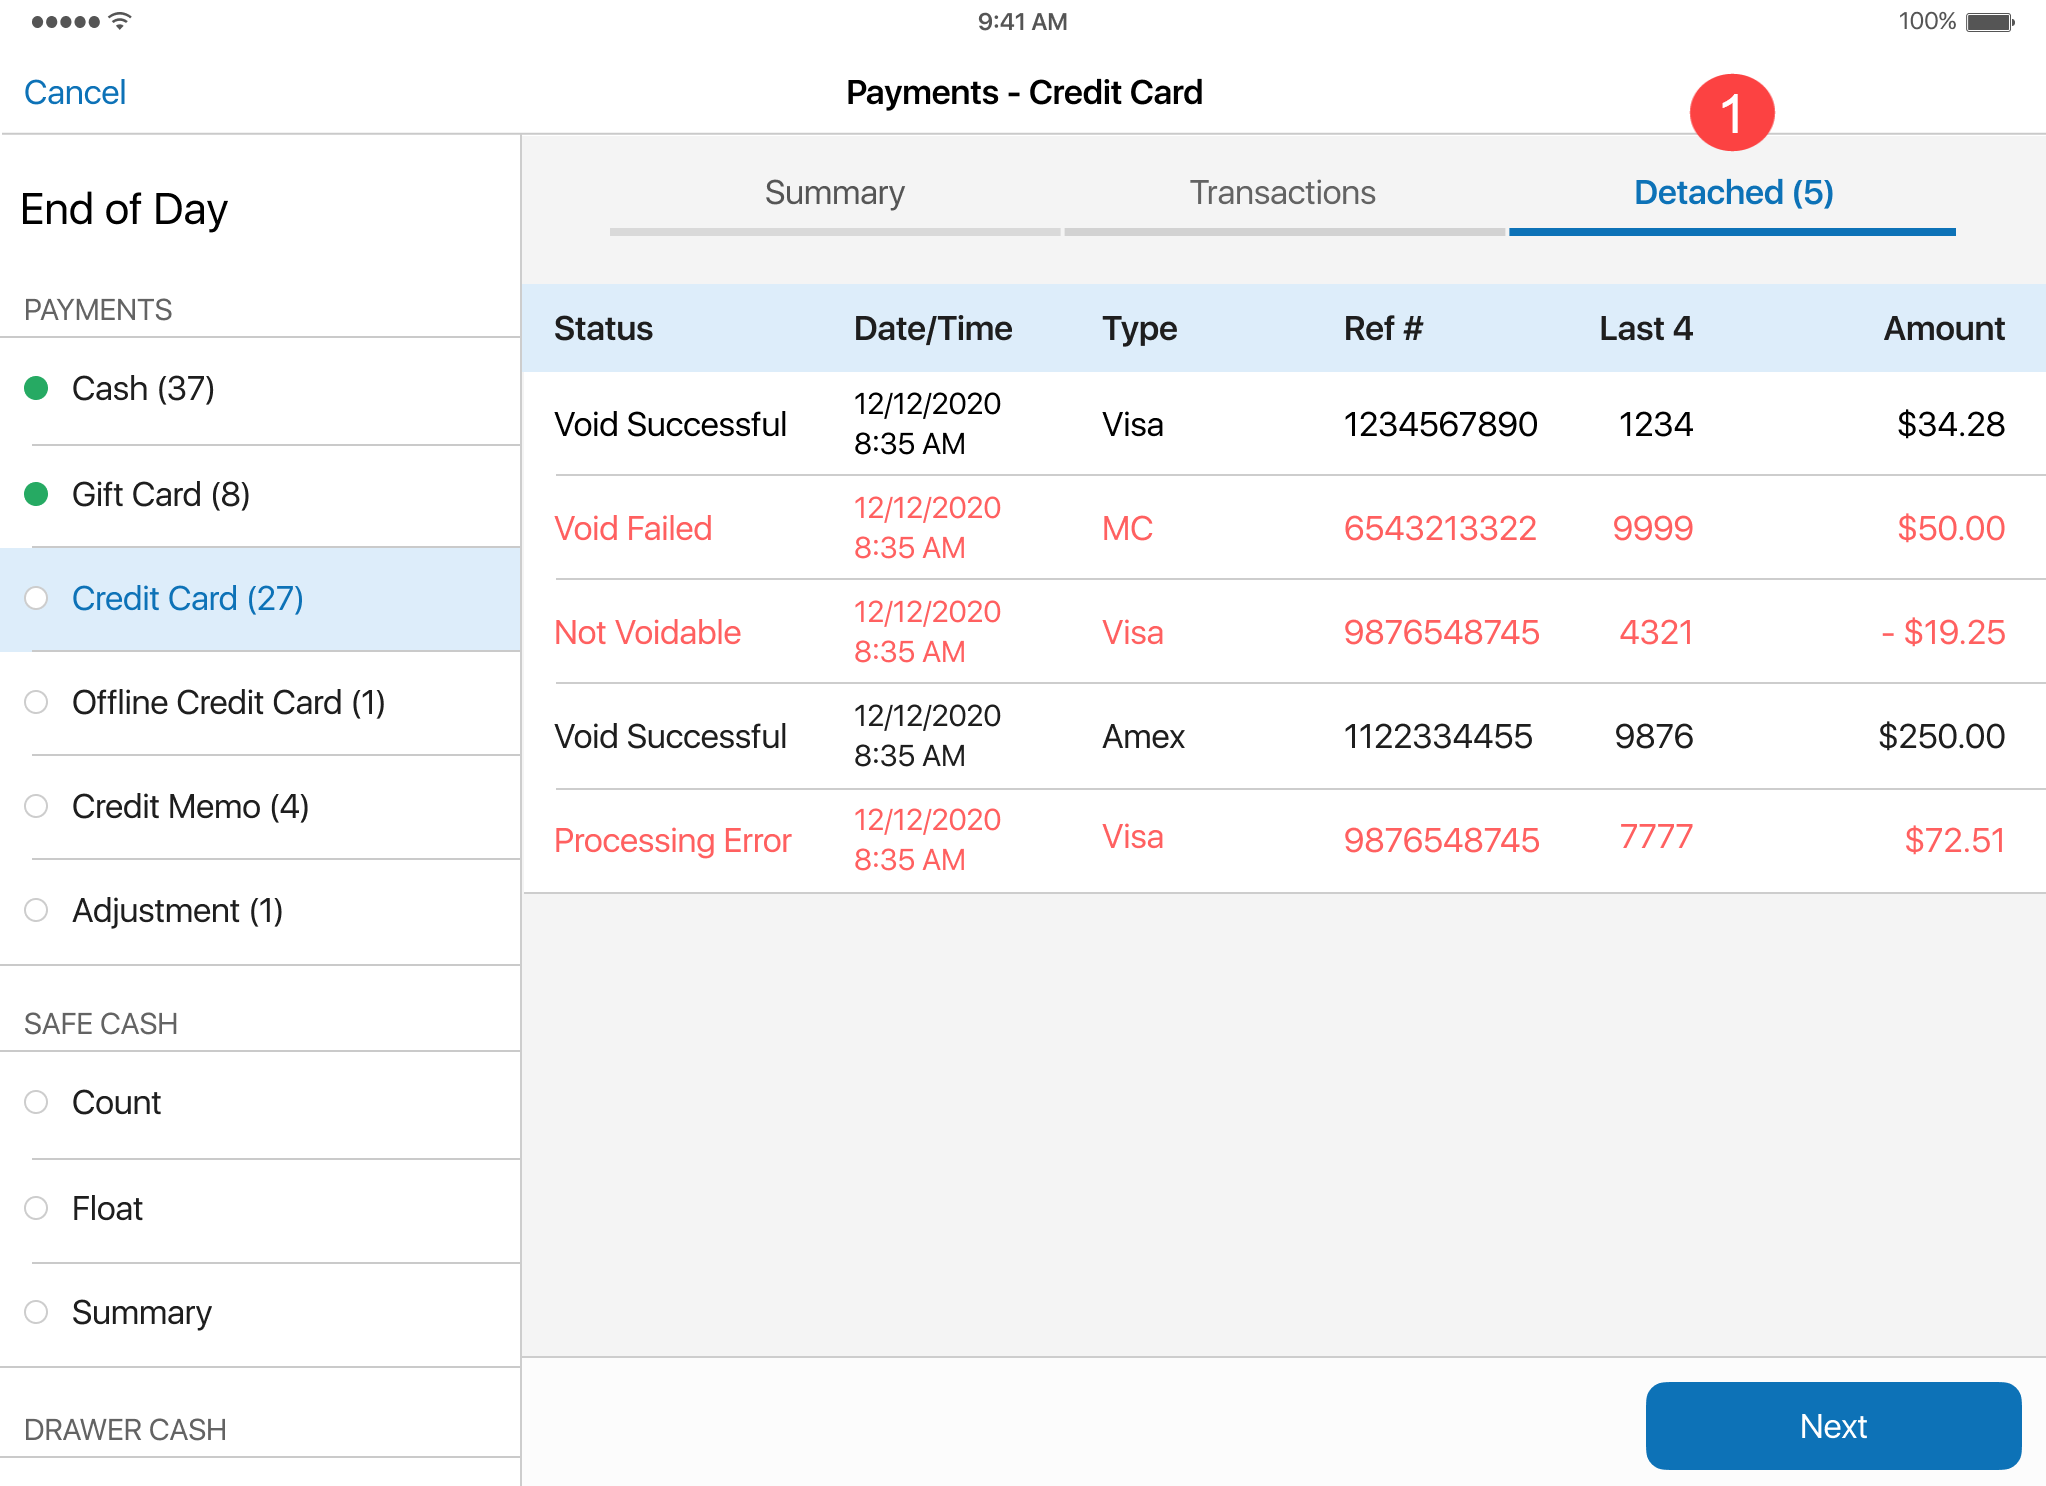 In the tab, it is possible to review details as well as the status of the detached payments. The following statuses are possible:
Void Successfull: the payment has been voidedVoid Failed: the payment wasn’t voided because voiding was rejected by the payment processor or POS lost connection to the terminal. Payments with this status need to be voided manually at the terminal or via your payment processor customer accountNot Voidable: the transaction is a refund or the time limit for voiding is exceeded
See also
- V6.33 CHQ Release Guide
- Mobile Quick Reference Guides in Teamwork Confluence
Disabled automatic voiding of detached payments
Build 6.33.203: PRO-6116, PRO-6144
As of version 6.33.203, POS Pro does not support automatic voiding of detached payments during End of Day and on the app restart.
Optimization of warning messages
Build 6.33.154: PRO-4931
We’ve made maintenance updates at the database level to ensure that warning messages display correctly in the POS Pro app.
Issue Resolutions
Error on trying to discard a held Sales Receipt
Build 6.33.154: DS-1995
We’ve fixed the issue where, under Sales Receipt > On Hold, trying to discard a held Sales Receipt could sometimes lead to the following error: The operation couldn’t be completed.
Customer: Sorting is applied only to the first page of search results
Build 6.33.154: DS-1848
Issue
In the Customer area of POS Pro, sorting by columns would be applied only to the first page of search results.
Resolution
The issue has been fixed. Now, sorting is correctly applied to all pages with search results.
Visual issue in the Sale Complete area
Build 6.33.154: DS-2047
We’ve fixed the visual issue under Sales Receipt > Sale Complete where the gray space at the bottom of the area would sometimes expand when item tag reprogramming was in progress.
DENSO RFID reader disconnects if the device’s screen is locked
Build 6.33.154: DS-2061
Prior to version 6.33.154, DENSO RFID reader could sometimes disconnect when the user opened the Sales Receipt area and then left the device idle with locked screen.
The issue has been fixed. Now, as expected, DENSO RFID reader remains connected even if the device’s screen is locked.
Sales Receipt: The RFID reader icon disappears
Build 6.33.154: DS-2075
We’ve fixed the visual issue where, in the Sales Receipt area, the RFID reader icon would disappear after an item was added to the Cart via RFID scanning.
Count Memo: Missing EPC records in the Scans tab
Build 6.33.154: DS-2109
Prior to version 6.33.154, under Count Memos > [selected Count Memo] > Items > [item name - edit dialog] > Scans, only one EPC record could display even if the item was scanned multiple times.
Electronic Product Code (EPC) is a unique product identifier that can store specific product information, such as manufacture date, origin, destination, and so on.
The issue has been fixed. Now, the number of EPC records in the Scans tab matches the number of times the item was scanned.
Error on starting a verified return from a customer’s purchase history
Build 6.33.198: DS-2148
Issue
Occasionally, starting a verified return from a customer’s purchase history could lead to the following error: Return of receipt items sold to different customers isn't supported. That happened even when the user was viewing the purchase history of the same customer.
Resolution
The issue has been fixed. Now, the user can start a verified return by selecting a transaction from the customer’s history as expected.
Payments sent twice to Adyen
Build 6.33.198: DS-2094
Prior to version 6.33.198, POS Pro could send the same payment processing request twice to the Adyen terminal. That happened because Adyen’s response after the first attempt wasn’t correctly recorded at the database level.
The issue has been fixed. Now, if the first payment request is successfully passed to Adyen, no additional requests are made.
Sales Receipt: The search button doesn’t work in the Find Receipt area
Build 6.33.198: DS-2153
Issue
Under Sales Receipts > Sales History > Find Receipt, after the user scanned a receipt and then tapped search on the virtual keyboard, the search wasn’t started.
Resolution
Now, as expected, the search begins once the user taps search.
Customer: The date range filter issue in Purchase History
Build 6.33.198: DS-2157
We’ve fixed the issue where the date range filter wasn’t working properly under Customer > [selected customer] > Purchase History.
Sales Receipt: Promotion discounts aren’t included in the Total value in the Edit Many area
Build 6.33.198: DS-2155
Issue
Under Sales Receipt > Edit Many, promotion discounts weren’t included in the calculation of the Total value for each item.
Resolution
The issue has been fixed. Now, the Total value in the Edit Many area is calculated with regard to applied item promotions.
Sales Receipt: Search doesn’t start automatically in Find Receipt
Build 6.33.198: DS-2160
Prior to version 6.33.198, after scanning a receipt under Sales Receipts > Sales History > Find Receipt, the search for the respective receipt wasn’t started automatically.
Now, once a valid receipt is scanned, the search begins automatically.
Printing prices modified by price levels on item tags
Build 6.33.198: PRO-5570
We’ve now allowed for printing prices with applied price levels on item tags. This update relates to the tags printed under Catalog > Print Tags in POS Pro.
To accommodate this update, changes were made at the database level. In particular, when the Print Tags functionality is used in POS Pro, information on each price modified by a price level is now saved to the PrintingPrice table as follows:
- PriceType:
1, which indicates a price modified by the price level settings - PriceLevelId: the ID of the price level from the PriceLevel table
- Price: the price calculated with regard to the applied price level
Shipments: Error when trying to receive a Transfer In
Build 6.33.207: DS-2286
Prior to version 6.33.207, when opening the Items tab of a Transfer In under Shipments > Incoming, the Internal Server Error message could come up.
The issue has been fixed. Now, users can open the Items tab and define received item quantities without any issues.
NF525: Reprinted Sales Receipts missing fiscalization data
Build 6.33.207: DS-2271
Issue
NF525 fiscalization related data could be missing on a reprinted Sales Receipt (SR) when:
- the fiscal SR was finalized on device A that was initialized at a location with country =
Franceand marked as fiscal, and - the same SR was reprinted on device B initialized at the same or another location with country =
Franceand marked as fiscal
Resolution
Now, fiscalization data appears on a reprinted SR when:
- the POS device that reprints the SR is initialized at a location with country =
France, and - that location is marked as fiscal in CHQ under
settings > location settings > locations / location settings > [selected location] > details
RFID readers: Ignoring EPCs without company-specific prefixes
Build 6.33.209: DS-2271
Prior to version 6.33, users could see the Item Failed To Scan error message in POS Pro when the RFID reader scanned a tag with an unrecorded in Teamwork type of Electronic Product Code (EPC), for example, a security tag.
Now, the Item Failed To Scan error message displays only for tags that are within the product catalogue but cannot be identified. At the same time, EPCs that do not start with the company-specific prefix and thus do not belong to the company’s product catalogue are ignored by POS Pro.
