Version 6.33
Sales
Updated loyalty program opt-in
Build 6.33.95.0: PRO-4693
Starting from version 6.33.95.0, the loyalty program opt-in setting located under settings > customer > preset customer options > [your customer preset option] and sales > customer > [your customer record] > membership can have the following values:
The loyalty program opt-in checkbox indicates if the customer wants to participate in the retailer’s loyalty program.
not selected: the customer has not specified their choiceYes: the customer wants to participate in the loyalty programNo: the customer doesn’t want to participate in the loyalty program
Also, we’ve added the capability to configure if the user in POS Pro should be prompted to define the loyalty program opt-in field if the latter is empty on saving the customer record.
Configuring the loyalty program opt-in at the location level
To configure if the user should be prompted to define the loyalty program opt-in field on saving the customer’s record in POS Pro, in CHQ:
- Go to
settings > location settings > locations / location settings. - Click to select your location record and then click edit.
- In the dialog that opens, go to the sales tab.
- Select the prompt customer loyalty opt-in if empty checkbox (selected by default):

- Click save.

See also
Updated calculation of loyalty membership levels
Build 6.33.114.0: PRO-6350
As of version 6.33.114.0, we’ve updated how the customer membership level is calculated.
If the loyalty program opt-in setting is set to yes under chq > sales > customers > [selected customer] > membership, the customer’s past sales from the last fiscal year are included in membership level calculations.
If the loyalty program opt-in setting is set to no, the customer membership level is downgraded.
Settings
Updated management of discounts
Build 6.33.95.0: PRO-4177
In CHQ, it’s now possible to define if discounts can be combined when applied to an item or the whole receipt in POS PRO V6.
Purpose
This update allows for a more accurate management of discounts within one sale. For example, it’s possible to prohibit applying item level discounts along with receipt level discounts, or combining a particular type of item discounts with another type of item discounts.
The update also adds the capability to define if an item or receipt discount can be applied more than once.
Configuring discount combination
To configure how a discount should be combined with other discounts, in CHQ:
- Go to
settings > sales > discount reasons. - Сlick to select your discount reason record and then click edit.
- In the general tab, click edit next to the allow combining discounts with field:

- In the select dialog that opens, use the search field at the top or the pagination controls at the bottom to find the required discounts. Then, click the selected checkbox next to those discount codes which can be combined with the selected discount (A in the screenshot below):

To allow applying a discount more than once in POS Pro, in the select discount dialog, click the selected checkbox next to that discount. For example, if you’re editing
Discount A, find and click the selected checkbox next toDiscount A. - Once finished, click select at the bottom to close the dialog.
- Back in the [selected discount reason] dialog, click save for the changes to take place.

See also
Linking a customer’s temporary account to the registered account
Build 6.33.95.0: PRO-4604
We’ve introduced the capability to automatically link temporary customer records to registered customer records.
Purpose
In Teamwork Commerce Pro, a temporary customer account is created in the following cases:
- the customer’s transaction was performed offline
- the customer placed a web order while not logged in
If the customer has a registered account, the temporary account can now be automatically linked to the latter. This allows for transferring and saving the customer’s purchase history as well as updating their loyaly points.
Configuring how customer accounts should be linked
To configure the new settings, the user must have the Add/Edit Customer Settings CHQ security right. For information on how to assign security rights to users, see the Roles section of the Cloud HQ User Manual: Settings.
In CHQ, it’s possible to configure how a temporary record should be linked to the registered account. To do so:
-
Go to
settings > customer > customer settings. -
To configure this setting for accounts resulting from offline transactions, in the offline transactions - link to registered customer section, select the required checkbox(es) among the following:
- auto link if member code matches
- auto link if primary email matches
- auto link if mobile phone matches
-
To configure the setting for accounts created after placing a web order, in the web order guest checkout - link to registered customer section, select the required checkbox(es) among the following:
- auto link if member code matches
- auto link if primary email matches
- auto link if mobile phone matches
It’s possible to have all three checkboxes selected in both offline transactions - link to registered customer and web order guest checkout - link to registered customer sections. If, for example, the member code is missing on the temporary account, the records can be linked by primary email or mobile phone.
- Click save.
See also
Cloud HQ User Manual: Settings
Defining the start of the week for analytics
Build 6.33.95.0: PRO-4749
It’s now possible to choose a day that should be considered the start of the week for analytics purposes in CHQ.
The specified start of the week value will then be used when applying the date range filter under chq > analytics > reports and chq > analytics > data mines:

To define the new start of the week field, the user must have the Add/Edit Reports Settings CHQ security right. For information on how to assign security rights to users, see the Roles section of the Cloud HQ User Manual: Settings.
How to define the start of the week
In CHQ, to select the day as the start of the week:
- Go to
settings > reports > report settings. - Under general settings, click the start of week field to select the day you need.
Sundayis set by default.

- Click save in the bottom right corner.

See also
Cloud HQ User Manual: Settings
Restricting the arrival day auto-calculating in Purchase Orders
Build 6.33.95.0: PRO-5130
We’ve added the capability to restrict the automatic calculation of the arrival date field value in CHQ under purchasing > purchase orders > new.
To do so, in CHQ:
- Go to
settings > purchasing > purchase documents. - In the purchase orders section, select the PO dialog - do not auto calculate arrival date checkbox. By default, the checkbox is clear.

- Click save.
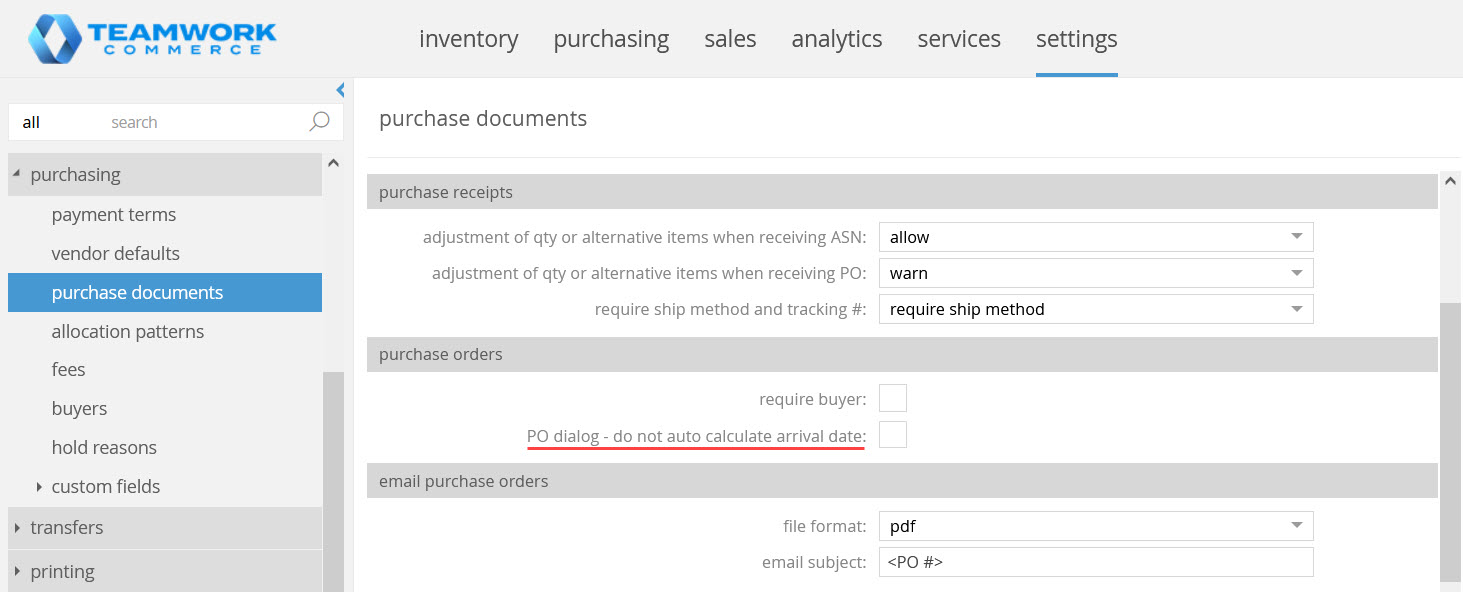
If the PO dialog - do not auto calculate arrival date checkbox is selected, when creating a new Purchase Order under chq > purchasing > purchase orders > new, arrival date is not automatically populated. Also, arrival date is not recalculated if the following fields of the purchase order dialog are populated or updated:
- ship date
- lead time days
- order date
- shipping method
- vendor
See also
Cloud HQ User Manual: Settings
New attribute alias fields
Build 6.33.95.0: PRO-3899, PRO-3997
We’ve added the capability to define aliases for inventory attributes in CHQ.
An alias is the alternative name of an item attribute. For example, if the retailer has configured the Attribute 1 column to show numeric codes of colors, the Attribute 1 Alias column may be configured to show the actual names of colors. That would help users to correctly identify colors when working with inventory.
User-defined aliases display in all inventory related CHQ areas where item attributes appear.
Defining aliases for inventory attributes
To set up aliases for inventory attributes in CHQ:
-
Go to
chq > settings > inventory / catalog > inventory labels. -
Scroll down to the attributes section.
-
Populate the following fields:

It’s possible to set up translations for the attribute aliases. Translations display in the POS Pro app if the respective language is selected as the language of the app’s user interface.
To set up a translation for an alias:- Click the globe icon next to the required field.
- On tapping the icon, the description: [default field name] dialog opens.
- Enter the required translation.
- Click save.
-
Click save for the changes to take place.

Configuring the display of attribute aliases in POS Pro via V6 App Designer
It is now possible to configure if attribute aliases display in the POS Pro app under settings > company settings > V6 App Designer. You can add attribute aliases to the following POS areas:
- Search Results under
Point of Sale v6 > iPad > Catalog - Cart Descriptions under
Point of Sale v6 > iPad > Sales Receipt - Item Details Panel under
Point of Sale v6 > iPad > Sales Receipt - Purchasing Cart Descriptions under
Point of Sale v6 > iPad > Shipments - Transfer Cart Descriptions under
Point of Sale v6 > iPad > Shipments - Ship Memo Cart Descriptions under
Point of Sale v6 > iPad > Shipments - Cart Descriptions under
Point of Sale v6 > iPad > Adjustments - Cart Descriptions under
Point of Sale v6 > iPad > Count Memos
See also
V6 App Designer: A new Discount Amount / % column in POS Cart
Build 6.33.95.0: PRO-3982
We’ve introduced the capability to add a new Discount Amount / % column to the Cart tab of the Sales Receipt area in POS Pro V6.
Purpose
The Discount Amount / % column displays the following in two rows:
- the item’s total discount amount. The value includes all item and receipt discounts as well as promotions applied to that item
- the total discount amount converted to percentage
How to add the Discount Amount / % column for display in POS Pro
In CHQ, to add the Discount Amount / % column to the Cart tab of the Sales Receipt area in POS Pro V6:
- Go to
settings > company settings > v6 App Designer. - In the area that opens, choose
Point of Sale V6 > iPad > Sales Receipt > Cart Columns.

- To add a column to the Cart Columns area, under available fields, press and drag Discount Amount / % to the layout section. Please note that the order of labels in the layout section defines the order in which respective columns display in POS Pro.

- Alternatively, to remove a column from the area, press the required label and then drag it out of the layout area.
- Click save.


See also
V6 App Designer: Updates in the Sales Receipt area of POS Pro
Build 6.33.95.0: PRO-2406
As of version 6.33.95.0, we’ve introduced the following updates in the V6 App Designer:
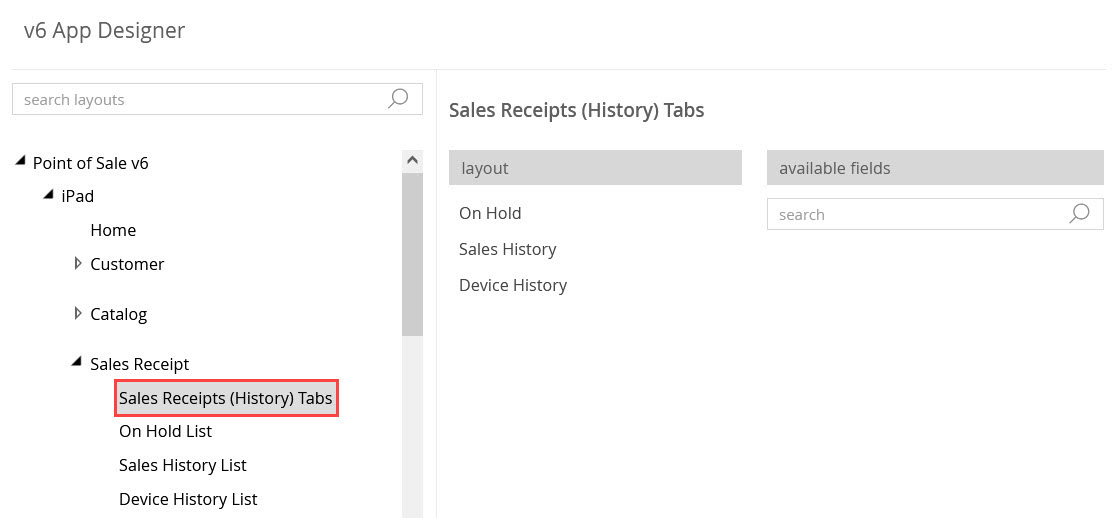
- added new Sales Receipts (History) Tabs and Sales History List
- renamed Held List, History List and Verified Return
- removed Hold from the V6 App Designer and put it in a permanent location in the Sales Receipt area of POS Pro.
Purpose
The updates are aimed at improving the user experience when looking for Sales Receipts in POS Pro.
Configuring updated Sales Receipt areas
In CHQ, under settings > company settings > v6 App Designer, the following updates have been introduced to the sections of the Sales Receipt area:
Please note that, in v6 App Designer, the order of labels in the layout section defines the order in which respective columns display in POS Pro.
To remove a column from the area, press the required label and then drag it out of the layout section to available fields.
- in the Receipt Options:
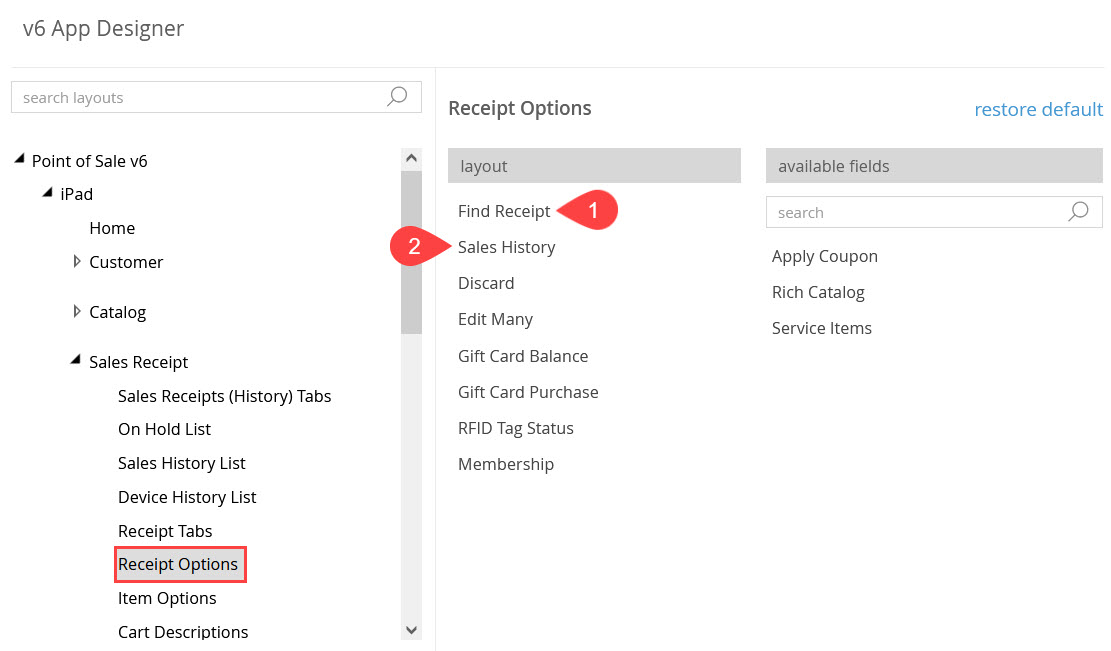
- Verified Returns has been renamed to Find Receipt (see 1 in the screenshot above).
- Sales History 2 has been added. Both Find Receipt and Sales History appear in the layout section by default.
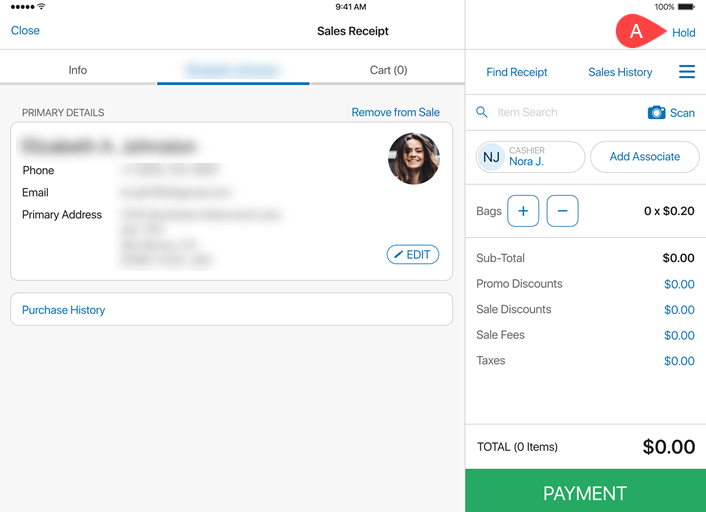
- Hold has been removed as it is no longer a designable option. Now, Hold is located in the top right corner of the Sales Receipt area in POS Pro V6 (see
A
in the screenshot below).
- Sales Receipts (History) Tabs has been added:
 Sales Receipts (History) Tabs allows for configuring which tabs and in which order will display in the Sales History area of POS Pro v6.
 - Sales History List has been added:
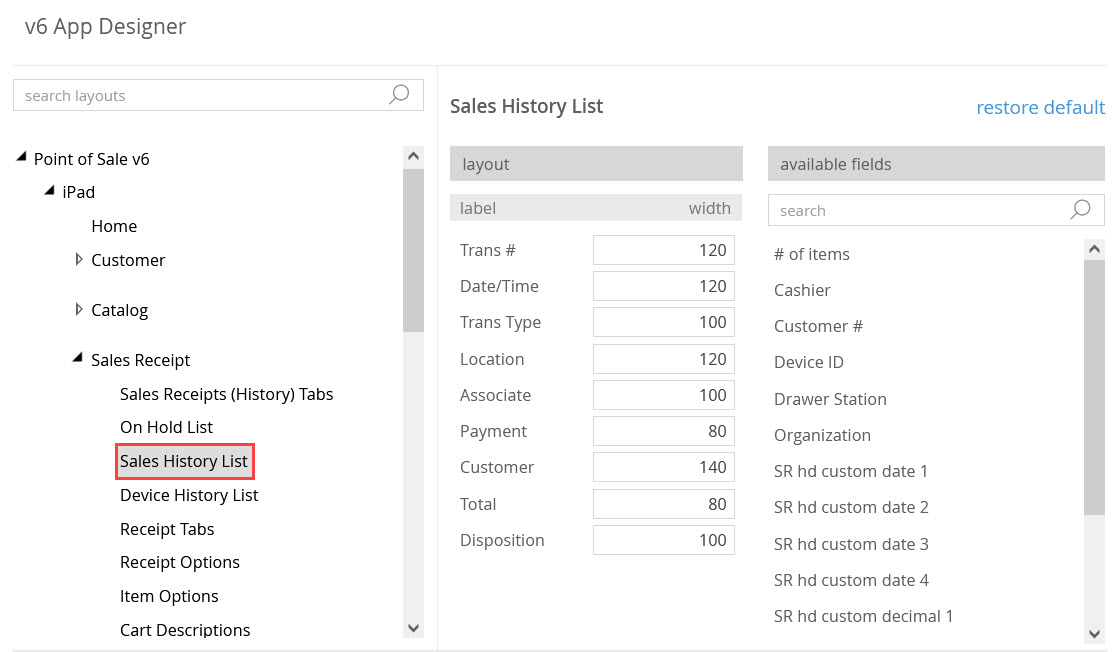 Sales History List allows for configuring how Sales History will display in POS Pro:

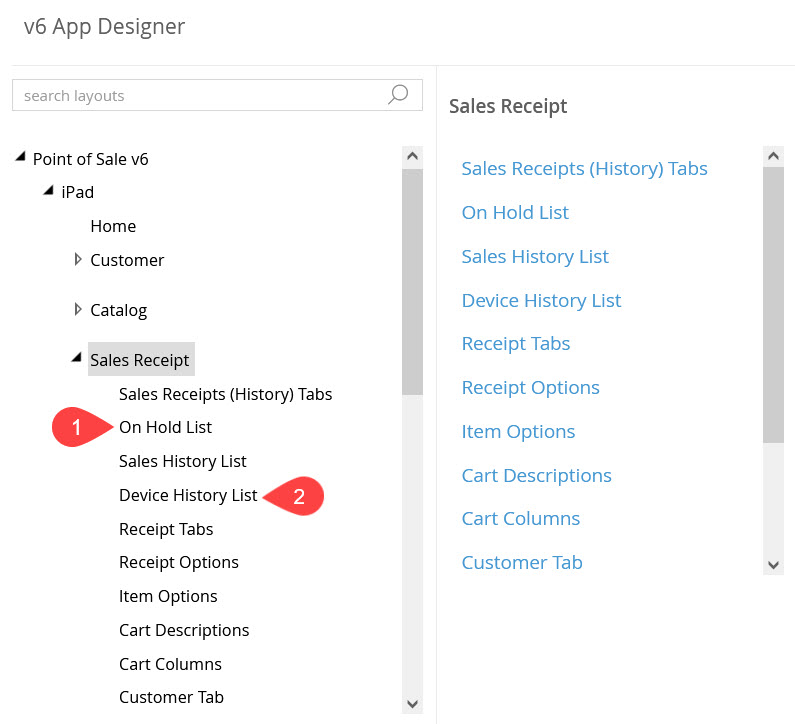
- Held List has been renamed to On Hold List
1
:

- History List has been renamed to Device History List (see
2
in the screenshot above)
Additionally, Location has been removed from the available fields options, as History List applies only to the current location.


Once done, click save.
See also
V6 App Designer: Configuring Verified Return areas for POS Pro
Build 6.33.95.0: PRO-2102
As of version 6.33.95.0, we’ve introduced the capability to configure:
- where Find Receipt is located in the POS Pro v6, and
- which fields display in the Find Receipt area.
Configuration is available in V6 App Designer in CHQ. To do so:
-
Go to
settings > company settings > v6 App Designer. -
Under
Point of Sale V6 > iPad > Sales Receipt > Receipt Options, Find Receipt displays on the top of the layout section.
Please note that the order of labels in the layout section defines the order in which respective columns display in POS Pro. -
Under
Point of Sale v6 > iPad > Sales Receiptfind and click Find Receipt: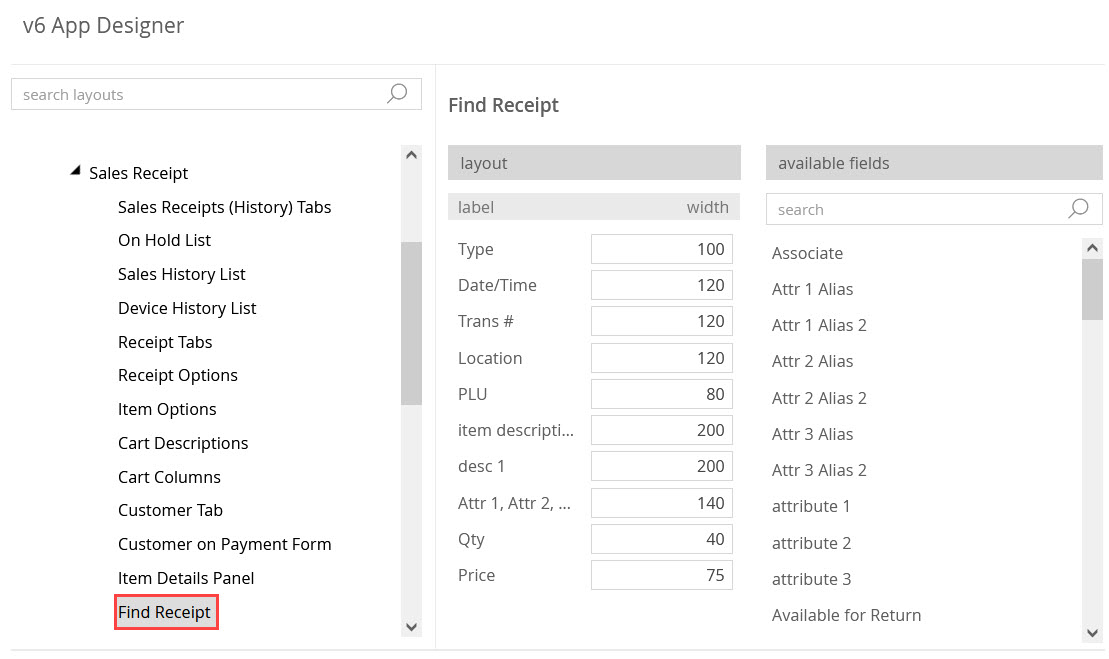 In the Find Receipt area that displays, press and drag the required fields from the available fields section to layout for them to become available in POS (or drag those back to available fields - to remove).

-
Once done, click save for the changes to take place.


See also
European fiscal compliance: Country fiscalization related fields are required for selecting the country at the location level
Build 6.33.95.0: PRO-4251
Starting from version 6.33.95.0, when creating a new company location in CHQ, users are not allowed to choose a country that has fiscalization related settings if those settings are not configured.
Fiscalization related settings for a country can be configured under settings > company settings > countries / regions > [selected country] > the fiscal tab.
As of version 6.33.95.0, this update applies to the following countries:
- France
- Germany
- Spain
Updated required fields at the country level
The following fields under settings > company settings > countries / regions > [selected country] > the fiscal tab are now required:
| Country | Required fiscalization related fields |
|---|---|
| France | SIRET, VAT registration # |
| Germany | VAT # |
| Spain | VAT #, CIF # |
See also
European fiscal compliance: Configuring fiscalization related features for individual store locations
Build 6.33.95.0: PRO-4440
We’ve added a new fiscal checkbox at the location level in CHQ.
Purpose
If the fiscal checkbox is clear, fiscalization related features for that company location are disabled.
This update may be useful if the retailer’s business is located in a country with fiscal regulations but where certain types of stores are exempt from these regulations. The retailer can now have the fiscalization functionality enabled at the country level but disabled for certain locations.
How to configure the fiscal setting for a location
To configure the fiscal checkbox for a new location, in CHQ:
- Go to
settings > location settings > location / location settings. - Click new.
- In the create new location dialog, select if you want to
create brand new locationorcopy from existing locationand then click ok. - In the details tab, go to the address section and configure the fiscal checkbox as required:

Please note that once the fiscal checkbox is selected and the location record is saved, the fiscalization functionality cannot be disabled again for that store location.
When a new location record is created, the fiscal checkbox is cleared by default. However, please note that for locations with country =France,Germany,Italy, andSpainthe fiscal checkbox is always selected automatically. - Click save.
- If the fiscal checkbox was selected, click yes in the fiscalization dialog:


See also
Allowing exchanges on Sales Receipts and Invoices
Build 6.33.95.0: PRO-5639
In CHQ, starting from version 6.33.95.0, it is possible to configure if sales and returns can be made within a single transaction.
Purpose
Usually, in fiscal countries where Invoices are in use, having sales and returns on the same transaction is not allowed. In some countries, for example, France, combining sales and returns is possible on Sales Receipts only.
The new settings allow retailers to configure if exchanges can be made within a single transaction. This can be configured separately for Sales Receipts and Invoices.
Typically, a customer may request an Invoice instead of the regular Sales Receipt when shopping on behalf of a company. Companies can use Invoices as proof of business expense to claim a VAT tax deduction.
Compared to the regular Sales Receipt, an Invoice will contain extended information on the company providing the goods and services, the customer or the customer’s company, details about the goods and services provided, payment terms, and tax rates.
How to configure
To allow combining sales and returns on the same transaction:
- Go to
chq > settings > company settings > countries/region. - Double-click the required country in the grid.
- Open the POS tab, select the required option(s):
- sale receipt - allow sales and returns on the same transaction
- sale invoice - allow sales and returns on the same transaction
- Once done, click save.
As of version 6.33.95.0, the following is the recommended configuration of the sale receipt - allow sales and returns on the same transaction and sale invoice - allow sales and returns on the same transaction settings for countries that have fiscalization related features in Teamwork:
The recommended configurations described below may need updating if the country’s legislation on exchanges within a single transaction has changed. Please consult the current government regulations to properly configure these settings.
| Country | sale receipt - allow sales and returns on the same transaction | sale invoice - allow sales and returns on the same transaction |
|---|---|---|
| France | yes | no |
| Spain | yes | no |
| Germany | yes | no |
| Italy | disabled | disabled |
See also
Allowing exchanges on sales receipts and invoices in POS PRO Guide V.6.33
Updated NF525 fiscal settings
Build 6.33.95.0: PRO-5668
In CHQ under settings > company settings > countries/regions > France > the fiscal tab, the following fields are now required:
- legal form
- social capital
- city of registry office
- trades directory registration
European fiscal compliance: Supporting fiscal invoices for France
Build 6.33.95.0: PRO-4770, PRO-5038
As of version 6.33.95.0, we’ve introduced support of fiscal invoices for France.
This enhancement required the following updates in CHQ:
- extending fiscal settings at the country level
- adding new settings for invoice configuration.
Purpose
In France, the customer can now choose which sales document to get on a sale finalization — a standard Sales Receipt or an Invoice.
Invoice is a fiscal document that is used in France for situations when a retail customer asks for an invoice for tax purposes when paying for items.
In its turn, Invoices are issued to the following customers:
- professional: identifies a company when an Invoice is issued according to NF 525 requirements
- individual: identifies an individual customer when an Invoice is issued according to NF 525 requirements
Depending on the customer type, Invoices contain additional information fields that can be preconfigured in CHQ as required or optional.
Configuring new fiscal settings
As a part of this enhancement, for France, in the country details dialog, we’ve updated the fiscal as well as POS tabs and added the new invoice customer tab.
To access this dialog, go to chq > settings > company settings > countries / regions, select France, and then click edit.
The POS tab
Now, the general section of the POS tab contains the following settings:
- sale receipt - allow sales and returns on the same transaction: if the checkbox is selected, it becomes possible to add both sale and return items to a single Sales Receipt. The checkbox is selected by default.
- sale invoice - allow sales and returns on the same transaction: if the checkbox is selected, it becomes possible to add both sale and return items to the Invoice. By default, the checkbox is clear for France.


The fiscal tab
In case of France, the NF-525 section of the fiscal tab has been extended with the following new settings:

| Setting | Description | Value |
|---|---|---|
| RCS | the RCS number (RCS stands for “Registre du commerce et des sociétés” - Trade and Companies Register) | Blank by default, max 128 characters allowed. |
| intra-community VAT ID | VAT Registration # of the company | Blank by default, max 128 characters allowed. |
| legal form | the type of business organization. For example, SA (stands for “Société anonyme”, Limited Liability Company) |
Blank by default, max 128 characters allowed. |
| social capital | the amount representing the total capital of the company (retailer) | Blank by default, alphanumeric, max 128 characters allowed. For example, 50000.00 Euros |
| city of registry office | the city where this company is registered | Blank by default, max 128 characters allowed. |
| trades directory registration | the ID number that defines the type of business (trade, transportation, restaurant, etc.) | Blank by default, max 128 characters allowed. |
The invoice customer tab
The invoice customer tab is a new tab that contains a list of fields the user can select as required for different invoice types.
 In POS Pro, these fields are populated by the user during the sale process, and the information from these fields then appears on the printed customer invoice.
The following fields are available in the section both for professional and individual customers:
-
SIRET (selected by default for professional only)
-
RCS (selected by default for professional only)
Additionally, for SIRET and RCS, under customer field, select where the values are populated from:none: indicates that this value is not included by default on the sales document when a customer is addedtax ID 2: indicates that the field is defaulted from the the tax ID 2 customer field valuetax ID 3: indicates that the field is defaulted from the the tax ID 3 customer field valuePlease be advised that you cannot select the same option for both customer fields.
-
VAT # (selected by default)
-
company name (selected by default)
-
first name (selected by default)
-
last name (selected by default)
-
address 1 (selected by default for professional only)
-
address 2
-
address 3
-
address 4
-
address 5
-
city (selected by default)
-
state/province
-
postal code (selected by default)
-
country (selected by default)
-
fiscal code
-
phone
-
email
Please note that if Identification Waiver is selected in POS under Sales Receipt > Payment > Invoice Information, the following fields become optional for individual Invoices:
- company name
- first name
- last name
Also, if Address Objection is selected in POS under Sales Receipt > Payment > Invoice Information, address 1 becomes optional for individual Invoice.
For more information, please see V6.33 Mobile Release Guide.
Configuring customer tax IDs
When issuing an Invoice in POS, the tax ID 2 and tax ID 3 fields are used to take the SIRET and RCS values from.
To configure the settings, in CHQ:
- Go to
sales > customers. - Find your customer and click it.
- In the general tab of the dialog, populate the tax ID 2 or tax ID 3 field.

- Click save.

See also
European fiscal compliance: Supporting fiscal invoices in Germany
Build 6.33.95.0: PRO-4445
As of version 6.33.95.0, we’ve introduced support of fiscal invoices for Germany.
This enhancement required adding new settings for invoice configuration at the country level in CHQ.
Purpose
In Germany, the customer can now choose which sales document to get on a sale finalization: a standard Sales Receipt or an Invoice.
To meet the fiscal requirements, either the company name or the customer name (both first and last name) should be mentioned when issuing an Invoice.
Configuring the invoice customer tab
For Germany, the invoice customer tab is now available in the country details dialog.
To access the country details dialog, go to chq > settings > company settings > countries / regions, select Germany, and then click edit.

The invoice customer tab contains the list of fields that can be selected as required for Invoice:
- tax ID (selected by default)
- company name (not available for selection)
- first name (not available for selection)
- last name (not available for selection)
- address 1 (selected by default)
- address 2
- address 3
- address 4
- address 5
- city (selected by default)
- state/province
- postal code (selected by default)
- fiscal code
- country (selected by default)
- phone
In POS Pro, these fields are populated by the user during the sale process, and the information from these fields then appears on the printed customer invoice.
The company name, first name and last name fields are not available for selection on this tab as they are required fields.
Please be advised that it’s enough for the store associate to indicate either the company name or the customer’s first and last name to issue the Invoice.
See also
New Custom payment method
Build 6.33.95.0: PRO-4338
In CHQ, we’ve added the capability to set up and configure the Custom payment method.
Purpose
This update allows retailers to set up payment types unique to their business. Via the Custom workflow, store associates can accept payment methods other than those listed by Teamwork while allowing POS Pro to keep track of funds and update inventory appropriately.
The Custom payment method also can be employed in the case where the retailer wants to reduce inventory using Sales Receipts. Then, Custom would be used as a “dummy” payment method allowing to finalize the transaction.
Configuring the Custom payment method at the company level
To set up a custom payment method, in CHQ:
-
Go to
settings > sales > payment methods. -
In the area that opens, click new.
-
In the new payment method dialog, select
customfor the payment type field and then click ok.
-
Then, configure the following payment settings:
Setting Description Value payment type the name of the payment method custom, not editablecode the payment method name in POS An alphanumeric value up to 128 characters, empty by default, required description an optional description of the payment method An alphanumeric value up to 400 characters, empty by default require customer if the checkbox is selected, a customer must be added to the sale Clear by default payment custom entry field if a note should be provided by the user when accepting the payment in POS Pro. If optionalorrequiredis selected, after entering a payment amount in POS Pro, a dialog appears where it’s possible to enter a textPossible values: not shown(set by default),optional, andrequiredcustom entry label the label for the field in POS Pro where the user can enter a text on accepting the payment An alphanumeric value up to 80 characters, empty by default; required if payment custom entry field is set to optionalorrequiredfiscal label the name of the payment method that will appear in fiscal reports An alphanumeric value up to 128 characters, empty by default list order the position of the payment method in the payment method list in POS Values can range from -9999to9999.0is set by defaultexternal ID an optional ID of the payment method An alphanumeric value up to 128 characters, empty by default inactive if the checkbox is selected, this payment method will be unavailable in POS Clear by default maximum amount allowed the maximum amount allowed for this payment method. If the entered payment amount is greater than the indicated value, a warning displays in POS Values can range from 0to999999999.99.0means that there’s no limit, set by defaultallow for positive amount if the checkbox is selected, an amount greater than the amount due can be accepted Clear by default max positive over-tender $ the maximum amount in $ for that payment method that can be accepted Editable if allow for positive amount is selected. The values range from 0to999999999.99.0is set by defaultmax positive over-tender % the maximum positive amount in % for that payment method that can be accepted Editable if allow for positive amount is selected. The values range from 0to100.0is set by defaultallow for negative amount if the checkbox is selected, an amount greater than the change due can be returned to the customer Clear by default max negative over-tender $ the maximum negative amount in $ Editable if allow for negative amount is selected. The values range from 0to999999999.99.0is set by defaultmax negative over-tender % the maximum negative amount in % Editable if allow for negative amount is selected. The values range from 0to100.0is set by defaultnon gift item - refund to an optional field to define how a refund should be performed for that payment method Possible values: virtual gift card,virtual gift card to giftee email,credit memo, andoffline payment. The field is empty by defaultgift item - refund to an optional field to define how a refund should be performed for that payment method Possible values: virtual gift card,virtual gift card to giftee email,credit memo, andoffline payment. The field is empty by default -
Click save.

Configuring the Custom payment method at the location level
To configure the Custom payment method settings for a specific company location, in CHQ:
- In CHQ, go to
settings > sales > payment methods. - Select [your Custom payment method] and then click location settings above the grid.
- Click to select your location and then click edit to open the following dialog:
 In the dialog, configure the following:
Setting Description Value visible if selected, this payment method is available for devices initialized at that company location Selected by default suggested amt. when positive if selected, in POS Pro, the positive payment amount is automatically set to the amount due. Alternatively, if the checkbox is cleared, the amount is set to 0and the user has to define the latter manuallySelected by default suggested amt. when negative if selected, in POS Pro, the negative payment amount is automatically set to the amount due. Alternatively, if the checkbox is cleared, the amount is set to 0and the user has to define the latter manuallySelected by default allow negative if selected, the payment method can be used for giving change and making refunds Clear by default list order the position of the payment method in the payment method list in POS Pro Values can range from -9999to9999.0is set by default - Click save.

See also
Managing Loyalty Reward Programs in CHQ
Build 6.33.95.0: PRO-3854
Starting from version 6.33.95.0, Loyalty Rewards Programs (LRP) are available in Teamwork Commerce Pro suite.
Purpose
Loyalty Reward Programs allow customers to earn loyalty reward points when making purchases in a physical store or on an ecommerce site.
There is a configurable ratio of the money spent to points. For example, spending $1.00 might earn you 1 point. When the customer reaches a predefined amount of loyalty reward points, the customer is awarded a coupon for a set value or discount %.
The coupon award notification can optionally be sent by email to the customer.
New security rights
With this update, the following security rights were added to CHQ:
| Area | Right | Description |
|---|---|---|
| Sales | Add LRP Transaction | Allows user to add manual LRP transaction |
Configuring LRP settings
Prior to using, the Loyalty Reward Program must be enabled and configured in Teamwork Commerce CHQ.
In CHQ, users can enable two Loyalty Reward Programs(LRP 1 and LRP 2) for an SVS zone. To do so:
-
Go to
settings > company settings > stored values services > SVS zones.An SVS zone unites company locations that share the same data for some of the CRM (customer relationship management) features.
Company locations are grouped into SVS zones by their base currency. -
Double click the required SVS zone in the table.
-
Click the LRP tab:
The LRP tab remains disabled if no currency is selected on the general tab under
chq > settings > company settings > stored values services > SVS zones > [selected SVS zone]. From the LRP tab, you can enable and configure two Loyalty Reward Programs – LRP 1 and LRP 2.
As the settings for both the programs are identical, in this guide, we describe only the settings for LRP 1.
-
Under LRP 1 settings, in the general section, select enable LRP 1.
-
In the points section, fill out the following fields to configure how reward points are calculated:
Field Description Value default ratio - 1 currency unit equals Defines the conversion rate at which the customer earns LRP points. Decimal. Negative values are not allowed. Default is 1. Max allowed:999999.99.total LRP ratio Defines how many points items result in when purchased. Possible values are: default ratio * item ratio: default ratio is multiplied by the item ratio;greater of default ratio, item ratio: the greater of the two is applied. For example, if the default ratio is1, and the item ratio is2, the item ratio is applied;default ratio: only the default ratio is applied;item ratio: the only item ratio is applied.
Item ratio is configured under
chq > inventory > styles and items > new or edit > general > product idsin the ratio field.customer sign up bonus points Defines how many points the customer receives as a sign-up bonus. Decimal. Min = 0, max =999999.99. Default is0.allow negative LRP balance Defines if the customer’s LRP balance can go negative. Selected by default. This may be useful to prevent rewards to customers who return merchandise after a reward has been granted. -
In the rewards section, configure how conversion of reward points into rewards is performed as well as reward expiration policies:
Field Description Value conversion threshold Defines the limit or threshold when the rewards come into play. Decimal. Negative or zero not allowed. Default is 1. Max is999999.99.conversion policy Defines how often the customer’s LRP points are converted into a reward. Possible values are: no conversion(default) anddaily conversion.conversion delay (days) Defines the number of days before the LRP points can be converted into a reward. Available if conversion policy equals daily conversion.Integer. Negative not allowed. Max is 9999. Default is0.rewards Defines the type of reward the customer can get. Possible values are: no reward(default) andcoupon.coupon description User-defined coupon description. Available if rewards equals coupon. Text. Max 512 characters. Empty by default.coupon type Defines the type of coupon received as a reward Possible values are: amount,percentageandpromo activation. Available if rewards equalscoupon.coupon program Allows for selecting one of the available programs to which the reward coupon will belong. Available and required if rewards equals coupon. Empty by default.If coupon type equals
amountorpercentage, it is not possible to select a coupon program where discount type ispromo discount. Also, if coupon type equalspromo activation, it is not possible to select a coupon program where discount type isline discountorglobal discount.conversion rate - each threshold amount equals Indicates percentage of coupon discount per each threshold amount. For example, “each 1000threshold equals10%” means that the customer gets a 10% discount per 1000 loyalty points.Available if rewards equals couponand coupon type isamountorpercentage. Decimal. Negative or zero not allowed. Foramountcoupons: max is999999.99, default is1. Forpercentagecoupons: max is100, default is0.expiration policy Defines if the reward coupon expires after a period of time. Available if rewards equals coupon. Available values:no expiration(default) andperiod.expiration period (days) Defines after how many days the coupon expires. Available and required if rewards equals couponand expiration policy equalsperiod. Integer. Default is0. Min is1, max is9999. -
In the reward mailing services section configure how customers are emailed when they reach a reward:
Field Description Value mailing service Defines if an email should be sent if a customer is reaching a reward and via which emailing service provider. Available options: Off(default) andMandrill.email template Allows for selecting one of the email templates predefined on the Mandrill side. Available if mailing service is Mandrill. Required.sender email Indicates the sender’s email. Validated by Mandrill. Required. Empty by default. ignore subscription flag Defines if the customer’s mailing preference is ignored when sending an email about a reward. Selected by default. send instant Defines if an email should be sent immediately or in a batch. Cleared by default. Emails will not be sent if mailing service is
offor the primary email (chq > sales > customers > [selected customer] > general) of the customer who’s linked to the coupon is empty. Also, no email is sent if ignore subscription flag (see step 7 above) is cleared and the transactional flag is cleared for primary email of the customer who’s linked to the coupon (chq > sales > customers > [selected customer] > general).

The LRP tab in the customer dialog
A new LRP tab has been added under chq > sales > customers > [selected customer]:

On the tab, for LRP 1 and LRP 2, you can do the following:
- In the rewards area 1 , select conversion disabled to disallow LRP 1 point conversion to rewards for the respective customer.
- In the loyalty reward points area 2 , it is possible to review information on available LRP points per SVS zone as well as to manually add new LRP transactions.
How to manually add an LRP transaction
LRP transactions add to or subtract LRP points from the customer’s running balance.
Automatic transactions add and subtract points automatically as the result of the customer’s sales and returns, awards, rewards, etc. It’s also possible to add or subtract a customer’s points manually in CHQ by creating a manual transaction under sales > customers > [selected customer] > LRP.
- On the LRP tab, under LRP 1 or LRP 2, in the loyalty reward points area click add manual transaction.

- In the new LRP transaction dialog that opens, fill out the following fields:
Field Description Value SVS zone Allows for selecting an SVS zone. An SVS zone name: - visible if there is more than one SVS zone defined in the system;
- editable if there is more than one SVS zone with enable LRP 1 (or enable LRP 2) selected;
- required if editable.
amount Defines the LRP transaction amount. Editable. Decimal (from -999999.99to999999.99). Required.description Allows the user to optionally provide extra details related to this transaction. Editable. Text (max 512 characters). Optional. - Click save.

Reviewing information on LRP points
On the LRP tab, for LRP 1 and LRP 2, under loyalty reward points, the following information on LRP points is available for each SVS zone:
- available points: displays LRP points available for conversion into reward
- points to next reward: displays LRP points that this customer lacks to meet the conversion threshold
- pending points: displays LRP points that are waiting for conversion into rewards in accordance with the conversion delay (days) setting for this Loyalty Reward Program
- LRP transactions: displays the view transactions link to review LRP transactions if there are any for this customer.
Clicking the view transactions link opens the LRP transactions dialog. In the dialog, the information on all the transactions linked to this customer displays:

- LRP trans #: the number of the LRP transaction
- location: name of the location where this transaction was made in the
- form - sales receipt #: the number Sales Receipt with this transaction
- created date: the date and time when the transaction was made
- created by: the name of the user creating the transaction
- type: the type of the transaction:
sale/return: for transactions when points were added/taken from account as result of sale or returnaward: for transactions which are result of crediting points for registration, birthday and other eventsreward: for redemption transactions when points were converted to couponsmanual: for manually created transactionstransfer: if balance is moved from the customer’s old account during customer record mergingimport: for transactions created resulting from import
- reward type: the type of the reward (
no rewardorcoupon) - reward #: the number of coupon, if the reward type equals “coupon”
- points: the number of points in this transaction
- running balance: the customer’s current point balance including this transaction
- description: transaction description
When merging customer records, if for the old customer record the loyalty point balance is different from zero, all the points are moved to that customer’s new account.
See also
Cloud HQ User Manual: Settings
Managing Coupons in CHQ
Build 6.33.95.0: PRO-3587
Starting from version 6.33.95.0, Coupons are available in Teamwork Commerce Pro suite.
Purpose
Coupons are vouchers entitling the holder to a discount when purchasing goods and services.
The retailer can issue coupons to reward customers based on their purchase history, increase sales as well as promote the retailer’s brand. Teamwork Commerce Pro now provides a wide set of features to set up and manage coupon programs as well as individual coupons within the retailer’s environment.
New security rights
With this update, the following security rights were added to CHQ:
| Area | Right | Description |
|---|---|---|
| Sales | Coupons - Access | Allows the user to access the coupons area |
| Sales | Coupons - Add/Edit | Allows the user to create new or edit existing coupons |
For information on how to assign security rights to users, see the Roles section of the Cloud HQ User Manual: Settings.
Creating coupon programs at the SVS zone level
In Teamwork, all existing as well as new coupons must be assigned to a coupon program. The coupon program defines what type of discount the coupons provide, application restrictions and rules as well as other details.
In CHQ, users can create multiple coupon programs at the SVS zone level.
To add a new coupon program to an SVS zone, in CHQ:
-
Go to
settings > company settings > stored values services > SVS zones. -
Double click the required SVS zone in the table.
-
Click the coupons tab:

-
At the top, click to select the enable coupons discount checkbox. The checkbox enables the coupons functionality for that SVS zone.
-
To configure how coupon numbers should look like when generated automatically, define the coupon # generation mask field. By default, the following mask is used:
[A-Z0-9]{10}. -
Then, above the table with existing coupon programs, click new:


In the new coupon program dialog that opens, the following sections are available:
- general
- restriction
- replacement
- custom
In the general section, populate the following fields:
| Field | Description | Value |
|---|---|---|
| program name | the name of the coupon program | Max 128 characters, required |
| description | user-defined program descriptions | Max 512 characters |
| discount type | the type of discount the coupon provides | Possible values are line discount (default), global discount, and promo discount |
| discount reason | the description of the discount the coupon provides | Visible if discount type = line discount or global discount. Required. Possible values depend on the selected discount type |
| inactive | if the checkbox is selected, the coupon program is turned off | Clear by default |
Below in the restriction section, populate the following fields:
| Field | Description | Value |
|---|---|---|
| item restrictions | if the coupon can be applied only to certain items or item groups | Possible values are no restricitons (default), restrict by promo groups, restrict by items. Not editable if discount type = global discount. Not visible if discount type = promo discount. |
| restricted by promo groups | if promotion groups are selected, coupons within that program can be applied only to items belonging to listed promo groups | Visible only if item restrictions = restrict by promo groups. Required. Clicking edit next to the field opens the select promo groups dialog |
| restricted by items | if items are listed, coupons within that program can be applied only to those items | Visible only if item restrictions = restrict by items. Required. Clicking edit next to the field opens the select items dialog |
| promotion | if a promotion is selected, coupons within that program can be applied only to items eligible for that promotion | Visible if discount type = promo discount. Clicking select in the field opens the select promotion dialog |
| coupon usage | if each coupon can be used only by a specific customer | Possible values are specific customer (default) and any customer |
| unlimited uses | if the coupon can be used an unlimited number of times | Cleared by default |
| uses allowed | how many times the coupon can be used | Visible if the unlimited uses checkbox is cleared. Possible values range from 1 (default) to 9999 |
Then, in the replacement section, populate the following fields:
| Field | Description | Value |
|---|---|---|
| replace on return | if the coupon should be replaced on return | Cleared by default. Editable if discount type = global discount or promo discount, coupon usage = any customer and the unlimited uses checkbox is cleared. |
| replacement expiration policy | how replacement expiration policy is determined | Visible if the replace on return checkbox is selected. Possible values are original expiration date (default) and period. |
| replacement expiration days | for how many days replacement is possible | Visible if the replace on return checkbox is selected and replacement expiration policy = period. Possible values range from 1 to 9999, 0 by default. |
In the custom section, fill out the required custom fields.
To configure what custom fields should appear in the new coupon program dialog, go to settings > company settings > custom fields > coupon program.
To save changes and add the coupon program to the SVS zone, click save at the bottom-right.
Making a promotion coupon-activated
We’ve added a new coupon activated checkbox to the new/edit promotion engine dialog located under sales > promotion engine > new or sales > promotion engine > [selected promotion engine]:
 If this checkbox is selected, the respective promotion is applied to eligible receipts only if a coupon activating that promotion is added to the sale.
Defining global coupon application priority
We’ve added a new global coupon application priority setting under settings > sales > sales documents:
 This setting defines the order in which global coupons should be applied to a transaction in the POS Pro app.
Depending on the setting configuration, either amount-type coupons or percentage-type coupons can be applied first.
This setting defines the order in which global coupons should be applied to a transaction in the POS Pro app.
Depending on the setting configuration, either amount-type coupons or percentage-type coupons can be applied first.
Searching for a coupon
In CHQ, existing coupons are listed under sales > coupons in the recent section (A in the screenshot):

To find a specific coupon, use the search bar (C in the screenshot above) at the top-right. Searching is possible by the following fields:
- coupon #
- customer name
- customer email
To apply a filter to the list of coupons, under filter (B in the screenshot above), define the field by which the list should be filtered.
Creating new coupons is possible by clicking new at the top (D in the screenshot). For information on how to create coupons, see the How to create a new coupon article of this Release Guide.
Coupons list view
To open the detailed list of existing coupons, under sales > coupons, click list at the top:

In the list view, the following columns are available by default:

- coupon #: the unique number of the coupon
- status: the status of the coupon. Possible values are
not yet active,active,deactivated,used,invalid, andexpired - customer: the customer who was issued the coupon
- type: the type of the coupon. Possible values are
amount,percentage, andpromo activation - value: the face value of the coupon in currency or percentage
- program name: the name of the coupon program
- discount type: the type of the discount. Possible values are
line discount,global discount, andpromo discount - uses allowed: how many times the coupon can be used. The column can be empty if uses are unlimited or show a number determined by the coupon program
- “uses allowed” applies to: if the uses allowed setting is relevant for transaction-level or item-level application of the coupon
- uses remaining: how many times the coupon can be applied with regard to prior applications
- start date: the date and time when the coupon was actived
- expiration date: the date and time when the coupon expires
- created date: the date and time when the coupon was created
Additionally, right-click the header of the grid to add the following columns to the list:
- description: user-defined description of the coupon
- SVS zone: the SVS zone the coupon belongs to
- discount reason: discount description
- item restrictions: if the coupon can be applied only to certain items or item groups
- promotion: if the coupon is tied to a promotion
- coupon usage: if the coupon can be used only by a specific customer or by any customer
- unlimited uses: if the coupon can be used an unlimited number of times according to the coupon’s program
- replace on return: if the coupon should be replaced on return
To filter the list by the status column, click filter in the upper right corner.
Also, the following actions are available in the list view:
- to create a new coupon, click new above the grid (A in the screenshot below)
- to edit an existing coupon, click the required coupon in the grid and then click edit (B in the screenshot below)
- to deactivate a coupon, click the required coupon and then click deactivate (C in the screenshot below)

Please be advised that deactivated coupons cannot be reactivated.
How to create a new coupon
To add a new coupon, under sales > coupons or sales > coupons > list, click new at the top of the area.
On clicking, the general tab of the new coupon dialog opens:

In the general section of the tab, populate the following fields:
| Field | Description | Value |
|---|---|---|
| coupon # | the unique number of the coupon | Required. The number should be unique at the company level. Click generate coupon # under the field to generate the coupon number automatically. |
| description | user-defined coupon description | Max 512 characters |
| SVS zone | the SVS zone to which the coupon belongs | Required. Defining the SVS zone field enables the generate coupon # button |
| type | coupon type | Possible values are amount(set by default), percentage, and promo activation |
| value | coupon face value | Visible if type = amount or percentage. Required. Possible values are currency symbol, percentage %, and 0 (default) |
| start date | the date and time when the coupon was actived | Date in the mm/dd/yyyy hh:mm format |
| expiration date | the date and time when the coupon expires | Date in the mm/dd/yyyy hh:mm format |
In the coupon program section below, click the program name field to select the required coupon program. Once selected, read-only information on that coupon program appears below.
Then, in the customer section, use the search field (A in the screenshot below) to find the customer who the coupon was issued to. Please note that the customer section is hidden if the coupon usage field is set to any customer.

When finished, click save at the bottom-right.
The coupons tab in the customer dialog
We’ve added a new coupons tab under chq > sales > customers > [selected customer]:

The coupons tab contains the list of all coupons that are linked to that customer.
Here, the following actions are possible:
- to add a new coupon to the cutomer’s record, click new above the table
- to edit a customer’s coupon, click the required coupon in the table and then click edit at the top
- to deactivate a customer’s coupon, click the required coupon and then click deactivate at the top
Transferring coupons when merging customer records
Starting from version 6.33.95.0, if two customer records are merged in CHQ, all coupons linked to the old record will be automatically reassigned to the new record.
See also
Cloud HQ User Manual: Settings
Returns Manager
Build 6.33.95.0: PRO-2856
We’ve now introduced Returns Manager to CHQ.
Please be advised that in version 6.33 of the software, the Returns Manager functionality is for review only as it is partially tested. Full testing will be completed in future versions.
To process returns via the previously existing return worksheets functionality, please use builds prior to 6.33.95.0.
Purpose
The Returns Manager provides users with the capability to handle merchandise returns in a quick and efficient manner with little manual processing required.
In particular, in CHQ it is possible to:
- view and edit imported as well as add new return lines
- create and configure Return Merchandise Authorization (RMA) Orders from customers' records
- process exchanges of merchandise
- have refund options automatically defined or configure refunding manually
- have returns finalized by the automatic process
- cancel returns
Using return lines and RMA Orders for return processing
As of version 6.33.95.0, several workflows are possible when using Returns Manager for return processing. In particular, it’s possible to make use of:
- automatic processing that involves imported return lines
- partially automatic processing that involves RMA Orders
Automatic processing
To make use of the automatic processing, every sale item must be shipped out with a Return Merchandise Authorization (RMA) code.
An RMA code allows for quick item identification when performing a return.
Customers wishing to make a return can simply ship an item with the RMA code back to the retailer without prior notification. When a company location handling returns receives the shipment, RMA codes are quickly scanned to create a list of items. Note that such list can contain a large number of returns from different customers.
Once the list of returns is imported into Teamwork’s system, linking every return to the correct customer record, Sales Order, Sales Receipt, etc. will occur automatically. Imported return lines (items) then appear under chq > sales > returns manager and are available for further automatic or manual completion.
RMA Orders
Processing a return is also possible by creating an RMA Order. An RMA Order indicates that a customer intends to make a return, thus a shipment of item(s) is about to be received.
This workflow may be useful when customers have to contact the retailer prior to shipping the return items. An RMA Order may thus contain additional information provided by the customer such as the shipment tracking number, preferred refund method, the desired exchange item, etc.
Once the retailer receives the shipment with the return items, it’s required to enter the RMA codes of those items under chq > sales > returns manager to change their status from not received to pending. Once the items are set to pending, the return can be completed by the automatic process.
If set up at Teamwork’s side, automatic creation of RMA Orders in CHQ is also possible. This may be useful for e-commerce sales where customers have the capability to submit a return form online. Once a return request is submitted, an RMA Order is automatically imported into Teamwork’s system.
New settings
Introduction of the Returns Manager functionality resulted in following updates and enhancements under chq > settings:
-
sales > sales documents
A new returns manager area has been added. In the area it is possible to:- select a fee type for returns in the fee for return drop-down menu
- select a fee type for credits in the fee for credit drop-down menu
- allow auto processing for exchanges
- allow returning to sell location
Also, under returns manager - auto process priority for split payments we removed
store creditand addedcredit memo. -
location settings > locations/location settings > new/edit
We’ve added the capability to mark the required location as allowed return location. The respective checkbox is available on the sales tab in the returns manager section:

-
sales > payment methods > [selected payment method]
In the returns manager section the following settings are now available:- non gift item - refund to: allows defining how refunding in case of a non-gift item is performed
- gift item - refund to: allows defining how refunding in case of a gift item is performed
-
inventory/catalog > styles & items designer
We’ve added the capability to configure the display of the auto apply return fee option for general single item and general service item.
To configure if the auto apply return fee option should display in an item’s dialog, click the required item and then click design:
 In case of style/model, the auto apply return fee displays on the items tab under the control & usage section.


Configuring email notifications about returns
CHQ allows for automatically sending a notification to the customer’s email address once the customer’s return has been processed.
To have return notifications sent automatically, make sure that, under settings > order management > customer orders > the email notifications - web and send sales section, the email notification for “return” checkbox is selected.
RMA Orders in CHQ
A Return Merchandise Authorization (RMA) Order is a document telling the system that merchandise is about to be returned.
An RMA Order allows for grouping return merchandise units, setting the return quantity, and specifying return details such as the shipping method, preferred refund method, and so on.
Security
To make use of the RMA orders functionality, the user must be granted the following security rights:
| Area | Right | Description |
|---|---|---|
| Sales | RMA Orders - Access | Access to RMA Orders |
| Sales | RMA Orders - Add Edit | Add new, edit RMA Orders |
Creating an RMA Order
In CHQ, creating an RMA Order is possible from the customer’s record. To do so:
- Under
sales > customers, find and click the record of the customer who is returning the merchandise. - On the left, click the sales tab.
- In the sales tab, click create RMA order:

- In the eligible for return items dialog that opens, all customer’s purchased items appear that have quantity available for return. By default, they are sorted by the receipt date column.
In the eligible for return items dialog, add all the items that are to be retuned with that RMA Order:- To find a specific item, use the search field at the top (
1
in the screenshot below):
 Searching is possible by the item’s PLU, CLU, UPC, style #, item description, RMA code, universal order #, sales order #, web order #, and sales receipt #.
 - To add an item to the RMA Order, fill out the qty to return column for that item.
Please note that the qty to return cannot exceed the qty value for that item.
Additionally, if the returned qty and open RMA order qty columns are populated, that also subtracts from the available to return quantity.The returned qty value shows what was already returned while the open RMA order qty indicates the quantity that is linked to other non-archived RMA Orders.
If the columns described above are not visible in the eligible for return items dialog, right-click the table header and then select the columns required for display. - Then, fill out the return reason for the item.
- If multiple items are selected, to add only those items to the RMA Order that have qty to return defined, apply the
selected for returnfilter by clicking filter at the top-right:

- Click create RMA order at the bottom.
- To find a specific item, use the search field at the top (
1
in the screenshot below):
- In the create RMA order dialog, fill out the details of the return such as the shipping method, preferred refund method, and so on:
 Please note that the exchange PLU field is visible only if in the eligible for return items dialog, only one item (one PLU) was selected for the return.
If an exchange of goods is to be made, click select in the field to add the exchange item. Once all the fields are populated as required, click yes at the bottom. Clicking yes creates a new RMA Order that will be visible under
Please note that the exchange PLU field is visible only if in the eligible for return items dialog, only one item (one PLU) was selected for the return.
If an exchange of goods is to be made, click select in the field to add the exchange item. Once all the fields are populated as required, click yes at the bottom. Clicking yes creates a new RMA Order that will be visible underIn the case when the return item is a style/model type, exchanging is possible only for a PLU within the same style/model.
If the return item is a single item type, on clicking select, the exchange PLU field is automatically filled out with the PLU of the return item.chq > sales > RMA orders.


Searching for an existing RMA Order
Existing RMA Orders can be found chq > sales > RMA orders.
Under RMA orders, the latest RMA Orders are listed in the recent section (
1
in the screenshot):
 RMA Orders can display with the following statuses:
pending: the return has been created and is waiting for the automatic processing or manual completionreturned: the return has been completedcancelled: the return has been cancelled by the user. Only returns in the pending status can be cancelled undersales > returns manager > [selected return line]not received: items from an RMA Order that haven’t been received by the retailer. Calculated as [qty] - [returned qty] - [cancelled qty] - [pending return]A single RMA order can have multiple statuses at the same time, for example,
returnedandpending. This means that some items from the order have been already returned and some are waiting for processing.
To apply a filter to the list of RMA Orders, fill out the required field in the filter section (
2
in the screenshot above). By default, the list is filtered by pending in the return status field and do not show archived in the do not show archived field.
To find a specific Order, use the search field at the top-right (
3
in the screenshot above). Searching is possible by the following fields:
- RMA order #
- RMA order external ID
- RMA code
- return tracking #
- universal order #
- sales order #
- web order #
- sales receipt #
- return receipt #
To see a detailed list of existing RMA Orders, click list:

RMA Orders list view
The list view shows a detailed grid with existing RMA Orders. The following columns are available for display:
To configure what columns display in the list, right-click the header of the grid and then select the required options.
- RMA order #: the universal number of the RMA Order
- return status: the status(es) from the associated return lines in the returns manager area. Possible values are
pending,returned,cancelled, andnot received - created date: the date and time when the RMA Order was created
- created by: the user who created the RMA Order
- return date: the latest return date from the associated return lines in the returns manager area
- customer name: the customer who is making the return
- shipping method: the shipping method used for the return
- return tracking #: the tracking number of the return
- preferred refund method: the customer’s preferred method of refunding
- giftee email: the email address which will receive a notification about the return. The defined giftee email is used if preferred refund method =
virtual gift card to giftee email - qty: the total original sell quantity
- RMA order total: the total RMA order amount including all refundable fees
- returned qty: item quantity that has been returned (has the
returnedstatus) - refunded amount: the amount that has been refunded to the customer for the returned qty
- cancelled return qty: the item quantity in cancelled returns (has the
cancelledstatus) - avail. for return: the available to return amount calculated as [original sell qty] - [returned] - [cancelled]
- pending return: the total item quantity with the
pendingstatus - not received qty: item quantity from an RMA Order that hasn’t been received by the retailer. Calculated as [qty] - [returned qty] - [cancelled qty] - [pending return]
- universal sales order #: the link to the associated universal Sales Order
- sales order #: the link to the associated Sales Order
- web order #: the link to the associated Web Order
- SO custom lookup 1: a user-defined field from the associated SO. This column is visible if marked as
CHQ visibleundersettings > sales > custom fields > sales order headerand may have a custom label if defined - sales order date: the date when the associated SO was created
- sales order total: the total amount from the associated SO including fees and taxes
- sales receipt #: the link to the associated SR
- return receipt #: the link to the associated return receipt
- archived: the checkbox indicating if the RMA Order was archived
- RMA order external ID: the ID by which that RMA order can be updated via importing from third-party systems
By clicking filter at the top-right (
1
in the screenshot below), you can filter the RMA Orders by the return status, manual return, CSR notes, preferred refund method, and archived/not archived criteria:
 Alternatively, use the search field (
2
in the screenshot above) to find a specific RMA Order.
Alternatively, use the search field (
2
in the screenshot above) to find a specific RMA Order.
Also, the following options are available at the top-left:

-
Clicking edit opens the selected RMA Order for editing. If the user doesn’t have the RMA Orders – Add Edit security right, the view button displays instead.
-
Clicking manage return opens the associated [RMA code] - [status] dialog from the returns manager area. The dialog shows details about the return item and allows for changing the RMA code, configuring the refunding options, or cancelling the return.
-
Clicking archive allows for marking the RMA Order as archived.
-
Clicking actions makes the following options available:
- run auto return process: launches the automatic process that finalizes returns with the
pendingstatus. This will reset the schedule for the next planned auto return process - suspend auto return process: opens the dialog where it’s possible to define when the next auto return process should be run.
- run auto return process: launches the automatic process that finalizes returns with the
Clicking an RMA Order in the list view opens that RMA Order for viewing or editing.
Viewing an RMA Order
The RMA order [order number] - [status] dialog that shows RMA Order related information includes the following tabs:
- general
- items
- user info
The general tab
The general tab contains RMA Order related information that was filled out on the order creation:
 Please note that under general, links to the associated documents are listed (
1
in the screenshot above) such as Sales Order, Web Order, and Sales Receipt.
Please note that under general, links to the associated documents are listed (
1
in the screenshot above) such as Sales Order, Web Order, and Sales Receipt.
Under totals (
2
in the screenshot above), the following quantity values are available:
- qty: the total of the original sell quantities
- returned qty: the quantity that has been already returned (has the
returnedstatus) - cancelled return qty: the total quantity of the return items with the
cancelledstatus - avail. for return: the quantity available for returning. Calculated as [qty] - [returned qty] - [cancelled return qty]
- pending return: the total quantity of the return items with the
pendingstatus
The items tab
The items tab shows all the return items assigned to that RMA Order:
 Searching for a specific item is possible via the search field located at the top-right.
Also, selecting an item and then clicking edit at the top-left opens the dialog where it’s possible to see item details as well as change the return reason and exchange PLU for that item.
The user info tab
The user info tab shows read-only information about when and who created and modified that RMA Order.
Returns Manager in CHQ
As of version 6.33.95.0, instead of return worksheets, in CHQ returns manager is used. To access the functionality, go to chq > sales > returns manager:

Security
To be able to make use of the returns manager functionality, the user must be granted the following security rights:
| Area | Right | Description |
|---|---|---|
| Sales | Returns Manager - Access | Allows users to access Returns Manager |
| Sales | Returns Manager - Add Edit | Allows users to add new, edit or remove lines in Returns Manager |
| Sales | Returns Manager - Finalize Return | Allows users to finalize returns in Returns Manager |
| Sales | Returns Manager - Refund to virtual gift card | Allows users to add the virtual gift card refund option in the Returns Manager |
Interaction view
Clicking returns manager under chq > sales, opens returns manager interaction view. There, it is possible to:
- review
pending,returnedorcancelledreturn items - in the recent section 1 - search for the required return items 2
- filter out return items based on a set of criteria - in the filter section 3

Filtering
It is possible to use the following parameters or their combination to filter out the return items you need:
- location
- RMA code
- return status (
pending,returned, orcancelled) - created date
- return tracking #
- universal sales order #
- sales order #
- web order #
- sales receipt #
- return receipt #
- RMA order #
- customer, email (sell-to customer / sell-to email from the original Sales Receipt or name /primary email from the customer record linked to the return line)
- style #
- PLU, UPC, CLU
- return worksheet #
On applying filters in the returns manager interaction view, the list view opens to display only those items that match the specified filtering criteria.
Searching
Searching for return items is possible by the following parameters:
- RMA code
- return tracking #
- universal order #
- sales order #
- web order #
- sales receipt #
- return receipt #
- RMA order #
- universal RMA order #
- return worksheet #
List view
Returns manager list view displays all return items from all RMA worksheets. From the list view, it is possible to:
- add new return item as well as edit or remove an existing return ( 1 )
- run or suspend the auto return process ( 2 )
- filter the item display by location ( 3 ) as well as by a set of other criteria ( 5 )
- search for the required return item ( 4 )
- review return item details in the grid or the bottom section detail panels ( 6 )
Also, from the detail panels, you can access the RMA related information as well as the information on the warehouse for the selected item.

Item grid
For each return item in the list view grid, that item related information displays in columns. By default, the following is available:
You can configure which columns display in the grid. To do so, right-click the table header and select the columns you want to display.
- RMA code: item RMA code from the RMA order
- condition: return condition from the list of predefined conditions
- return reason: return reason from the list of predefined return reasons
- qty: returned item quantity (if return status is
pendingand avail. for return < qty, then the value displays in red - available for return: number of items available for return
- refund amount: the amount to refund
- sales receipt #: linked original Sales Receipt
- sales order #: linked original Sales Order
- return status: the status of that return –
pending,returned, orcancelled - refunded to: all the refund options used
- return receipt #: linked Sales Receipt for the return
Filtering
In the list view, above the grid, you can select the required location from the location drop-down menu to display the return items for. If <all> is selected, all available return items for all locations will display.
Also, clicking filter in the top right corner opens the panel, where you can configure filtering by the following criteria:
- return status: display items with the required return status(es) only
- ext. return status: display items with the required external return status(es) only
- manual return: display items that were manually returned and/or via the auto return process
- refunded to: display items with a particular refund method(s)
- RMA code: display items with RMA code found and/or not found
Searching
In the list view, searching for a return item is possible by PLU, CLU, UPC, style #, all item descriptions, item RMA code, return tracking #, universal order #, sales order # , web order #, RMA order #, sales receipt #, and return worksheet #.
Adding return item
In the list view, clicking add in the top left corner opens the add return lines dialog:
 In the condition drop-down menu on the top right of the add return lines dialog optionally select the required return condition.
Then, use the search to add field in the upper left corner to find the required item. Searching is performed by the RMA code.
Item is added automatically if Sales Receipt lines with positive quantities are found by the RMA code. If such lines have not been found, the RMA not found dialog displays asking if you still want to add the respective item. In the latter case, the RMA code field is populated by the value used in the search to add field.
You can configure which columns display in the grid. To do so, right-click the table header and select the columns you want to display.
- qty to add: editable, zero and negative not allowed
- condition: editable return condition; can be empty
- RMA code: item RMA code
- PLU: item PLU
- sales receipt qty: taken from the original SR;
0if the line is not linked to SR - returned qty: sum of quantities in all return receipt lines linked to the SR line
- avail. for return: calculated as difference between sales receipt qty and returned qty (
0if < 0) - sales receipt #: linked SR
- sales order #: displays if SR is linked to SO; otherwise - empty
- final sale: taken from SO if SR is linked to SO
- gift item: taken from SO, if SR is linked to SO
Once all the required items are added to the add return lines dialog, click add in the bottom right corner. On clicking add, a new return worksheet with return items is created.
Editing return item details
Clicking edit in the return manager list view with a return item selected opens the RMA [RMA code]-[ext. return status] dialog:

The return tab
On the return tab of the dialog, in the general section the following information displays:
- sales receipt #: linked SR. The Access Sales Receipts right is required; not editable
- sales order #: linked SO. The Access Orders Management right is required; not editable
- sales order date: order date from SO; not editable
- customer name: linked customer; not editable
- RMA order #: linked RMA order; not editable
- exchange PLU: PLU of the exchange item; not editable
- RMA order notes: notes from the linked RMA order; not editable
- preferred refund method: preferred refund method from the linked RMA order; not editable
- condition: return condition; editable if the user has the Returns Manager - Add Edit right
- return reason: return reason; not editable if return status is
pending (finalizing) - giftee email: the giftee’s email address; editable if return status is
pendingand user has the Returns Manager - Add Edit right - return date: the date of the return, cannot be greater that the current local date-time; editable if the return status is
pendingand user has the Returns Manager - Add Edit right - qty: return quantity; editable if the return status is
pendingand the user has the Returns Manager - Add Edit right, displays in red if the value is greater than avail. for return - avail. for return: available for return quantities; not editable
Additionally, next to general, clicking the WH info link opens the RMA [RMA code] - WH info dialog:
 In the dialog, the warehouse notes about the return item are available. The information aims at helping CHQ users to link the return item with the respective document (RMA Order, Sales Order, and/or Sales Receipt) line.
Back to the RMA [RMA code]-[ext. return status] dialog, in the return section, the following displays:
- return receipt #: linked return receipt; not editable
- exchange order #: linked exchange sales order; not editable
- exchange order status: current status of the linked exchange sales order; not editable
In the total section, the following information is available:
- net price: original amount excluding fees/taxes
- refundable fees: original fee amount subject to refunding
- tax: original tax amount
- return value: original amount including fees/taxes
- return fee %: fee % for this return; editable if the return status is
pendingand the user has the Returns Manager - Add Edit right - return fee: return fee amount; editable if the return status is
pendingand the user has the Returns Manager - Add Edit right - return credit: credit fee amount; editable if the return status is
pendingand the user has the Returns Manager - Add Edit right - refund amount: calculated as original amt incl. fees/taxes - fee amount + credit fee amount; if negative, displays in red; not editable if the return status is
pending (finalizing)
Additionally, clicking show all fees in the section opens the RMA [RMA code] - original fees dialog, where all the fees linked to the original Sales Receipt item display.
In the dialog, the fees can be marked as refundable under the following conditions:
- if exchange PLU is not set, and
- the return status is
pending, and - the user has the Returns Manager - Add Edit right

In the notes section, the notes from the return line display. The user can add or modify the notes if they have the Returns Manager – Add Edit right.
The info tab
Clicking info in the RMA [RMA code]-[ext. return status] dialog opens the info tab:
 On the tab, the following information displays:
-
In the info section:
- universal SO #: linked Sales Order; to open the order the Access Orders Management right is required
- web order #: linked Sales Order; to open the order the Access Orders Management right is required
- shipping method: the method of shipping used
- return tracking #: displays as a link if a tracking URL is defined for the shipping method in use
-
In the promo section, the information on a promo record displays if at least one promo record is related to the linked SO line.
-
In the return section:
- location: a return location; editable if the status is
pendingand the user has the Returns Manager - Add Edit right - worksheet #: a number of the return worksheet the return item belongs to
- auto return process error: the text of the error message if the auto return process cannot be completed
- location: a return location; editable if the status is
-
In the user info section, the create and last modified dates as well as the user who added or modified the return item display.
Change RMA code
Clicking change RMA code at the bottom of the RMA [RMA code]-[ext. return status] dialog opens the change RMA code dialog:
 In the dialog, it is possible to specify a new RMA code for the item.
Please be advised that changing the RMA code will remove existing links to an SR / SR line, customer, inventory item, SO / SO line, RMA order. Also, the following fields will be cleared: return tracking #, shipping method, exchange PLU, avail. for return, original amt, original fee amt,original tax amt, original amt incl fees/taxes. Fees and refund amount are recalculated.
pending.
Cancel return
Clicking cancel return at the bottom of the RMA [RMA code]-[ext. return status] dialog opens the cancel return dialog:
 In the dialog, the user can choose from the two options:
- return by POS: if selected, on clicking yes, the return item is marked as
cancelled - return by POS - return rejected: if selected, on clicking yes, the return item is marked as
cancelled - return rejected
The cancel return button is visible if the user has the Returns Manager - Add Edit right and the return status is pending.
Exchange
Clicking the exchange button at the bottom of the RMA [RMA code]-[ext. return status] dialog opens the finalize return - exchange confirmation dialog. On clicking yes in finalize return - exchange, a return receipt as well as a new Sales Order for an exchange item are created. Also, the return item is marked as returned - exchange.
The exchange button is visible and enabled under the following conditions:
- if the user has the Returns Manager - Finalize Return right, and
- the return status is
pending, and - the exchange PLU is populated for the return item.
Refund
Clicking refund at the bottom of the RMA [RMA code]-[ext. return status] dialog opens the refund dialog:
 In the refund dialog, it’s possible to define how the customer is to be refunded.
The following information is available in the dialog:
-
In the payment/refund history section, all payments and refunds are shown from the associated Sales Order(s) or Sales Receipt. The balance field indicates the total balance of the listed payments and refunds.
-
In the preferred refund method section, the preferred refund method from the RMA Order is shown.
-
In the refund section, available refund options as well as the refund amount for each option are suggested automatically.
However, it is possible to configure the refund options manually. The following fields are available:- refund amount: the total refund amount
- refund to: an available refund method. Possible values are
original card,Global-E,virtual gift card,virtual gift card to giftee email,credit memo, andoffline payment. To remove a refund option from the dialog, click remove next to the respective refund to field. - amount: the amount returned via the respective refund method. Possible values range from
0to792281624. For refund to =original card, the amount cannot exceed the original captured amount. - giftee email: the email address of the holder of the virtual gift card. Visible and required if refund to =
virtual gift card to giftee email - original card: the type and masked number of the customer’s card. Visible if refund to =
original card - available for refund: the amount that can be returned to the customer’s card. Visible if refund to =
original card - remaining balance: the difference between the refund amount and the sum of the user-defined amounts for each refund option. To finalize the return, the remaining balance must be
0.
Additionally, to add another refund method, click add refund option.
Clicking finalize return at the bottom opens the finalize return confirmation dialog. Click yes to finalize.
After clicking yes, the document processing dialog opens:
 When processing is finished, the following messages can display:
The return has been finalizedThe return has not been finalized. If not finalized, the error reason will display in the message
Alternatively, to close the document processing dialog, the user can select I don’t want to wait. I’ll check the return status later checkbox and then click close.
To check the result of the refund processing later, it’s required to:
- find and open the respective return line again under
chq > sales > return manager - check the status of the return in the dialog header. Additionally, if the return hasn’t been finalized, the error message with the error reason will display in the dialog.
See also
Cloud HQ User Manual: Settings
Other enhancements
Configuring embedded Looker dashboard session length
Build 6.33.95.0: PRO-5263
For CHQ embedded Looker reports, we’ve added a new setting — Area: Dashboard.LookerSessionLength.
This setting allows for specifying the amount of time the user can remain idle without having to reload the report.
The Area: Dashboard.LookerSessionLength setting is configured at the database level. Its default value is set to 15 minutes.
JSON-based Sales Order History Export API: New fields added, RmaCode removed
Build 6.33.95.0: DS-2124
The following new fields have been added to JSON-based Sales Order History Export API at the Item level:
- SalesReceipItemId
- RMANo
- Qty
- Receipt date
Also, the RmaCode field has been removed.
Issue Resolutions
SalesReceiptFullExportToJson_get task optimization
Build 6.33.95.0: DS-1978
We’ve optimized the SalesReceiptFullExportToJson_get task to reduce the time required for its execution.
Discrepancy marker when posting Transfer Memos via XML-based Transfer Memo Import API
Build 6.33.95.0: DS-2070
We’ve fixed the issue where when posting via XML-based Transfer Memo Import API, Transfer Memos would be marked as having discrepancies, though showing qty out = qty in.
The issue has been fixed. Now, Transfer Memos are posted as expected.
JSON-based Sales Receipt Full Export API: Incorrect value type of MembershipCode
Build 6.33.95.0: DS-2131
We’ve fixed the issue where the JSON-based Sales Receipt Full Export API returned a string value instead of number for the MembershipCode field.
JSON-based Sales Receipt Export API: DeviceId not returned
Build 6.33.105.0: DS-2005
We’ve fixed the issue where when specifying DeviceName for DeviceIdentifierSetting in the JSON-based Sales Receipt Export API request call, there was no DeviceIdentifier returned in the API response.
XML-based Transfer Memo In Import API: Transfer Memos In not imported to CHQ
Build 6.33.107.0: DS-2205
We’ve fixed the issue where importing Transfer Memos In (TMIs) via XML-based Transfer Memo In Import API could occasionally fail with the “Task.ImportTransferTaskHandler Error: 0 : RTW.AdminServer.Scheduler.Core.TaskProcessException: Cannot insert the value NULL into column ‘MemoNo’, table ‘CloudHQ.dbo.TransferMemo_t’; column does not allow nulls. UPDATE fails” error message.
Missing External ID in imported customer records
Build 6.33.107.0: DS-2209
We’ve fixed the issue where, as a result of customer record import via JSON-based Secure Customers Import API, the external ID value could occasionally be missing under chq > sales > customers > [required customer] > the system tab.
ASNs not generated automatically
Build 6.33.110.0: DS-2220
As of version 6.33.110.0, we’ve fixed the issue where some ASNs could occasionally not be generated automatically against the Ship Memo.
Updated JSON-based Sales Receipt Full Export API and JSON-based Receipt Full Export API
Build 6.33.110.0: DS-2216
As of version 6.33.110.0, JSON-based Sales Receipt Full Export API and JSON-based Receipt Full Export API have been extended with a new MembershipCode filter. The filter supports the following two operators: Equal and Contains.
Incorrect traffic count details
Build 6.33.114.0: DS-2305
We’ve fixed the issue where the traffic count data, imported to CHQ from NEDAP (a third-party traffic counting service) via JSON-based Traffic Counter Import API, would occasionally be duplicated or missing.
Incorrect display of item committed quantities on Ship Memo rejection
Build 6.33.114.0: DS-2260
We’ve fixed the issue where quantities from a rejected Ship Memo still displayed as committed in item availability dialog. This dialog is available from various CHQ areas, for example, under chq > sales > order management > [selected sales order] > items > check qty.
Also, the same quantities would display as committed in the [item] - [location] - committed qty dialog.
To access the [item] - [location] - committed qty dialog, click the value in the committed column of the item or style check quantity dialogs. The latter opens on clicking check qty in various CHQ areas, for example, on the items tab of a Sales Order.
JSON-based RMA Order Export API: Getting incorrect RMANo values
Build 6.33.114.0: DS-2211
We have fixed the issue where JSON-based RMA Order Export API wouldn’t occasionally work due to inability to get the correct RMANo value for the returned item.