Version 6.34
Sales
Rejecting Ship Memos from the Sales Order dialog
Build 6.34.254.0: PRO-6117
We’ve introduced the capability to reject a Ship Memo (SM) from the selected Sales Order in CHQ.
Purpose
Rejecting a Ship Memo from the selected Sales Order dialog allows for improving user experience as well as saving time when working with Ship Memos.
How to reject a Ship Memo
To reject a Ship Memo:
-
Go to
chq > sales > order management. -
Find and open your Sales Order.
-
In the dialog that opens, go to the shipments tab.
-
Click to select your Ship Memo, then click reject above the table.
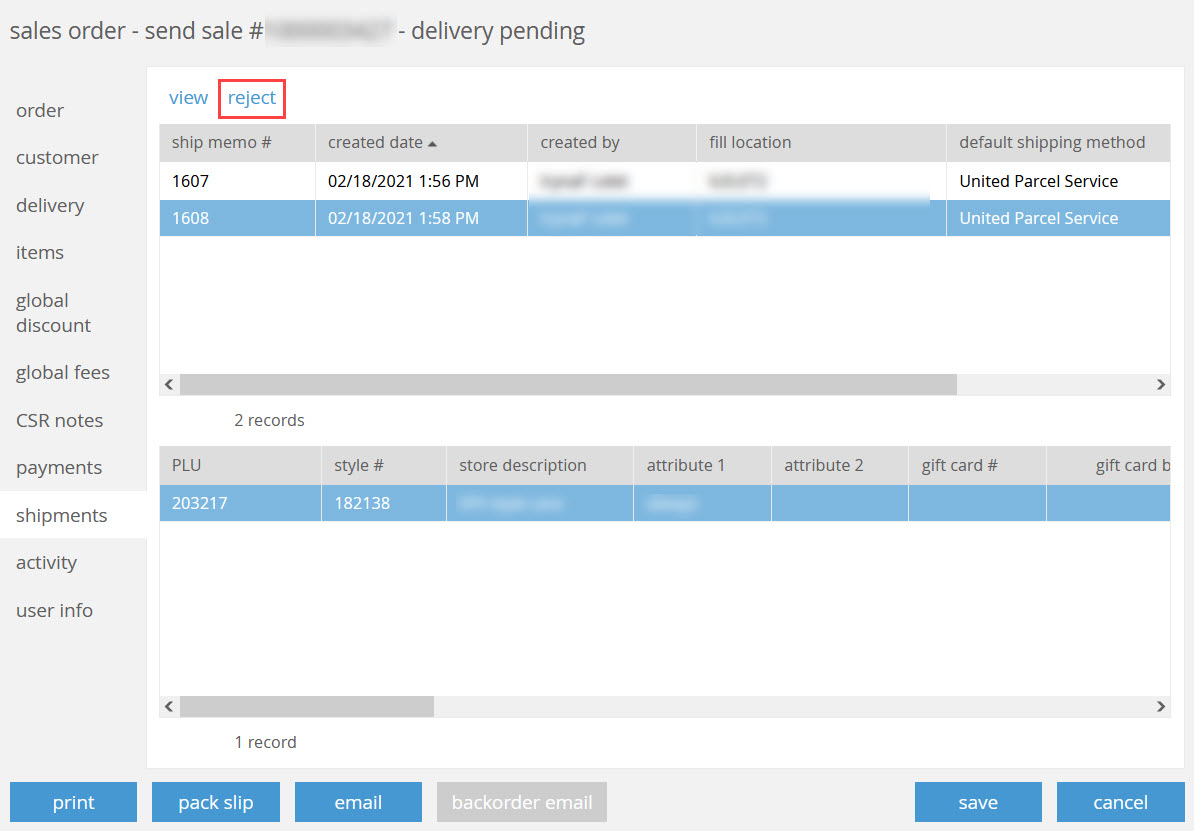
The reject button is not active when:
- there are no Ship Memos on the selected Sales Order
- the selected Ship Memo has any of the following statuses:
shipped,picked up,drop ship doneorrejected - the user doesn’t have the Process Ship Memos in CloudHQ security right.
-
In the reject reason dialog, click to select the reject reason.
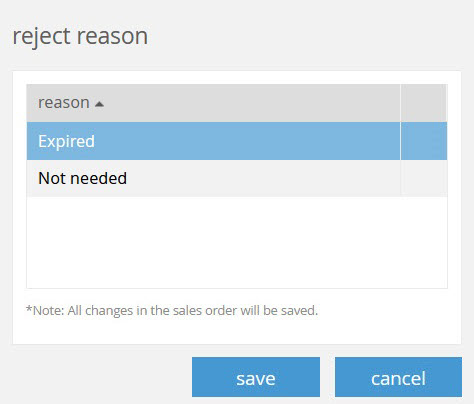
-
Click save twice.
Rejecting a Ship Memo is not possible in the following cases:
- SM was modified after opening the sales order dialog
- SM contains an activated Gift Card
Also, if the selected Ship Memo has delivery method drop ship.
See also
Cloud HQ User Manual Sales & eCommerce
Optimized execution of OMS-related tasks
Build 6.34.254.0: PRO-5494, PRO-3306, DS-2027
We’ve introduced updates to ensure better performance of OMS-related tasks (in particular, filtering, searching, and sorting) for Sales Receipts and Customers.
Returns Manager
Build 6.34.254.0: PRO-2856
Testing of the Returns Manager functionality has been completed.
Purchasing
Custom ASN Import in CHQ
Build 6.34.254.0: PRO-4867
In version 6.34, we’ve introduced a customized version of the Excel-based ASN import. This import considers a new Factory Cost parameter.
Please be advised that the custom ASN import is available on request only.
Importing ASNs is possible under chq > purchasing > ASNs > import > new.
Calculating the Factory Cost value is based on user-defined values from the following custom tables:
- Commissions
- Duty and Freight
- Shipping and Design
To simplify importing of the data to custom tables as well as reviewing custom table settings, custom reports can be created based on specified requirements. In CHQ, reports are available under analytics > reports.
Settings
Send Sale: Enabling the Ship to Customer option
Build 6.34.254.0: PRO-2781
To respect changes made in Teamwork POS Pro version 6, in particular, introducing new types of Send Sales, we have:
- removed the Send Sale option from
settings > company settings > v6 App Designer - added new available for POS ship item setting to the shipping method dialog under
settings > company settings > shipping methods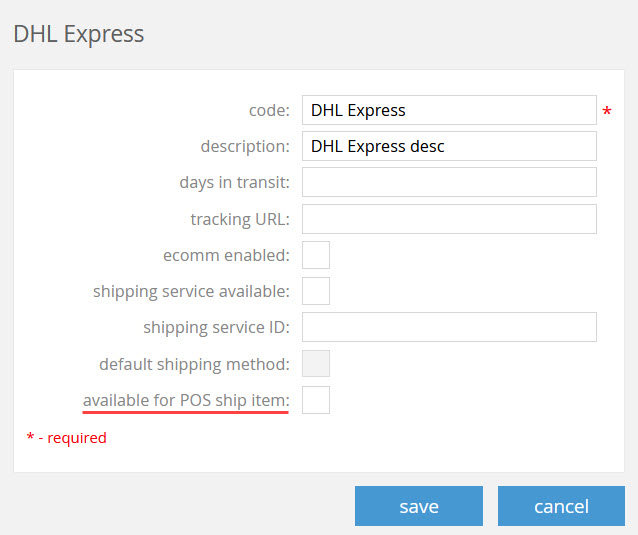
As of version 6.34, the customer can choose during the sale where the purchased item(s) should be shipped:
- directly to the customer (Ship to Customer), or
- to the selected store (Store Pickup).
Ship to Customer may be useful for situations when the customer purchases an item in the store, but requests that it should be shipped directly to the customer. Also, this might be an option when the item is out of stock and the store arranges for the item to be shipped directly from the warehouse to the customer.
During Store Pickup, a Ship Memo is sent to the store and the order is filled from store inventory. The order can be also transferred to the store, and held for customer pickup. If the order is never picked up, the store rejects the Ship Memo, and the order is canceled.
See also
Updated management of discounts: required customer
Build 6.34.254.0: PRO-5975
We’ve added the capability to require a customer be added to the transaction in order to apply a specific discount during the sale.
Purpose
This update may be useful to ensure that customer-defined discounts are applied correctly, for example, for registered customers only.
How to configure
- In CHQ, go to
settings > sales > discount reasons. - Сlick to select your discount reason record and then click edit.
- In the general tab, select the require customer checkbox (see
A
in the screenshot below). The checkbox is empty by default.
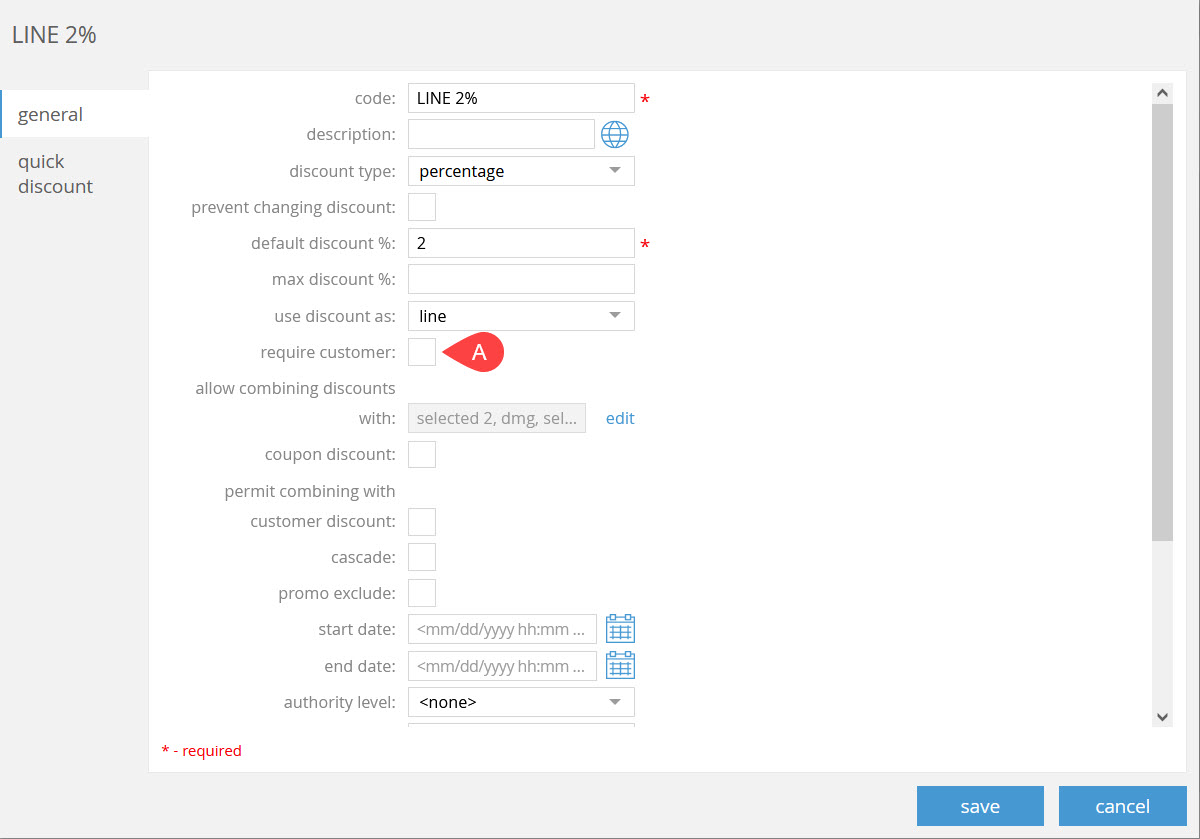 If the require customer checkbox is selected, the store associate is prompted to add a customer to the sale in POS Pro V6.
Once the customer is added, the discount is activated. - Click save.
See also
Coupon and promo discounts in Sales Orders
Build 6.34.254.0: PRO-3722, PRO-6291
Respective to changes made in Teamwork POS Pro version 6, in particular, introducing the coupon functionality, the following changes have been made to Sales Orders at the item level (chq > sales > order management > [selected sales order] > items > [selected item]):
-
On the discount tab:
- the discount reason field displays
couponif there is only one coupon discount and there are no manual or promo discounts - the discount reason field displays
promoif there is only one promo discount and there are no manual or coupon discounts - the discount reason field displays
multipleif there are two or more discounts (manual, coupon, or promo) - the amount and percentage fields are not editable if there is a
promoorcoupon, ormultiplemanual discounts
- the discount reason field displays
-
On the general tab, the qty field is disabled if there is a global coupon discount or multiple global manual discunts.
At the Sales Order proper level (chq > sales > order management > [selected sales order]), on the global discounts tab:
- the discount reason field displays
couponif there is only one coupon discount and there are no manual discounts - the discount reason field displays
multipleif there are two or more discounts (manual or coupon) - the amount and percentage fields are not editable if there is a coupon discount or multiple manual discounts
Additionally, this update ensures that all the applied discounts are transferred from the respective Sales Order to the Sales Receipt created as a result of Ship Memo finalization.
See also
- Cloud HQ User Manual Sales & eCommerce in Teamwork Confluence
- V6.34 Mobile Release Guide
Payment processing logs in CHQ
Build 6.34.254.0: PRO-5380
We’ve introduced the capability to view payment processing logs in CHQ as well as search and filter the existing log records.
Purpose
The log record displays data on various payment related actions.
Checking payment processing logs may be useful to track down the statuses of transactions as well as to search for errors, if there are any.
How to access payment processing logs
To access the new area, go to chq > settings > server tasks > payment processing logs:
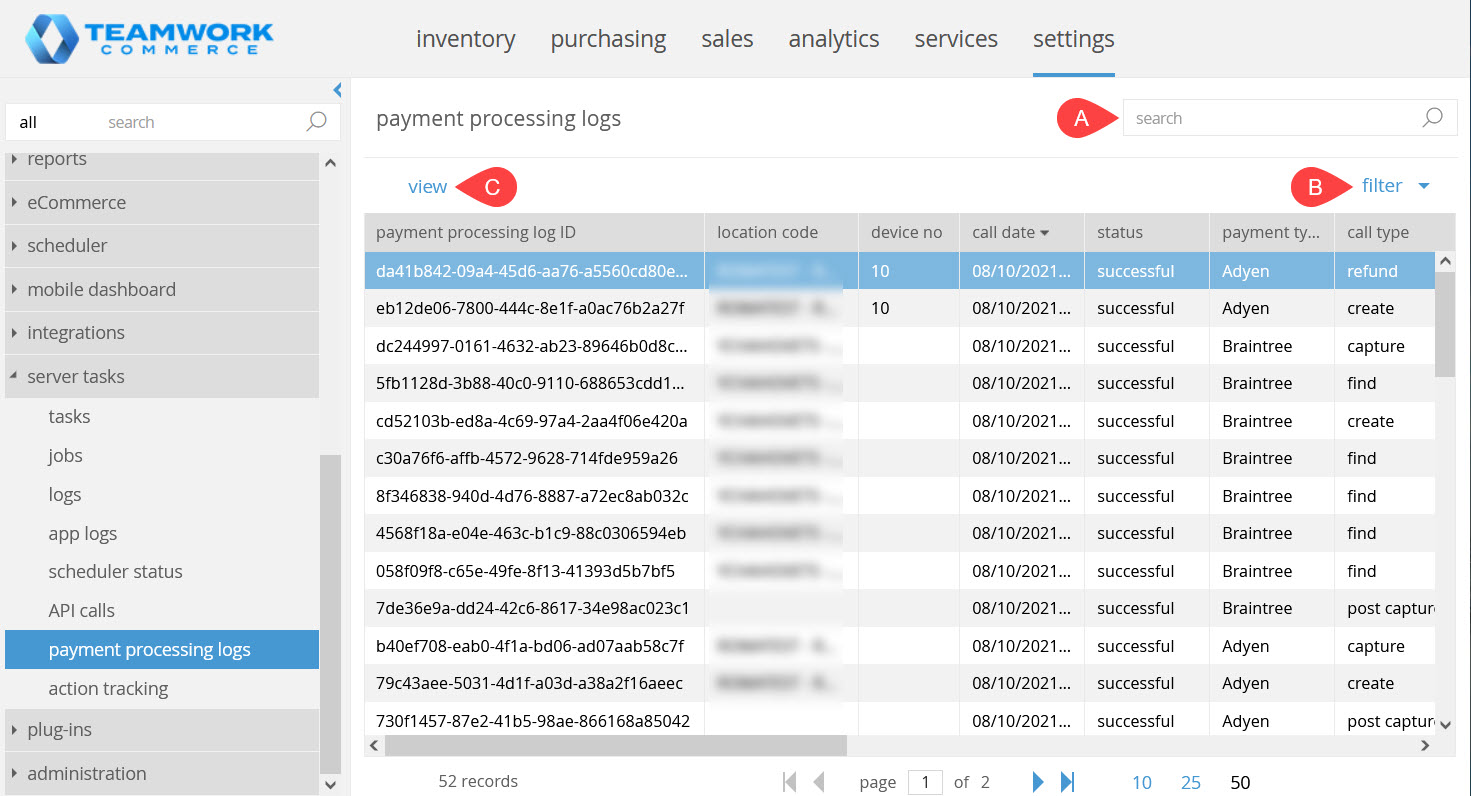
In the payment processing logs area, the following information is available in the grid:
- payment processing log ID: the unique ID of the payment processing log
- location code: the code of the location where the payment was processed
- device no: the device (iPad) number where the payment related operation was made
- call date: the date and time when the API call to the payment processor was made
- status: the status of the payment related operation. Possible values are
successfulanderror - payment type: the payment processor name, for example,
AdyenorPaypal - call type: the type of operation performed, for example,
capture,voidorrefund - transaction ID: the ID number of the transaction
- amount: the amount of money in the transaction. Decimal value, from 2 up to 5 decimal possible.
- produced transaction ID: the unique ID number of the transaction provided by the payment processor in use
- entity type: possible values are
sales receipt,sales order,sales order held paymentandempty - DTN: Device Transaction Number, a number that uniquely identifies the document across the whole Teamwork Commerce suite. Displays as a link to the respective document in CHQ; empty if not found
- message: the message describing the performed operation
Additionally, right-click the column header to add the following columns to the list:
- created date: the date and time when the log record was created
- modified date: the date and time when the log record was modified
- streaming date: the date and time when the log record was streamed to the database
- employee: the employee who made the API call
- entity ID: the unique ID number of the respective entity type
Please note that sorting is possible only by the call date column. By default, the sorting is set in the descending order.
To find a specific log record, use the search field ( A in the screenshot above) at the top-right. Searching is possible by the following fields:
- payment processing ID
- entity ID
- Sales Receipt/Sales Order DTN
- transaction ID
- produced transaction ID
By clicking filter above the grid ( B in the screenshot above), you can filter the records by status, location code, device no, call date, payment type, call type and entity type criteria.
Reviewing information on the selected log record is possible by clicking view above the grid ( C in the screenshot above).
The payment processing dialog
Clicking view in the payment processing logs area with a record selected opens the read-only payment processing dialog.
The dialog includes the following tabs:
- general
- request
- response
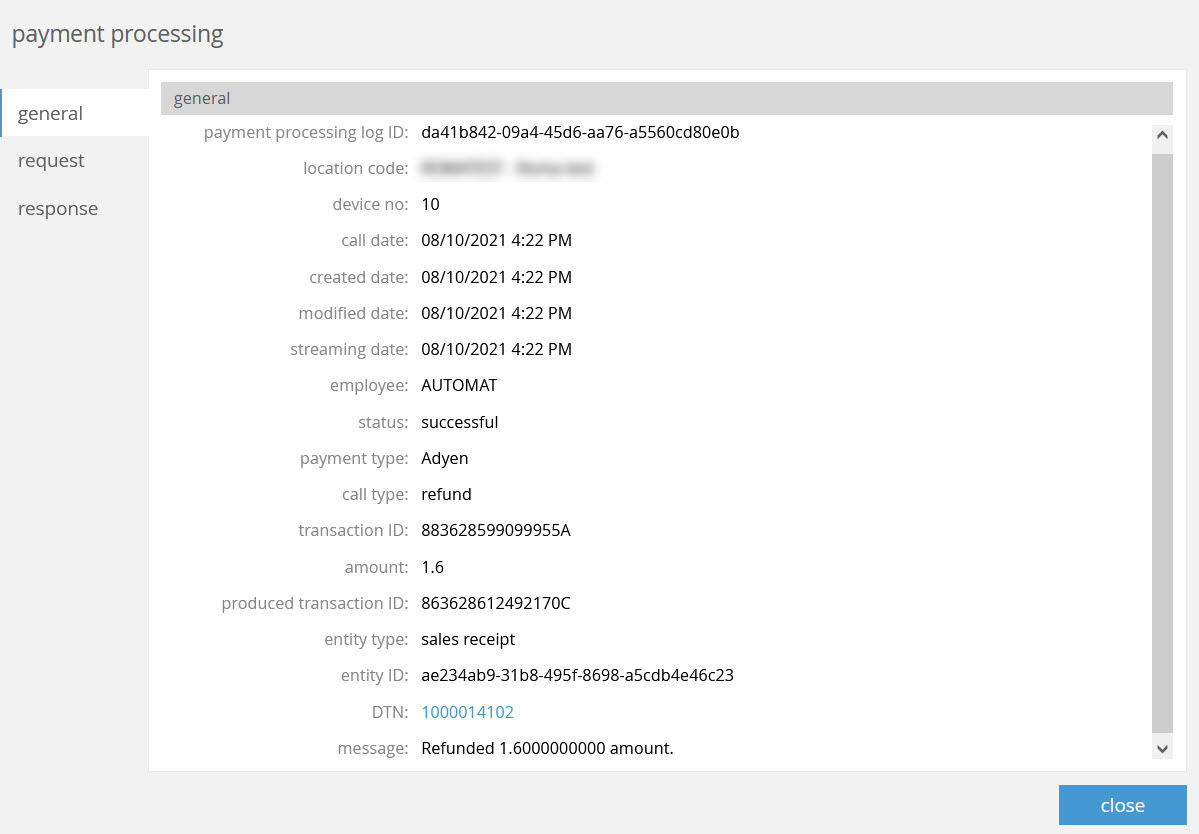
The general tab
In the general section of the general tab the following read-only information is available:
The request tab
The request tab contains the read-only request body in the request data section. For example, in the screenshot below, the refund request to Adyen displays:
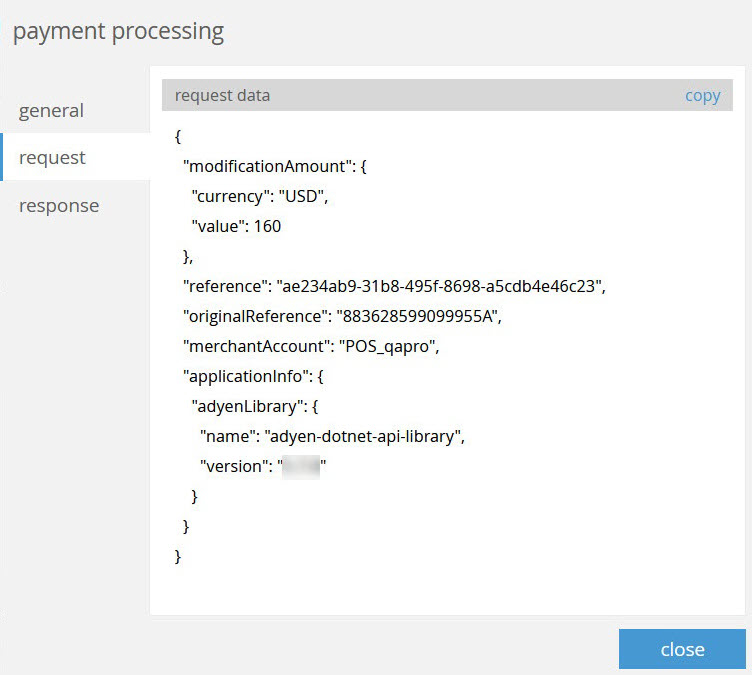
To copy the request body, click copy at the top-right.
Please note that the copy button is available only if there is a request body in the request data section.
The response tab
The response tab contains the read-only response text in the response data section. In the screenshot below, for example, the response from Adyen is received:
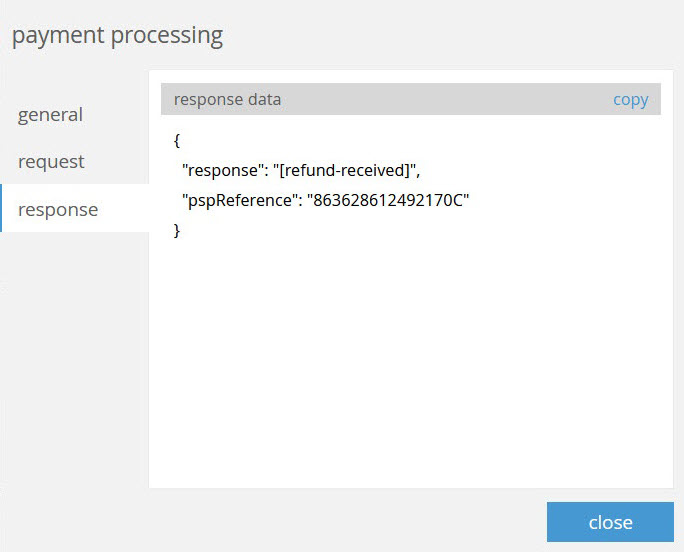
To copy the response, click copy at the top-right.
The copy button is available only if there is a response text in the response data section.
See also
Cloud HQ User Manual: Settings
Action tracking logs in CHQ
Build 6.34.254.0: PRO-5381
We’ve introduced the capability in CHQ to track the actions made in POS Pro V6 and CHQ.
Purpose
Tracking the performed actions allows for keeping the history of user activity in one place. For example, you can see who is performing such actions as login or logout, thus ensuring that there are no security issues.
Also, regular checking of action logs allows users to timely react to errors, if there are any.
How to access the action tracking area
The new action tracking area is available under chq > settings > server tasks > action tracking.
In the new action tracking area, you can check information on the selected action record by clicking view ( A in the screenshot below).
To find an action record, use the search field ( B in the screenshot) at the top-right.
By clicking filter above the grid ( C ), you can filter the records by location code, device no, action date and action criteria.
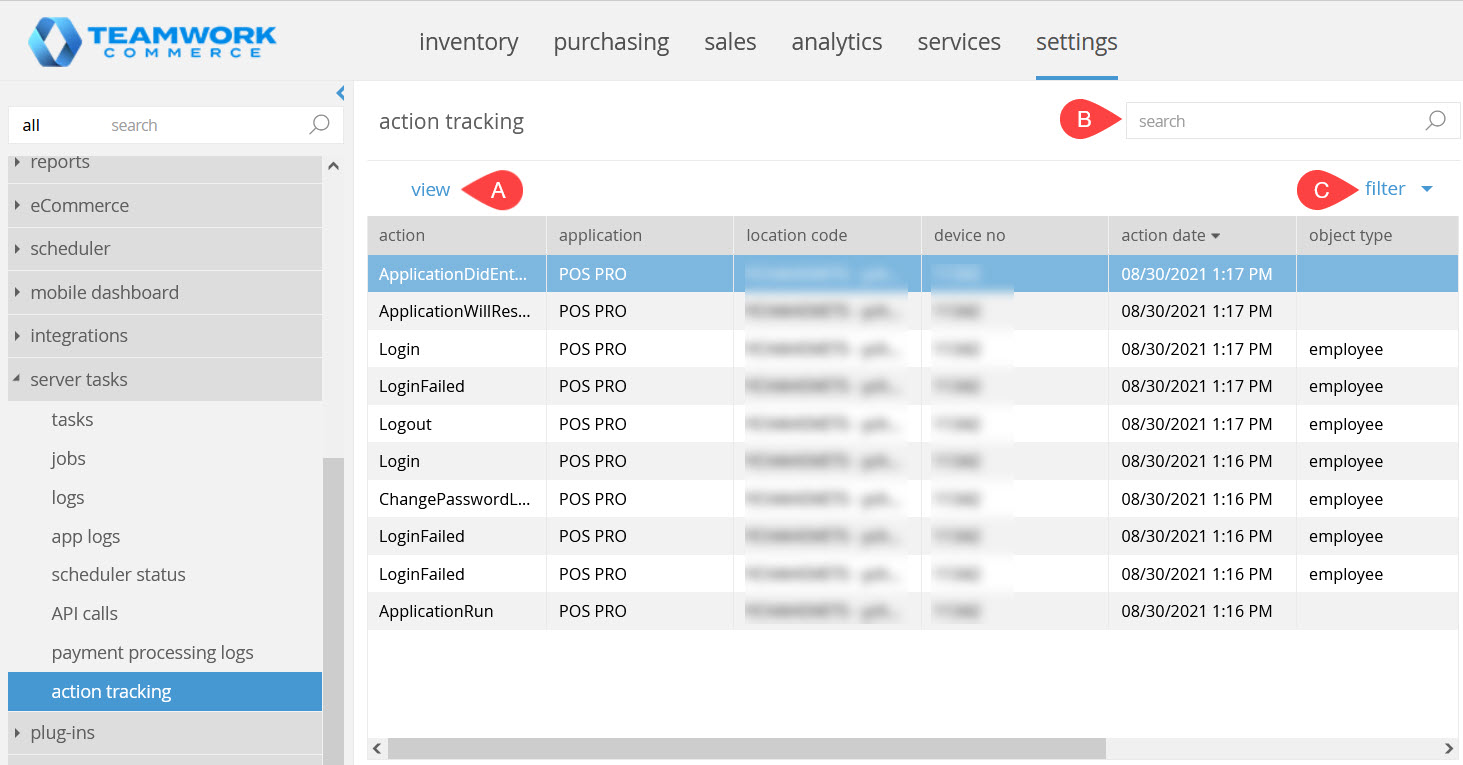 In the action tracking area, the following information is available in the grid:
- action: the name of the action performed, for example
login,logout,AplicationRun - application: the name of application, for example,
POS PROorCloudHQ - location code: the code of the location where the action was performed
- device no: the number of device (iPad) where the action was performed
- action date: the date and time when the action was performed
- object, object type, parent, parent type: information on entities related to a specific action as well as on entitiy types. For example, if a location is added to a promotion, the object field displays that location’s name and the object type field equals
location. In its turn, parent contains the name of the respective promo, and parent type equalspromotion - reason: the message describing the performed action.
Additionally, right-click the column header to add the following columns to the list:
- created date: the date and time when the action record was created
- modified date: the date and time when the action record was modified
- streaming date: the date and time when the action record was streamed to the database
- employee: the employee who performed the action.
The action dialog
Clicking view in the action tracking area with a record selected opens the read-only action dialog.
The dialog includes the following tabs:
- general
- details
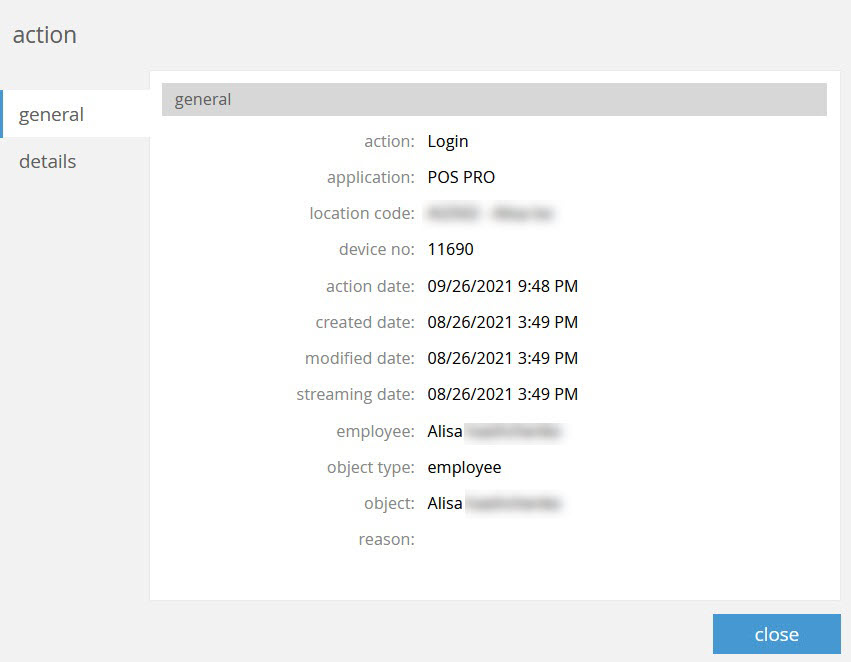
The general tab
In the general section of the general tab, the following read-only information is available:
The details tab
The details tab contains the read-only description of the performed action in the details section. For example, in the screenshot below, the information on the associate who performed login to POS PRO V6 displays:
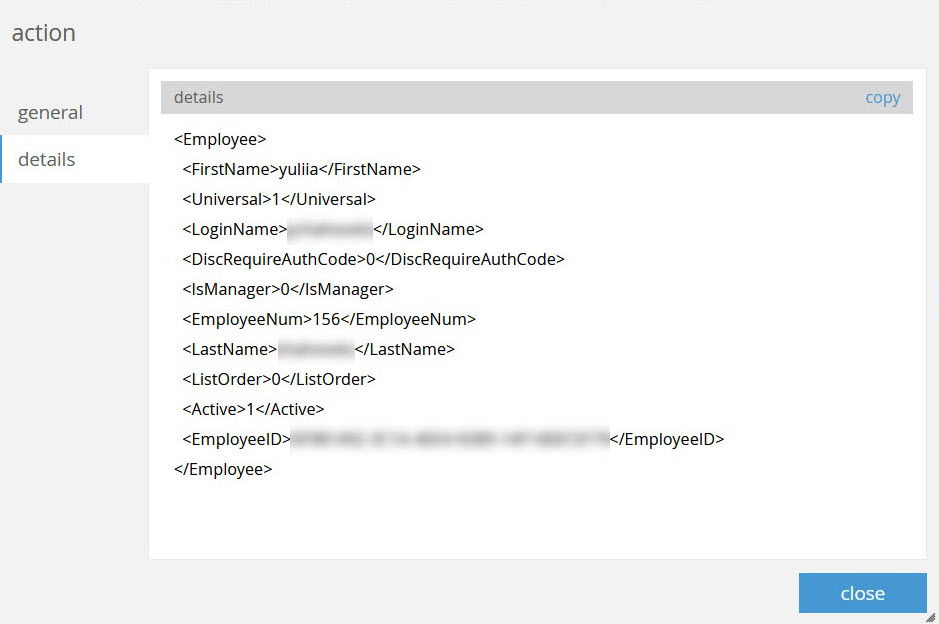
To copy the text, click copy at the top-right.
The copy button is available only if there is a response text in the details section.
See also
Cloud HQ User Manual: Settings
SVS Zone renamed to Fiscal Zone
Build 6.34.254.0: PRO-5841
Starting from version 6.34 of the software, instead of SVS Zone, we use Fiscal Zone across all Teamwork apps and services.
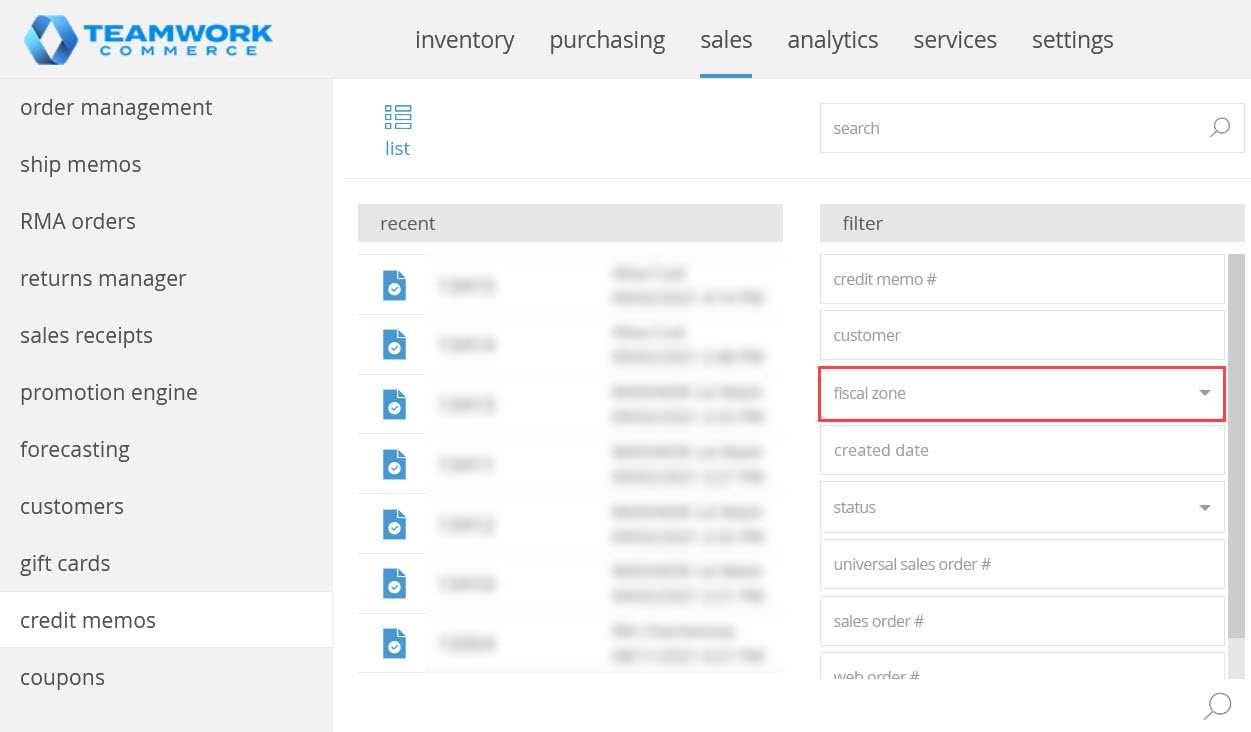
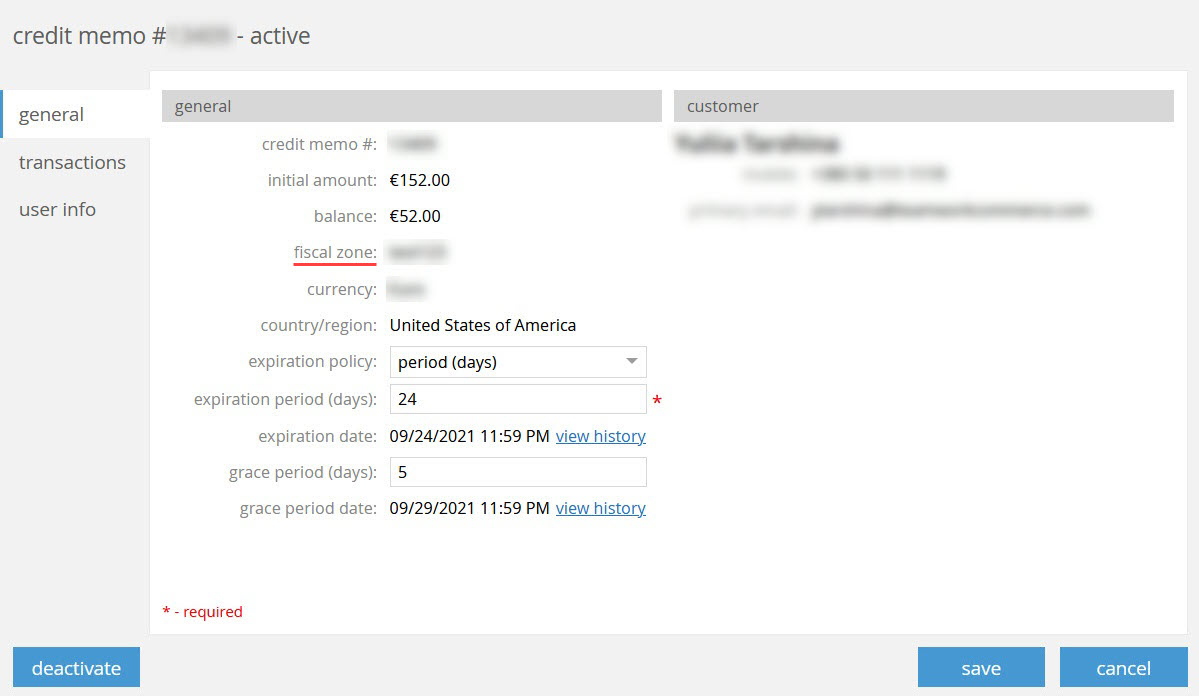
This change resulted in renaming a number of UI elements in CHQ:
-
Under
chq > settings > company settings, the stored valued services area has been renamed to credit & reward platform.
Under credit & reward platform, the SVS zones area has been renamed to fiscal zones: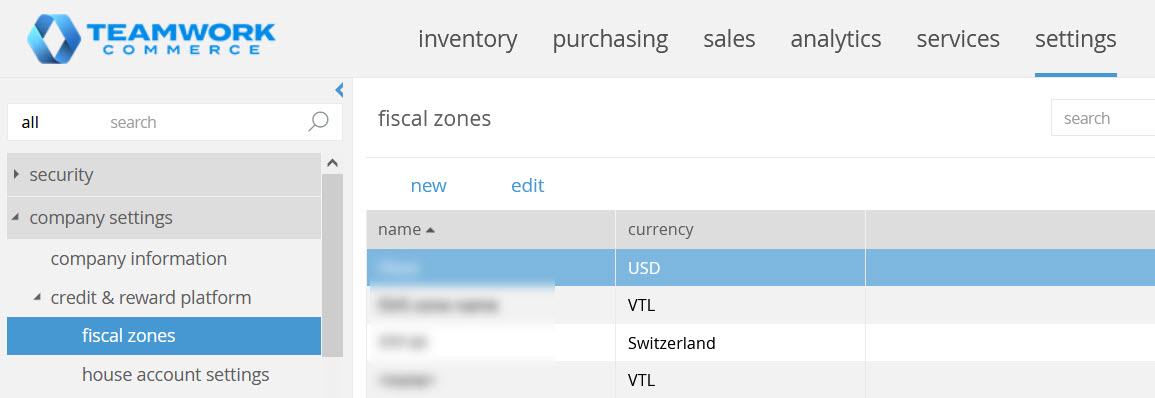 Also, under fiscal zones, on clicking new or edit, the dialog that opens now displays new fiscal zone or edit fiscal zone respectively until the name for that zone is defined.
 -
For Credit Memos, Gift Cards, and Coupons under
chq > sales:
See also
Cloud HQ User Manual: Settings
Configuring global coupons availability
Build 6.34.254.0: PRO-5099
As of version 6.34.254.0, we’ve added a new coupon-related setting in CHQ.
Purpose
Please be advised that the following types of coupons are available in POS Pro V6:
line coupon(item-level): a coupon applied to individual sale itemsglobal coupon(transaction-level): a coupon applied to all the sale itemspromo coupon: a coupon that activates a certain promotion
The new setting allows for configuring if application of global (transaction-level) coupons is available in POS Pro V6. In particular, if the setting is enabled, the Add Coupons button becomes available in POS in the Sales Receipt area.
How to configure
To make the Add Coupons button available in the Sales Receipt area of POS Pro:
- In CHQ, go to
settings > location settings > location/location settings. - Click to select your location record and then click edit.
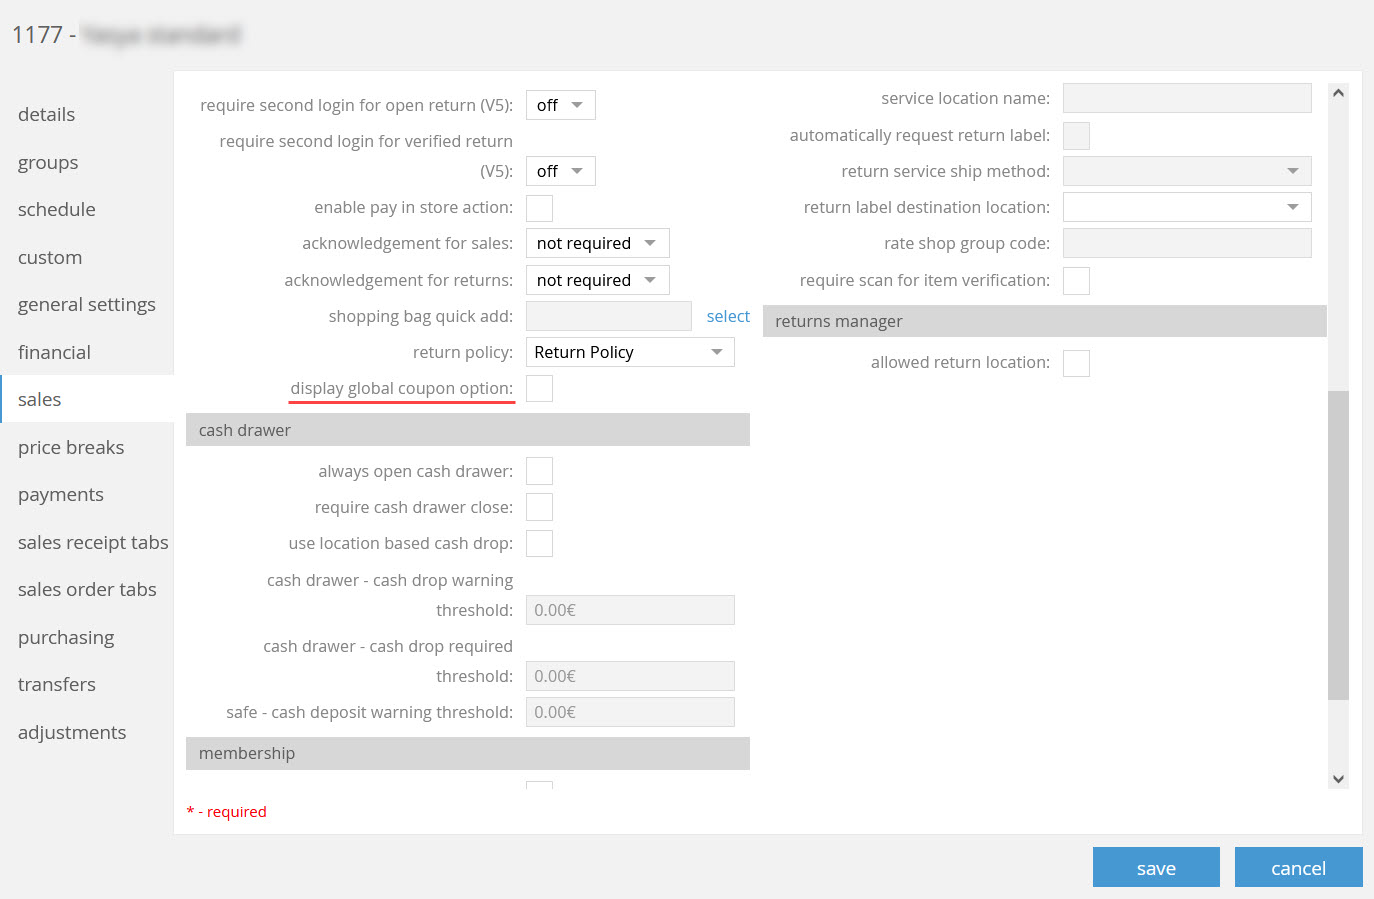
- In the dialog that opens, go to the sales tab.
- Select the display global coupon option checkbox (clear by default):
- Click save.
See also
- V6.34 Mobile Release Guide
- Managing Coupons in CHQ in V6.33 CHQ Release Guide
- Cloud HQ User Manual: Settings
Configuring foreign currency payments
Build 6.34.254.0: PRO-5709
Starting from version 6.34, it is possible to accept cash payments in foreign currency in POS.
To perform such transactions, first, you should configure the usage of foreign currency in CHQ. In particular, you need to:
- create a cash payment method,
- enable this payment method for your location,
- configure an exchange rate.
Purpose
This new feature allows customers to pay cash in foreign currency while purchasing items. POS calculates both the base and foreign currency amounts automatically using the defined exchange rate, which eliminates the possibility of human error.
Creating a new payment method
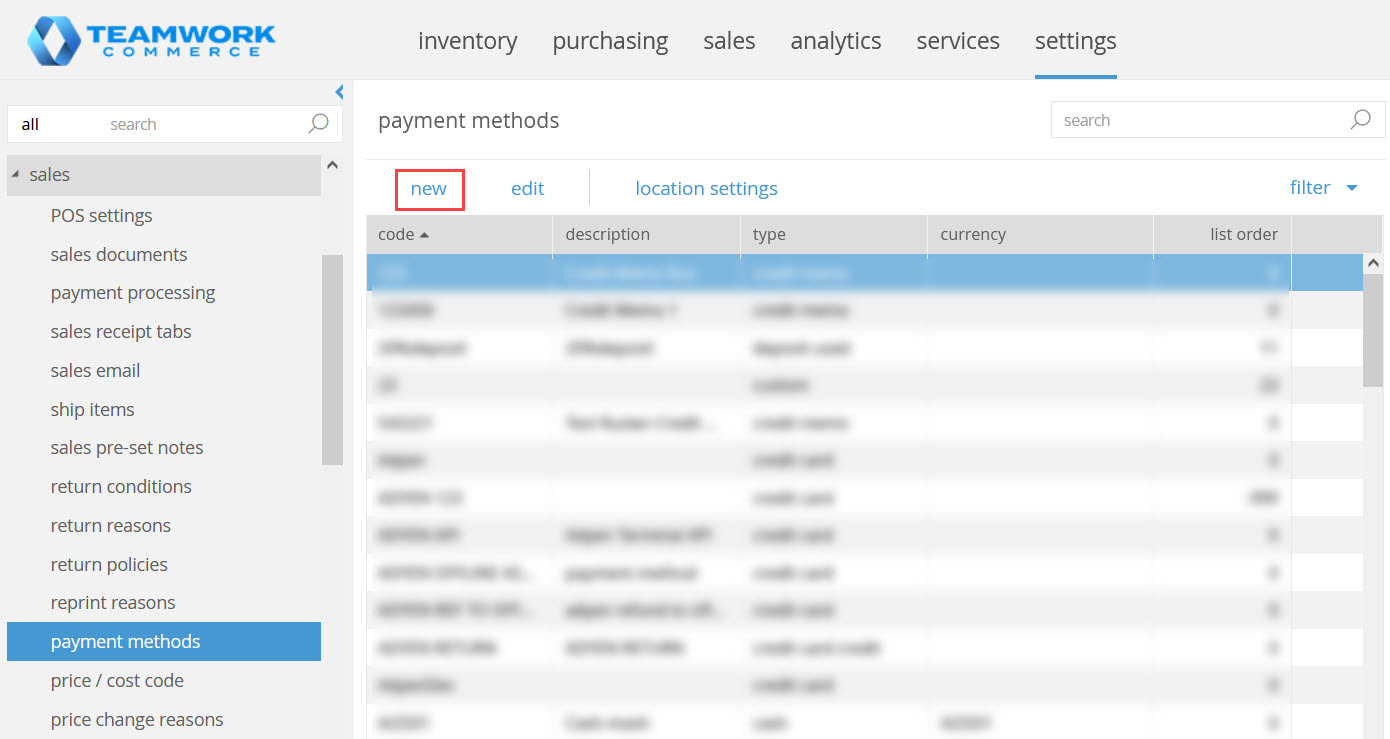
- In CHQ, go to
settings > sales > payment methods. - Under payment methods, click new.
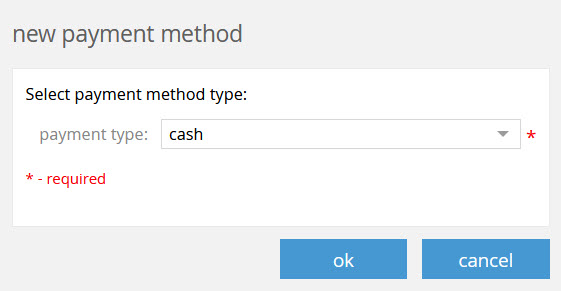
- In the new payment method dialog, select cash in the payment type field and click ok.
- Next, specify your payment method code and select the required foreign currency.
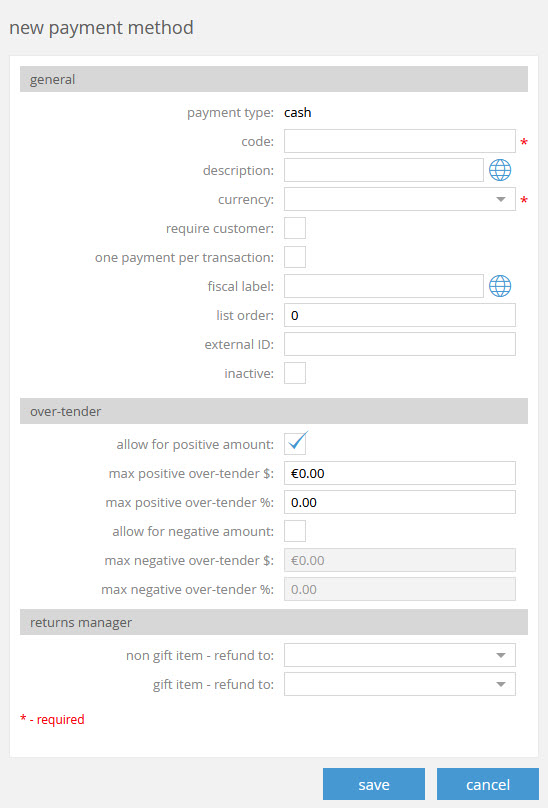
- Сlick save.
Enabling the payment method for location
- In CHQ, go to
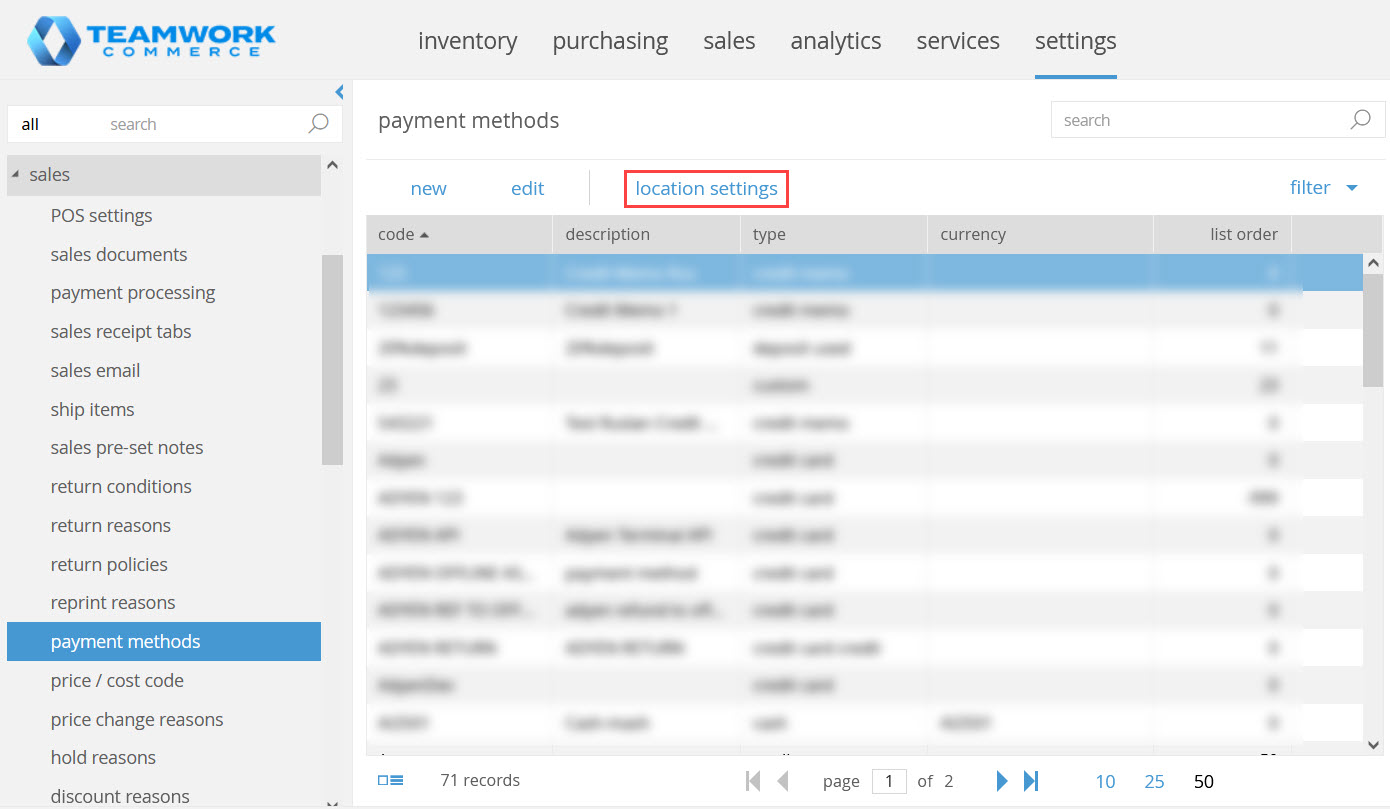
settings > sales > payment methods. - In the grid, click to select the payment method you’ve just created and then click location settings:
- In the [selected payment method - location settings] dialog, double-click the required location.
- In the [selected payment method - location] dialog, select the visible checkbox.
![The [selected payment method - location] dialog](https://twc-pedia-data.teamworkinsight.com/img/V6.34%20CHQ%20Release%20Guide/634_chq_fcurrency5.jpg?width=450px)
- Click save twice.
Defining the exchange rate
Users can edit the exchange rate only if they have the Allow to change Exchange Rate security right.
- In CHQ, go to
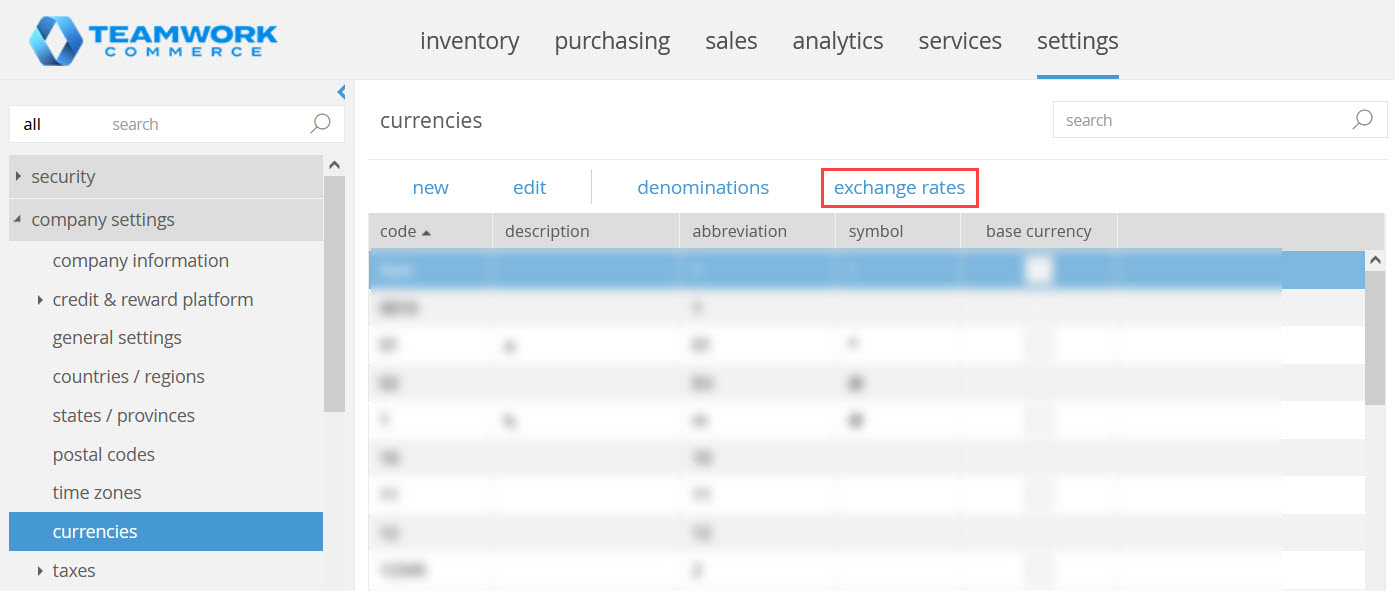
settings > company settings > currencies. - Click to select the required currency in the grid and click exchange rates:
- In the [selected currency] - exchange rates dialog, click new.
- In the [selected currency] - exchange rate, configure your rate:
![The [selected currency] - exchange rate dialog](https://twc-pedia-data.teamworkinsight.com/img/V6.34%20CHQ%20Release%20Guide/634_chq_fcurrency7.jpg?width=450px)
Please note that the exchange formula is as follows: [Foreign Currency Amount] = [Base Currency Amount] * [Exchange Rate].
- Click save twice.
See also
Cloud HQ User Manual: Settings
Adding a person from customer’s contacts to Sales Receipt
Build 6.34.254.0: PRO-4903
We’ve introduced the capability to add a person from the customer’s contacts to the sale.
To accommodate this feature, we’ve added the following in CHQ:
- new designable fields to the Customer Tab area of V6 App Designer, and
- a new prompt for person on add customer checkbox at the company level.
Purpose
This feature may be useful for situations, when, for example, the customer buys a gift for their relative and wants to remember who exactly the gift is for.
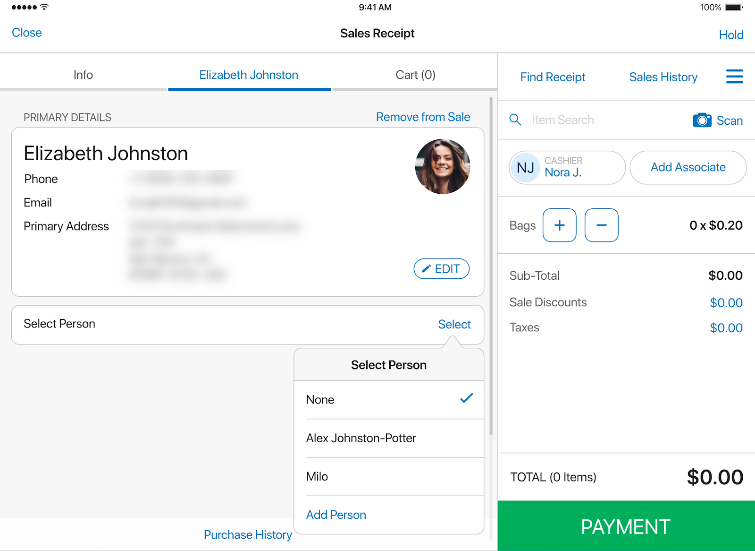
The customer can either add or pick a person from contacts during the sale. Then, the person’s name is saved to the Sales Receipt and is available in Sales History in POS Pro.
How to add the Select Person field to the Customer area of POS Pro
In CHQ, to add the Select Person field to the Customer tab of the Sales Receipt area of POS Pro V6:
- Go to
settings > company settings > v6 App Designer. - In the area that opens, choose
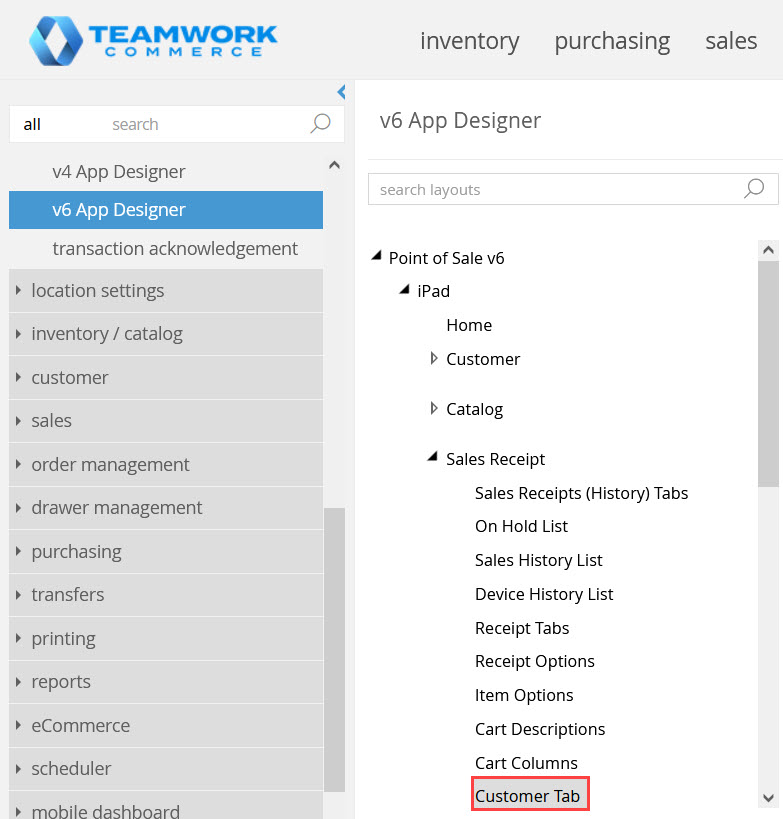
Point of Sale V6 > iPad > Sales Receipt > Customer Tab.
- Under available fields, find and then press and drag Select Person to any pre-defined group in the layout section. For example, in the screenshot below, Select Person displays under Select Person group.
Please note that the order of groups and labels in the layout section defines the order in which they display in POS Pro.
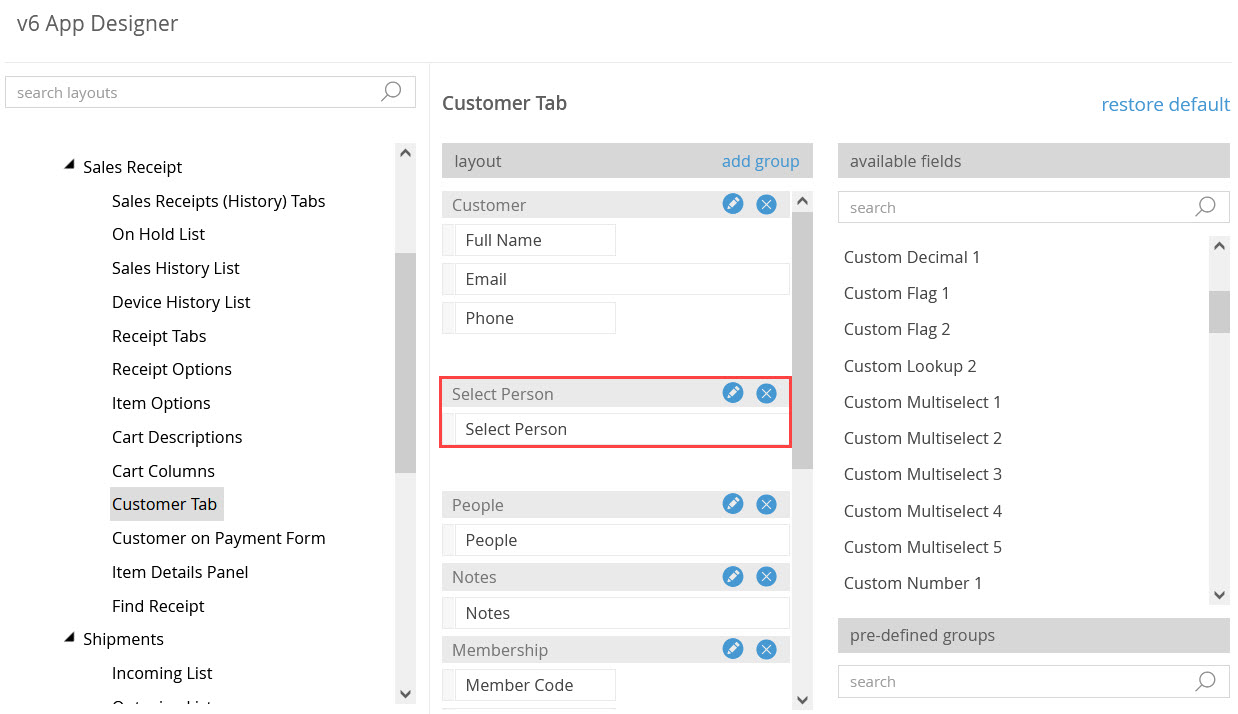 Alternatively, to remove a field from the area, press the required label and then drag it out of the layout area.
You can create a new pre-defined group by clicking add group at the top-right of the layout area.
- Click save.
Enabling the prompt for person on add customer setting
In CHQ, it’s possible to configure if the Select Person pop-over dialog should automatically come up in POS Pro after a customer was added to the sale. To do so:
- Go to
settings > sales > sales documents. - In the sales section, select the prompt for person on add customer checkbox:
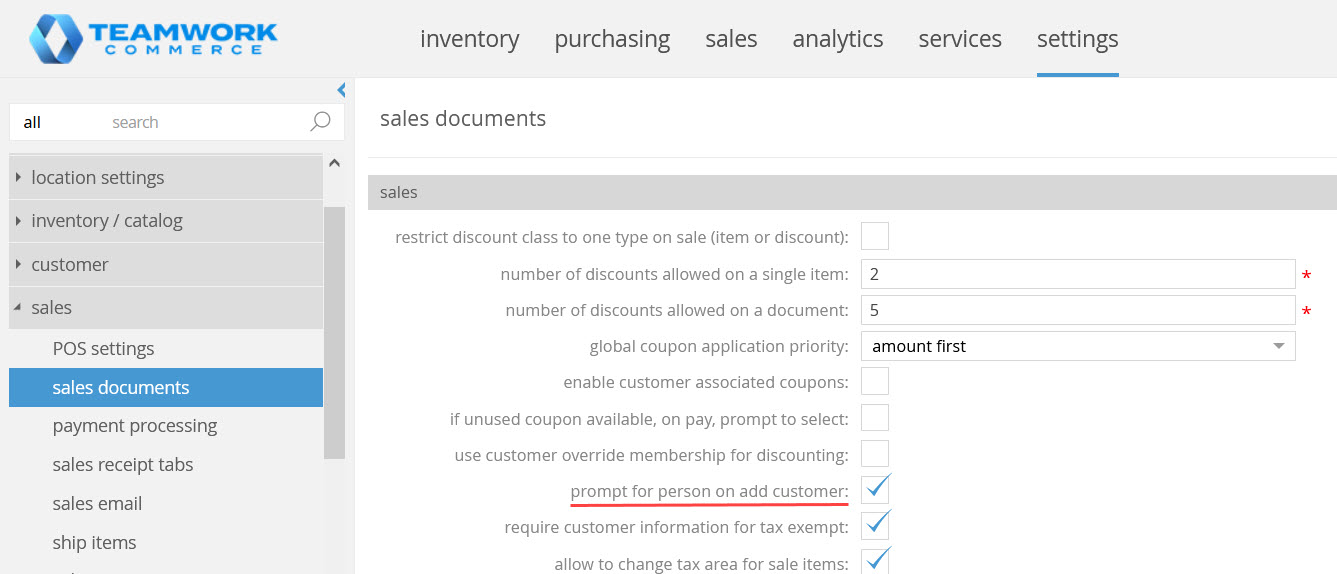 If the checkbox is selected, the Select Person pop-over dialog automatically displays in POS Pro V6:
- Click save.
See also
Сonfiguring display of links to external customer profiles
Build 6.34.254.0: PRO-5443
In CHQ, we’ve added the capability to add and edit links to external customer profiles.
Purpose
This new functionality can be helpful if a retailer has an external web-service that stores various customer details on the “per customer” basis and wants these customer profiles to be accessible via link from POS and/or CHQ.
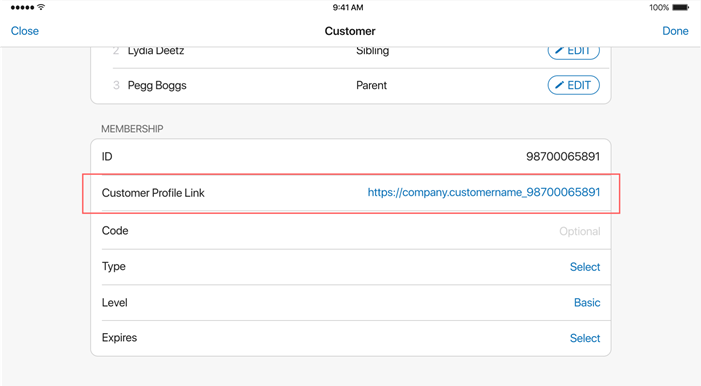
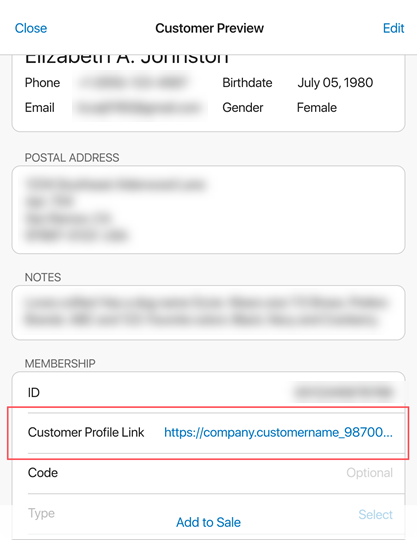
These links, once configured, will display:
Configuring a profile link display on Customer Form of POS Pro
- Go to
chq > settings > company settings > v6 App Designer.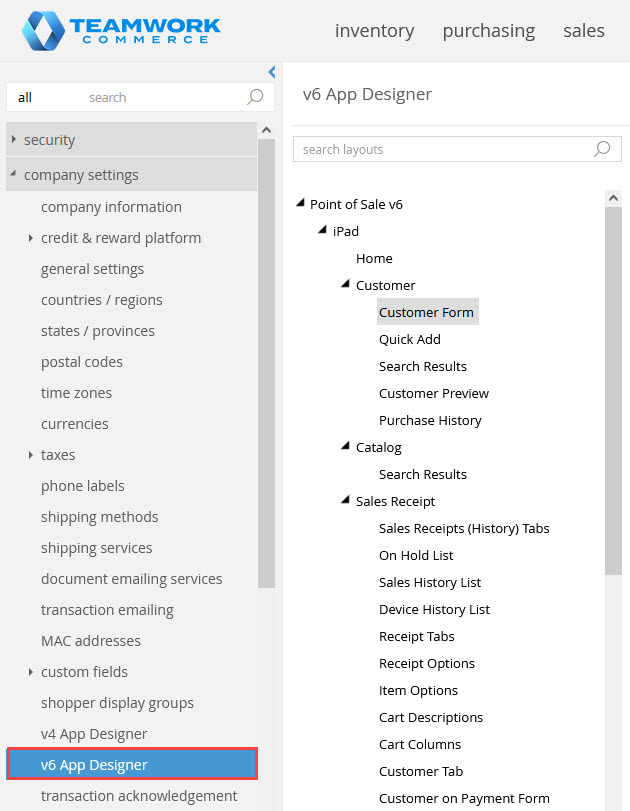
- In the area that opens, navigate to
Point of Sale v6 > iPad > Customer > Customer Form. - Under available fields on the right, press Customer Profile Link and drag it to the preferred sub-section under layout (for example, Membership).
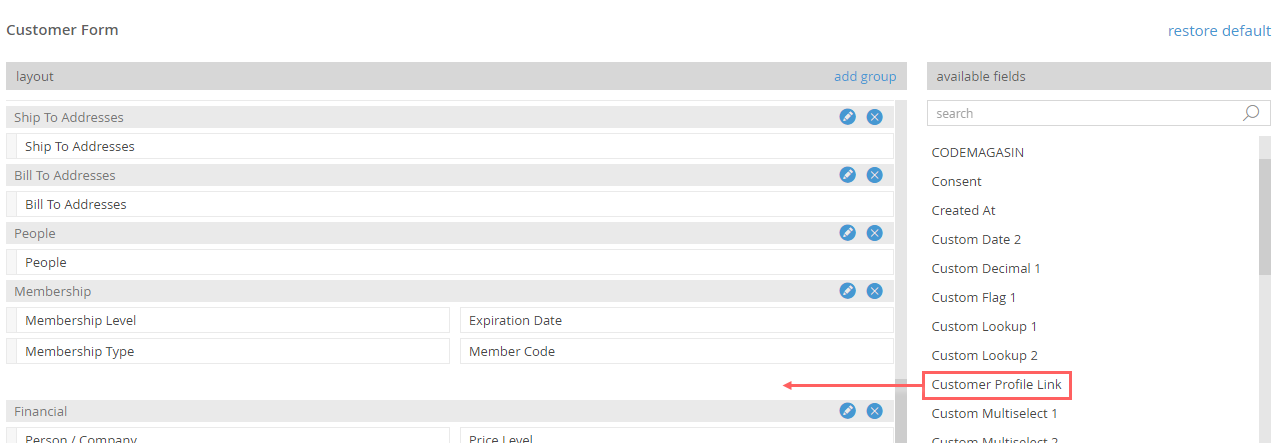
- Click save for the changes to take place.
Configuring a profile link display on Customer Preview of POS Pro
To make the Customer Profile Link field available for your POS device, in CHQ:
- Go to
settings > company settings > v6 App Designer. - In the area that opens, choose
Point of Sale v6 > iPad > Customer > Customer Preview. - In the available fields, press Customer Profile Link and drag it to the preferred subsection under layout (e.g. Membership).
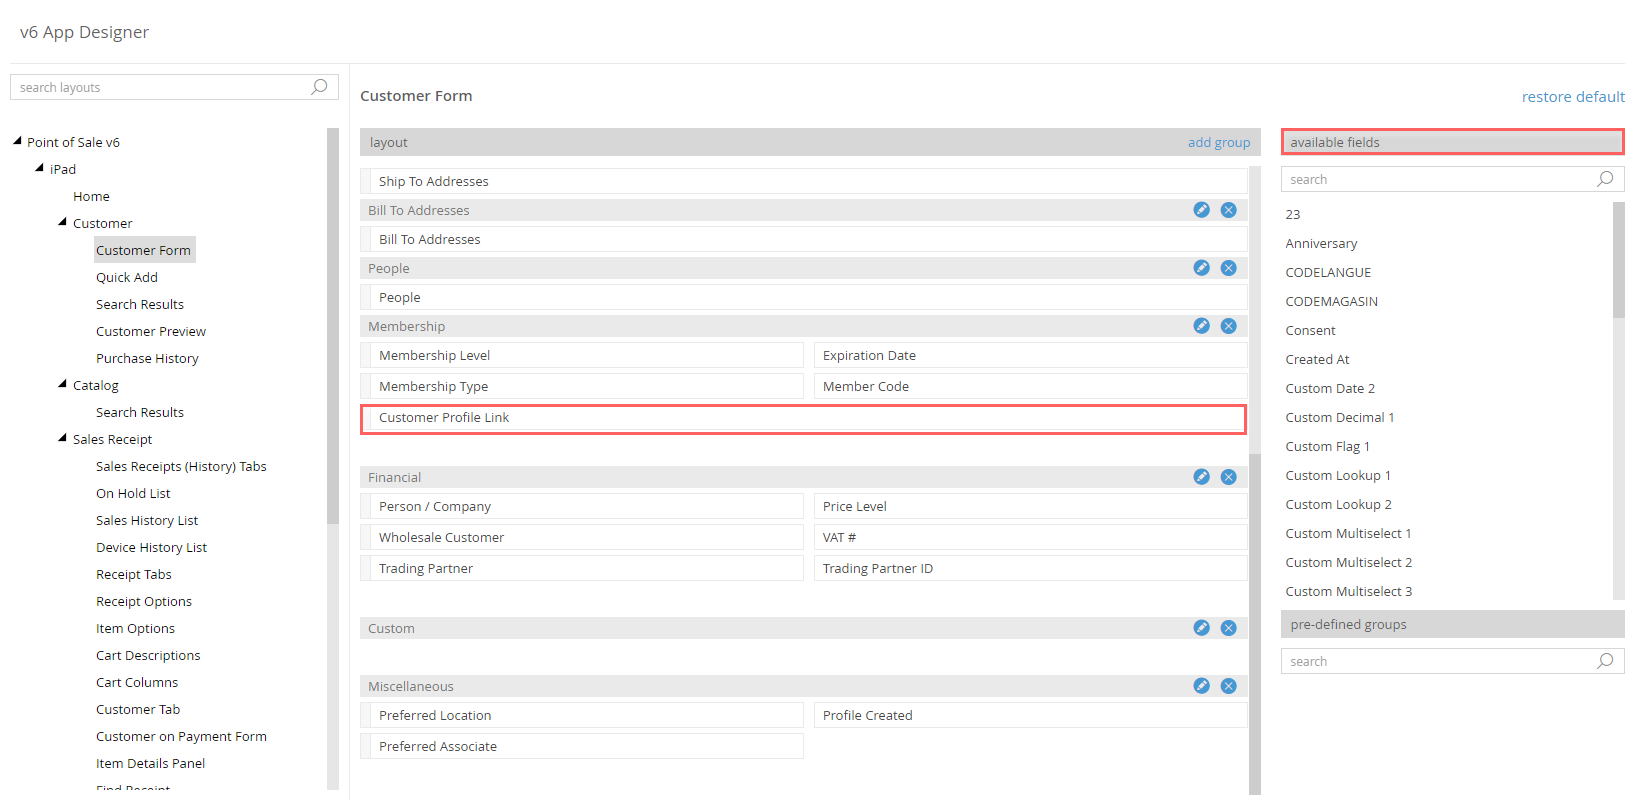
- Click save.
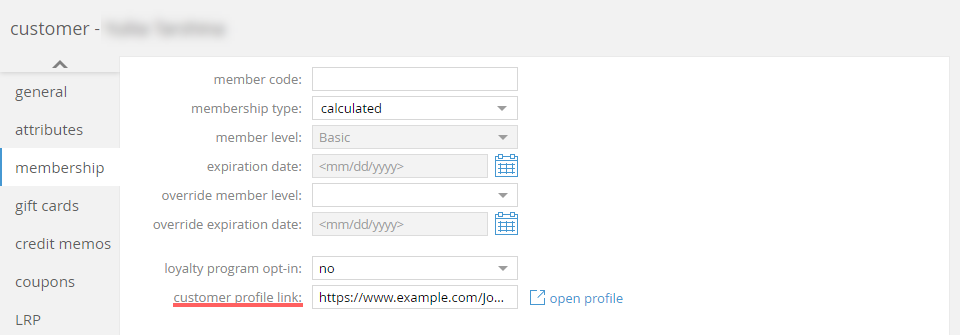
Adding a profile link to Customer in CHQ
- In CHQ, go to
sales > customers. - Find the required customer record and click it.
- In the customer details, open the membership tab.
- In the customer profile link field, enter the link.
![The customer profile link field in the [selected customer] dialog](https://twc-pedia-data.teamworkinsight.com/img/V6.34%20CHQ%20Release%20Guide/634_chq_web7.png?width=700px)
- Click save.
See also
Updated Drawer Memo settings
Build 6.34.254.0: PRO-6193, PRO-682
To respect changes made in POS Pro V6, we’ve introduced the following updates in CHQ:
- new security rights have been added
- drawer memo entry settings have been updated
Purpose
Hiding the expected amounts may be useful for retailer to prevent the user from simply entering the “expected” amount without performing an actual count. This can help to ensure that money in the drawer is properly counted.
Also, updating the denomination entry settings allows for configuring if the counting should be required for Start of Day, End of Day, and Midday Count respectively.
New security rights
With this update, the following security rights were added for POS Pro V6:
| Application | Area | Right | Description |
|---|---|---|---|
| V6-POS | Drawer Memos | Mask expected amount totals | User cannot see expected amounts |
| V6-POS | Drawer Memos | Perform midday count | Allows the user open and complete midday counts |
For more information on how the “expected” amounts are masked in POS Pro V6, please see V6.34 Mobile Release Guide
Also, as a part of this update, we’ve updated the description of the following security right:
| Application | Area | Right | Description |
|---|---|---|---|
| V6-POS | Sales Receipts | Bypass required cash drop | User may proceed to make a sale without making a required cash drop from cash drawer |
New drawer memo entry settings
We have updated the settings in the drawer memo section under chq > settings > drawer management > drawer memo settings:
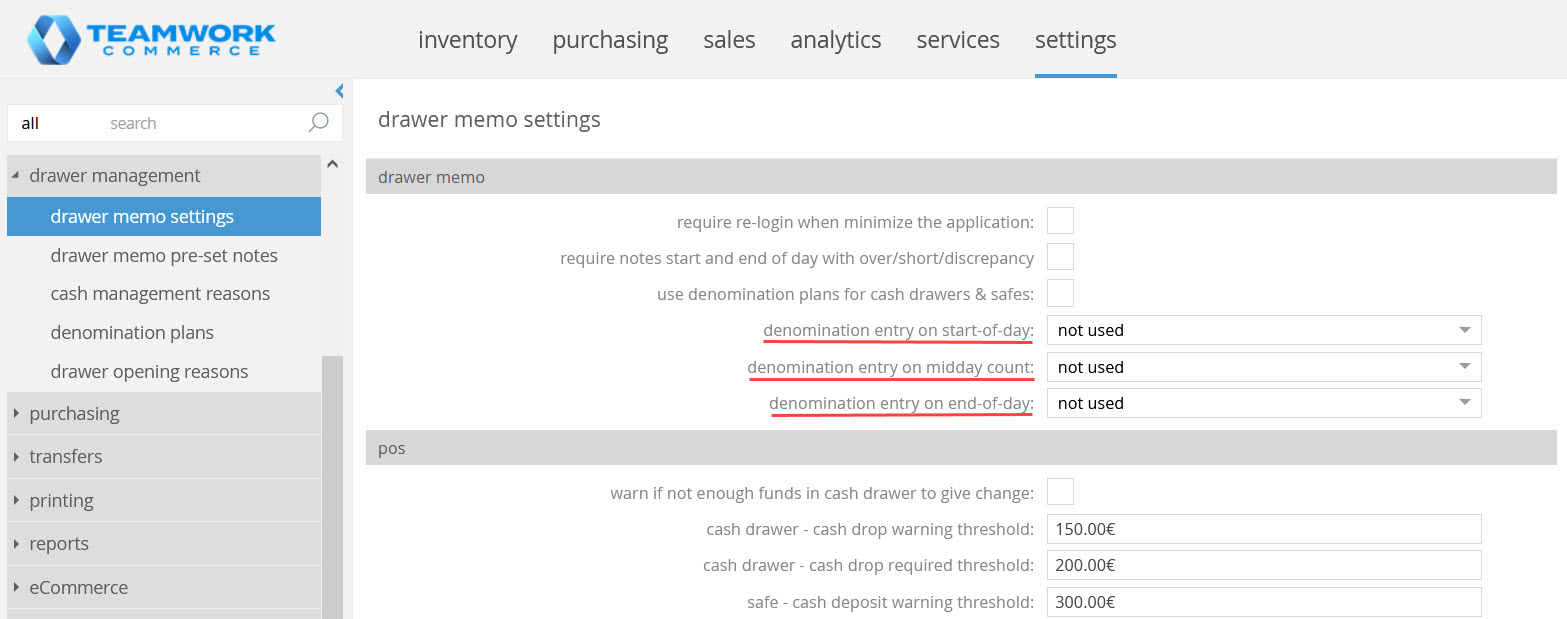 In particular, denomination entry on drawer memo has been removed. Instead, the following new settings have been added:
- denomination entry on start-of-day
- denomination entry on midday count
- denomination entry on end-of-day
For these three settings, the following options are available:
not used: if the option is selected, denomination counting is not possible on Drawer Memo both for cash drawer and safe. Set by default.optional: if the option is selected, denomination entry is available but not requiredrequired: if the option is selected, the denomination entry is required.
Please note that if the use denomination plans for cash drawers & safes checkbox is selected in the drawer memo section under chq > settings > drawer management > drawer memo settings, then denomination entry on start-of-day/midday count/end-of-day is set to required automatically and cannot be changed by the user.
Also, the denomination entry on start-of-day/midday count/end-of-day setting is only applied to counts made in the store’s base currency.
See also
Assigning a location to a price level
Build 6.34.254.0: PRO-5989
We’ve introduced the capability to choose a specific company location for a price level.
As a part of this update, the following changes have been introduced:
- a new security right has been added
- a new location field has been added to the price level dialog and
- updated logic on selecting price levels at the location level.
Purpose
When a specific location is defined for a price level, prices from that level are available only for the respective company location.
This update helps optimize the time required for the initialization and synchronization of POS devices.
New security right
The following security right has been added in CHQ:
| Area | Right | Description |
|---|---|---|
| Settings | Edit Location on Price Level | Allow to change Location on Price Level |
How to choose a location for a price level
- In CHQ, go to
settings > inventory / catalog > price levels. - Click to select your price level and click edit.
- In the dialog that opens, choose your location in the dropdown menu of the location field.
![The location field in the [selected price level] dialog](https://twc-pedia-data.teamworkinsight.com/img/V6.34%20CHQ%20Release%20Guide/634_chq_pricebreak1.jpg?width=400px)
- Click save.
Also, the corresponding location column has been added under chq > settings > inventory / catalog > price levels. The column is not visible by default. To make the location column visible, right-click the table header and then select the columns required for display:

Price levels at the location level
In CHQ, under settings > location settings > locations / location settings > [selected location] > edit, it’s possible to define the price level field under:
- the details tab, in the details section
- the price breaks tab, in the general price break and the customer price break sections
![The price break field in the price breaks tab of the [selected location] dialog](https://twc-pedia-data.teamworkinsight.com/img/V6.34%20CHQ%20Release%20Guide/634_chq_pricebreak3.jpg?width=600px)
When defining price levels for the location’s price breaks, users cannot select a price level that:
- has a company location assigned, and
- that location is different from the location that is being configured.
See also
Configuring regional price level
Build 6.34.254.0: PRO-6394
In version 6.34, we’ve added the capability to set a regional price level for a certain location.
This update resulted in changes of settings at the company and location levels in CHQ.
Purpose
This new feature may be helpful if, for example, you didn’t define the price at the location price level. In that case, the price from the regional price level is used to calculate your item’s Original Price.
Updates in company settings
In CHQ, under settings > company settings > general settings, we’ve added a new area – location settings with the require regional price level option.
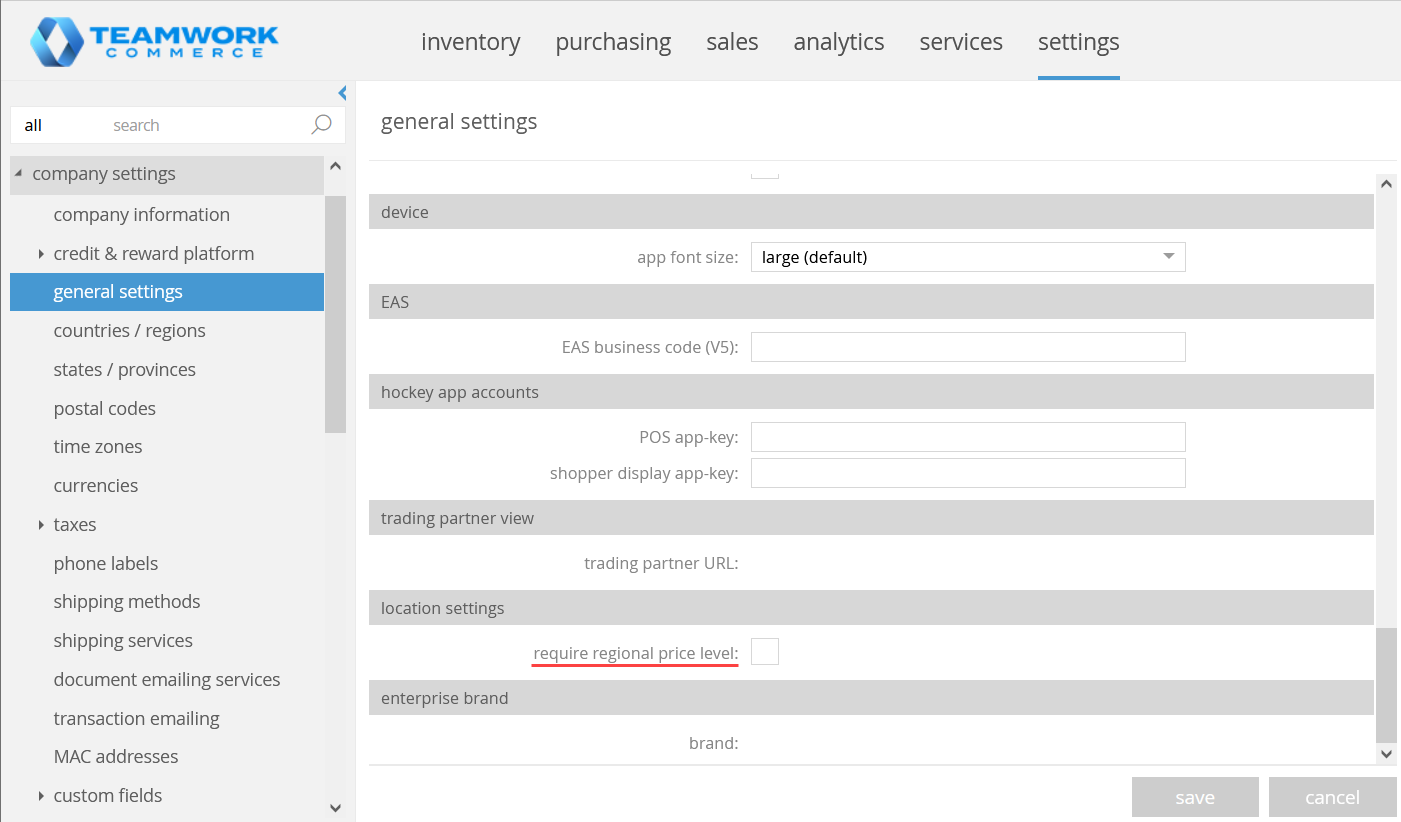 If this option is selected, then the regional price level field in the location level settings is required.
By default, on new installations, the require regional price level option is selected. However, on existing installations, the checkbox is cleared.
Updates in location settings
In CHQ, under settings > location settings > locations / location settings > [selected location], in the details section of the details tab, we’ve added a new regional price level field.
Also, the existing price level field has been renamed to location price level.
![The regional price level and location price level fields in the [selected location] dialog](https://twc-pedia-data.teamworkinsight.com/img/V6.34%20CHQ%20Release%20Guide/634_chq_regpl2.png?width=700px) In the new regional price level field, it is possible to select any price level, except for “BASEPRICE”. Also, it is not possible to select any price levels that are used by different locations as a general price level, general price break price level, or customer price break price level.
In the new regional price level field, it is possible to select any price level, except for “BASEPRICE”. Also, it is not possible to select any price levels that are used by different locations as a general price level, general price break price level, or customer price break price level.
If the field remains empty, the regional price level is not included in the price calculation. The field is required if, at the company level, the require regional price level option is selected.
See also
Enabling email notifications for “pick up” confirmation
Build 6.34.254.0: PRO-6871
Starting from version 6.34.254.0 of the software, we’ve added a new email notification for pick up confirmation.
Purpose
This new feature helps the customer track the status of their orders, especially if the order has been picked up by someone else.
If the email notification for “pick up” confirmation notification is enabled, an email is sent to the customer once the status of one or more Ship Memo items is changed to “picked up”.
The email is sent to the ship-to email address. If the latter is missing, then to the sell-to email. If the sell-to email is not indicated, then – to customer email 1 and then – to customer email 2.
The email is not sent if the block email notifications option is selected on the respective Sales Order.
How to enable email notification for “pick up” confirmation
- In CHQ, go to
settings > order management > customer orders. - Under email notifications - web and send sales, select the email notification for “pick up” confirmation checkbox.
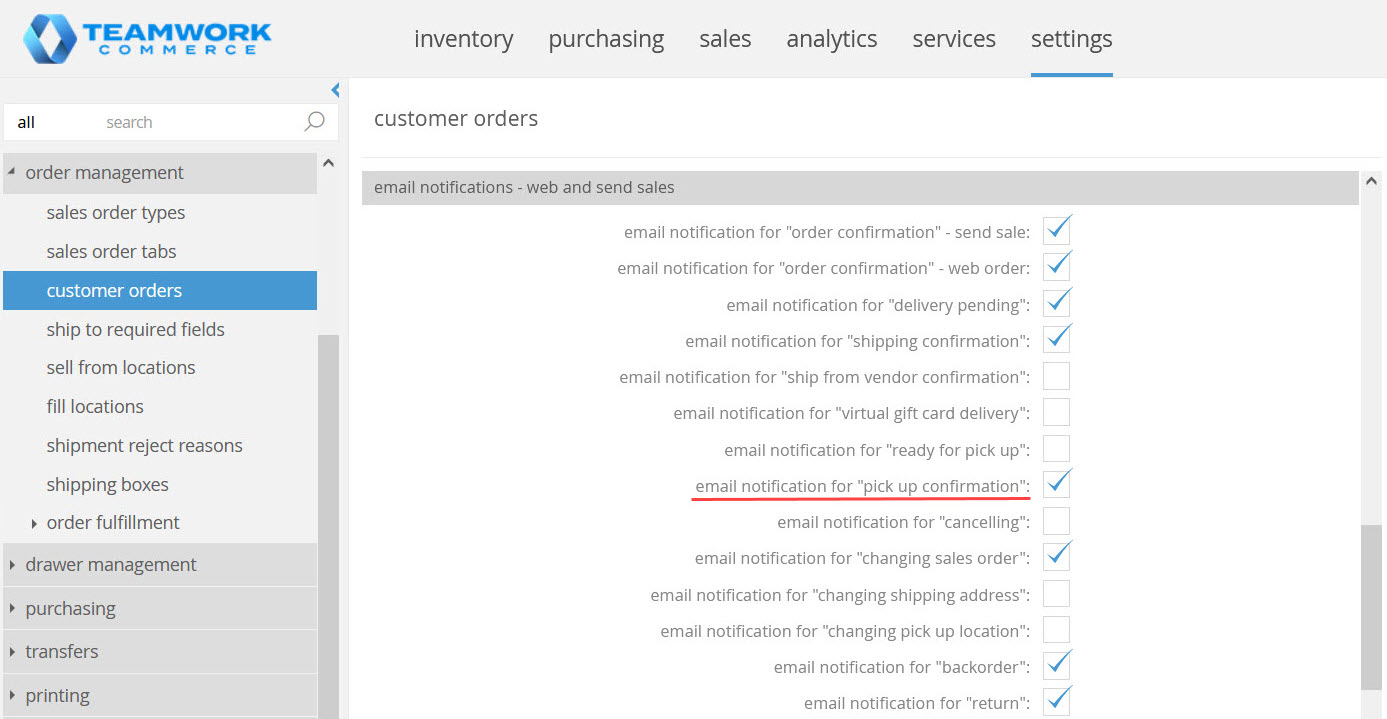
- Click save.
See also
Cloud HQ User Manual: Settings
Configuring integration with Clover
Build 6.34.254.0: PRO-6786
Respective to changes made in Teamwork POS Pro version 6, in particular, introducing integration with Clover, we’ve added new settings in CHQ. These settings allow for:
- configuring connection between POS Pro and the Clover payment terminal and
- selecting Clover as the payment processor for the Credit Card payment method.
Purpose
The update allows for using the Clover device as a payment terminal during sales in the POS Pro V6 app. With Clover, it is possible to process sales, refunds, perform voiding and administer credit card credit payments.
Configuring connection to the Clover payment terminal
To configure the connection between POS and Clover, in CHQ:
-
Go to
services > device controller. -
Find your device and click it.
-
In the edit device dialog that opens, go to the app settings tab.
The app settings tab is available for configuration in the edit device dialog only if:
- your device is location-specific (the exact name of a location is indicated in the location field of the general tab) and
- your device is Teamwork POS version 6.0 or higher
Otherwise, the app settings tab is invisible.
-
In the payment terminal type field of the payment terminal section, choose
Clover(see the screenshot below):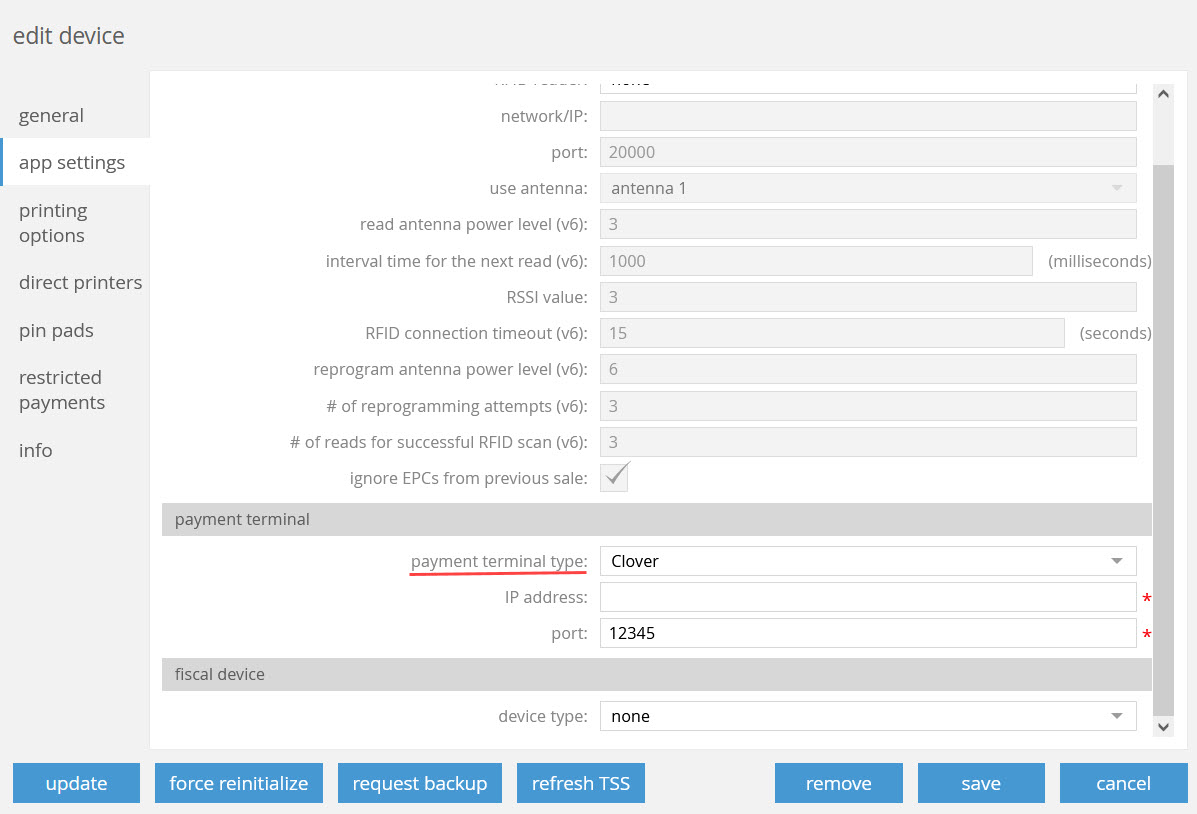 Selecting
 Cloverenables the following fields for configuration:Setting Description Value IP address the IP address to connect to your Clover payment terminal empty by default; required port the port number of your Clover payment terminal values can range from 1to65535;12345is set by default; required -
When finished configuring the settings, click save for the changes to take place.
Please note that changes in the payment terminal settings made at the CHQ side are automatically synchronized with the POS Pro app and vice versa.
Configuring the Credit Card payment method to use Clover as a payment processor
To select Clover as the payment processor for the Credit Card payment method:
- Go to
chq > settings > sales > payment methods.If a Clover Credit Card payment method is not set up under
settings > sales > payment methods, click new at the top-left to create one.
In the new payment method dialog that opens, selectcredit cardfor the payment type field and then click ok. On clicking, the dialog displays where it’s required to set up parameters for the new credit card payment method and then click save. - In the payment methods area, click to select the required method of the Credit Card type and then click location settings.
- Click to select your location and click edit to open the following dialog (see the screenshot below):
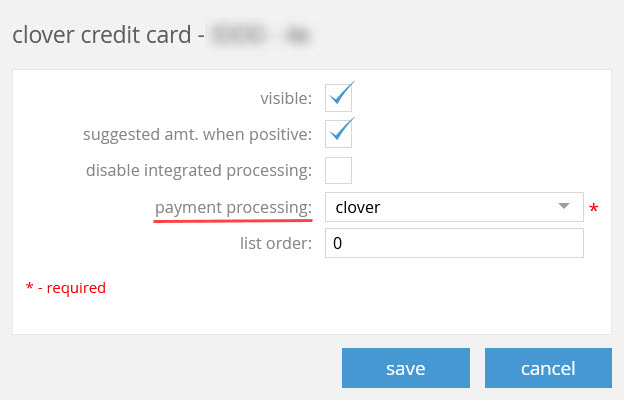
- In the payment processing field, select
Clover. - Click save in both the dialogs for the changes to take place.
See also
Configuring integration with GiveX
Build 6.34.254.0: PRO-6319, PRO-6684
We’ve introduced support of GiveX Gift Cards in addition to existing Teamwork’s native gift card functionality.
To do so, the GiveX Gift Card functionality should be configured in CHQ:
- at the company level under
settings > sales > payment processing - at the location level under
settings > location settings > locations / location settings > payments tab.
Also, GiveX must be selected as a payment processor for the respective Gift Card payment method under settings > sales > payment methods.
Additionally, as a part of this update, we have:
- removed the gift card service setting from
settings > company settings > credit & reward platform > fiscal zones > [selected fiscal zone] > edit > gift cards > general section - made the gift cards area always visible under
chq > sales > gift cards
Purpose
This update allows for using GiveX as a payment processor in Teamwork Commerce Pro Suite. Now, both Teamwork and GiveX Gift Cards can be used on the same Sales Receipt.
Additionally, with this update, we are introducing a unified approach to processing all types of Gift Cards available in Teamwork Commerce Pro.
Please note that with this implementation, it is only possible to redeem GiveX Gift Cards. It is still possible to give change back to, reload the balance of, and sell new Teamwork native gift cards.
In CHQ, GiveX Gift Card numbers are masked except for the last 4 digits.
Configuring connection to GiveX at the company level
In CHQ, to configure the GiveX settings at the company level:
-
Go to
settings > sales > payment processing. -
In the area that opens, scroll down to the givex section.
-
Populate the existing as well as the following two new settings:
- item ID: select how items are identified; possible values are:
PLU(set by default),UPC,CLUandEID - timeout: specify the number of seconds before timeout. Values range from
1to999,15is set by default
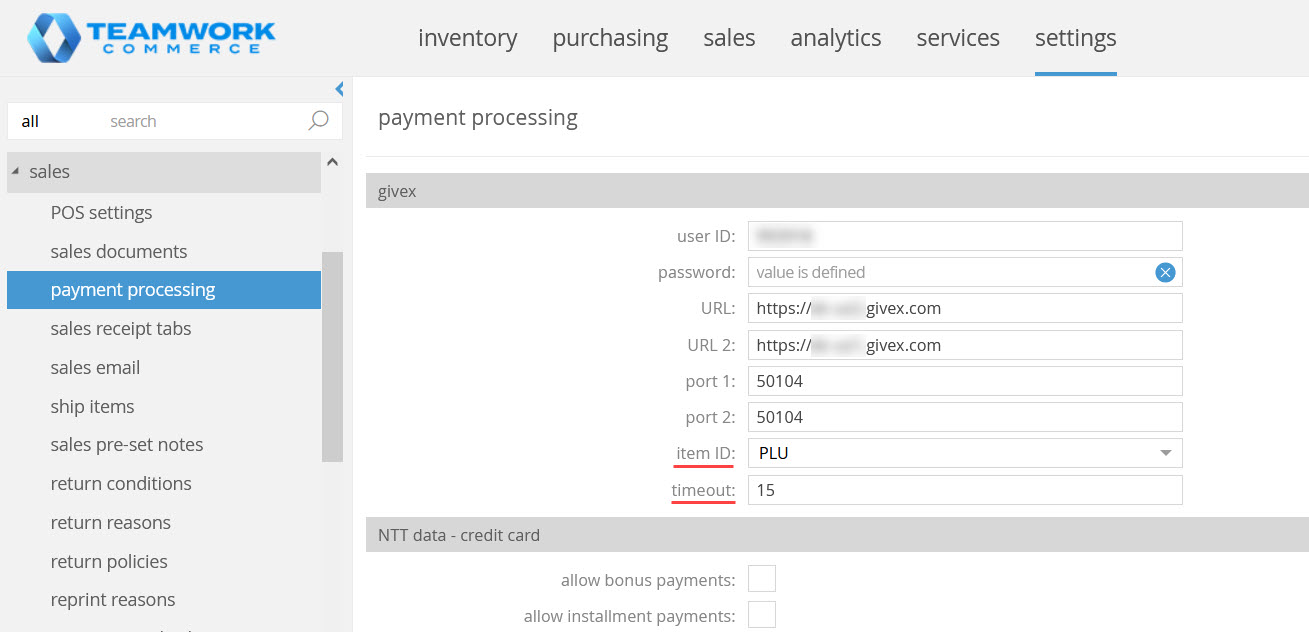
- item ID: select how items are identified; possible values are:
-
Once finished, click save.
Configuring connection to GiveX at the location level
In CHQ, we’ve updated the payment processing - Givex section and made it always visible at the location level.
To configure the GiveX settings, do the following:
-
Go to
settings > location settings > locations / location settings. -
Click to select your location, then click edit.
-
In the [selected location] dialog that opens, go to the payments tab.
-
Scroll down to the payment processing - Givex section.
-
Populate the following settings:
- user ID: your unique GiveX user ID
- password: your GiveX account password
- URL: the primary GiveX URL
- URL 2: the secondary GiveX URL in case of outage
- port 1: the transmission port ID,
50104is set by default - port 2: the alternate port ID,
50104is set by default - item ID: the product identifier, possible values are:
PLU(set by default),UPC,CLUandEID - timeout: the number of seconds before timeout. Values range from
1to999,15is set by default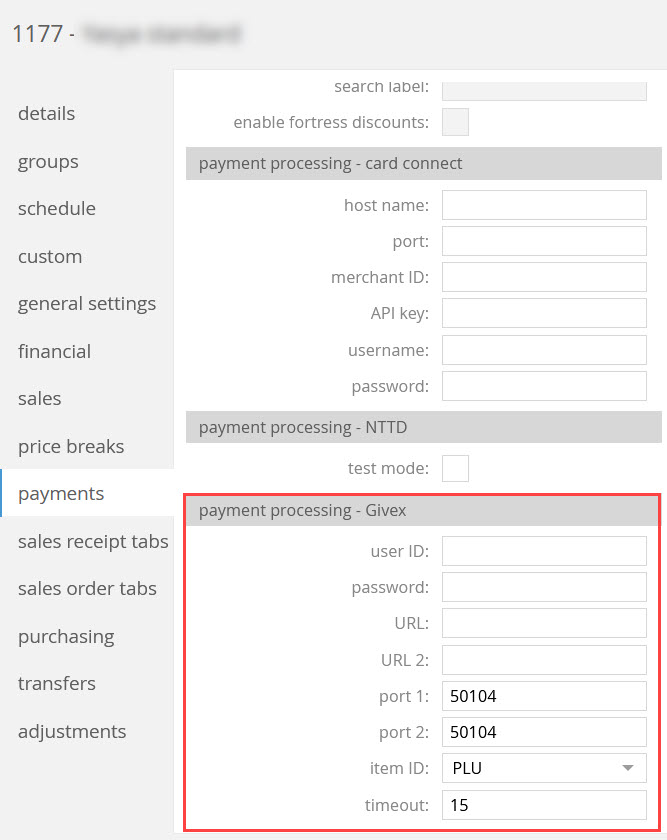
-
Click save for the changes to take place.
Please be advised that location-level settings override company-level settings if all 8 settings of the payment processing - Givex section are populated.
Setting GiveX as a payment processor for the Gift Card payment method
To select GiveX as a payment processor for the Gift Card payment method:
-
Go to
chq > settings > sales > payment methods.If a GiveX Gift Card payment method is not set up in CHQ under
settings > sales > payment methods, click new at the top-left to create one.
In the new payment method dialog that opens, selectgift cardfor the payment type field and then click ok. On clicking, the dialog displays where it’s required to set up parameters for the new gift card payment method and then click save.Please note that for Givex:
- refund on cancel in Teamwork setting is required by Givex. However, POS Pro V6 always voids the payment when removing it from the sale or cancelling the receipt
- allow for negative amount - currently, Teamwork does not support giving change to GiveX or loading value on a card
-
In the payment methods area, click to select the required payment method, then click location settings.
-
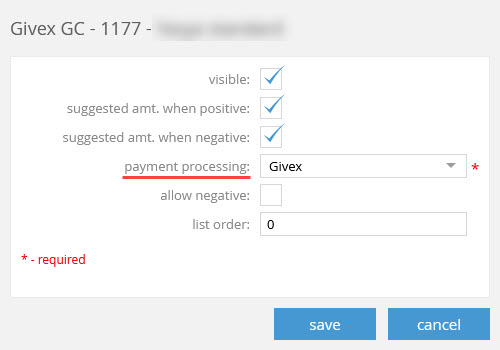
Click to select your location and click edit to open the following dialog (see the screenshot below):
-
In the payment processing field, select
Givex.
Please note that for GiveX:- the suggest amt. when negative setting is ignored, and
- the allow negative setting is clear.
-
Click save in both dialogs for the changes to take place.
See also
Configuring integration with Fortress
Build 6.34.254.0: PRO-6475, PRO-6757, PRO-6800
To respect changes made in Teamwork POS Pro version 6, in particular, introducing the integration with Fortress, we’ve updated settings in CHQ.
Configuring integration with Fortress is available:
- at the company level under
settings > sales > payment processing - at the location level under
settings > location settings > locations / location settings > payments tab.
Also, Fortress must be selected as a payment processor for the respective payment method of the Gift Card type under settings > sales > payment methods.
Purpose
Fortress is a payment provider commonly used in the stadium space.
This integrating with Fortress allows for:
- using Fortress Gift Cards as a payment method
- applying Fortress discounts associated with a retrieved Fortress customer to a Sales Receipt
On scanning a Fortress card in POS, Teamwork retrieves a customer record from Fortress. If this record contains a discount percent, the discount is applied to a Sales Receipt.
Such a discount can be removed if, for example, there are better discounts the user wants to apply.
Currently, with Fortress, it is possible to:
- make payments
- make returns (open and verified)
- load value to a gift card via refunding
- check the remaining balance on a gift card
- void payments (only before the transaction is finalized).
In CHQ, Fortress Gift Card numbers are masked except the last 4 digits. The Fortress Gift Card number can display under:
sales > order management > [selected sales order] > paymentssales > returns manager > list > [selected RMA ###] > edit > refund > payment/refund history section
Configuring connection to Fortress at the company level
In CHQ, to configure the Fortress settings at the company level:
- Go to
settings > sales > payment processing. - In the area that opens, scroll down to the fortress section.
- Populate the existing as well as the following three new settings:
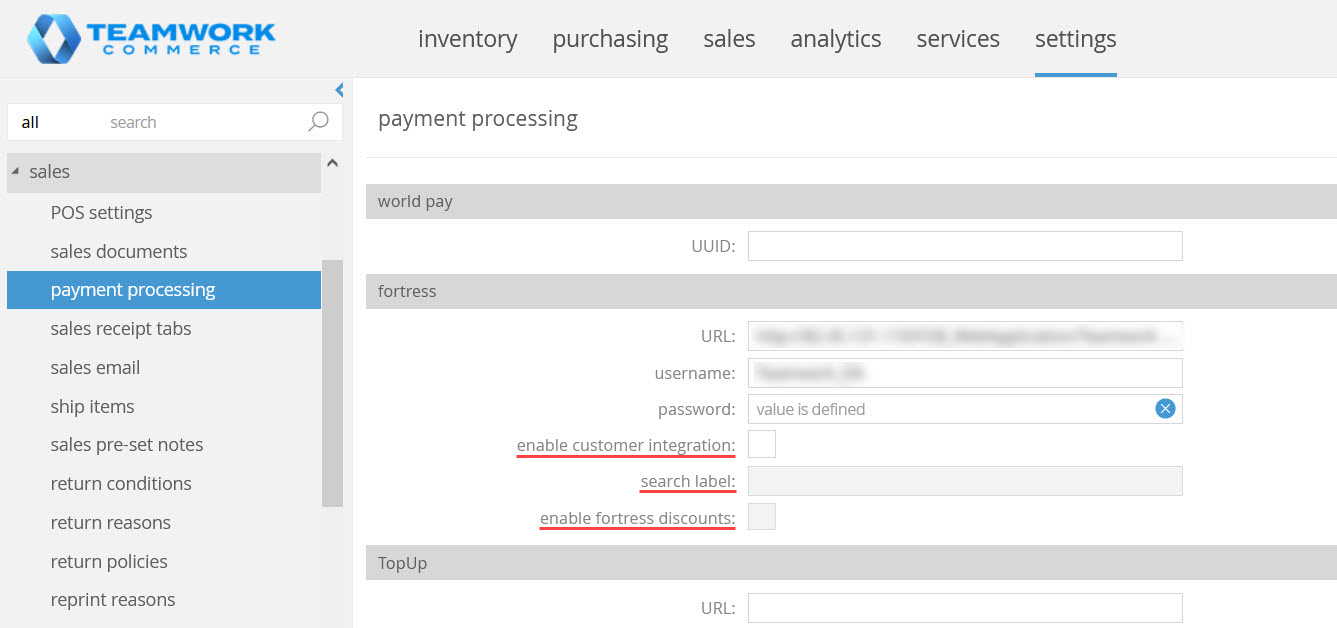
- enable customer integration: allows the user to search for and retrieve Fortress customer information in POS Pro. The checkbox is clear by default.
When selected, enables the search label and the enable fortress discounts settings of the fortress section. - search label: allows the user to define the label for Fortress in POS. Can be left blank; max
40characters allowed. - enable fortress discounts: allows POS Pro to apply Fortress discounts during the sale. The checkbox is clear by default.
Please note that enable customer integration and enable fortress discounts are only used in POS Pro if the URL, username, and password fields are properly defined.
- Click save for the changes to take place.
Configuring connection to Fortress at the location level
In CHQ, to configure the Fortress settings at the location level:
-
Go to
settings > location settings > locations / location settings. -
Click to select your location, then click edit.
-
In the [selected location] dialog that opens, go to the payments tab.
-
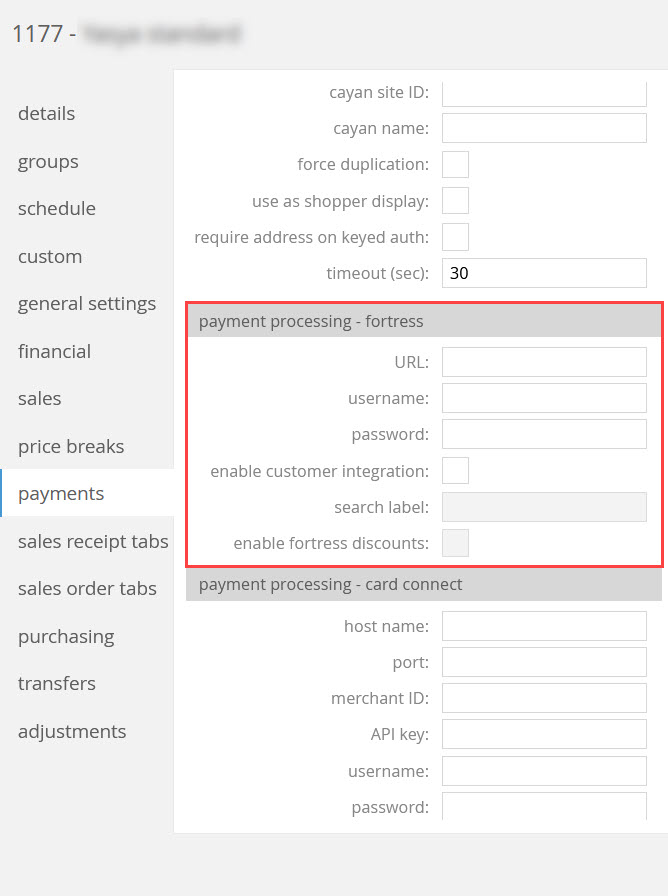
Scroll down to the payment processing - fortress section.
-
Populate the following settings:
- URL: the Fortress URL address
- username: your Fortress username
- password: your Fortress account password
- enable customer integration: select the checkbox to allow the user to search for and retrieve Fortress customer information in POS Pro
- search label: allows the user to define the label for Fortress in POS
- enable fortress discounts: select the checkbox to allow POS Pro to apply Fortress discounts during the sale
-
Click save for the changes to take place.
Please be advised that location-level settings override company-level settings if all 6 settings of the payment processing - fortress section are populated.
Setting Fortress as a payment processor for the Gift Card payment method
To select Fortress as a payment processor for the Gift Card payment method:
-
Go to
chq > settings > sales > payment methods.If a Fortress Gift Card payment method is not set up under
settings > sales > payment methods, click new at the top-left to create one.
In the new payment method dialog that opens, selectgift cardfor the payment type field and then click ok. On clicking, the dialog displays where it’s required to set up parameters for the new gift card payment method and then click save. -
In the payment methods area, click to select the required paymet method and then click location settings.
-
Click to select your location and click edit to open the following dialog (see the screenshot below):
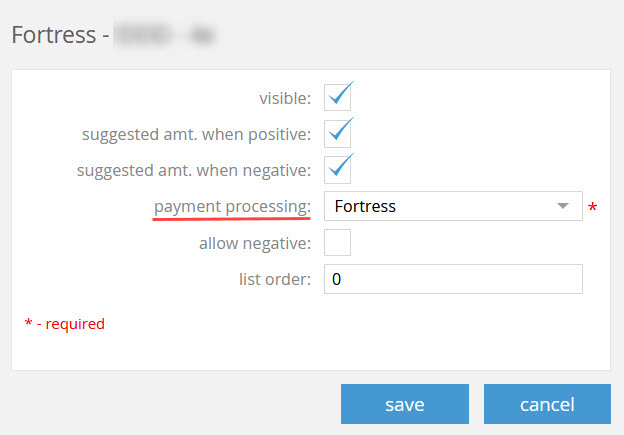
-
In the payment processing field, select
Fortressto use the Fortress payment processor for this location.
Also, the following settings are enabled for Fortress:- suggest amt when negative
- allow negative
-
Click save in both dialogs for the changes to take place.
See also
Configuring allowed RFID tags
Build 6.34.254.0: PRO-7385
As of version 6.34.254.0, it has become possible to configure which RFID tags are allowed and which are ignored when scanned by the RFID reader.
To do so, it is required to specify the allowed EPC prefixes for RFID tags in a specific RFID allowed prefixes setting in CHQ. Once done so, all the tags with EPCs starting with figures other than specified are ignored.
The RFID allowed prefixes setting is available at the company and location level.
Purpose
This feature can be helpful if you want to avoid the “Item Failed to Scan” error message in iPad POS every time you scan items with RFID tags that are not included in the product catalog (for example, security tags).
Configuring tag prefixes at the company level
- In CHQ, go to
settings > sales > POS settings. - In the general section, enter your RFID number in the RFID allowed prefixes field:
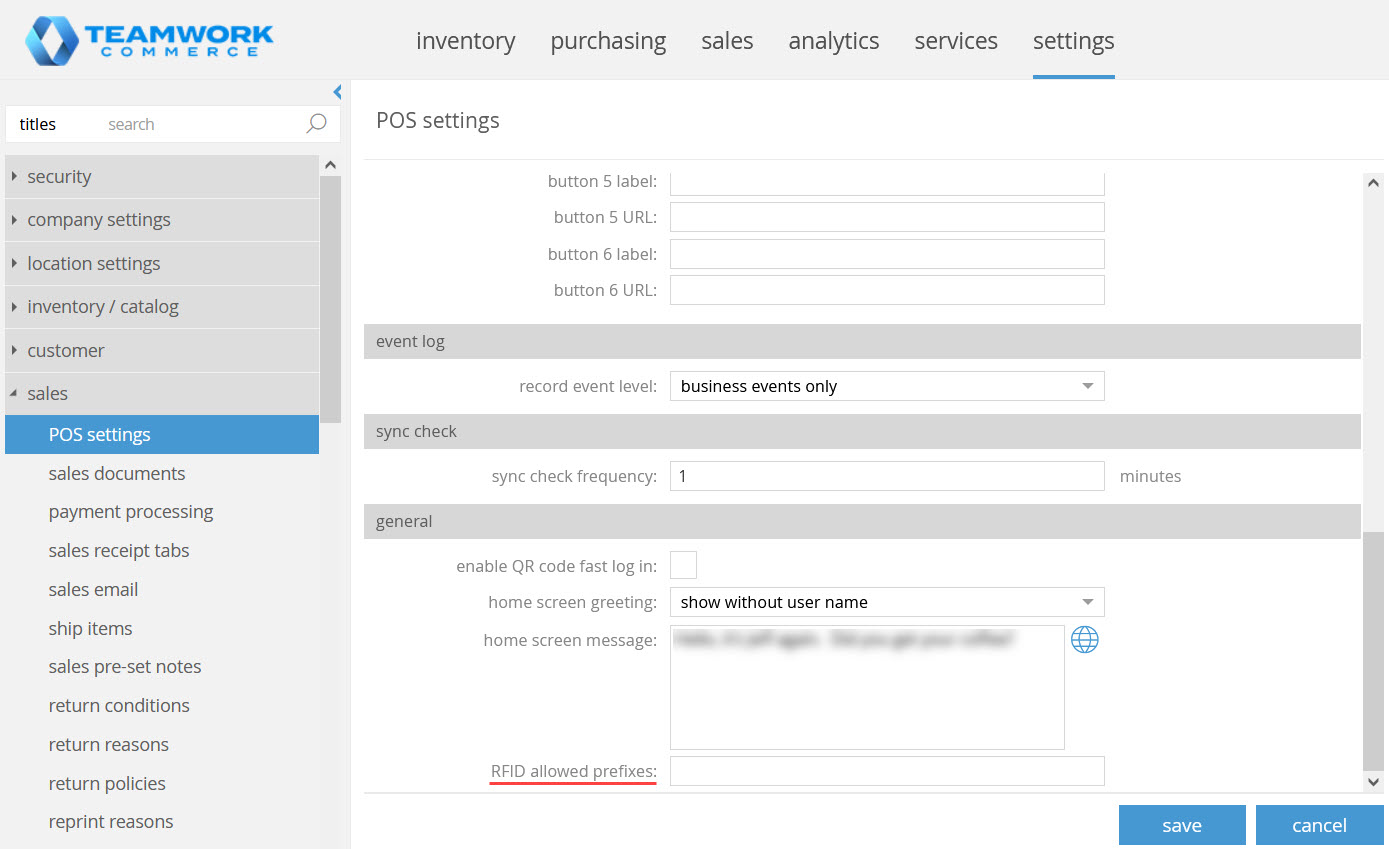
If you want to specify several prefixes, the respective values must be separated by a comma. For example: 3039, 3040.
- Click save for the changes to take place.
Configuring tag prefixes at the location level
- Go to
settings > location settings > locations / location settings. - Click to select your location, then click edit.
- In the [selected location] dialog that opens, go to the payments tab.
- Populate the RFID allowed prefixes field:
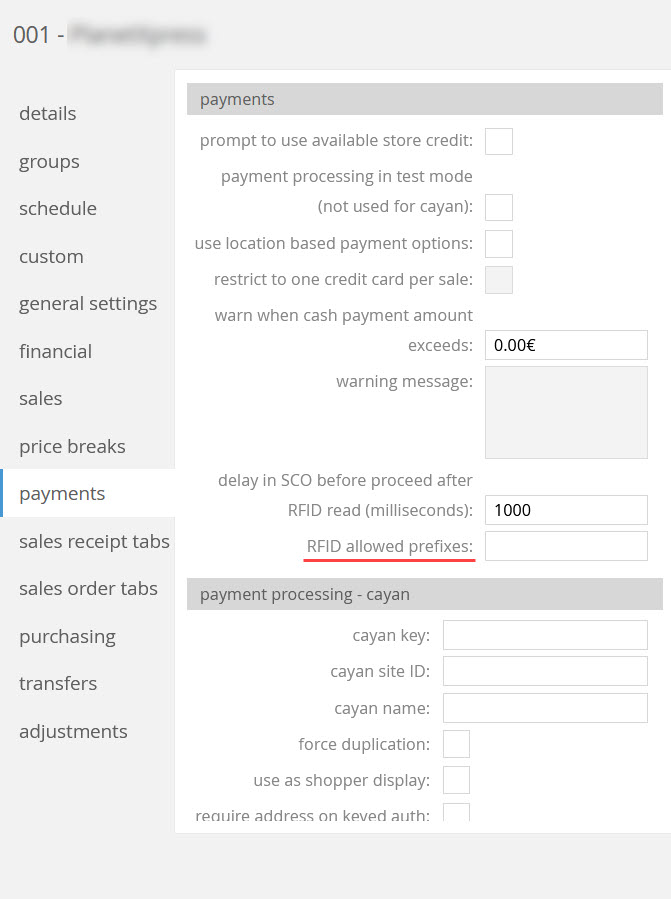
If you want to specify several prefixes, the respective values must be separated by a comma. For example: 3039, 3040.
- Click save for the changes to take place.
Please be advised that location-level settings override company-level settings.
See also
Updated Banorte settings
Build 6.34.254.0: PRO-6470
We’ve added a new additional timeout delay setting to configure the waiting period for the Banorte payment processor’s response. Values can range from 1 to 999, 30 is set by default on new installation.
The additional timeout delay setting is available for configuration at the company and location levels in CHQ:
- under
settings > sales > payment processing > Banorte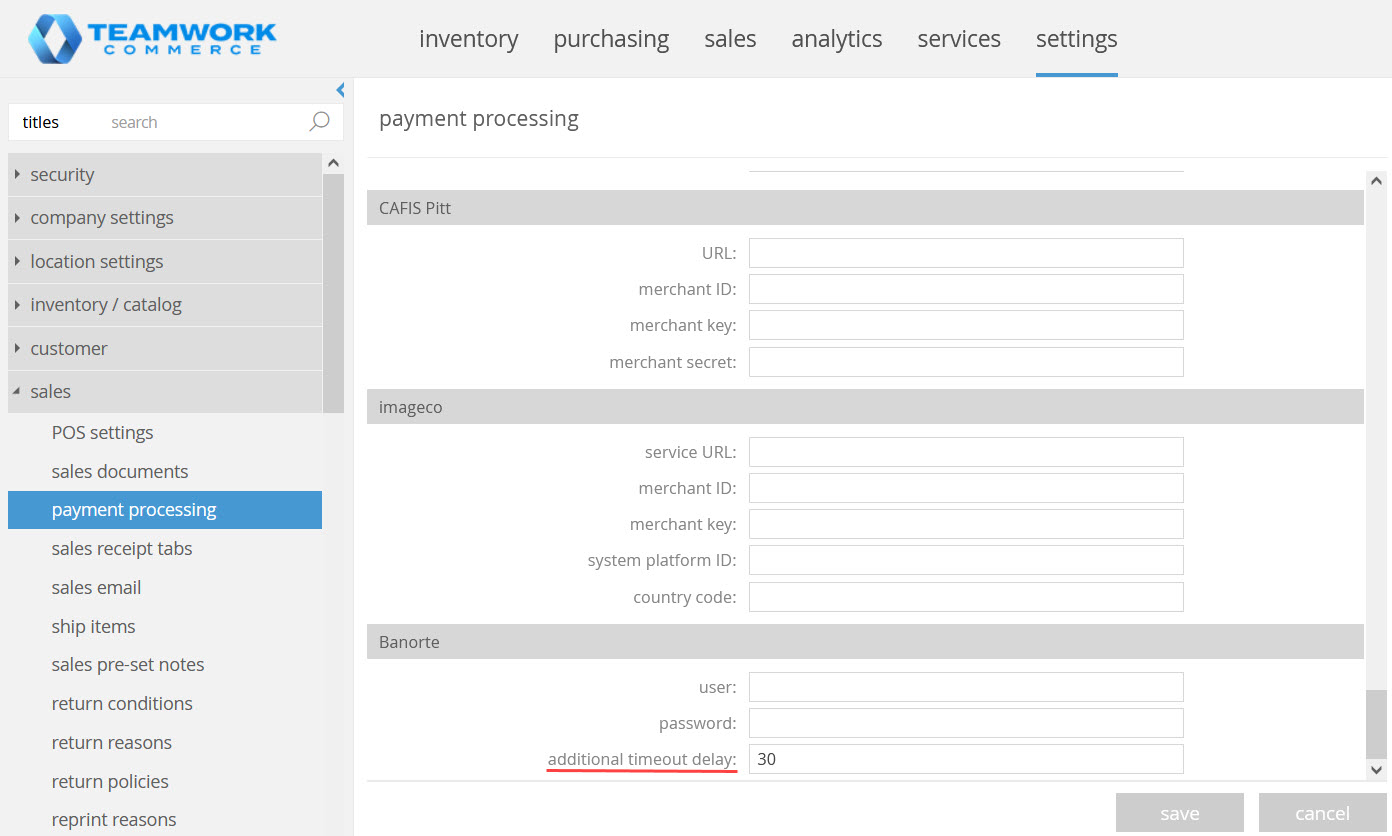
- under
settings > location settings > locations / location settings > payments > Banorte.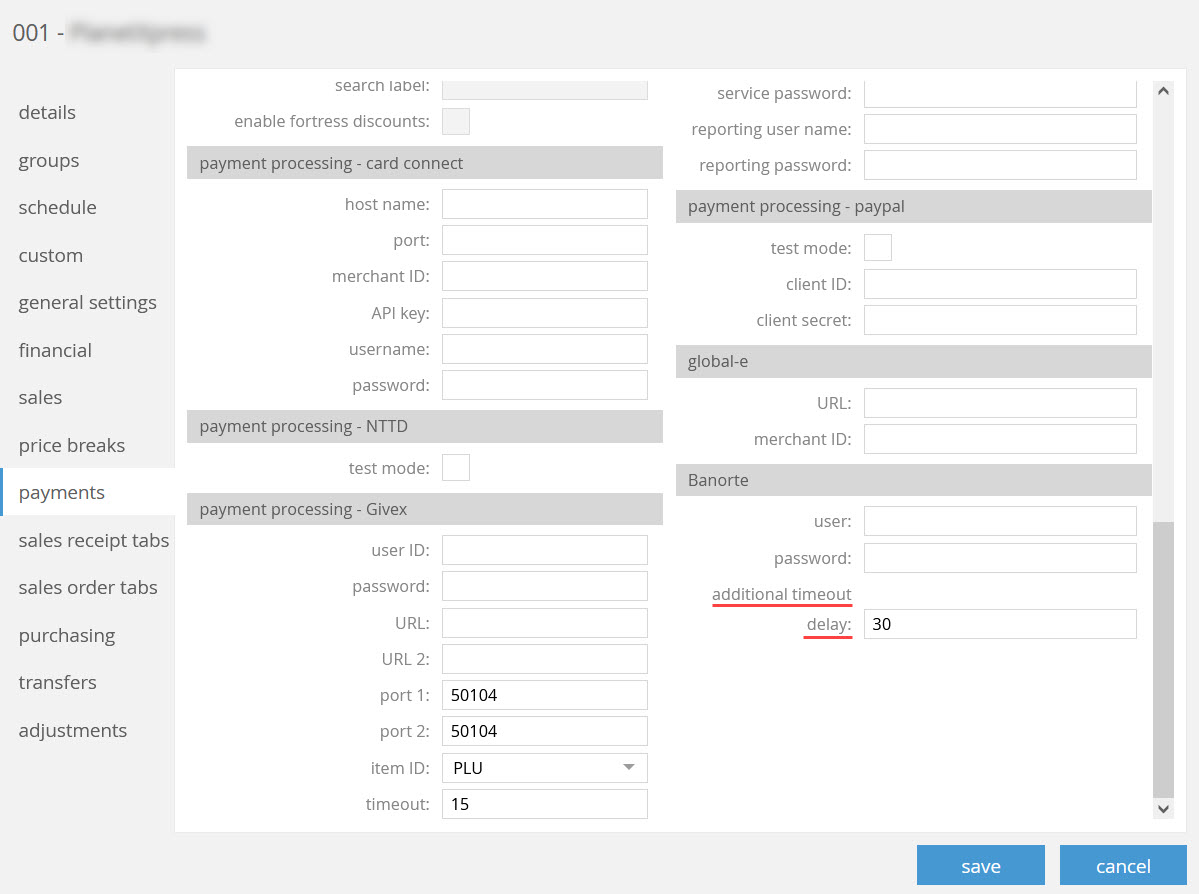
Please be advised that location-level settings override company-level settings.
See also
Removed functionality: Store Credit
Build 6.34.254.0: PRO-6651
As of version 6.34.254.0, we’ve removed Store Credit from CHQ as the current implementation of Store Credit functionality is not supported in the multicurrency environment.
The store credit functionality has been removed from the following areas in CHQ:
settings > company settings > credit & reward platform > store credit settingssales > customers > [selected customer] > store credit
Also, the store credit option is no longer available under:
sales > order management > [selected sales order] > payments > add paymentsales > sales receipt > [selected sales receipt] > items > appease memo
See also
Cloud HQ User Manual: Settings
Other enhancements
NF525: Updated fiscal Sales Receipts
Build 6.34.254.0: PRO-6175
We’ve introduced updates at the database level to ensure support of NF525 requirements related to fiscal Sales Receipts.
NF525: Optimized calculation of grand totals
Build 6.34.254.0: PRO-5931
We’ve introduced updates at the database level to optimize the calculation of grand totals for fiscal Sales Receipts.
New JSON-based Coupon Program Import API
Build 6.34.254.0: PRO-6463
We’ve added a new JSON-based Coupon Program Import API to import coupon programs.
Issue Resolutions
JSON-based RMA Order Export API: Incorrect work of the SalesOrderNo filter
Build 6.34.254.0: DS-2262
Prior to 6.34.254.0, making an export via JSON-based RMA Order Export API could fail with an error due to the incorrect work of the SalesOrderNo filter.
Now, the SalesOrderNo filter has been updated and JSON-based RMA Order Export API works as expected
Missing External ID in imported customer records
Build 6.34.254.0: DS-2183
We’ve fixed the issue where, as a result of customer record import via JSON-based Secure Customers Import API, the external ID value could occasionally be missing under chq > sales > customers > [required customer] > the system tab.
JSON-based Promo Engine Import API: New RestrictedMemberships setting
Build 6.34.254.0: DS-2221
We’ve updated JSON-based Promo Engine Import API with new RestrictedMemberships setting. This setting allows for importing information on:
- if the promotion is restricted to certain membership levels, and
- if restricted, what membership levels are allowed.
Device Controller: Request backup button doesn’t work
Build 6.34.254.0: DS-2217
We’ve fixed the issue where, after clicking request backup and then save under chq > services > device controller > [selected device], no backup was created at the respective POS device.
JSON-based Sales Receipt Export API: LineDiscountAmount and LineDiscountPercent fields missing
Build 6.34.254.0: DS-2314
We’ve fixed the issue where, the LineDiscountAmount and LineDiscountPercent fields would be missing in the JSON-based Sales Receipt Export API response.
JSON-based RMA Order Export API: New ReturnTrackingNo filter added
Build 6.34.254.0: DS-2429
We’ve enhanced the JSON-based RMA Order Export API with the ReturnTrackingNo filter that supports the following operators: Equal and Contains.
The ReturnTrackingNo setting represents the return tracking number from the Ship Memo item level.
JSON-based RMA Order Export API: The operator Contains issue
Build 6.34.254.0: DS-2296
Issue
Prior to 6.34.254.0, when performing export via JSON-based RMA Order Export API, the Contains operator of the SalesOrderNo filter would occasionally return incorrect data in the response.
Resolution
The issue has been fixed. Now, the Contains operator of the SalesOrderNo filter works as expected.
JSON-based RMA Order Export API: the RmaItemNo filter issue
Build 6.34.254.0: DS-2362
We’ve fixed the issue where during the export using JSON-based RMA Order Export API, the operator Contains in the RmaItemNo filter could occasionally fail to return requested values in the API response.
JSON-based Sales Receipt Export API: New OriginalReceiptIdentifier parameter added
Build 6.34.254.0: DS-2450
We’ve enhanced the JSON-based Sales Receipt Export API with a new OriginalReceiptIdentifier parameter.
Missing the ReturnReasonCode value in the JSON-based Sales Receipt Export API response
Build 6.34.254.0: DS-2360
We’ve fixed the issue where, as a result of export via JSON-based Sales Receipt Export API, the ReturnReasonCode value could occasionally be missing in the API response.
JSON-based Sales Receipt Export API: Incorrect TotalDiscountAmount in the API response
Build 6.34.254.0: DS-2344
Issue
Prior to 6.34.254.0, when exporting Sales Receipt via JSON-based Sales Receipt Export API, only one global discount would be counted for the TotalDiscountAmount field in the API response despite multiple discounts applied in the Sales Receipt.
Resolution
The issue has been fixed. Now, the TotalDiscountAmount field considers the value of total discounts applied to the Sales Receipt.
JSON-based Sales Receipt Export API: Missing InventoryPrice in response
Build 6.34.254.0: DS-2381
We’ve fixed the issue where, as a result of exporting Sales Receipt via JSON-based Sales Receipt Export API, the InventoryPrice field would occasionally be missing at the Item level in the API response.
JSON-based Sales Receipt Export API: Missing GlobalDiscReason in response
Build 6.34.254.0: DS-2431
We’ve fixed the issue where, as a result of exporting Sales Receipt via JSON-based Sales Receipt Export API, the GlobalDiscReason field would occasionally be missing at the Item level in the API response.
JSON-based Sales Receipt Full Export API: New TaxExtAmount field added
Build 6.34.254.0: DS-2328
We’ve enhanced the JSON-based Sales Receipt Full Export API with a new TaxExtAmount field. The new field is available at the Item level. The value is formatted as a number.
JSON-based Sales Receipt Full Export API: New discount amount and percent fields added
Build 6.34.254.0: DS-2345
We’ve enhanced the JSON-based Sales Receipt Full Export API at the Item level with the following new fields:
- LineExtDiscountAmount
- LineUnitDiscountAmount
- LineDiscountPercent
- GlobalExtDiscountAmount
- GlobalUnitDiscountAmount
All the values of these fields are formatted as numbers.
JSON-based Sales Receipt Full Export API: Missing information from the original Sales Receipt
Build 6.34.254.0: DS-2456
We’ve fixed the issue where, as a result of exporting a Sales Receipt with a return item via JSON-based Sales Receipt Full Export API, the OriginalReceiptNum, OrigReceiptItemId and OrigReceiptItemLineNo fields that contained information from the original Sales Receipt, could occasionally be missing in the API response.
JSON-based Sales Receipt Full Export API: New RMANo and SOItemRMANo fields
Build 6.34.254.0: DS-2448
We’ve enhanced the JSON-based Sales Receipt Full Export API with the RMANo and SOItemRMANo fields. The fields allow for exporting Web Sales Receipts.
JSON-based Sales Receipt Import API: Missing information in some fields
Build 6.34.254.0: DS-2327
Issue
Prior to 6.34.254.0, as a result of importing Sales Receipts via JSON-based Sales Receipt Import API, information from the LineDiscountCouponNumber, LineDiscountCouponValue, and AccountNumber fields would not occasionally be stored in the API response.
Resolution
The issue has been fixed. Now, all the fields are imported as expected.
JSON-based Sales Order History Export API: Incorrect amount in response
Build 6.34.254.0: DS-2418
We’ve fixed the issue where, as a result of export via JSON-based Sales Order History Export API, the incorrect number of items could occasionally be sent in the API response.
JSON-based RMA Worksheet Import API: ItemSetting now supports the CLU value
Build 6.34.254.0: DS-2382
The ItemSetting field of the JSON-based RMA Worksheet Import API now supports CLU in addition to the following values: UPC (default), PLU, ExternalID and ID. This enhancement allows for defining items by their Custom Lookup (CLU) parameter.
The ItemSetting can be applied only if the ByOrderAndItemId parameter is selected in ImportBySettings.
JSON-based Sales Order Full Export API error
Build 6.34.254.0: DS-2417
We’ve fixed the issue where the JSON-based Sales Order Full Export API call would occasionally fail with the Invalid column name 'SalesReceiptId' error message.
JSON-based Promo Engine Import API: Missing coupon activated setting in new promotions
Build 6.34.254.0: DS-2329
We’ve fixed the issue where, as a result of importing new promotions via JSON-based Promo Engine Import API, the coupon activated checkbox would occasionally be left empty when required under chq > sales > promotion engine > [selected promotion].
Send Mail job error
Build 6.34.254.0: DS-2368
We have fixed the issue where the SendMail job would occasionally return error and, thus, fail to send emails to customers via Mandrill.
Missing information in the ReturnReceiptItemId field for RMA Worksheets
Build 6.34.254.0: DS-2458
We’ve fixed the issue where as a result of creating an RMA order with an exchange PLU and returning the item in CHQ, the ReturnReceiptItemId field was not populated in the dbo.RmaWorksheetItem table at the database level.
Device Controller: The request status button wouldn’t work
Build 6.34.254.0: DS-2340
We’ve fixed the issue where, after clicking request status under chq > services > device controller > [selected device] > info tab, no device status information was returned to CHQ.
Fixed filtering customers by receipt#
Build 6.34.254.0: DS-1805
We’ve fixed the issue where filtering customer records under chq > sales > customers by receipt # would occasionally fail with an error message.
The returned item is not transferred to the auto transfer location
Build 6.34.254.0: DS-2339
We’ve fixed the issue where the returned item would not be transferred to the auto transfer location predefined for the return reason.
Inability to reverse a Transfer Memo
Build 6.34.254.0: DS-2377
We’ve fixed the issue where clicking the reverse button under chq > inventory > transfer memos > list > [selected transfer memo], would occasionally fail to reverse and cancel the selected Transfer Memo.
Inability to unhold and post out a Transfer Memo
Build 6.34.254.0: DS-2390
We’ve fixed the issue where on clicking the unhold & post transfer out button under chq > inventory > transfer memos > list > [selected held transfer memo], the Transfer has not been posted out. Error: Transfer was edited on another device error message appeared.
Sales Orders stuck in progress for a long time
Build 6.34.254.0: DS-2374
We’ve fixed the issue where multiple Sales Orders would occasionally remain processed for a long time under chq > sales > order management > list.
Sales Orders: Insufficient funds payment for completed Sales Order
Build 6.34.256.0: DS-2419
Issue
Prior to 6.34.254.0, in CHQ, under sales > order management > [selected order] > payments tab, “Insufficient Funds” displayed instead of the payment method name in the payments section. This would happen when CHQ failed to capture funds for the Sales Order, then the Sales Order status changed to completed.
Resolution
The issue has been fixed. Now, the original payment method name displays as expected in the [selected sales order] dialog.
Customer: Change log not updated
Build 6.34.254.0: DS-2452
Issue
Prior to 6.34.254.0, when selecting a customer for a loyalty program in the loyalty program opt-in setting, the respective action could occasionally be not recorded in the customer change log under chq > sales > customers > [selected customer] > change log.
Resolution
The issue has been fixed. Now, all the changes made in the loyalty program opt-in setting are correctly indicated in the customer change log.
Customer membership level not upgraded
Build 6.34.254.0: DS-2462
We’ve fixed the issue where the sales from the previous calculation period would occasionally be ignored if the conversion delay period for those sales overlapped the membership recalculation date.
Customer membership level incorrectly upgraded
Build 6.34.260.0: DS-2473
We’ve fixed the issue where the customer membership level could occasionally be incorrectly upgraded before the membership conversion delay period is completed.
