Credit Memo payment
This guide describes how to accept a Credit Memo payment in POS Pro V6.
Credit Memos are issued to customers in case of a return or as a way of appeasement (for example, for any customer service problems). Customers, in their turn, can use Credit Memos to pay for their purchases.
In POS Pro V6, one customer can have multiple Credit Memos attached to their account. Also, Credit Memos:
- have an expiration as well as grace period
- cannot be re-loaded with money
- can be deactivated in CHQ
To accept a Credit Memo payment in POS Pro V6:
-
On the Home Screen, tap New Sale.
-
In the Sales Receipt area that opens, add a customer (required for Credit Memo payments) and sale items. To learn how to do that, see Sales Receipt: Adding a customer and items to the sale.
Then, tap Payment at the bottom-right.
- In the Payment area, tap Credit Memo in the right-side panel.
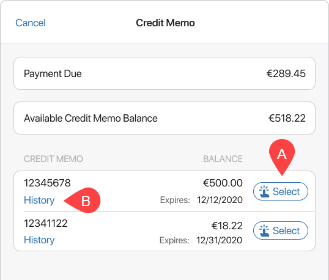
- In the Credit Memo dialog that opens, tap Select A next to the required Credit Memo.

Additionally, tapping History B opens the Memo’s details as well as the history of transactions.
-
In the area with Payment Due that opens, tap the amount field to edit it. Then, tap Pay at the bottom.
-
Back in the Payment area, once the full payment amount is captured, tap Finalize at the bottom-right.
Alternatively, to cancel the payment, swipe left the row with the Credit Memo payment and then tap Remove.