Version 6.34
Feature Descriptions
Shipping items to the customer and managing store pickups
Build 6.34.234: PRO-2780, PRO-6239
With this update, it is now possible to:
- ship a sale item to the customer
- prepare a sale item for store pickup
Purpose
A Ship to Customer is a type of sale where the customer purchases goods in a store and requests for the purchase to be shipped to a specific address. Shipping may also be useful when certain merchandise is out of stock, and the store arranges for the latter to be shipped from the warehouse directly to the customer.
A Store Pickup is a type of sale where the customer picks up purchased goods at a store. The pickup order is filled from the store’s inventory, or the neccessary items may be transferred to the store and then held for customer pickup.
Shipping an item to the customer
To ship an item to the customer on sale finalization, in POS Pro:
-
On the Home Screen, tap New Sale.
-
In the Sales Receipt area, add sale items and a customer to the receipt.
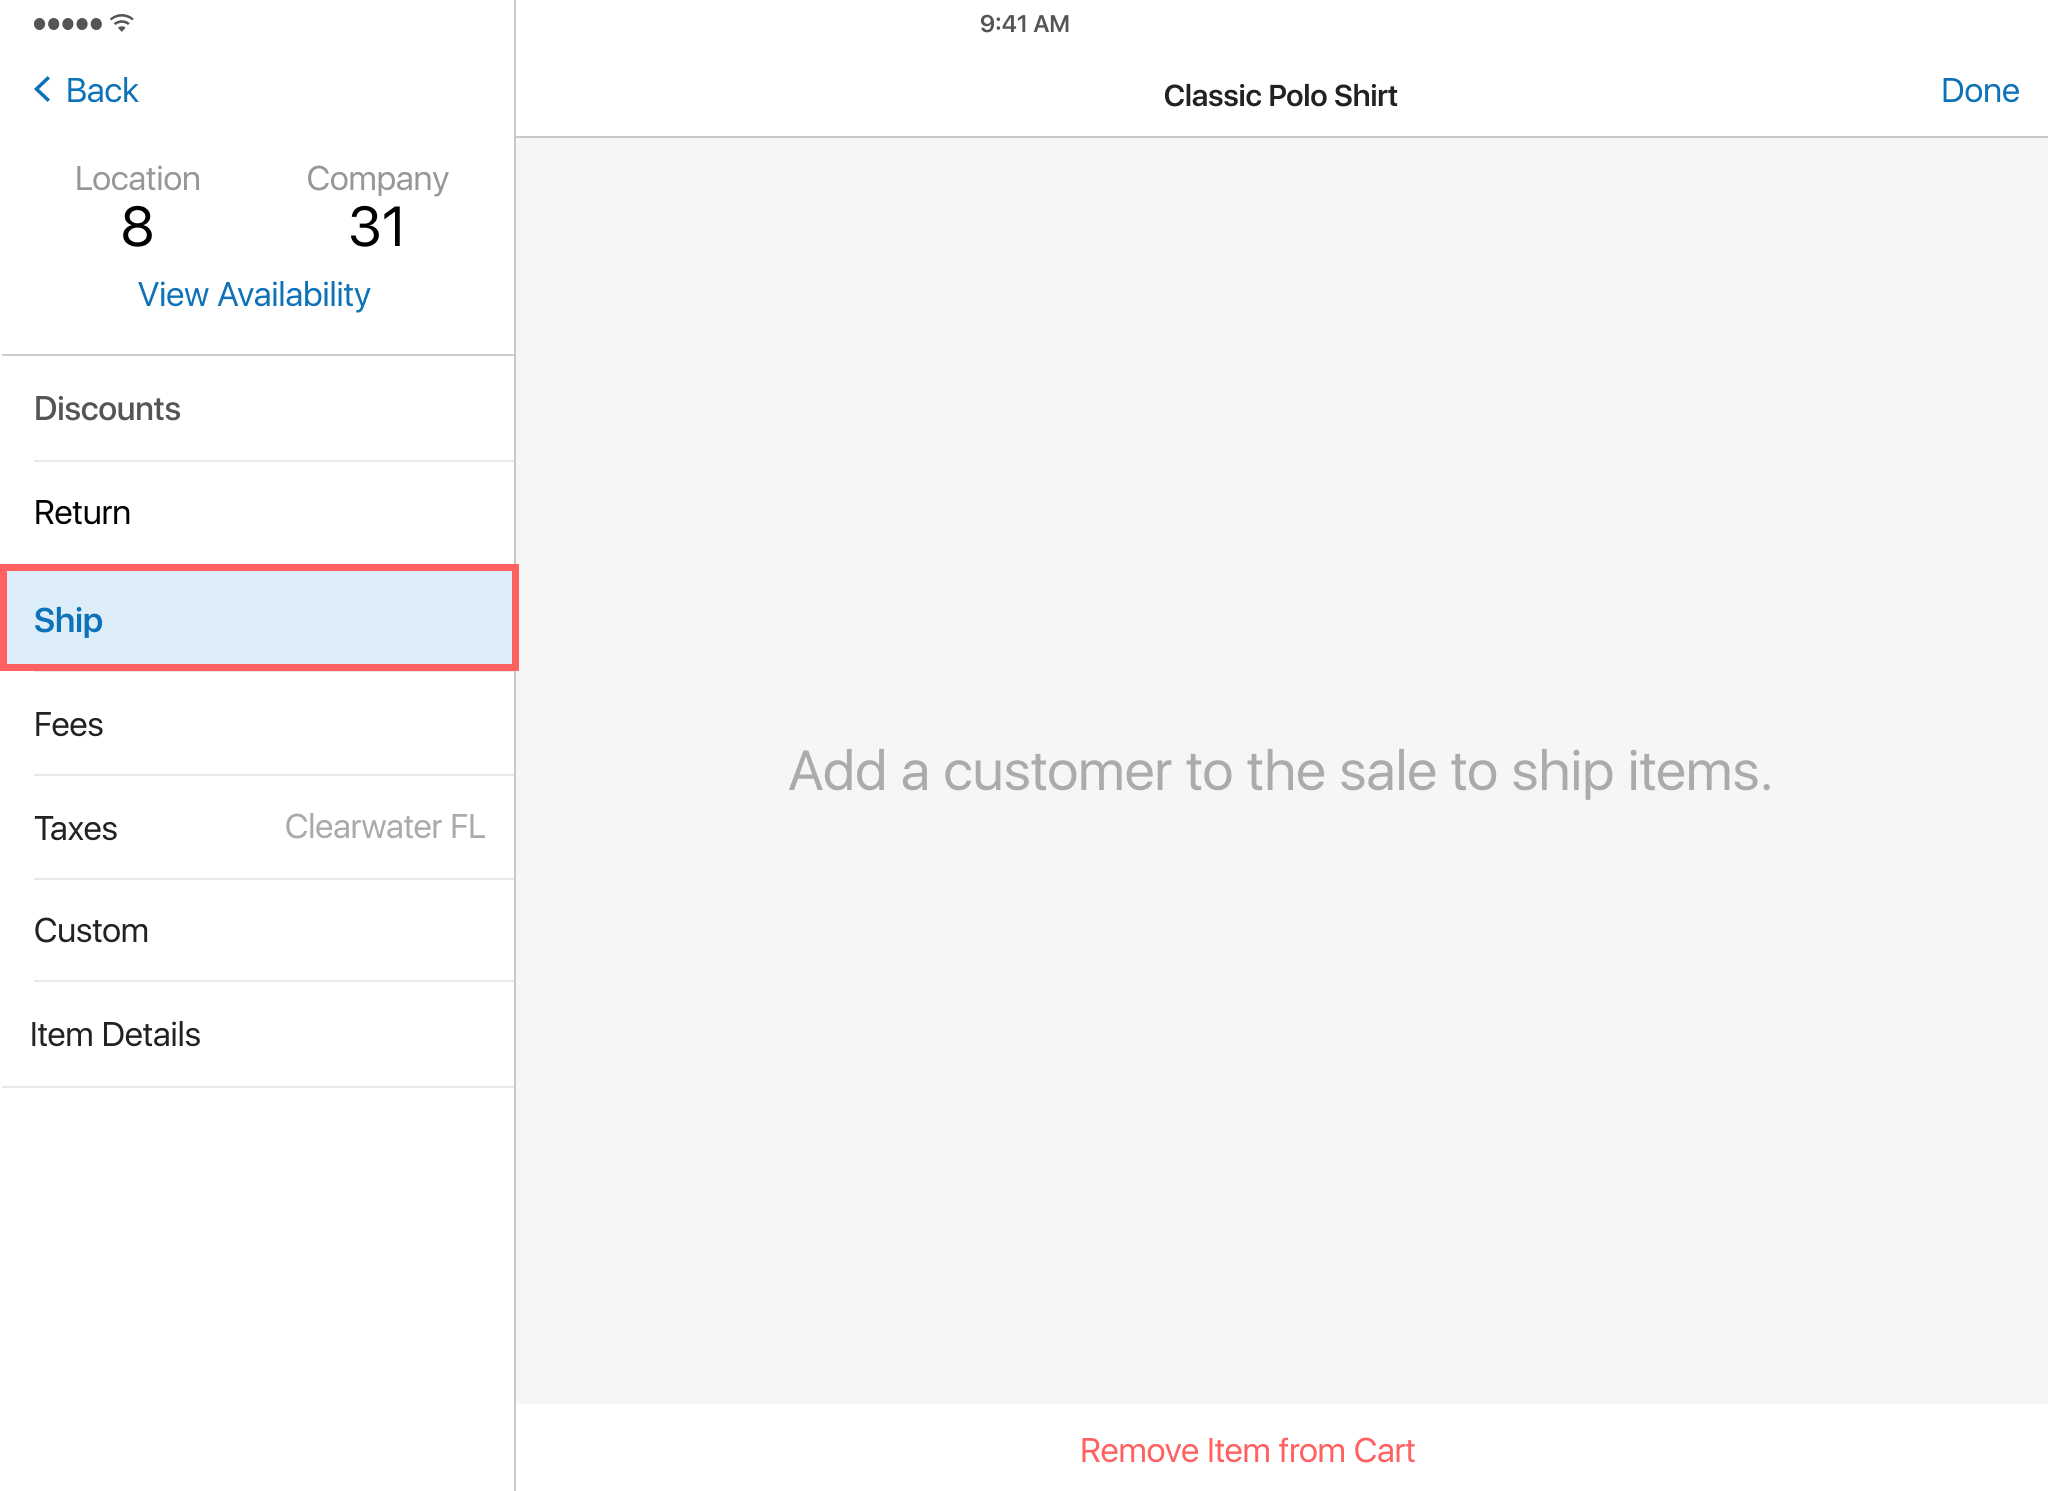
Adding a customer is required for shipping. If a customer is not added, the Ship tab of the [item name] - edit dialog will be blank.
-
Under
Sales Receipt > Cart, tap the sale item that needs to be shipped. -
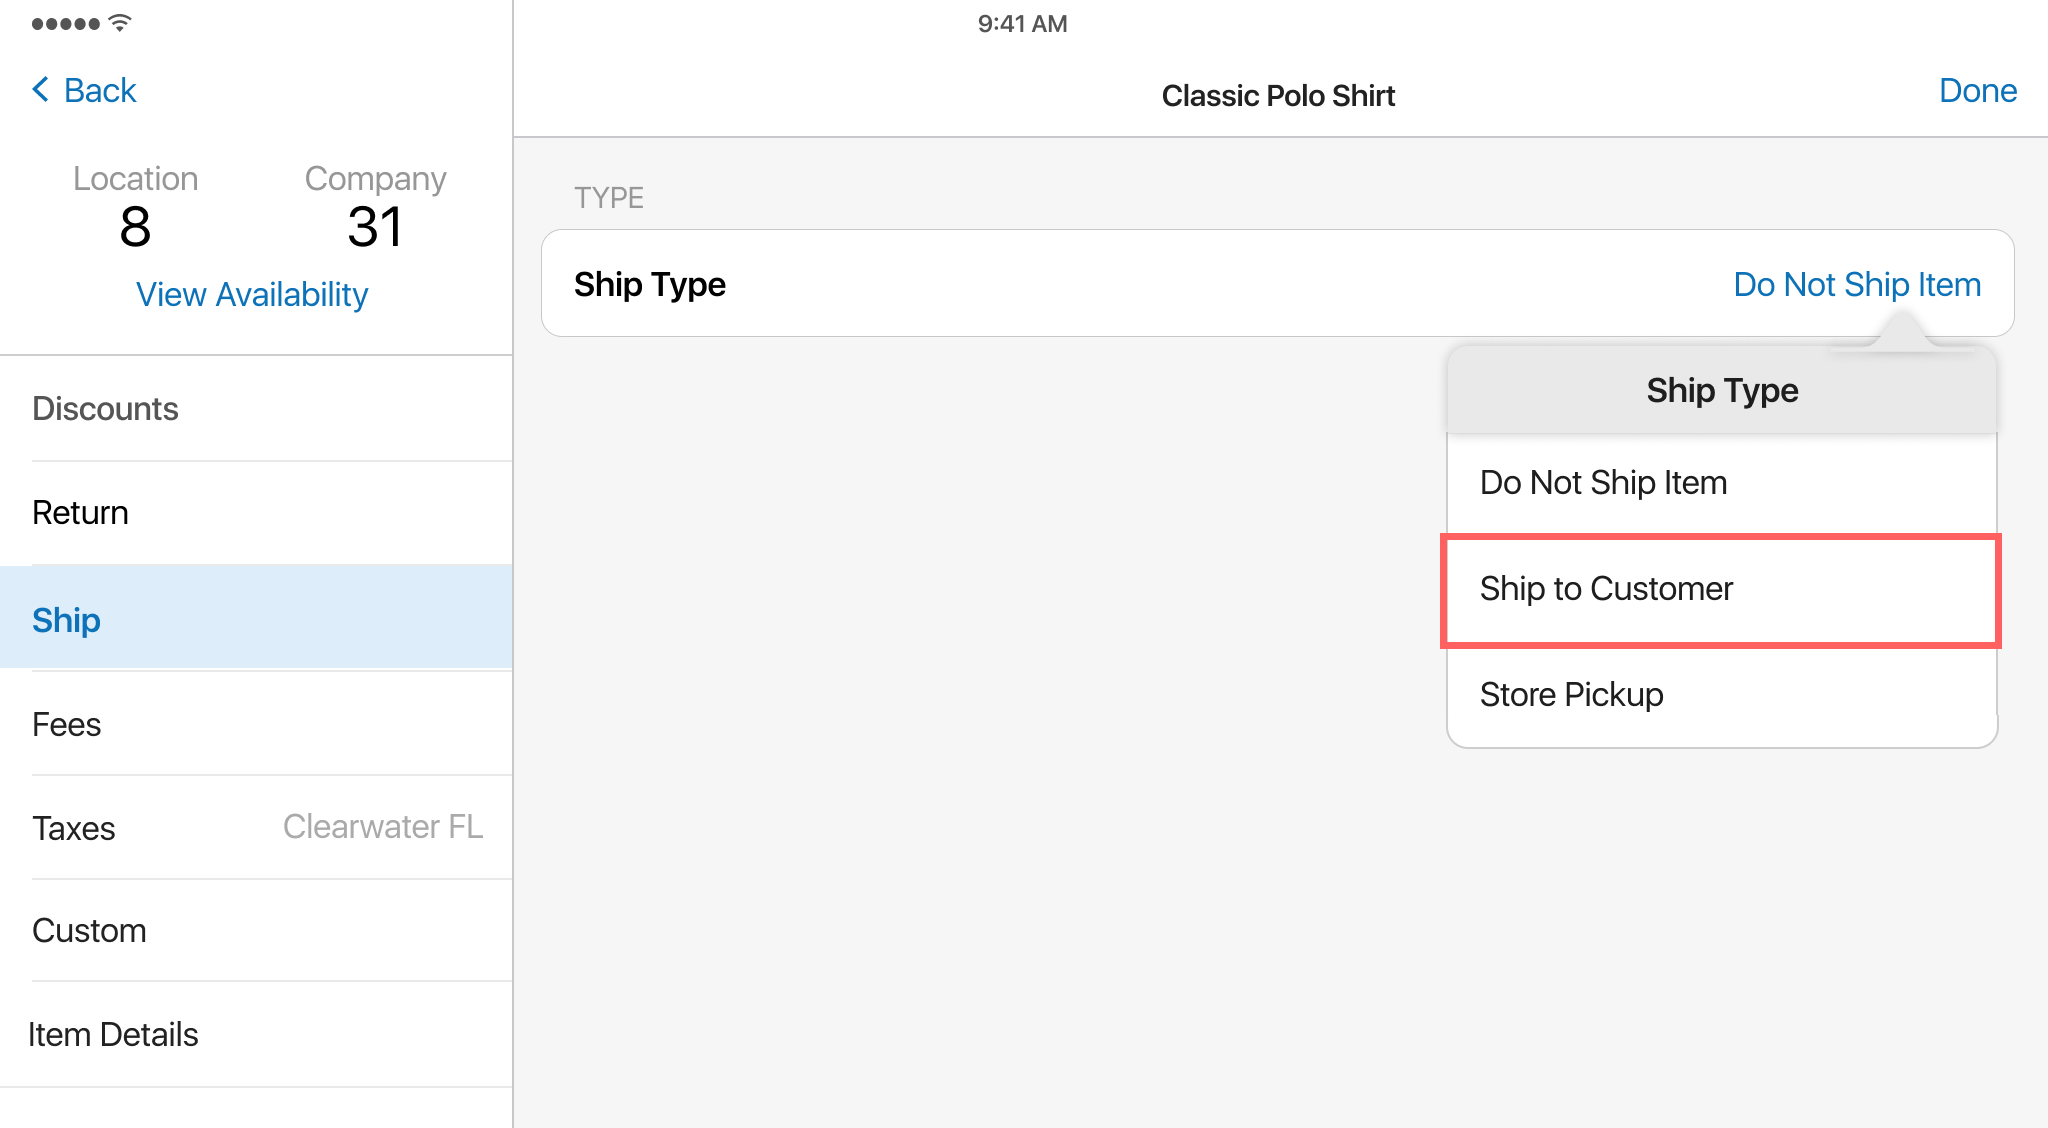
In the [item name] - edit dialog that opens, in the left-side panel, tap the Ship tab:

-
The Ship Type pop-over dialog will automatically display for the Ship Type field. Tap Ship to Customer:

-
In the Ship To Address dialog that displays, tap the address the item must be shipped to.
Additionally, in the Ship to Address dialog, you can do the following:
- switch between the Ship To, Bill To, and Postal tabs 1 to view all the addresses available on the customer’s record
- tap Edit next to an address to edit it 2
- tap Add New Address at the bottom 3 to add a new address record. After the sale is finalized, the new address can be automatically added to the customer’s record
-
Once the ship-to address is defined, back in the Ship tab, configure the following fields:
Field Description Value Ship Method The shipping method used to deliver the item to the customer. If no value is set by default, the Select button allows for choosing among available ship methods. Alternatively, the following default values may be set:To be available for selection in the Ship Method field, in CHQ, the ship method must be marked as available for POS ship item. The available for POS ship item checkbox is available under
settings > company settings > shipping methods > [selected ship method].- the default ship method from the customer’s record, or
- if no ship method is available in the customer’s record, the company’s default ship method (
chq > settings > company settings > shipping methods).
Fill From and Lock Fill From The company location where the order is to be filled from. Note that it’s possible to choose a fill location different from your store location. In this case, the goods will be shipped from the fill location directly to the customer. The Select button allows for choosing a fill location. The availability and behavior of the Fill From and Lock Fill From fields are controlled by the send sale - lock fill location setting located under
chq > settings > order management > customer orders. For the send sale - lock fill location setting, the following values are available:always: the Fill From field is visible in POS Pro. If the user defines a fill location, the Order Management System (OMS) does not override the user’s choiceok: both Fill From and Lock Fill From fields are visible in POS Pro. If the Lock Fill From switch is turned on, the order must be filled at the location defined in the Fill From field. If the Lock Fill From switch is turned off, and the order can’t be filled at the defined location, OMS will automatically assign another fill locationnever: neither Fill From nor Lock Fill From fields are visible in POS Pro. OMS assigns a fill location automatically
-
In the [item name] - edit dialog, tap Done in the upper right corner.
-
Back in the Sales Receipt area, tap PAYMENT at the bottom-right.
-
Accept the required payment and then tap FINALIZE.

Processing a store pickup
To process a store pickup, in POS Pro:
-
On the Home Screen, tap New Sale.
-
In the Sales Receipt area, add sale items and a customer to the receipt.
-
Under
Sales Receipt > Cart, tap the sale item that is to be picked up. -
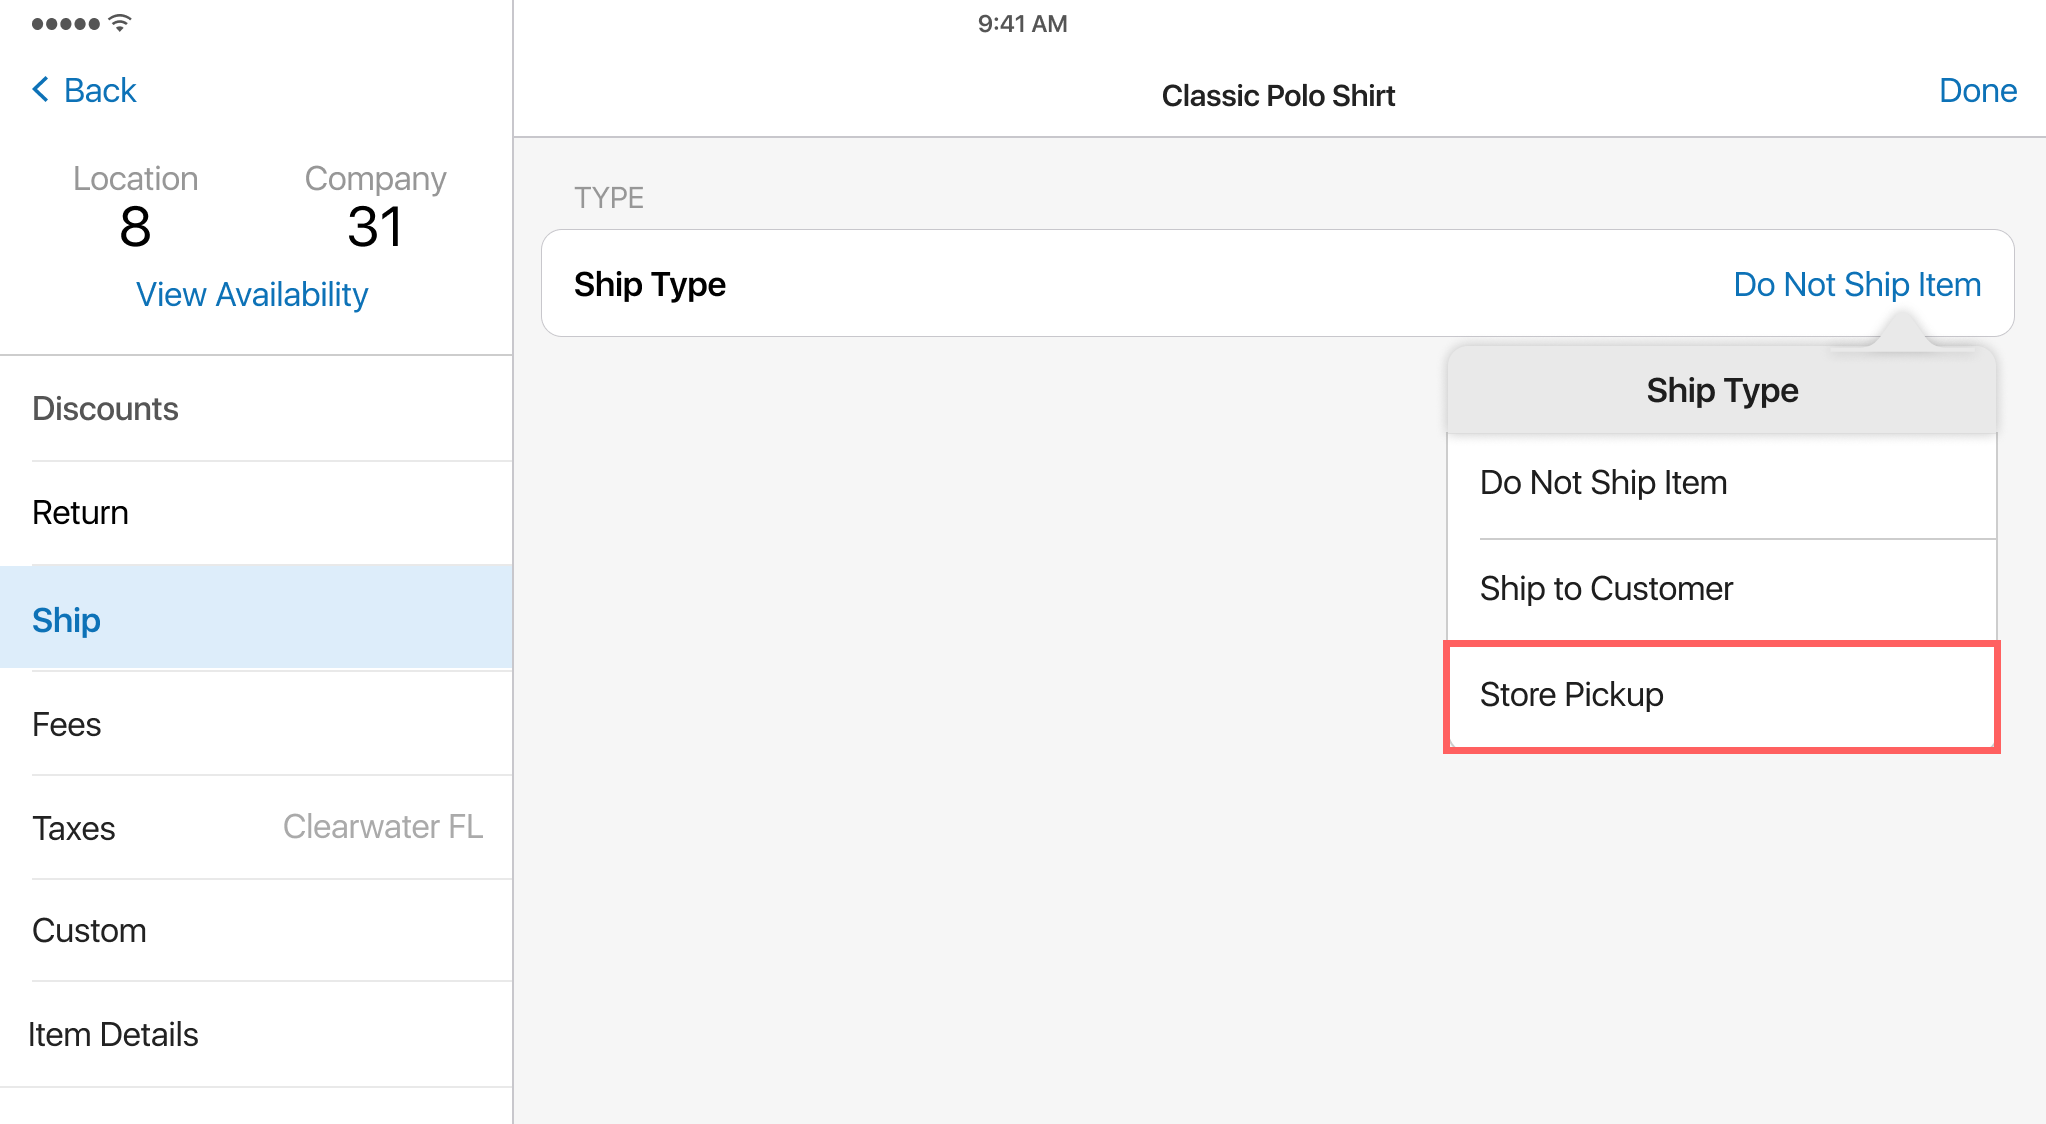
In the [item name] - edit dialog that opens, in the left-side panel, tap the Ship tab:
-
The Ship Type pop-over dialog will automatically display for the Ship Type field. Tap Store Pickup:
-
In the Select Location dialog that appears, select the required pickup location. Use the Search field to search for the required location by location code or name:

To be available as a pickup location, in CHQ under
settings > location settings > locations / location settings > [selected location] > details >thegeneralsection, the location must have the available for store pick up checkbox selected. -
Back in the [item name] - edit dialog, tap Done in the upper right corner.
-
In the Sales Receipt area, tap PAYMENT at the bottom-right.
-
Accept the required payment and then tap FINALIZE.


See also
Foreign currency payments
Build 6.34.234: PRO-5708, PRO-6191
In POS Pro, it is now possible to accept cash paymens in foreign currencies.
Configuration in CHQ
For a foreign currency payment method to be available in POS Pro, the following must be set up in CHQ:
- under
settings > sales > payment methods, a cash payment method must be set up with a currency that is different from the location’s base currency - under
settings > sales > payment methods > location settings, the foreign currency payment method must be marked as visible for the required company location(s) - under
settings > company settings > currencies > exchange rates, exchange rates must be configured for the currencies in use
Accepting a foreign currency payment
To accept a cash payment in a foreign currency, in POS Pro:
-
On the Home Screen, tap New Sale.
-
In the Sales Receipt area, add sale items and a customer to the sale.
-
Tap Payment at the bottom-right.
-
In the right-side panel, tap the required foreign currency payment:
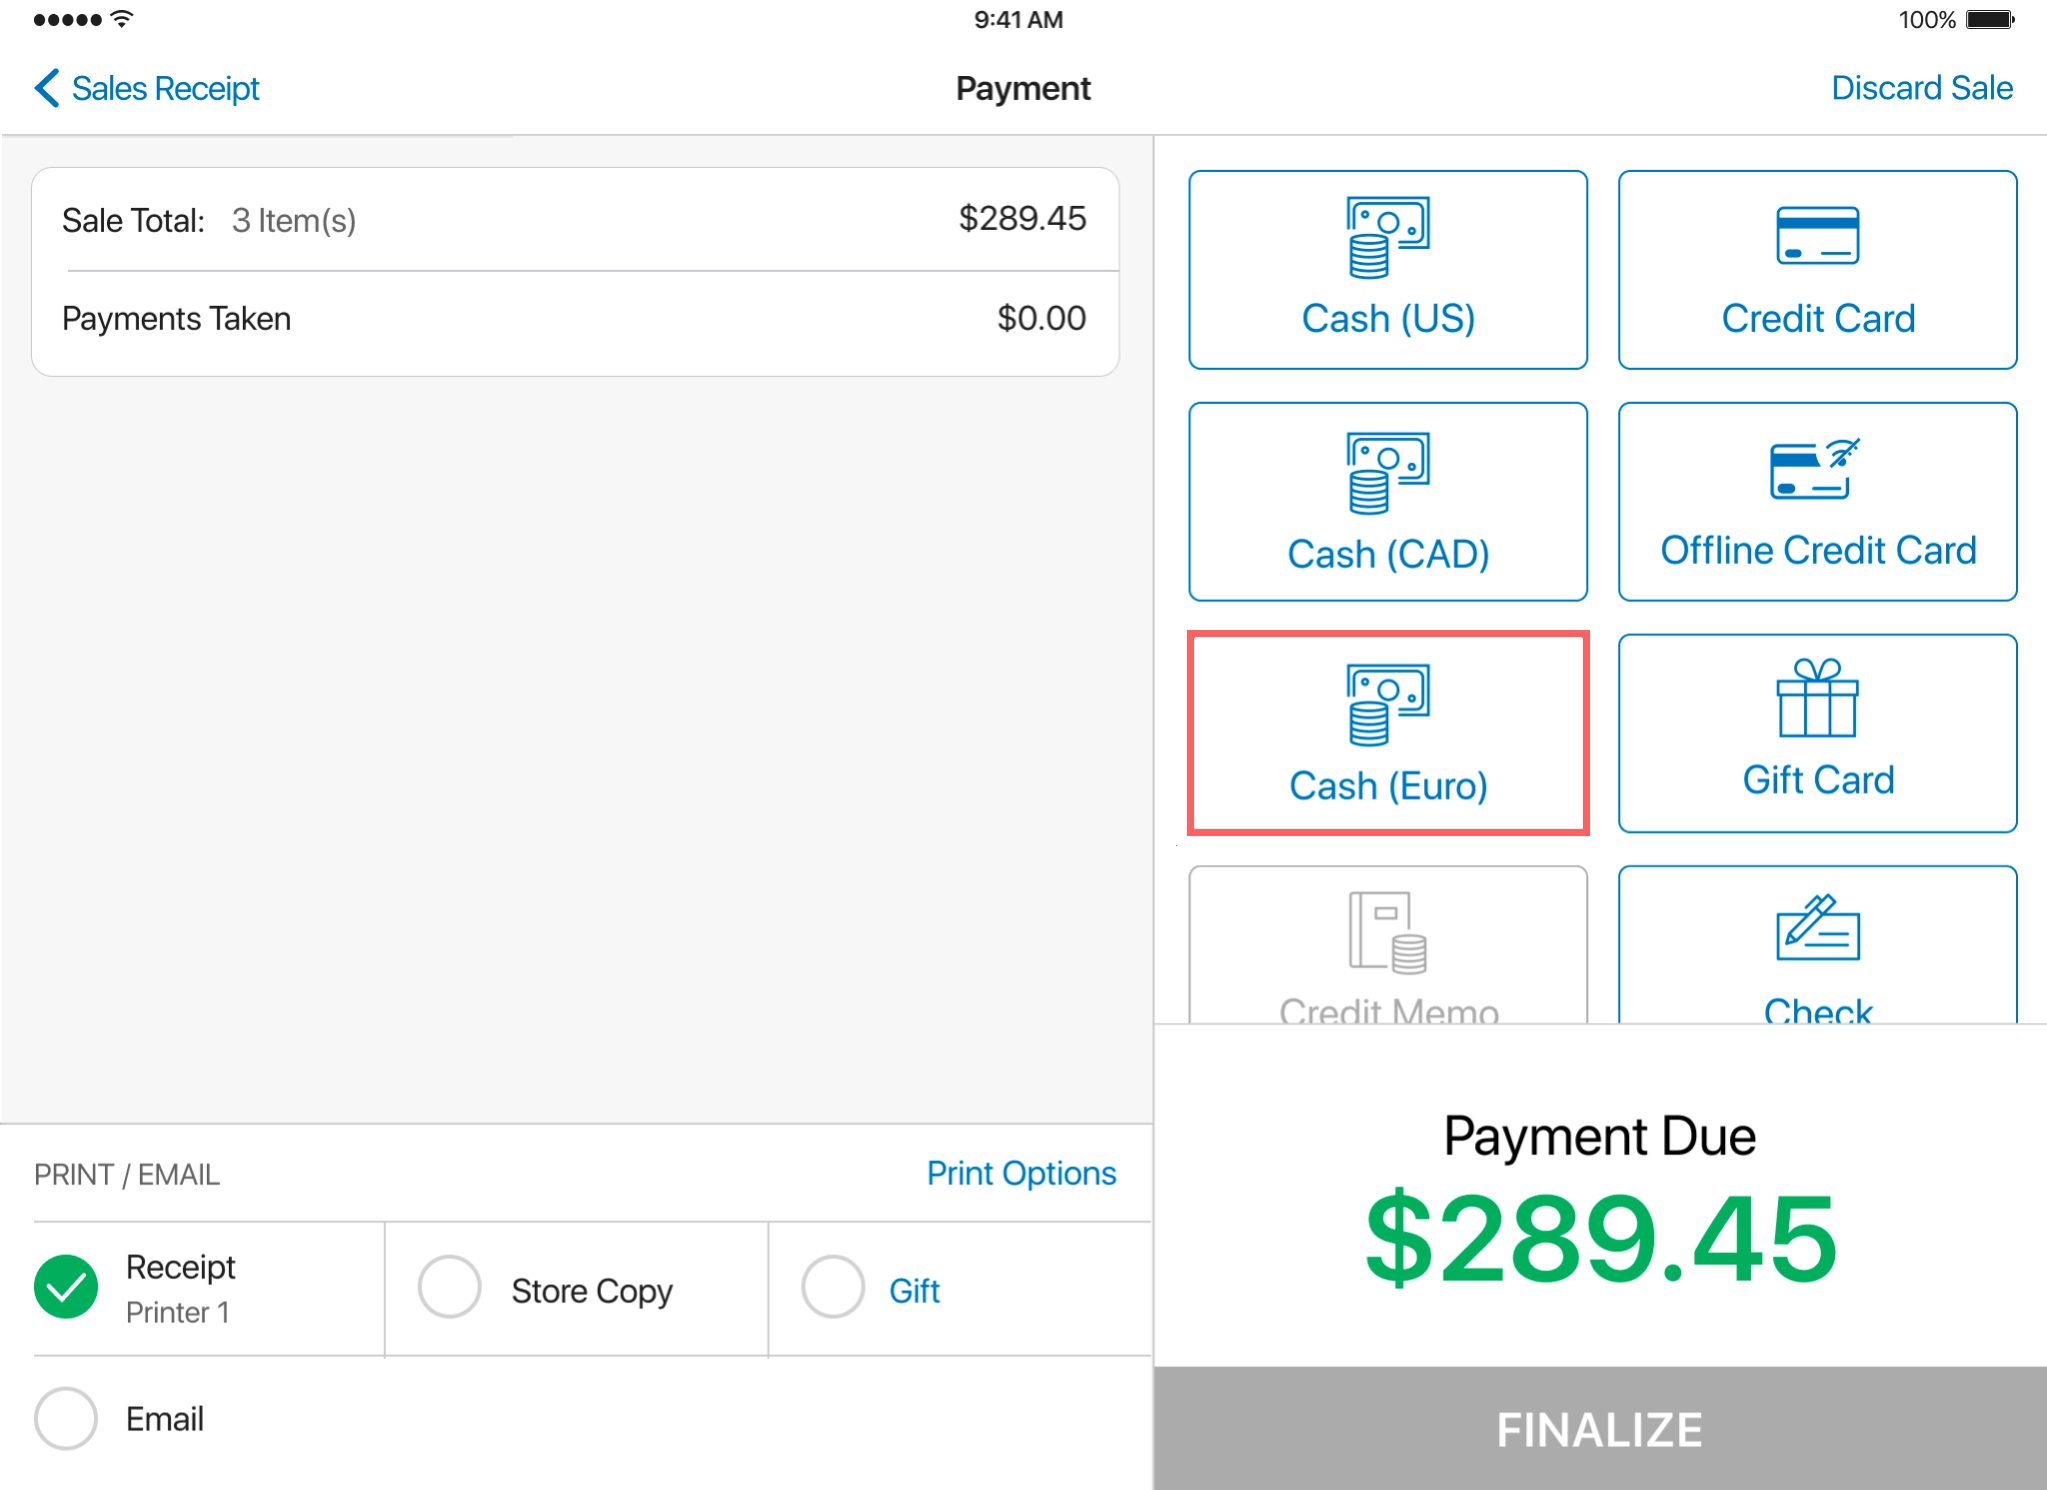
Please note that the way a payment method is called in POS Pro is defined in CHQ under
sales > payment methods > [your foreign currency payment method]in the description field. -
In the [currency name] area that opens, tap to define the payment amount either in the foreign 1 or base 2 currency:
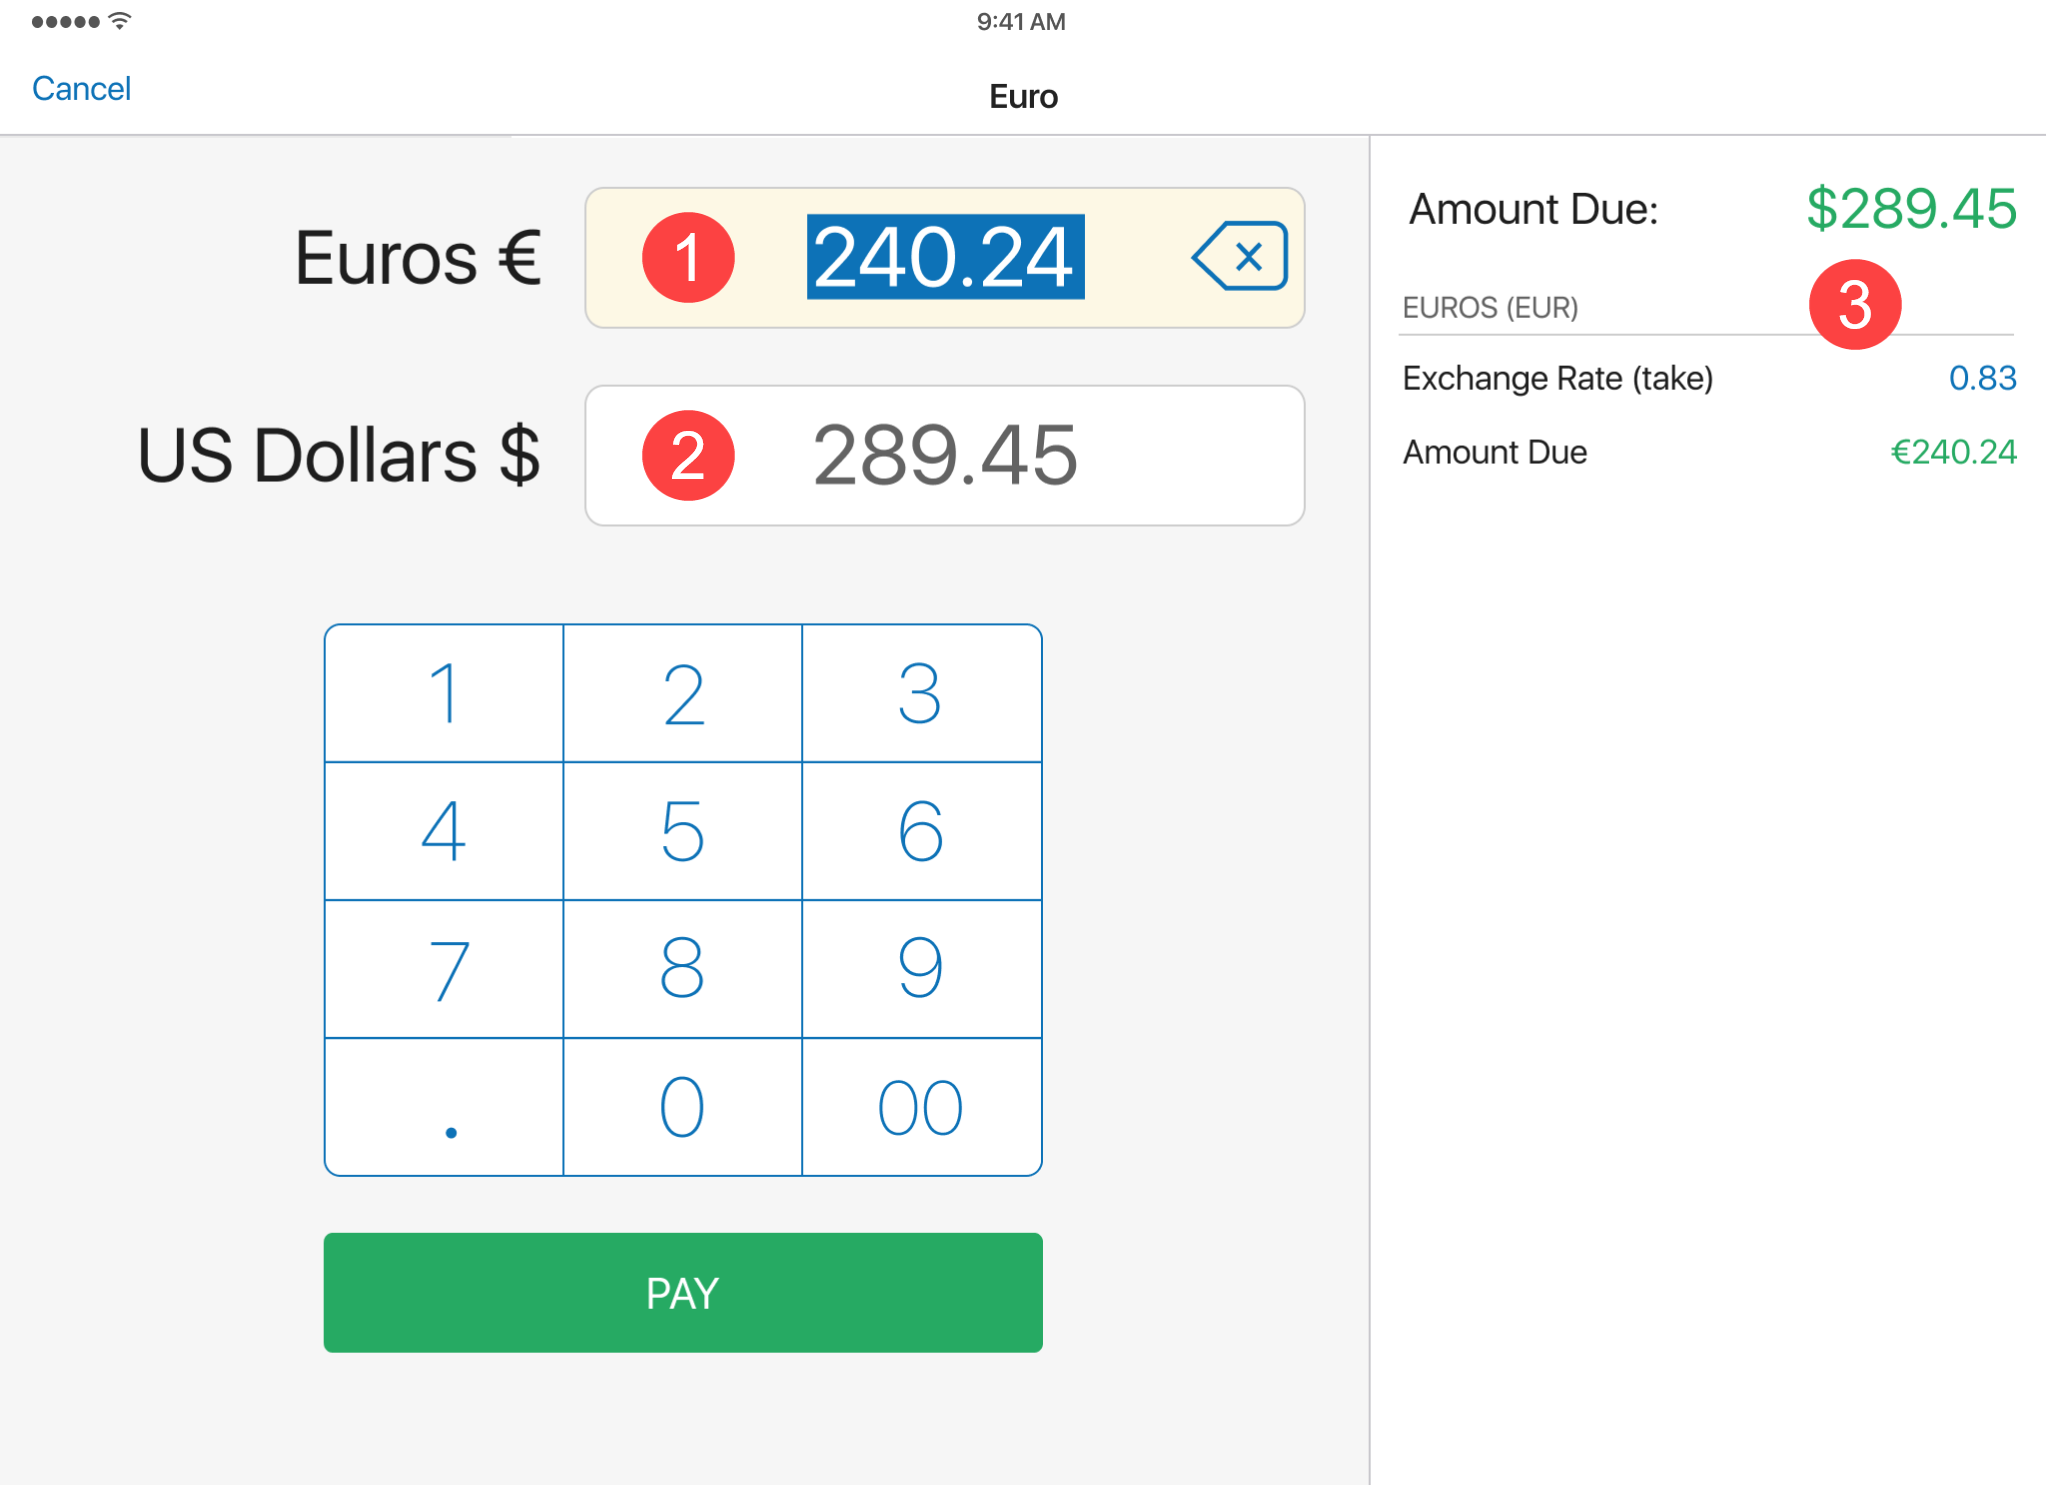 If the user changes the amount in the [foreign currency] field, the amount in the [base currency] field is automatically re-calculated, and vice versa.
Also, please note that the required payment amount both in the foreign and base currency as well as the exchange rate are shown in the right-side panel 3 . Tapping the value in the Exchange Rate field allows for editing the current rate if the user has the Sales Receipts – Allow to change Exchange Rate security right. -
Tap PAY at the bottom.
Back in the Payment area, it’s possible to edit the foreign currency payment by tapping it in the left-side panel:
Please note that, after taking a foreign currency payment, it’s possible to give change in the store’s base currency. To do so, in the right-side panel, select the cash payment method set up for the base currency.
-
Tap FINALIZE at the bottom-right.


Foreign currency payments in the Drawer Memo area
Reviewing and managing foreigh currencies is now also possible in the following Drawer Memo areas:
Drawer MemoDrawer Memo > Start of DayDrawer Memo > End of DayDrawer Memo > Manage Cash > Deposits
Changes in the Drawer Memo area
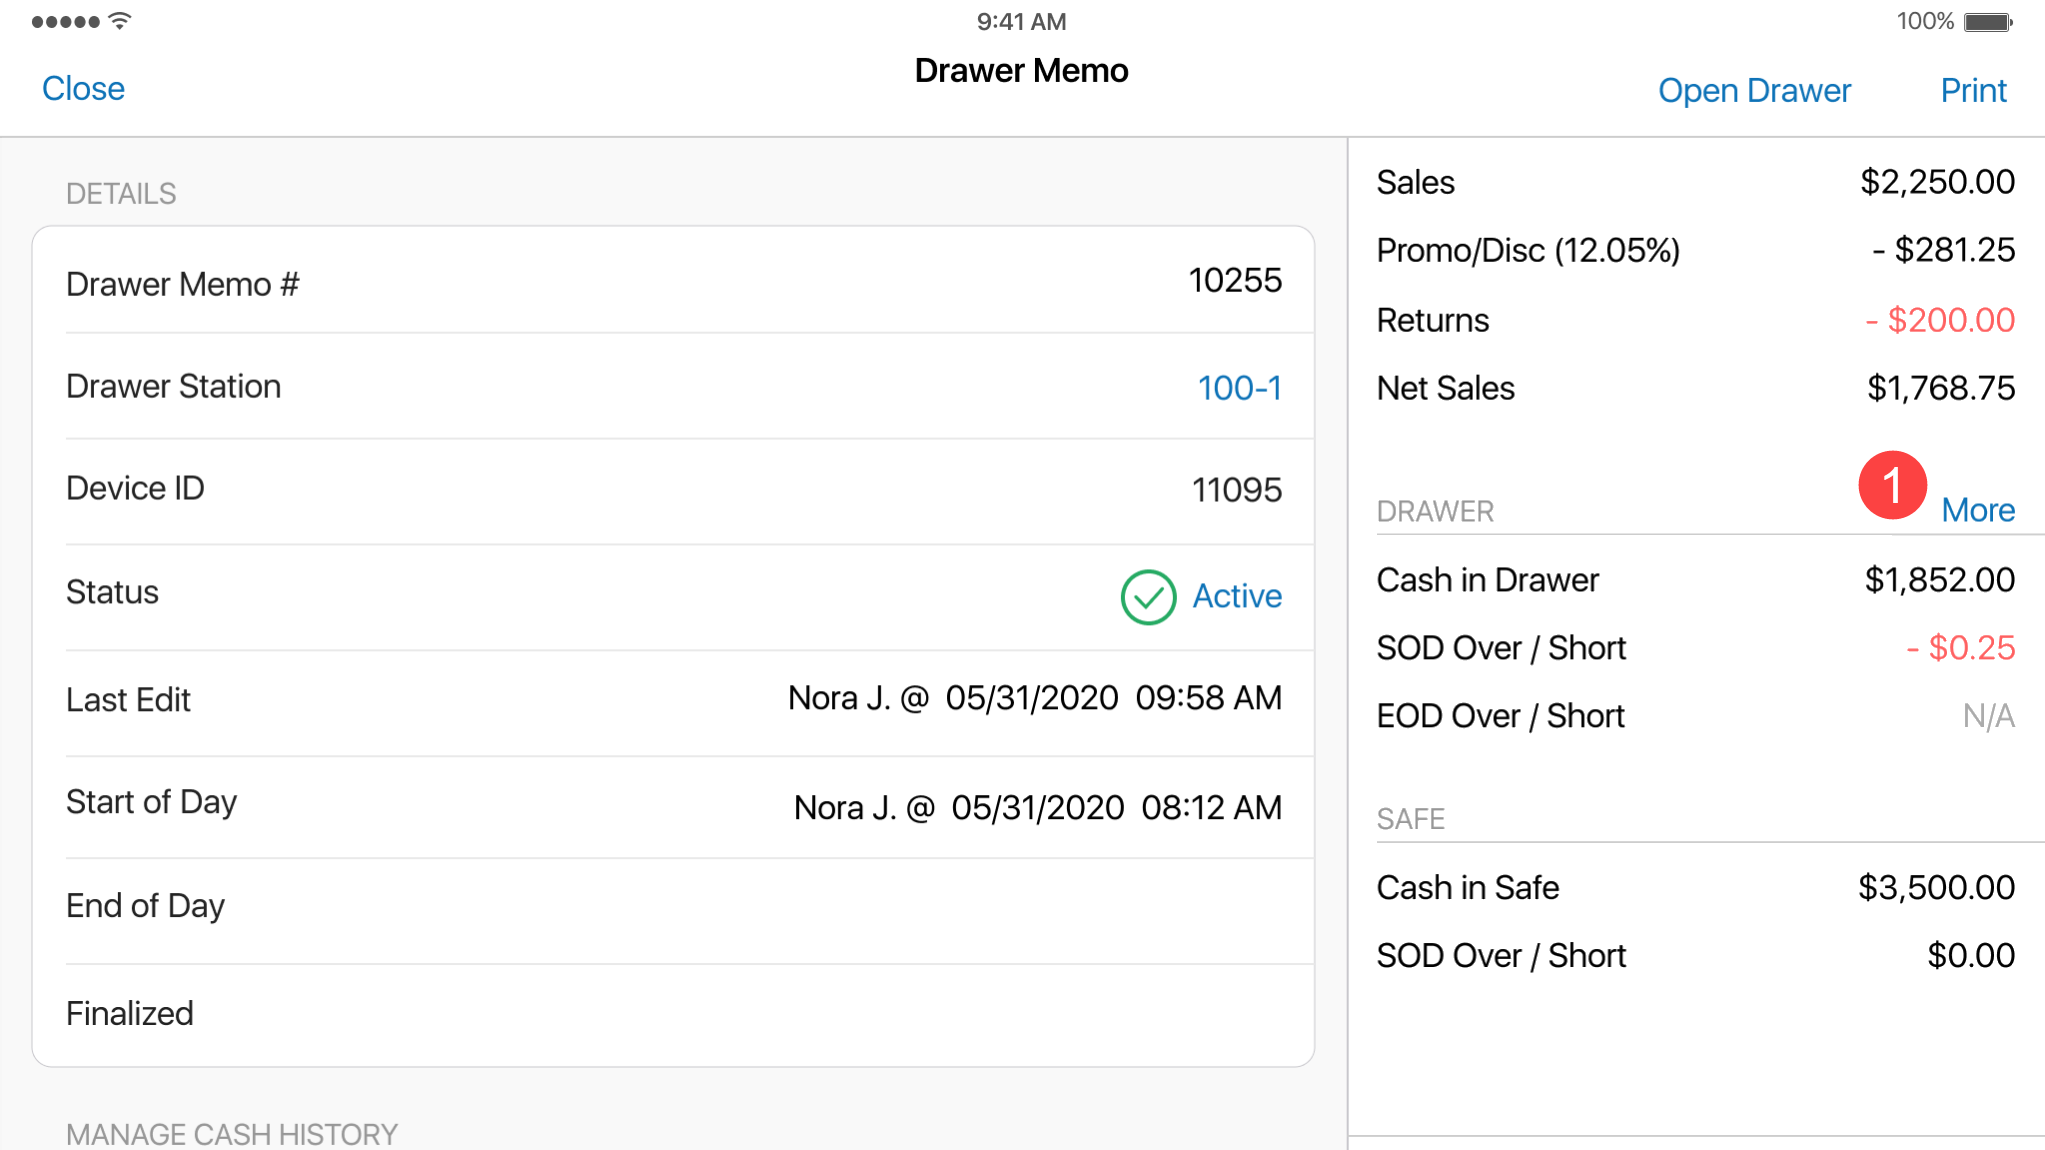
In the Drawer Memo area, it is now possible to see the total amount in the drawer for each available foreign currency.
To do so, in the Drawer Memo area, tap More in the right-side panel
1
:
Changes in the Start of Day area
Under Drawer Memo > Start of Day, in the Drawer Cash section, there is now a separate Opening Count tab for each available foreign currency
1
:
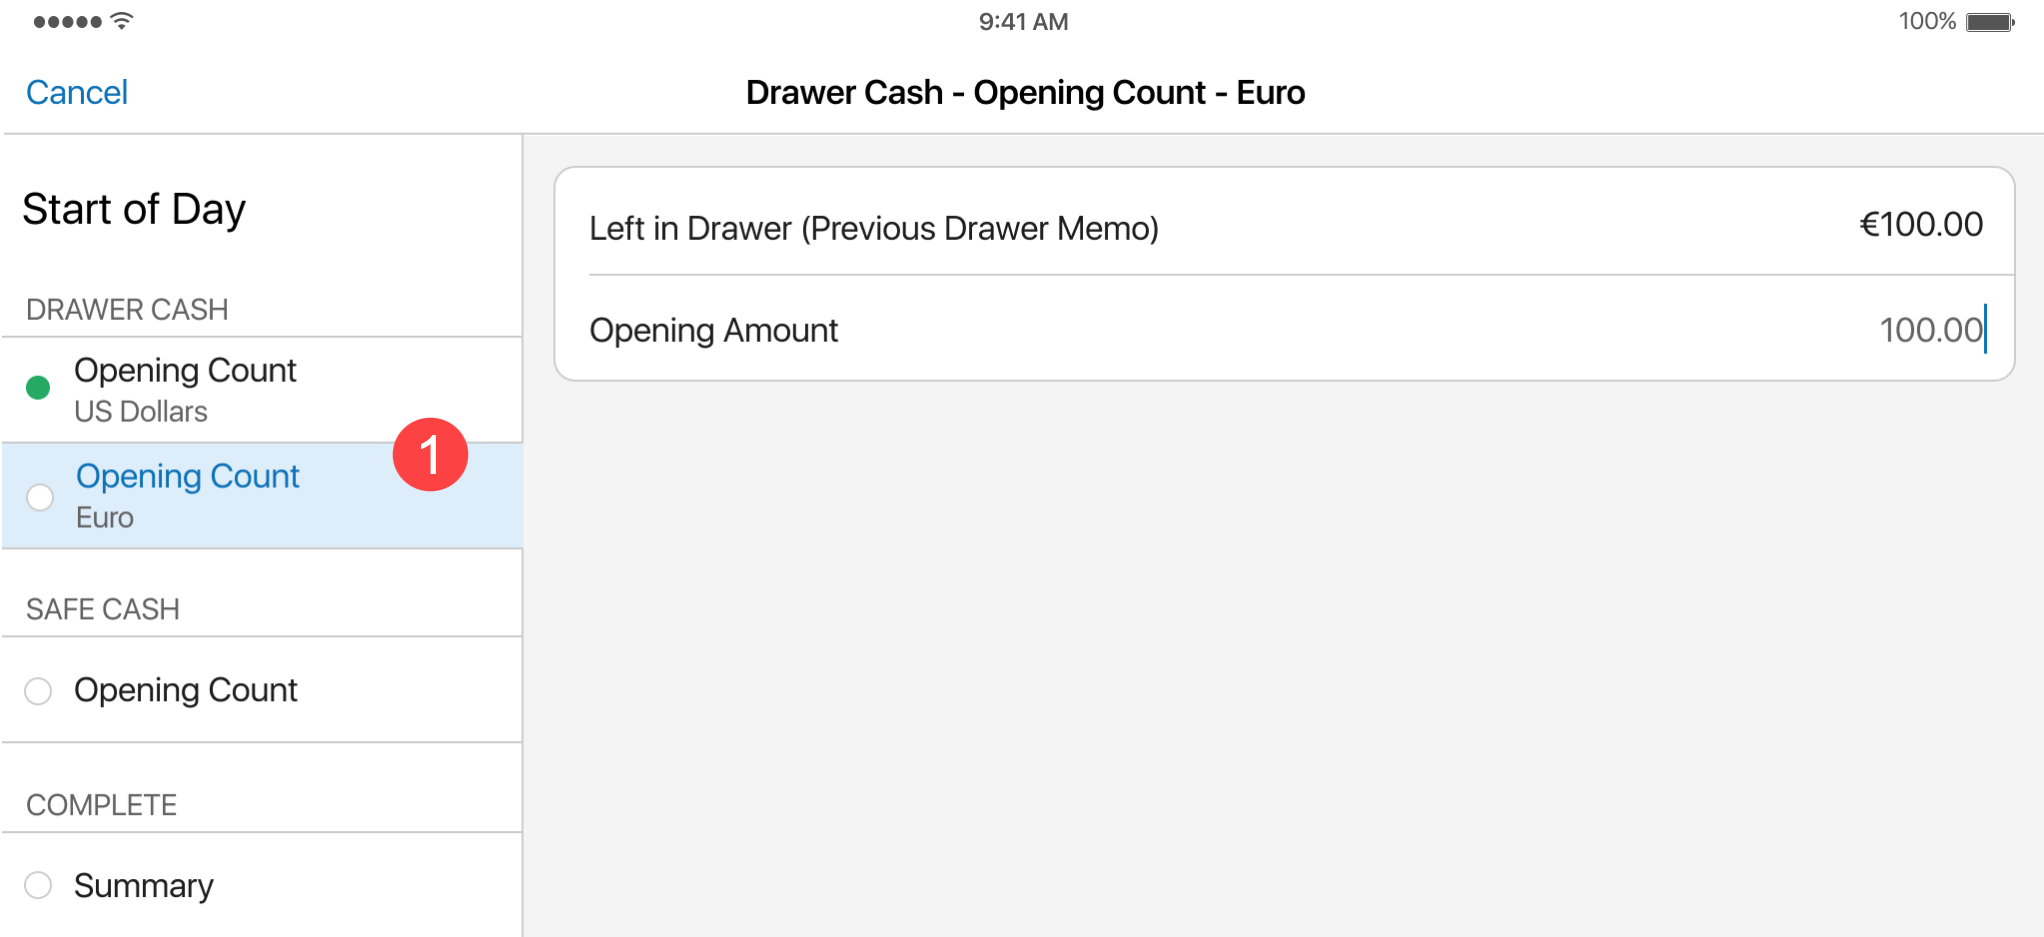 On each foreign currency tab, it is possible to define the Opening Amount for that currency.
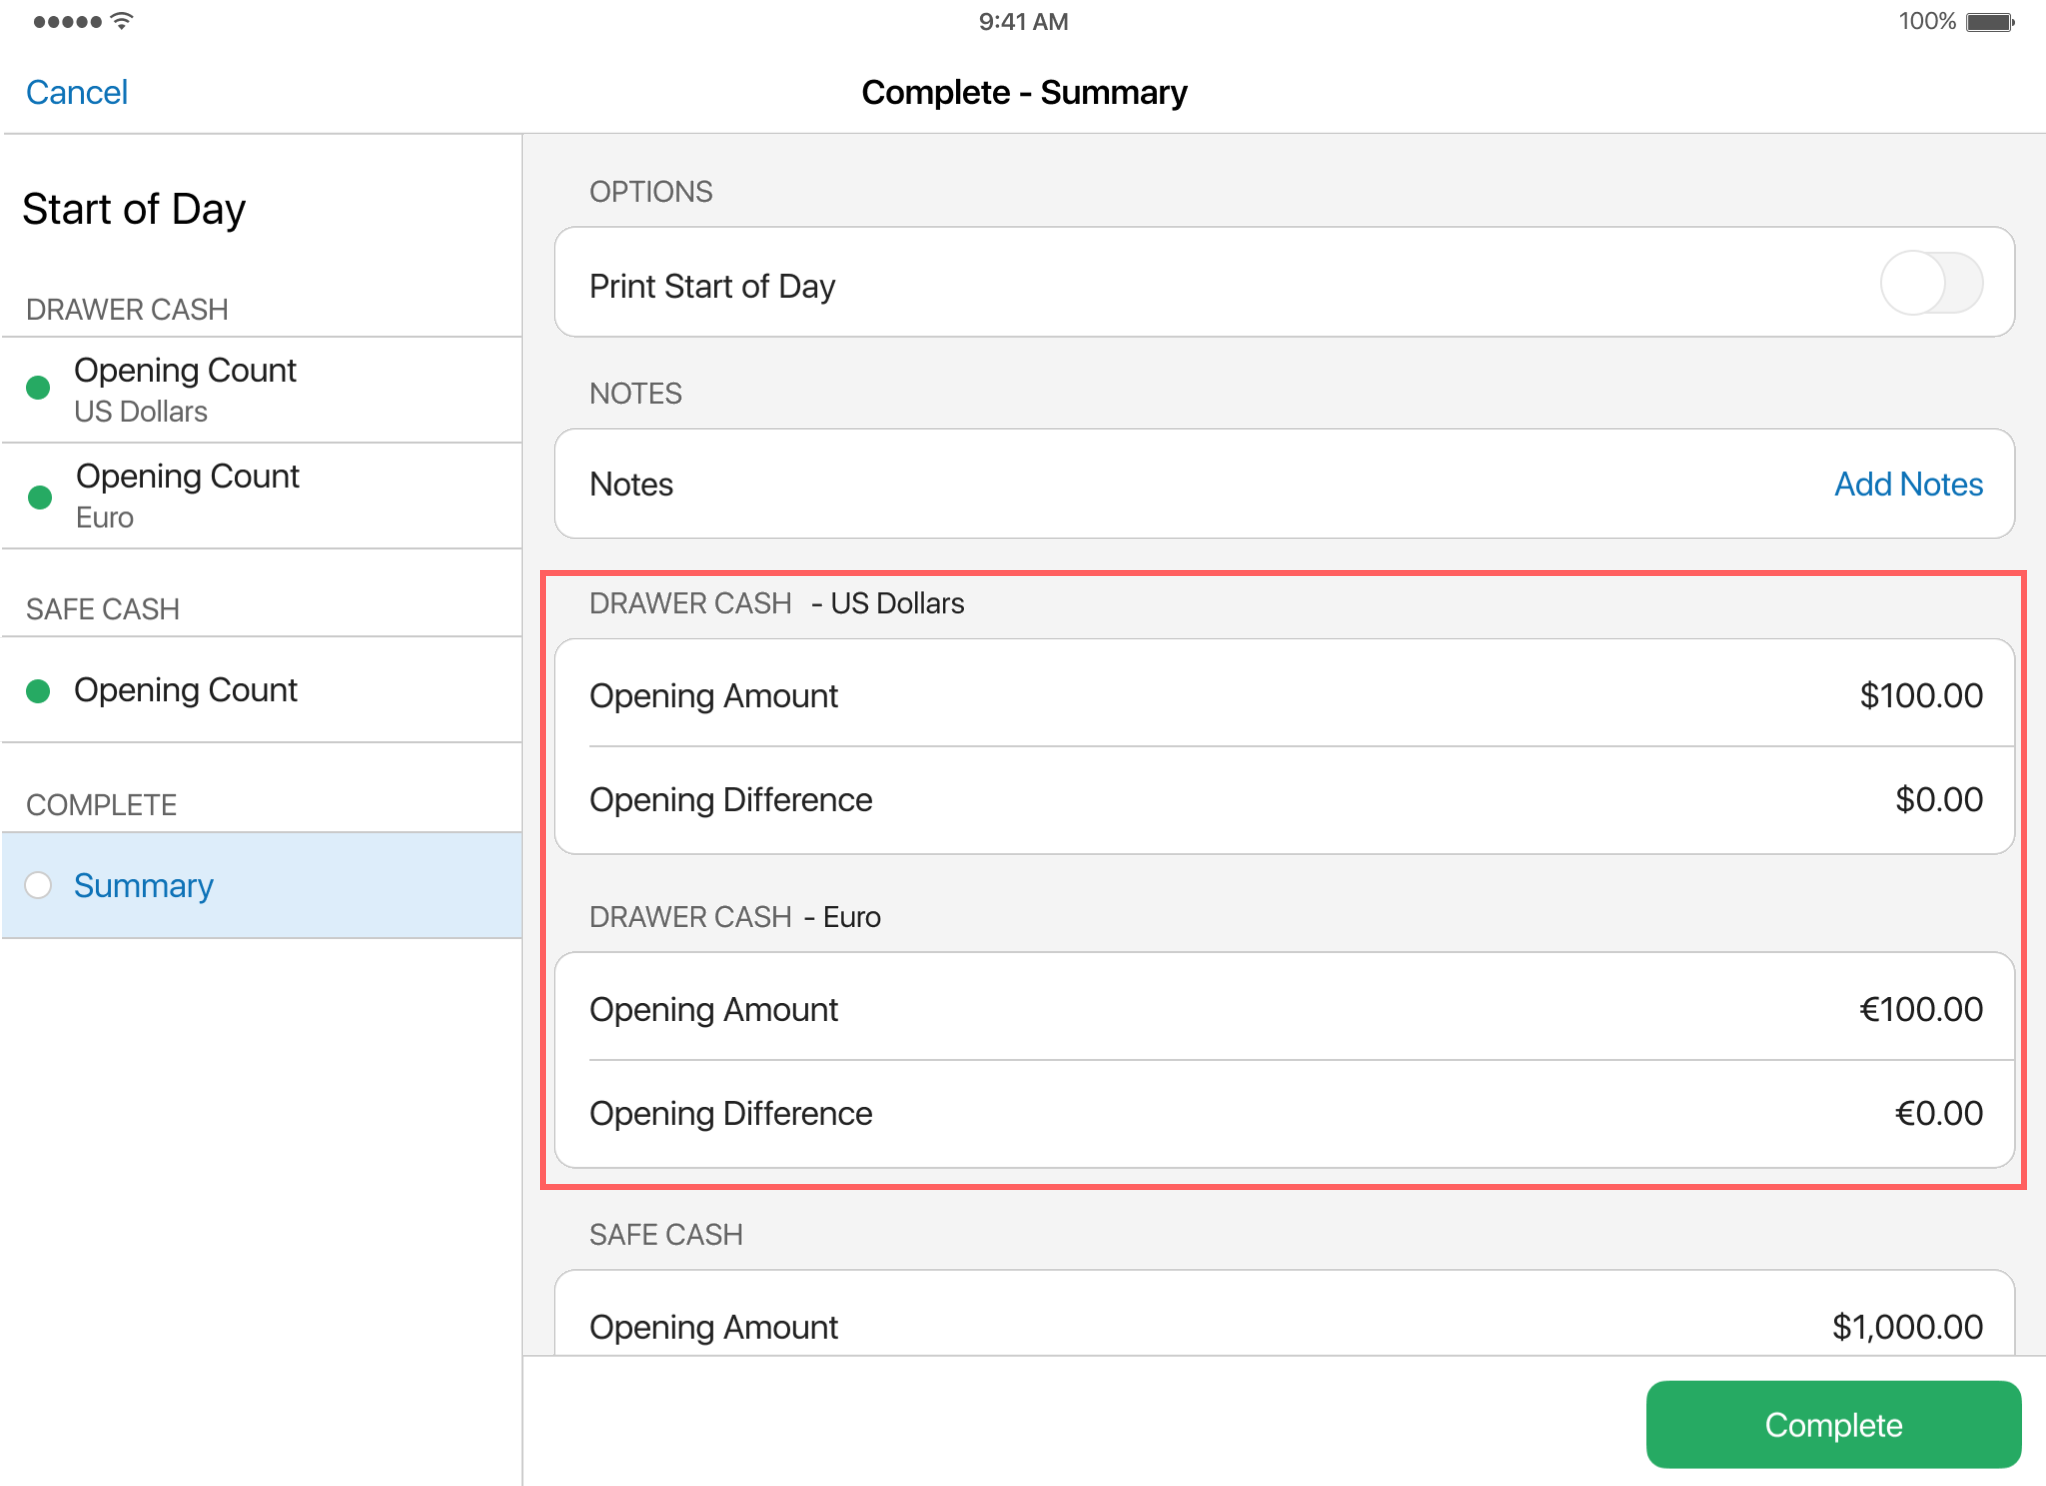
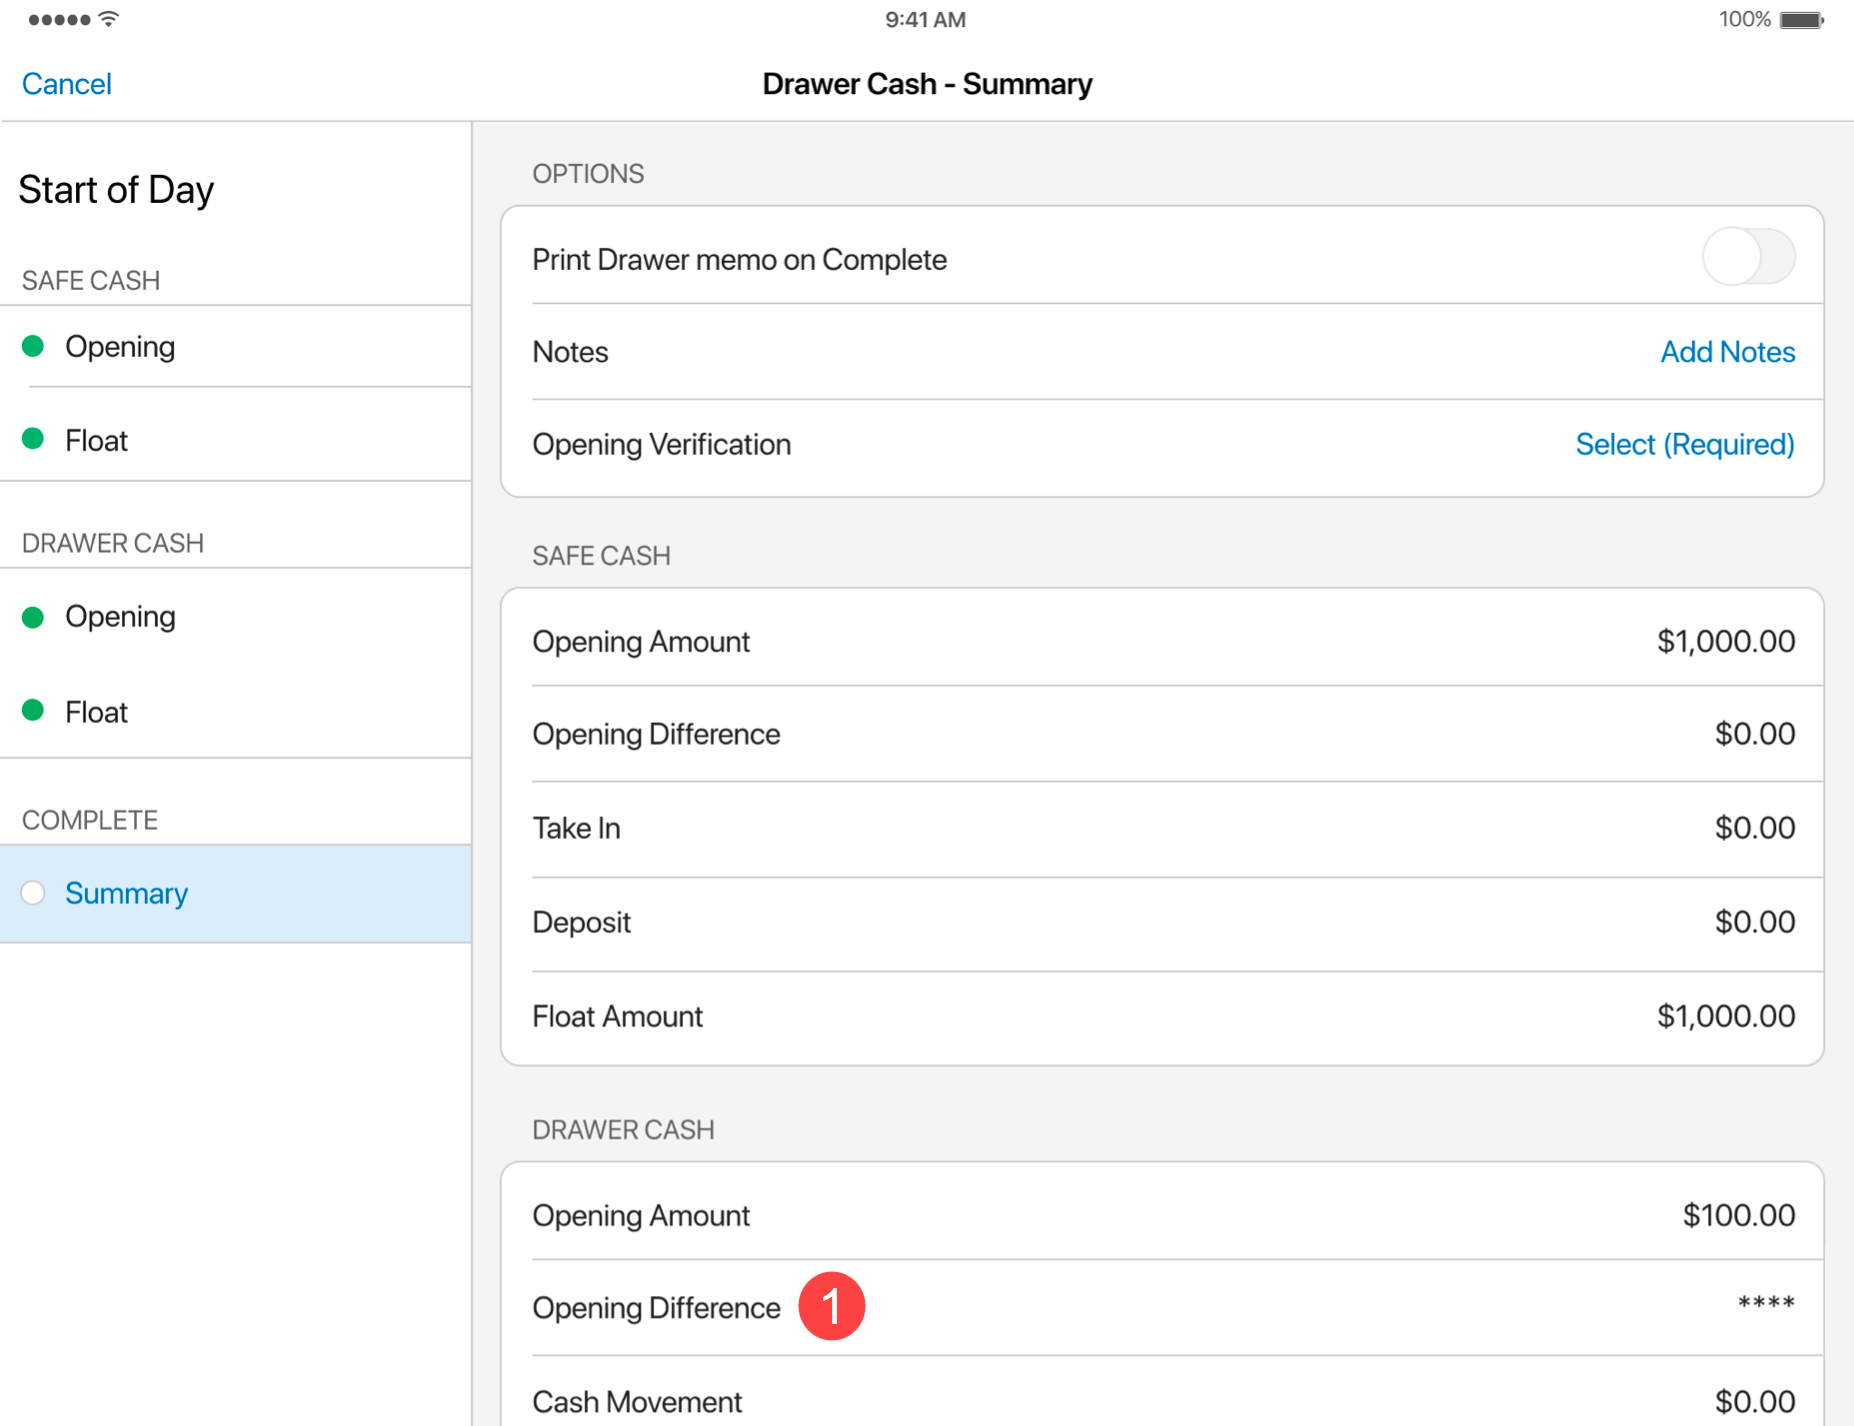
Also, under Drawer Memo > Start of Day > COMPLETE – Summary, we’ve added a separate DRAWER CASH section for each foreign currency:
Changes in the End of Day area
Under Drawer Memo > End of Day, in the Payments section, we’ve added a separate tab for each available foreign currency
1
:
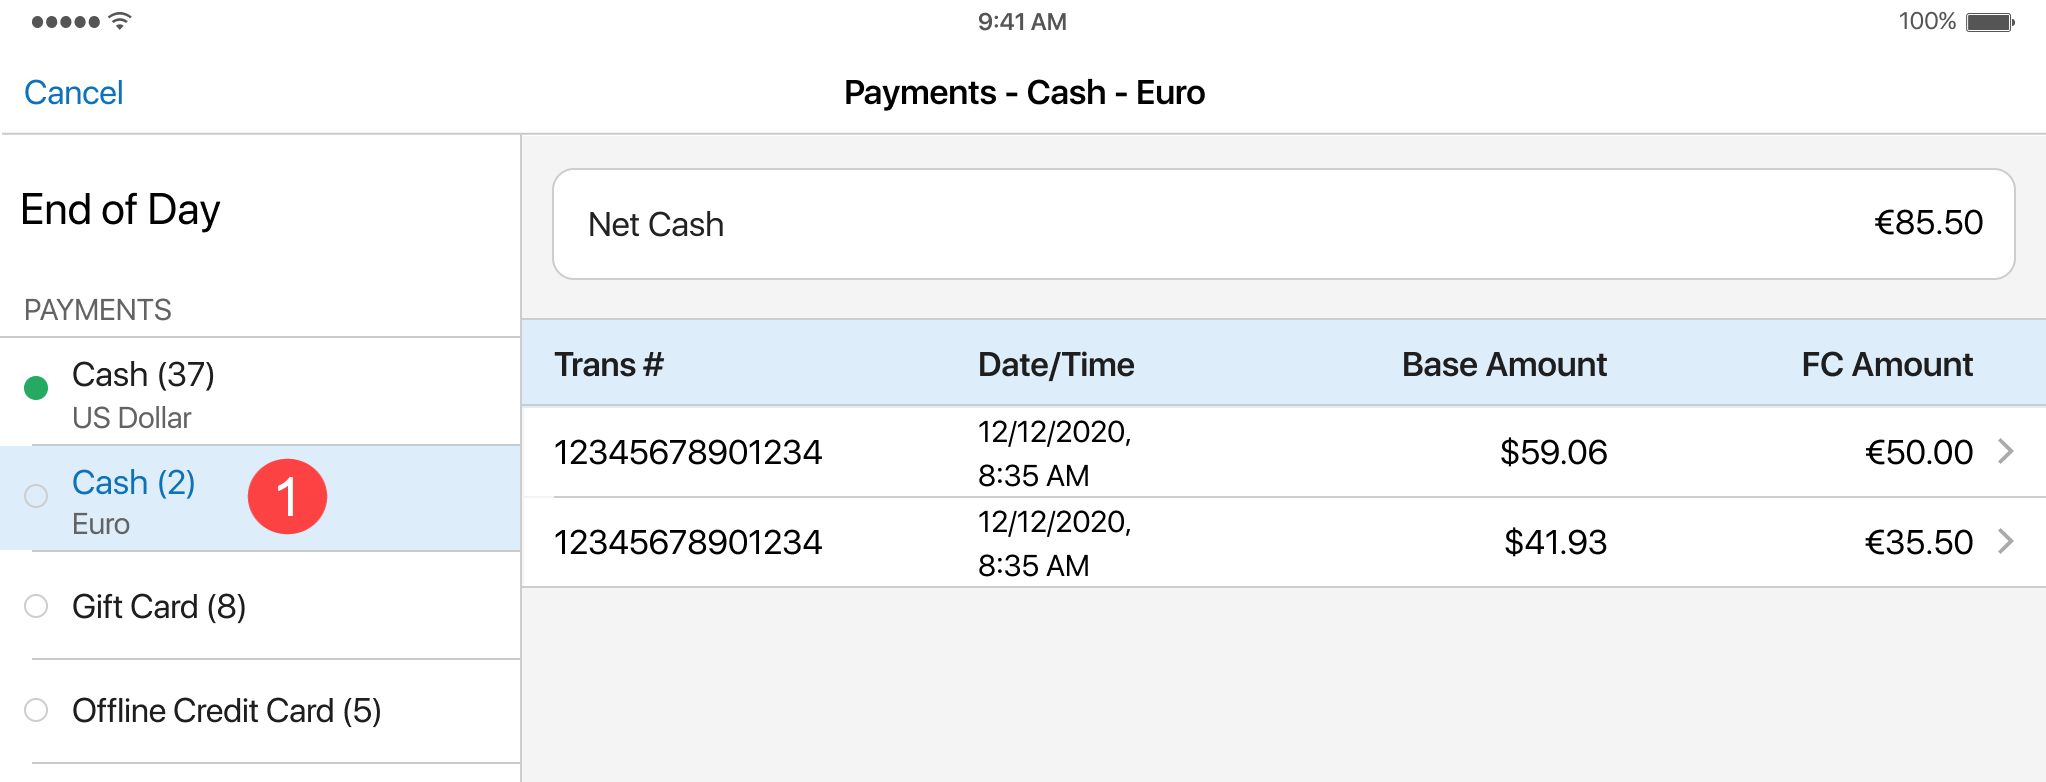 On each foreign currency tab, it is possible to review the details of the payments made in that currency.
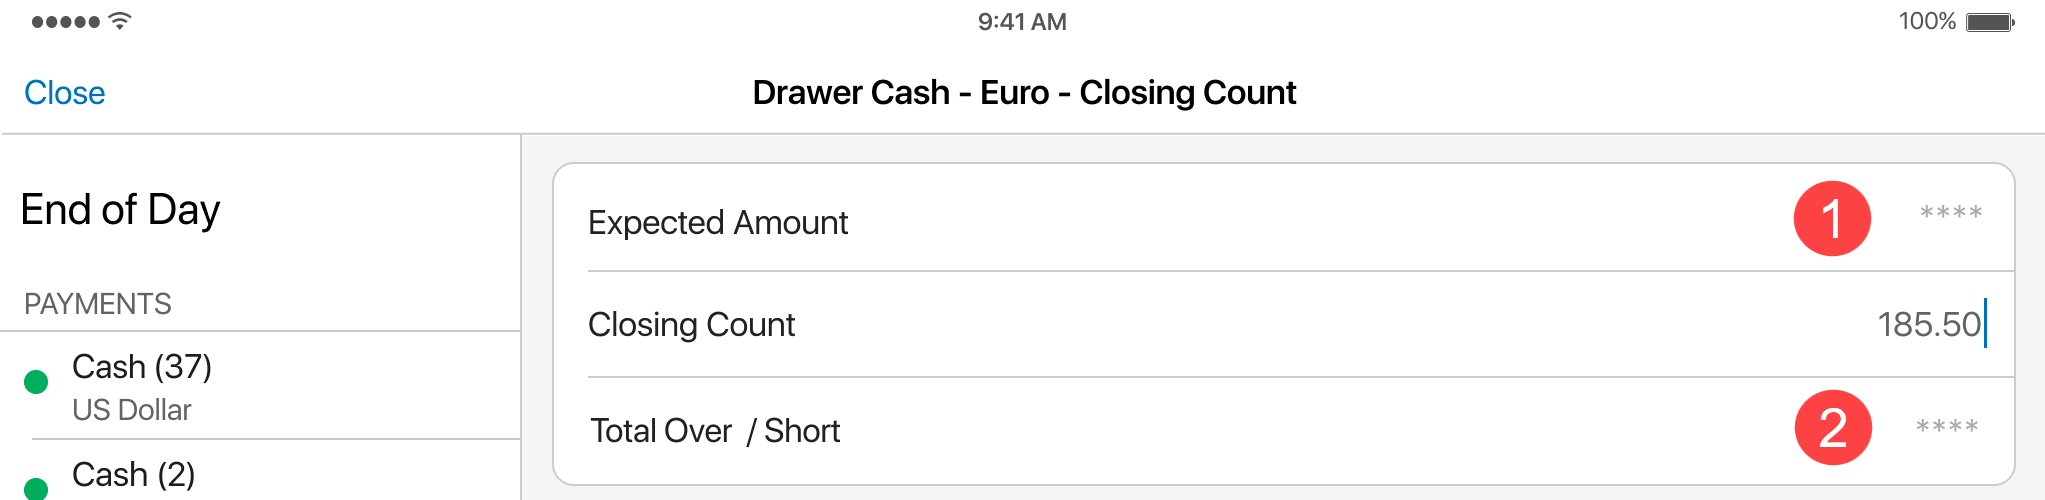
Additionally, a separate DRAWER CASH – Closing Count section is now available for each foreign currency:
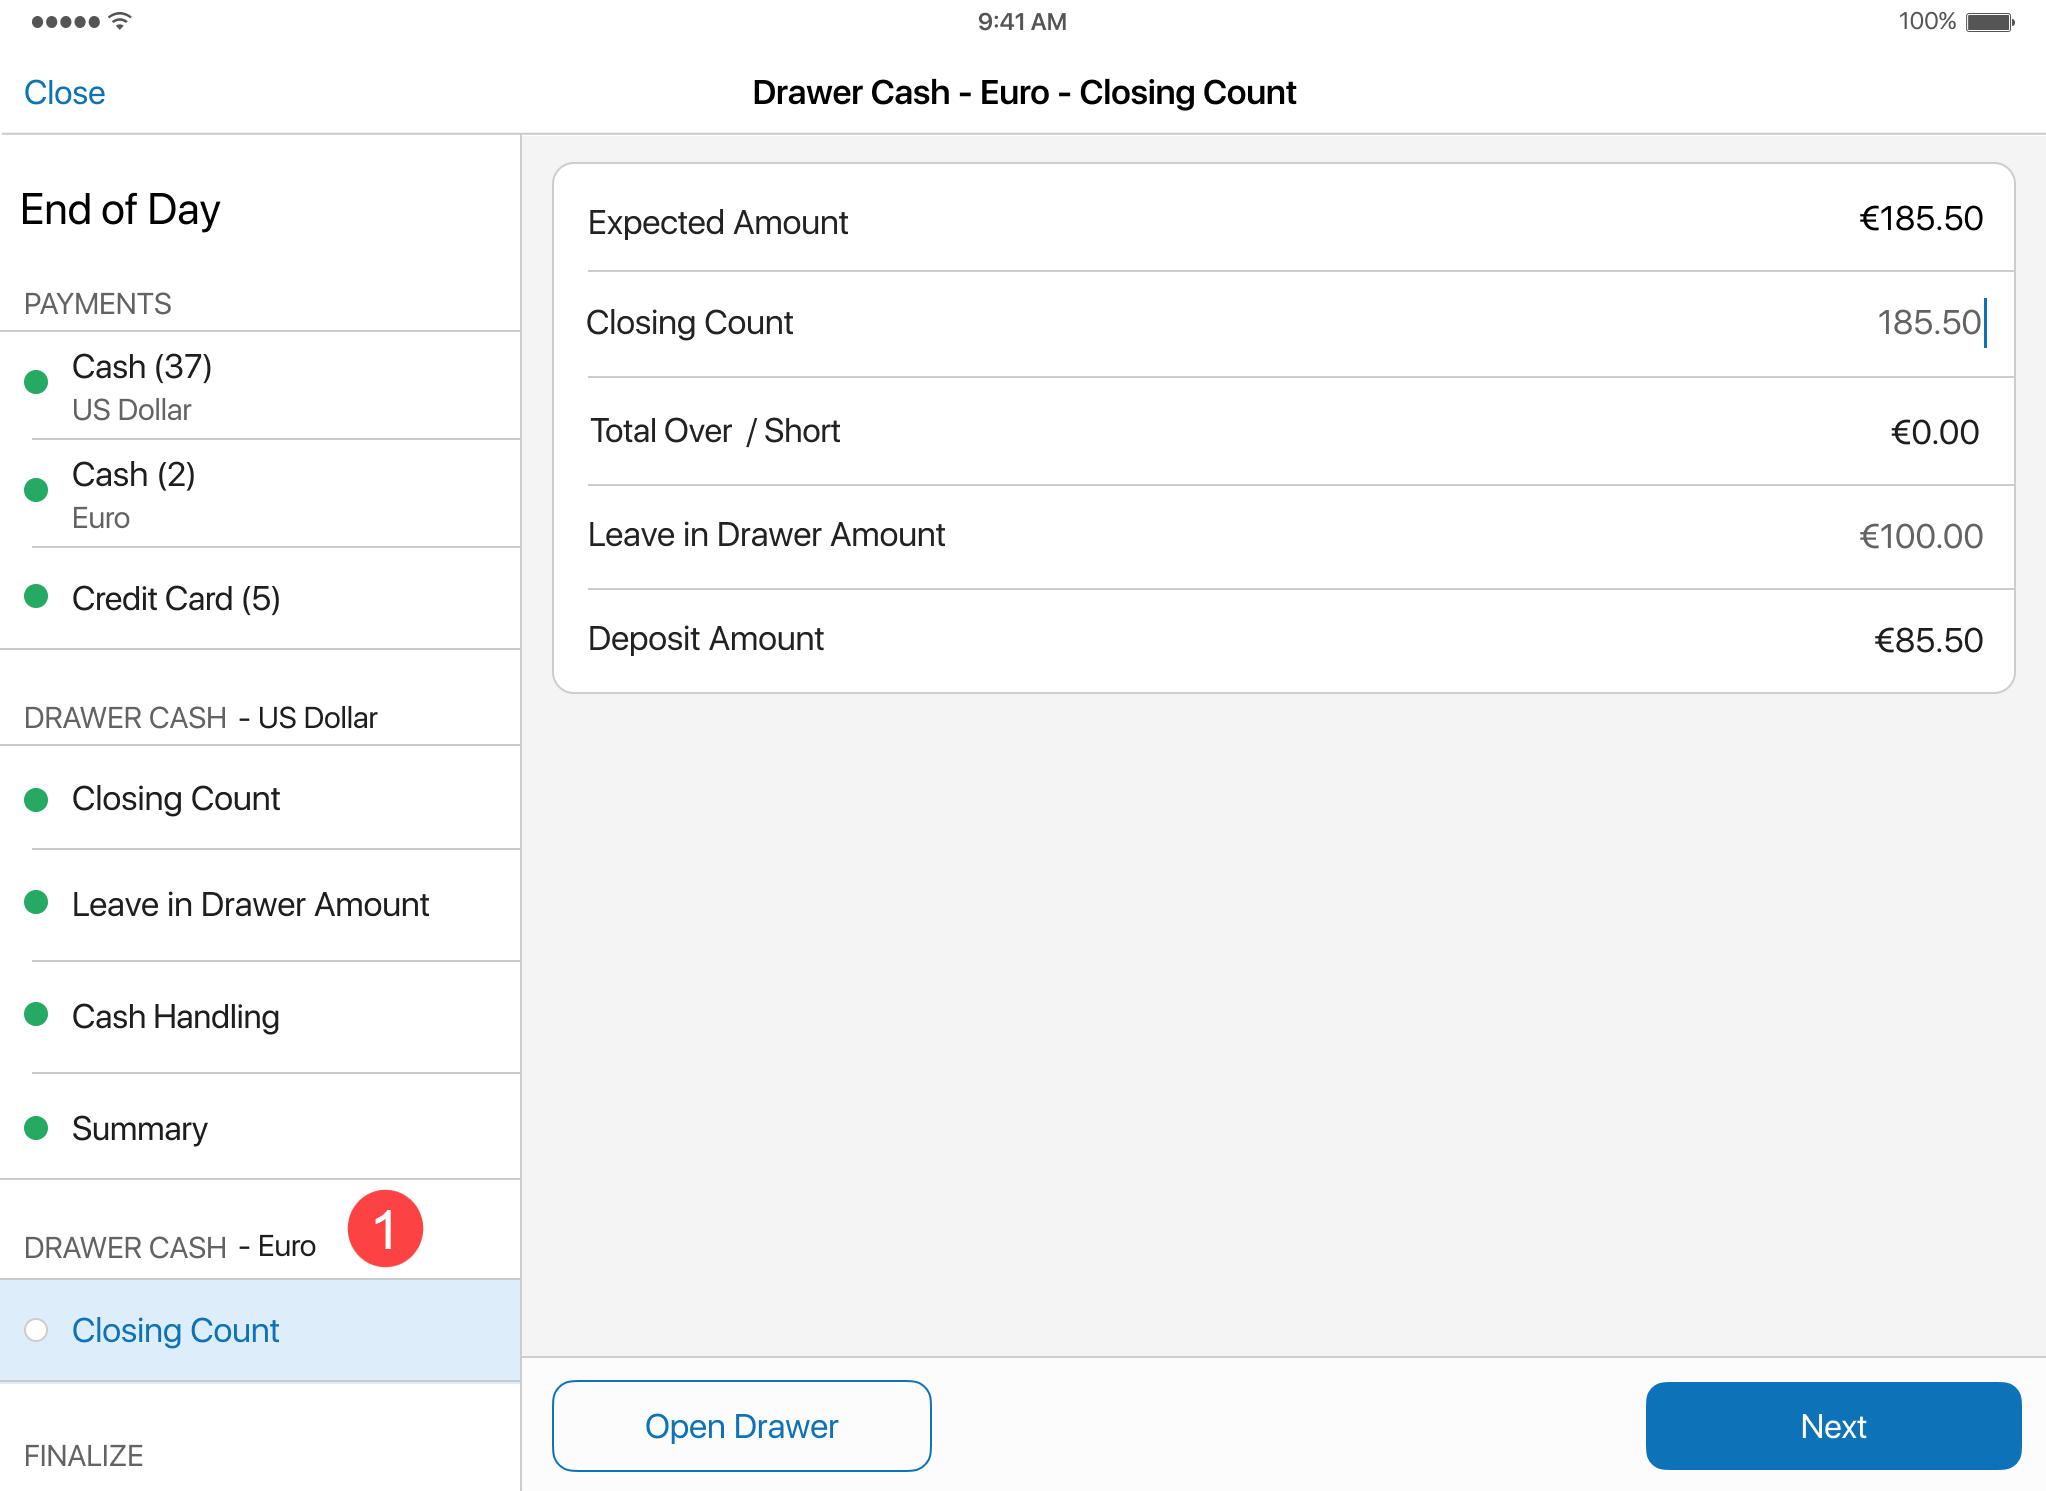 In each such section, it’s possible to define the Closing Count amount as well as set the Leave in Drawer Amount (what should be left in the drawer for the next day) for that currency.
Also, in the FINALIZE section, a separate DRAWER CASH section is now available for each foreign currency.
Changes in the Deposits area
Under Drawer Memo > Manage Cash > Deposits, the Currency column is now available
1
:
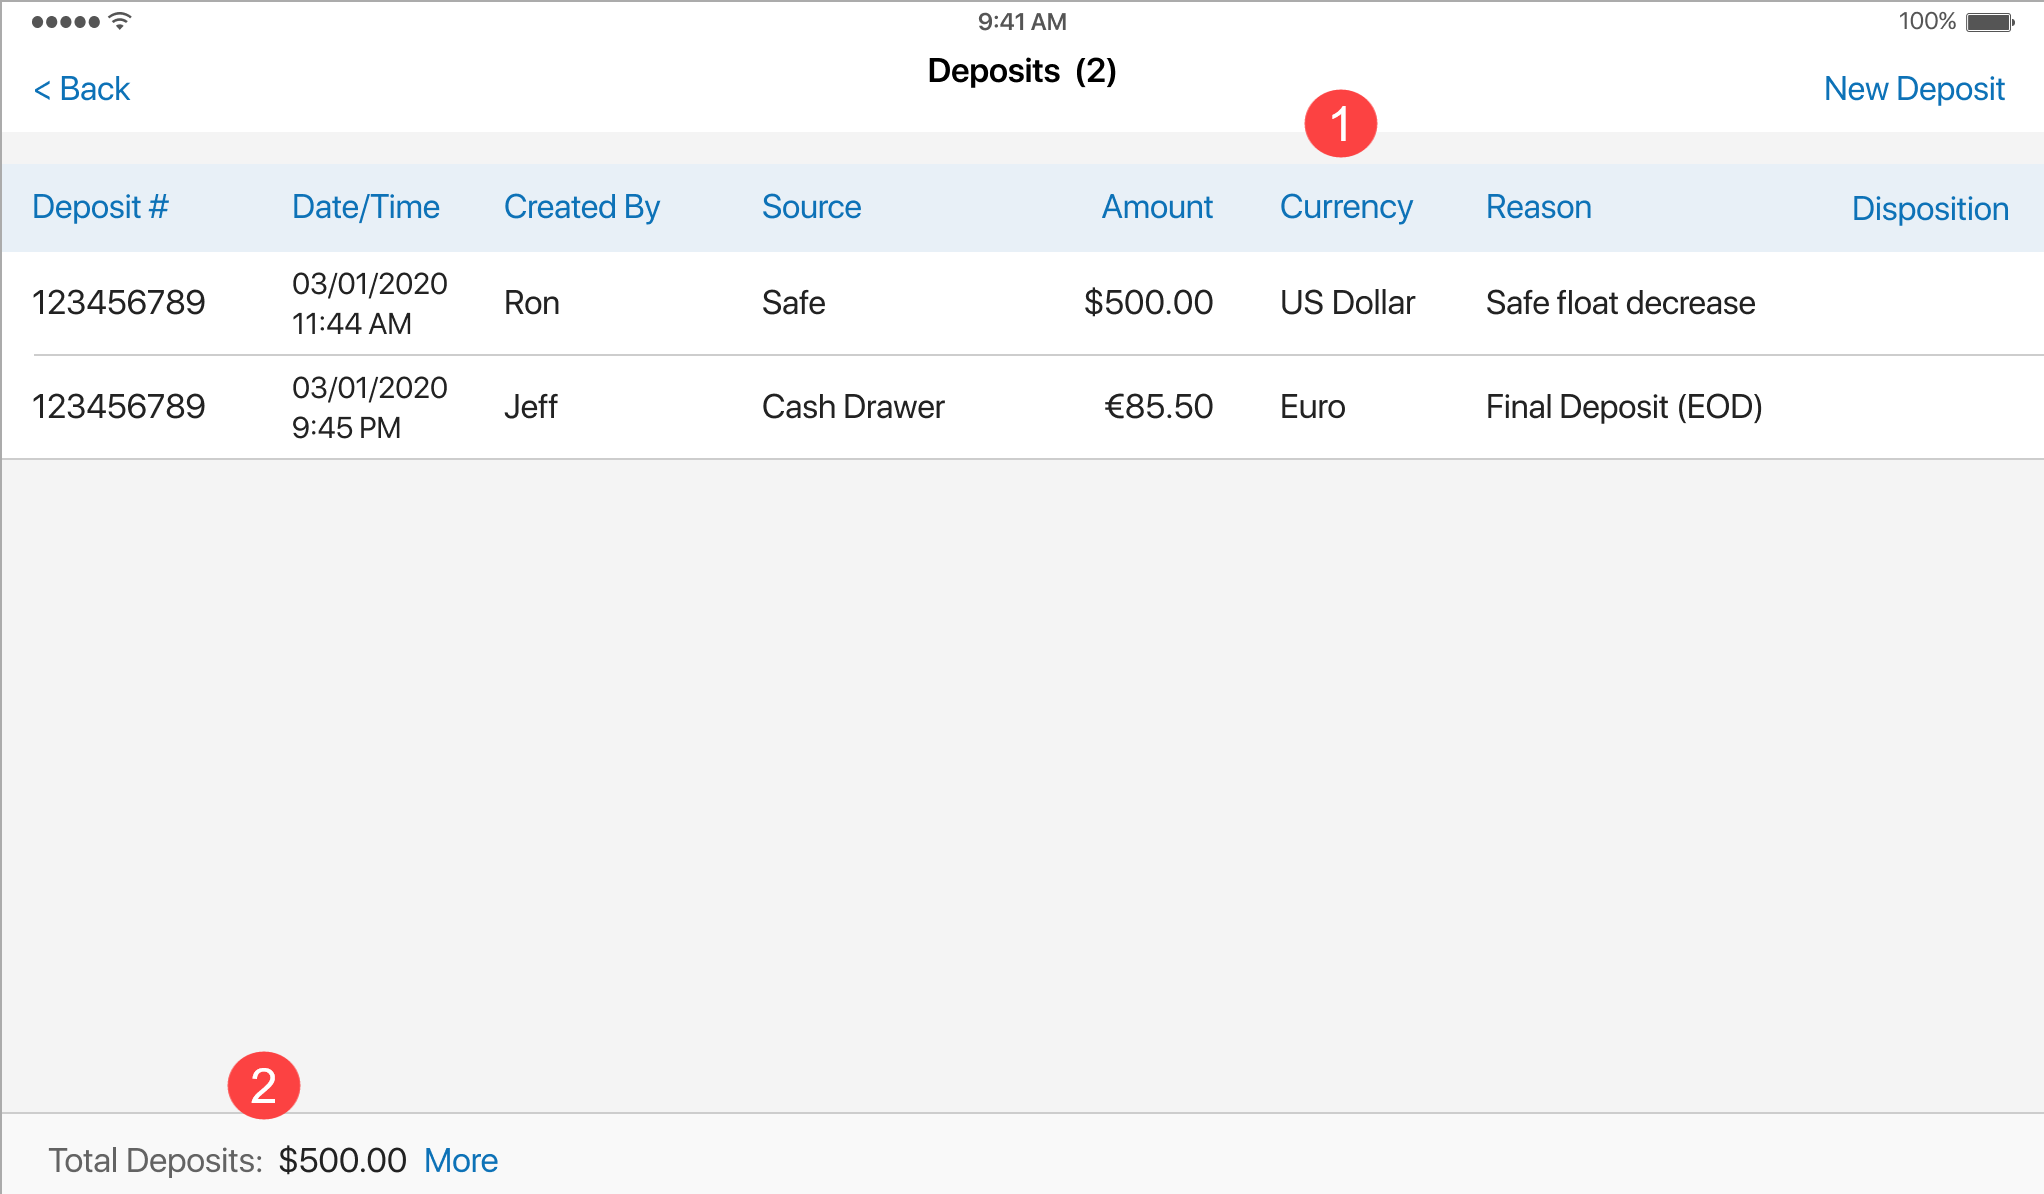 The Currency column shows in which currency the deposit was made.
Additionally, the Total Deposits field showing the total deposit amount in the base currency is now available at the bottom-left 2 . To see deposit totals for foreign currencies, tap More.
See also
Drawer Memo: Performing midday counts of cash and masking “expected” amounts
Build 6.34.234: PRO-6191
The Drawer Memo area of POS Pro was updated with the following capabilities:
- performing midday counts of cash in the drawer
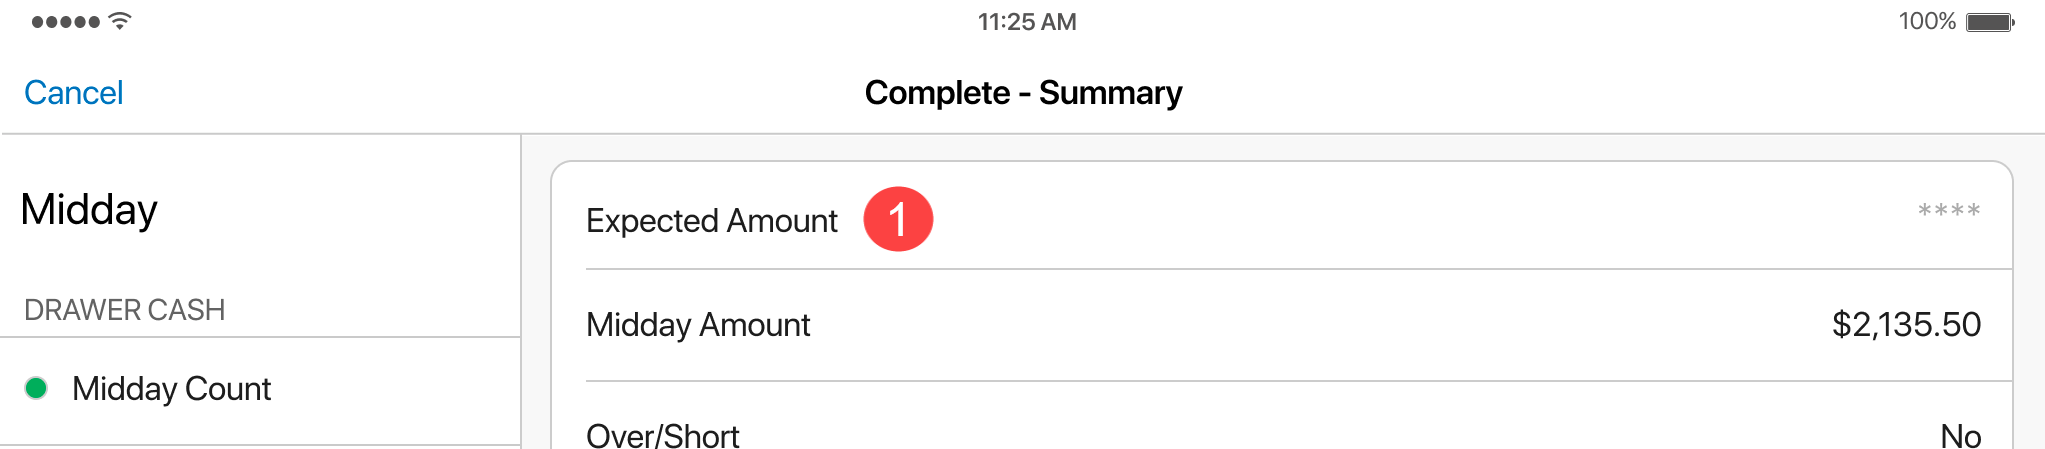
- masking values in the “expected amount” fields showing what should be in the drawer with
****
Purpose
Midday counts allow for checking drawer balance during the day and ensuring there are no discrepancies. Additionally, if no cash payments were made after a midday count, the latter can be used as the end-of-day count to speed up the store closing procedures.
Note that midday counts can be performed multiple times throughout the day but are not a requirement for finalizing the Drawer Memo.
Masking expected amounts may be useful for preventing store associates from simply copying the expected amount when counting money in the drawer. That would ensure no discrepancies are present and the cash is properly counted.
Performing a midday count of the drawer cash
To perform a midday count, in POS Pro:
-
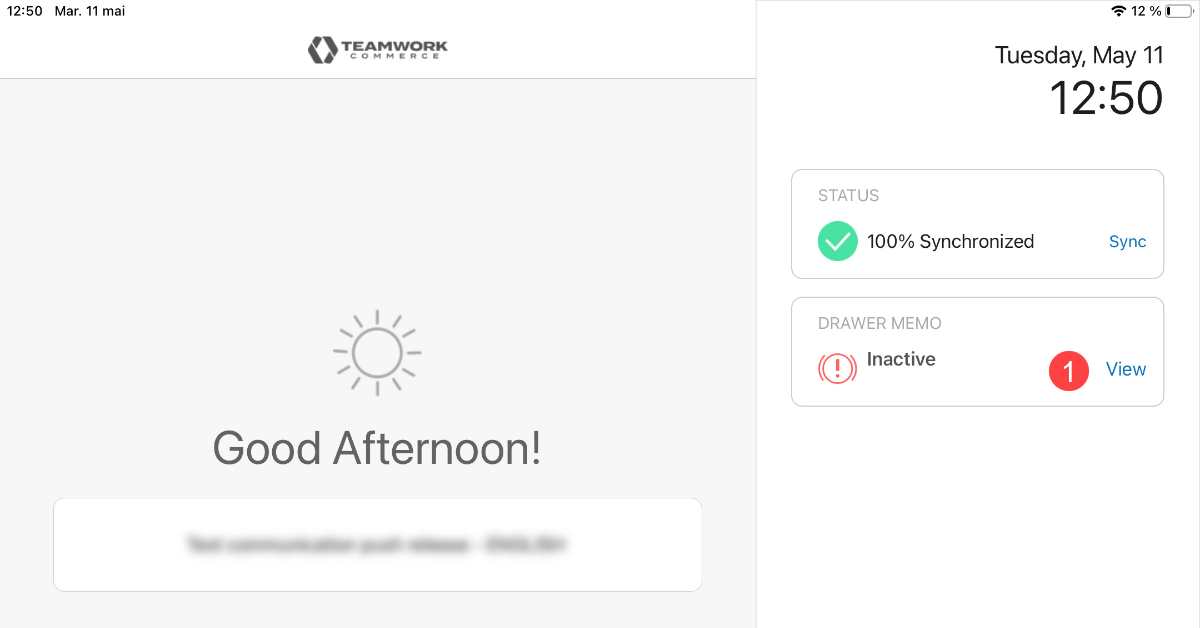
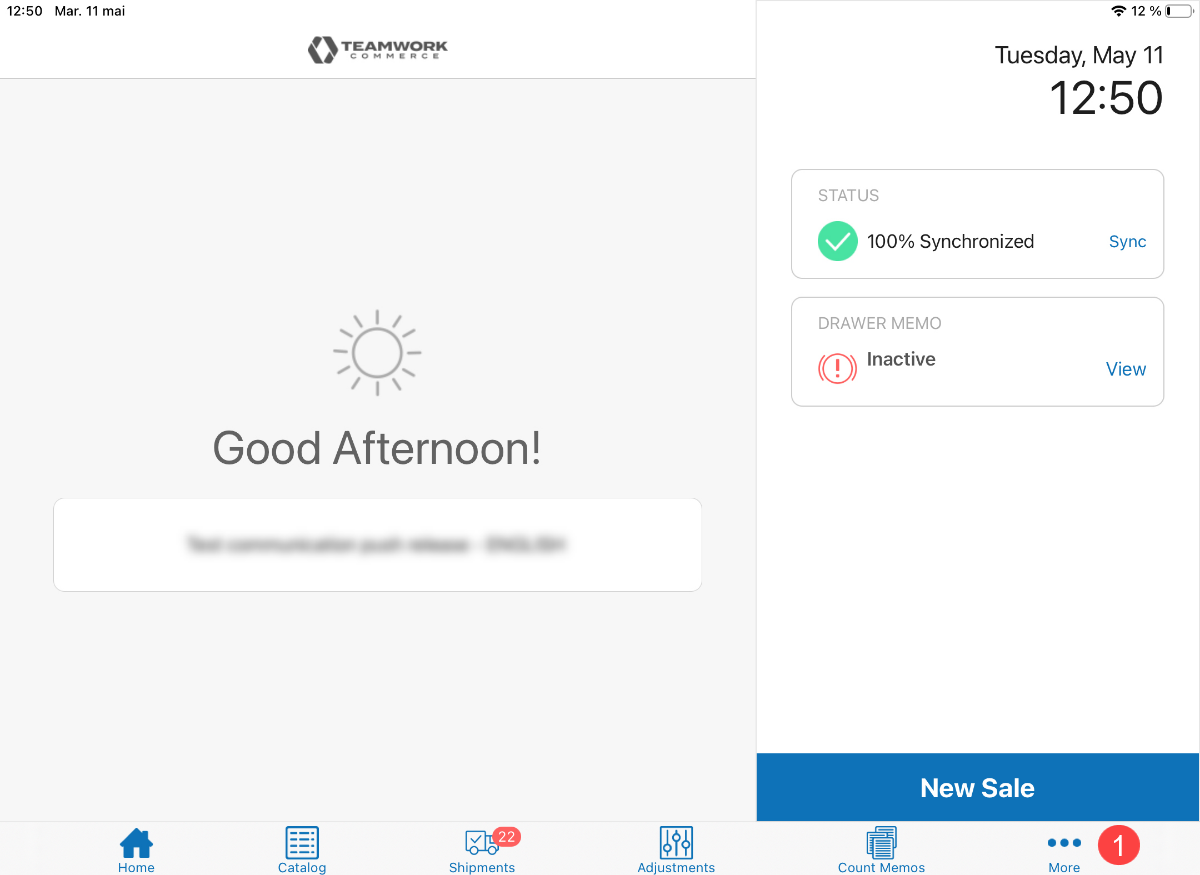
On the Home Screen, in the right-side panel, tap View in the DRAWER MEMO section 1 :

-
Tap Midday Count at the bottom-right 1 :
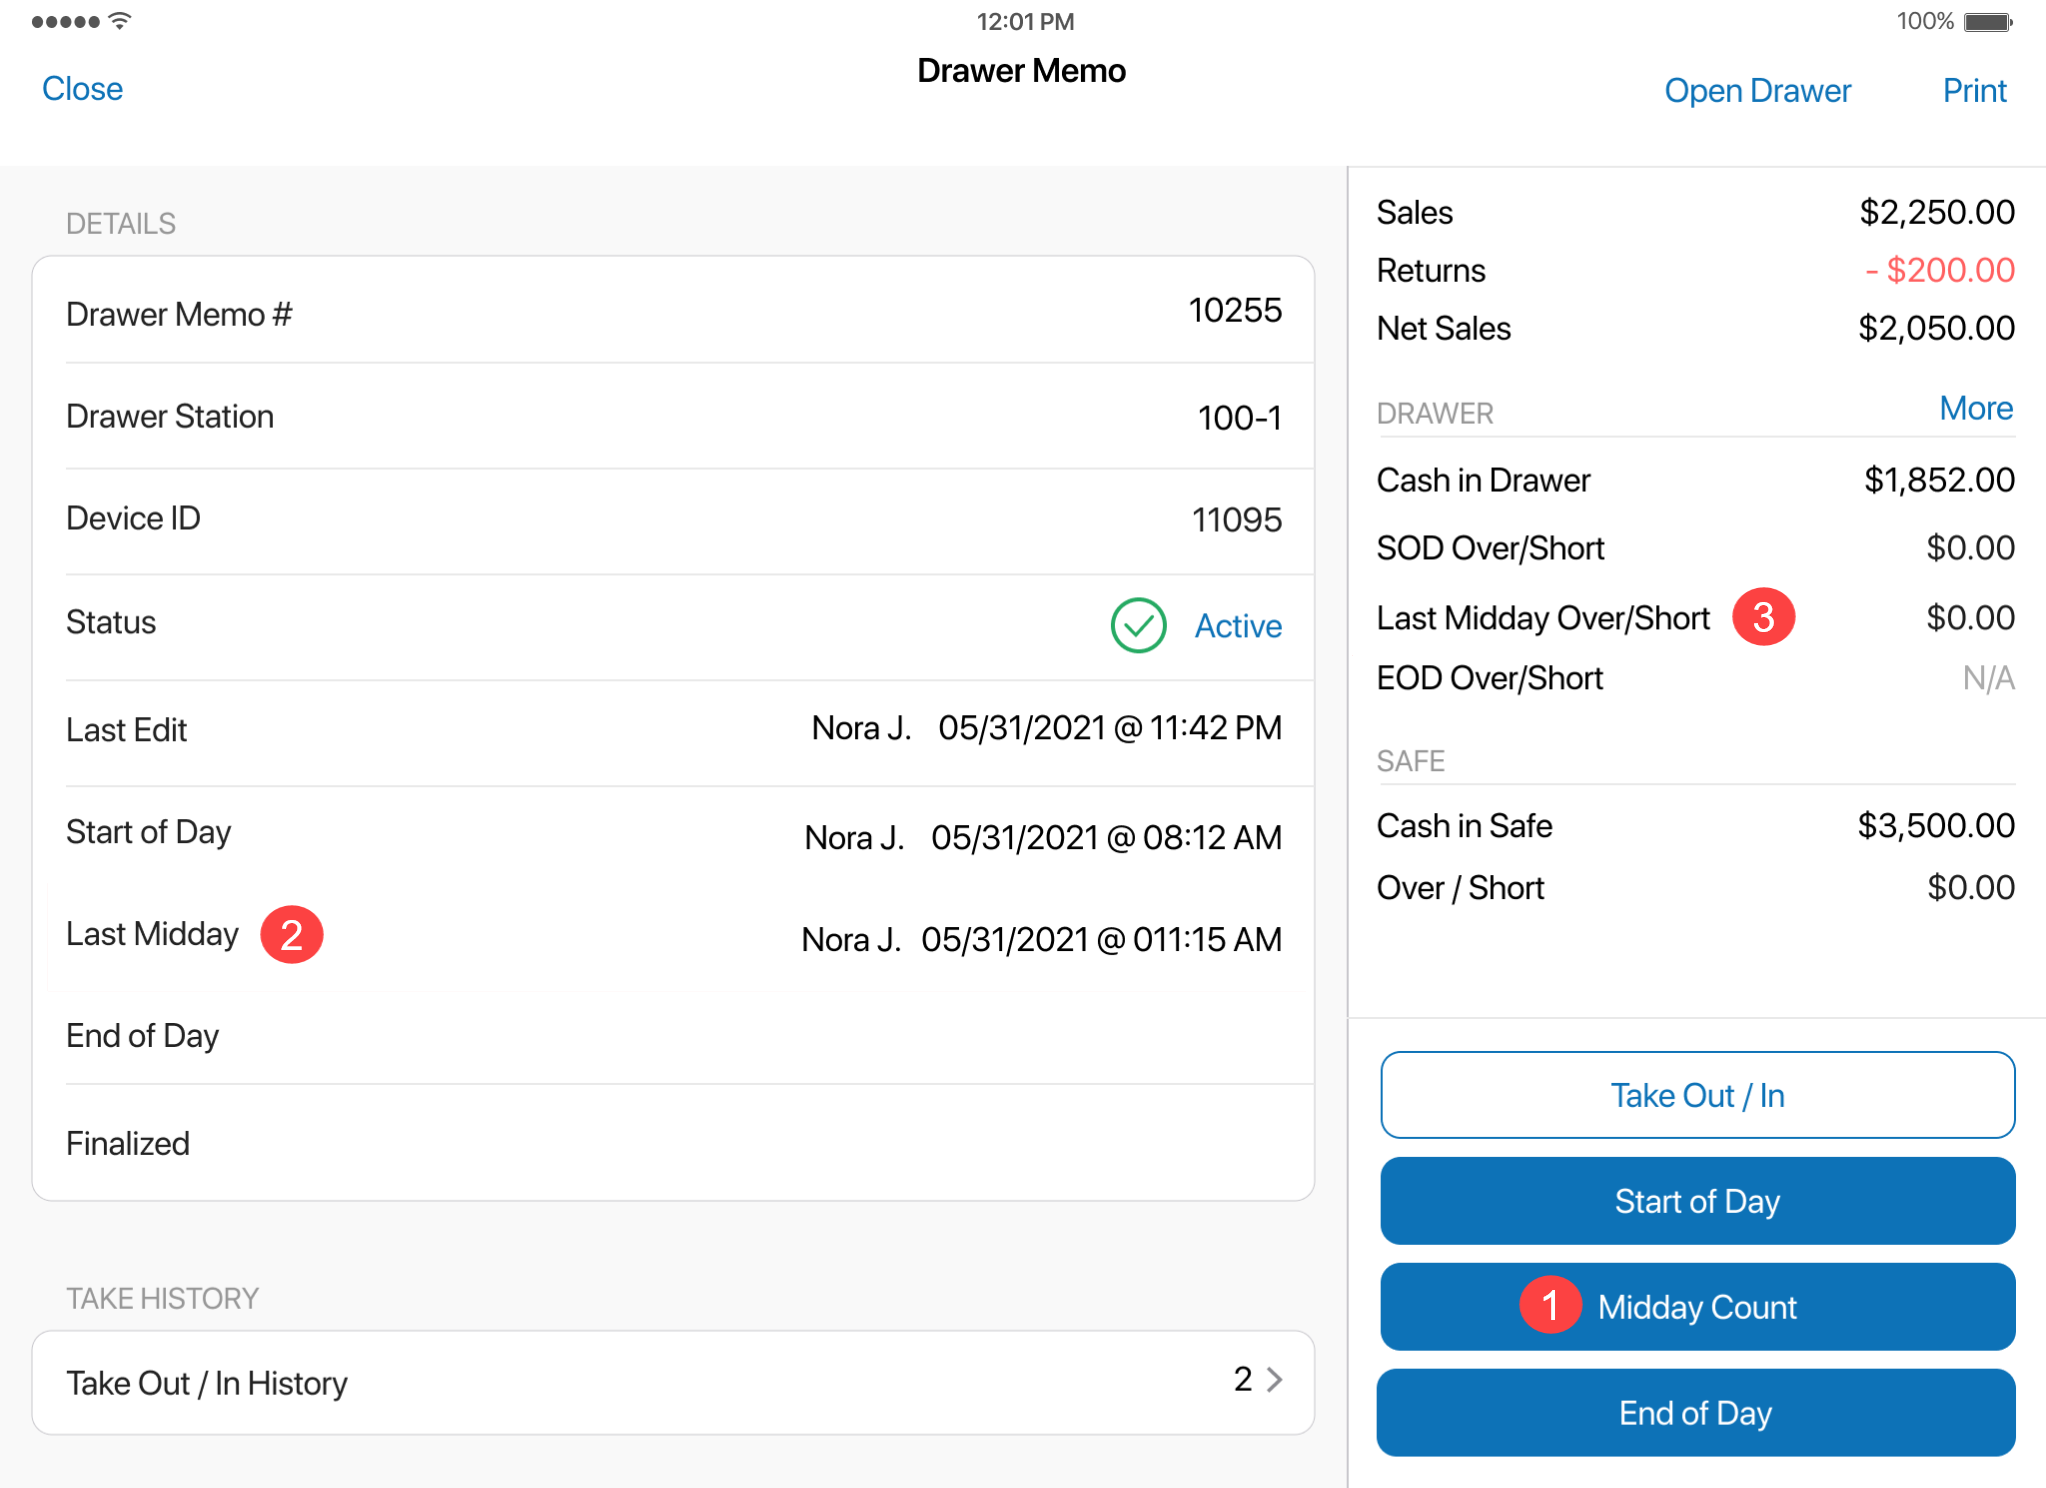 Please note that, in the Drawer Memo area, the time and date of the last midday count are available in the left-side panel
2
. In the right side-panel, the Last Midday Over/Short amount is shown
3
.
Please note that, in the Drawer Memo area, the time and date of the last midday count are available in the left-side panel
2
. In the right side-panel, the Last Midday Over/Short amount is shown
3
. -
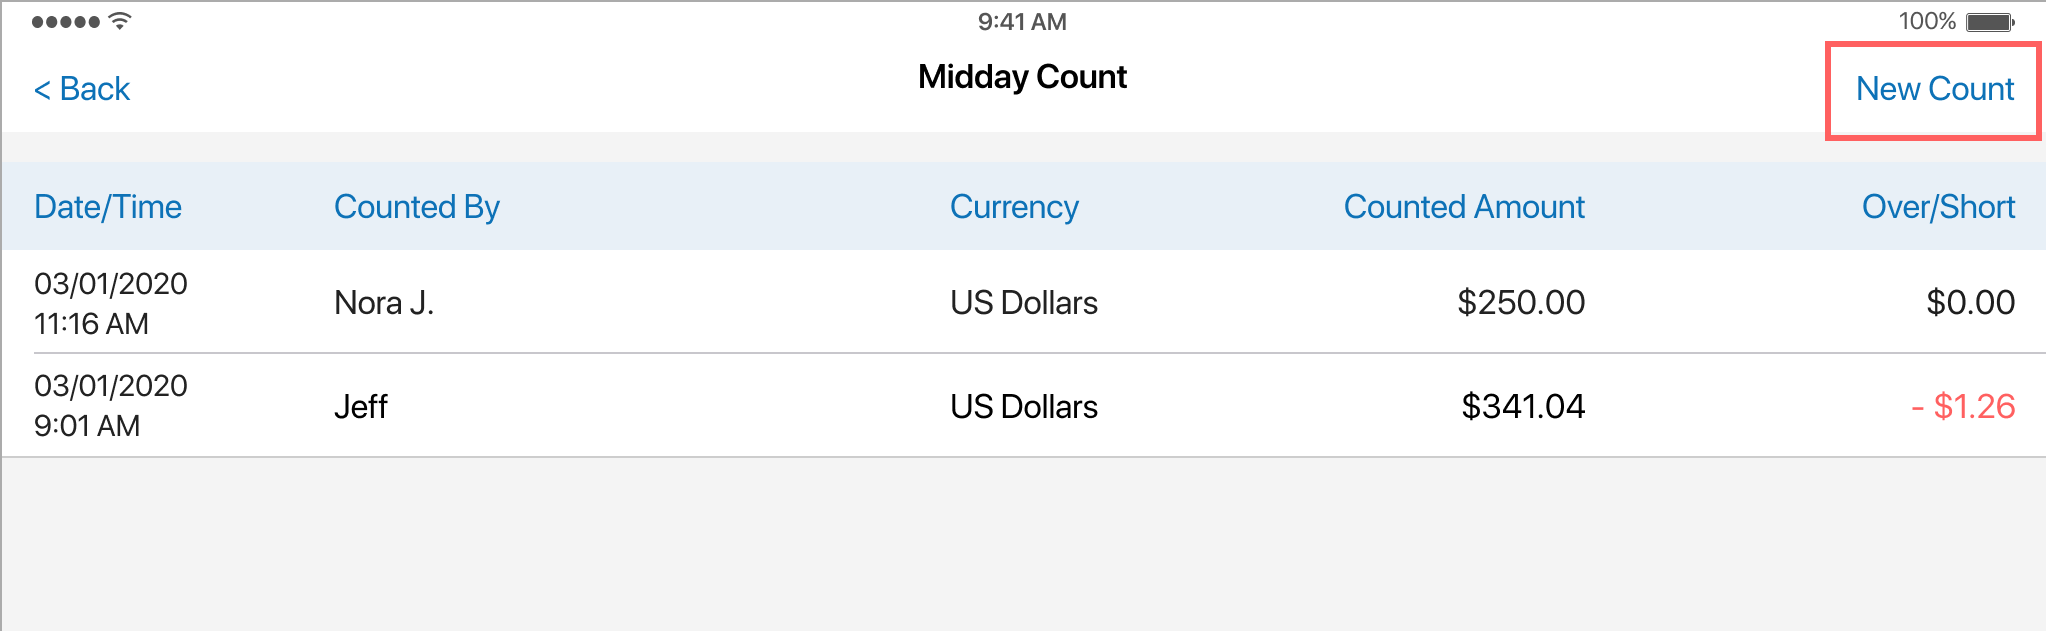
In the Midday Count area, tap New Count:
 If foreign currencies are available, in the pop-over dialog that appears, select the currency that should be counted.
 -
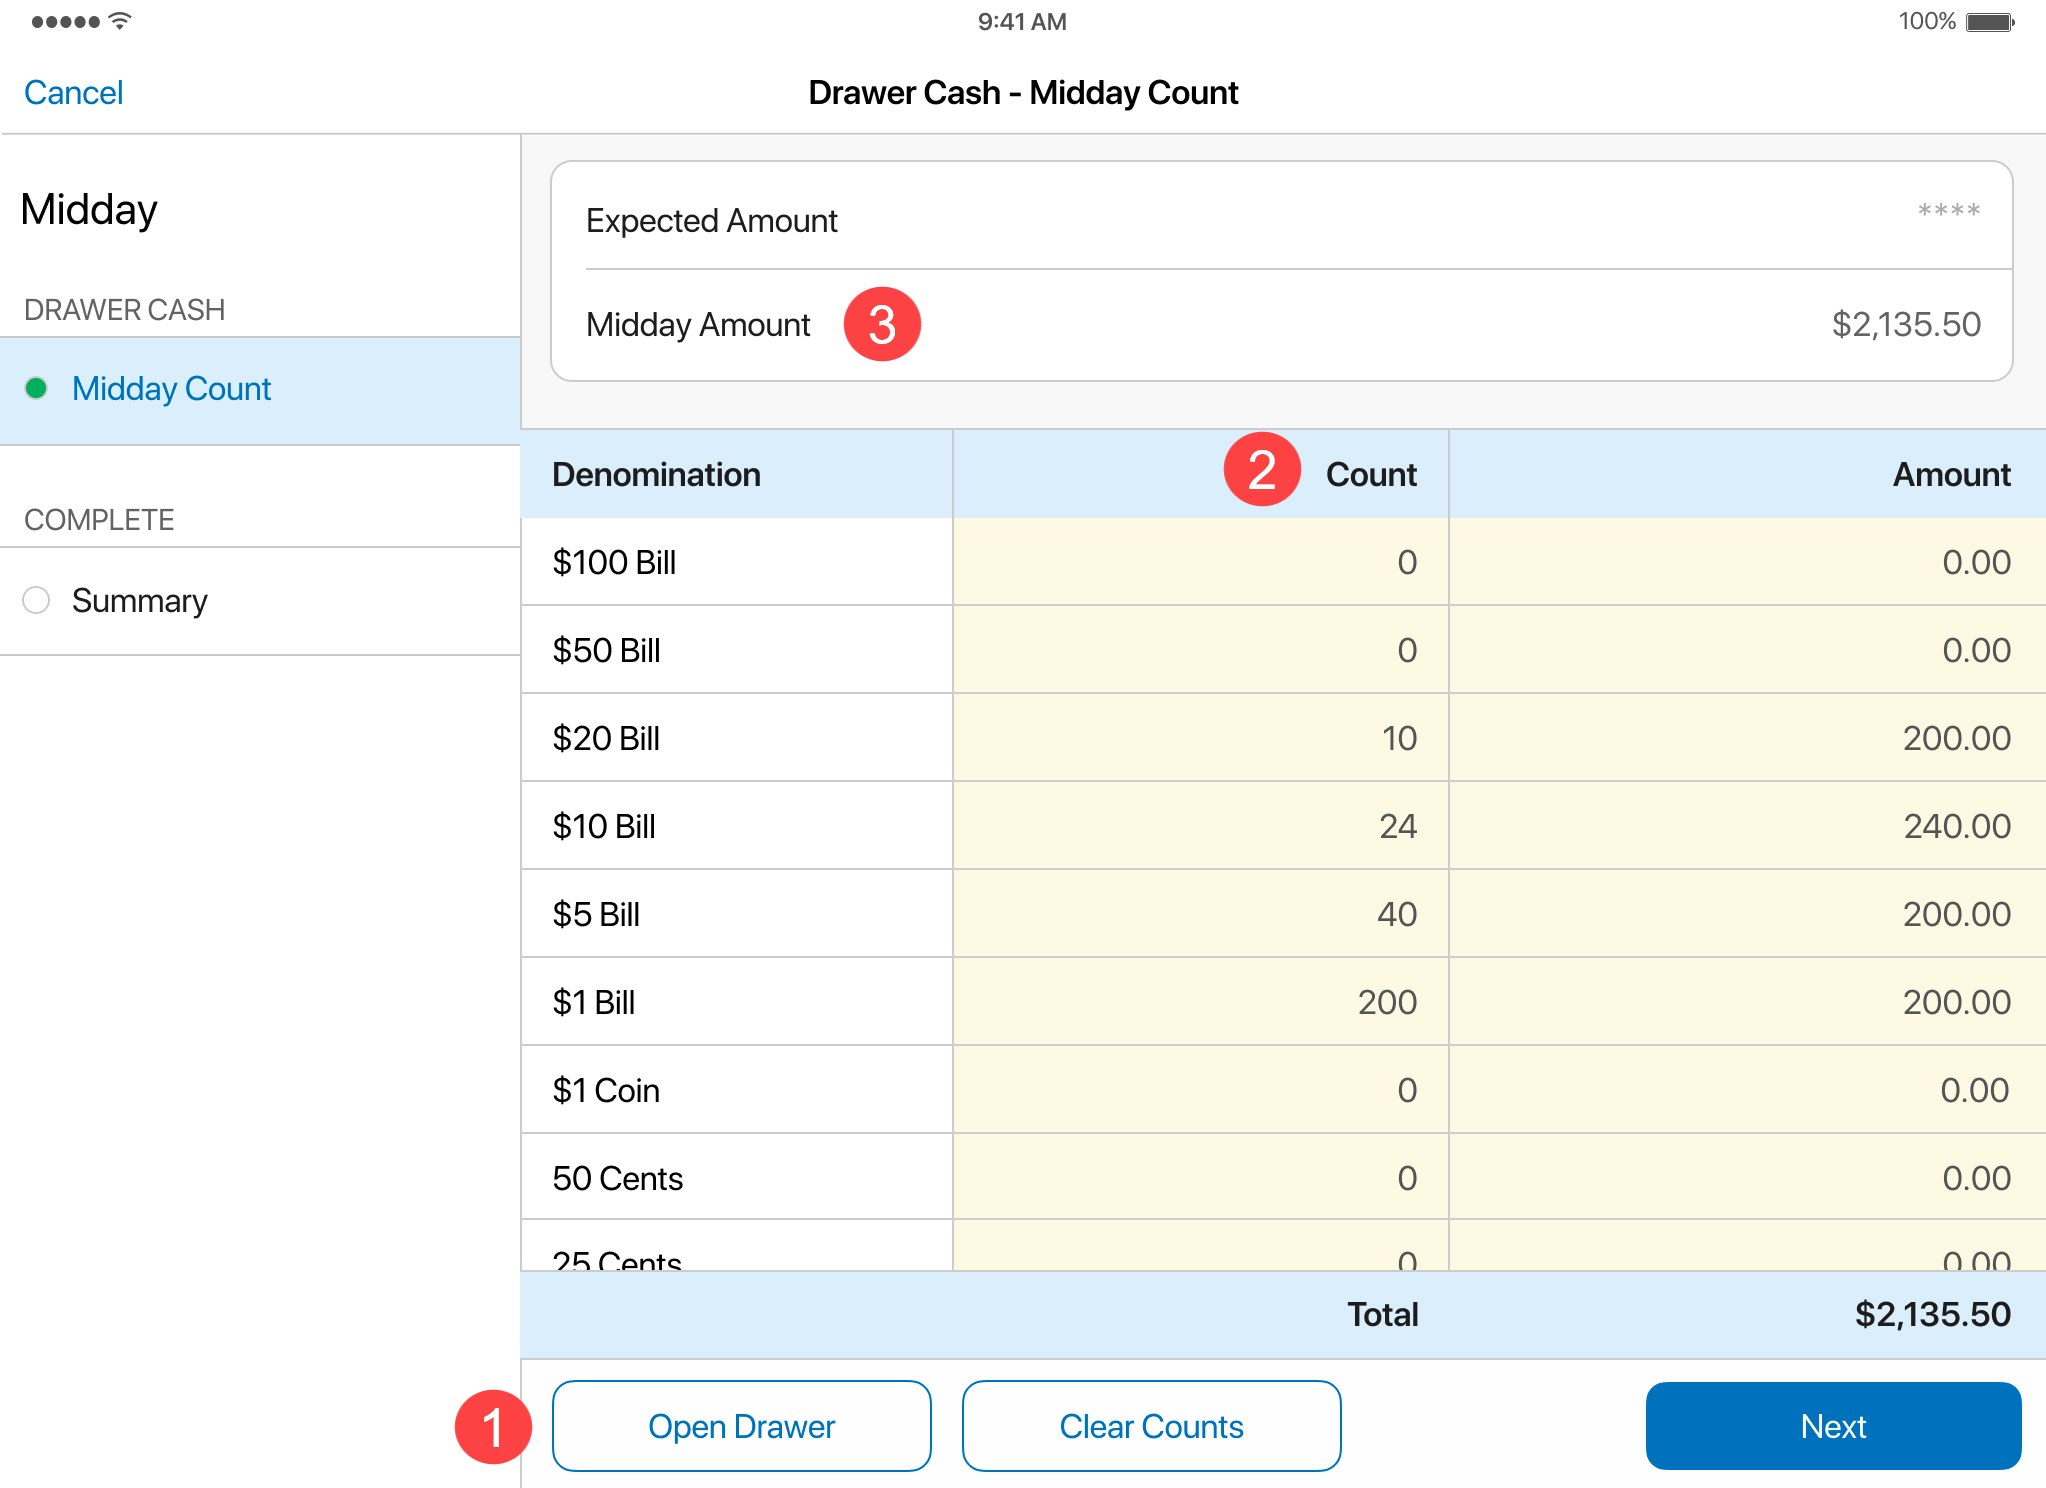
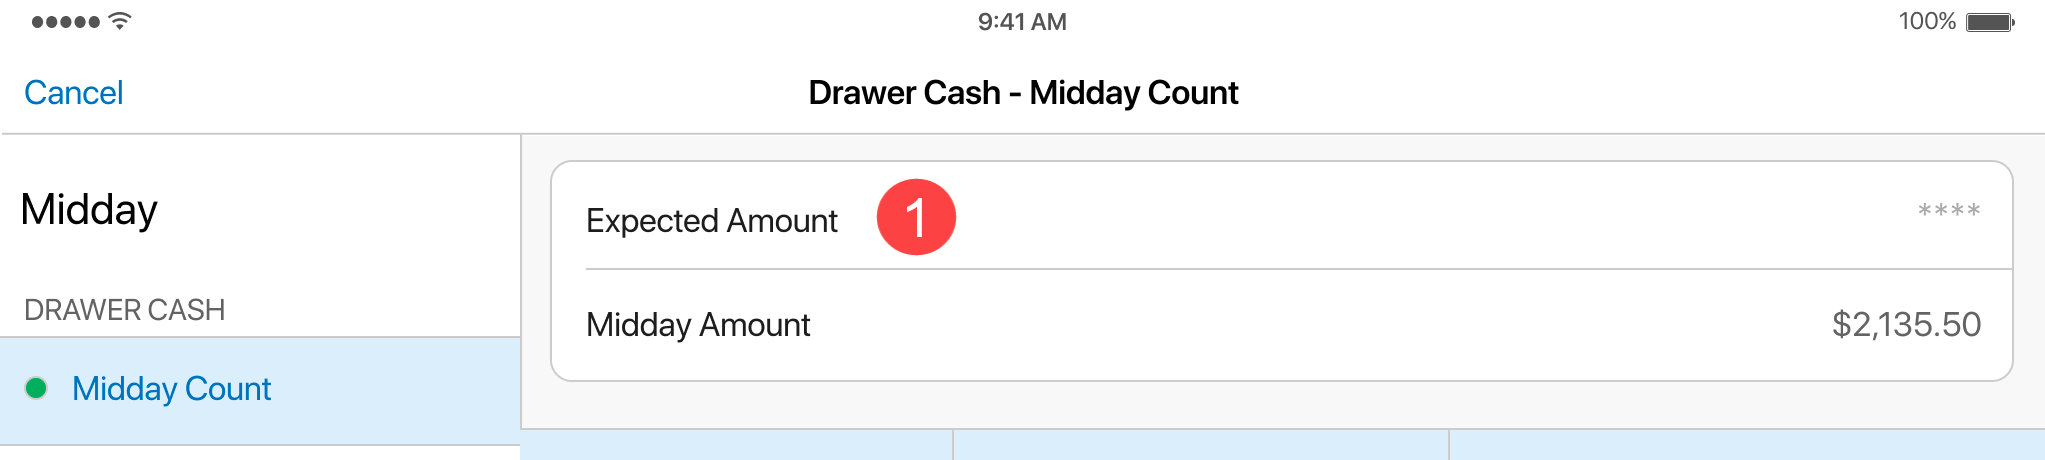
In the Drawer Cash – Midday Count area that opens, tap Open Drawer at the bottom 1 and count the cash:
 After counting:
- if applicable, in the denomination grid, enter the number of counted bills and coins in the Count column 2 , or
- enter the counted total in the Midday Amount field
3
To define if the denomination grid is shown and required for midday counts, under
chq > settings > drawer management > drawer memo settings, configure the denomination entry on midday count field.
-
Tap Next at the bottom-right.
-
In the COMPLETE – Summary area, review the details of your count and then tap Save at the bottom-right.

Masking expected amounts for drawer cash
To enable masking of expected amounts in POS Pro, in CHQ under settings > drawer management > drawer memo settings, select the mask expected amount totals checkbox.
When masking is turned on, certain values in the Drawer Memo related areas are replaced with ****.
Under Drawer Memo > Start of Day, the following values will be hidden:
-
on the Drawer Cash – Opening Count tab:
-
on the COMPLETE – Summary tab:


Under Drawer Memo > End of Day, the following values will be hidden:
-
on the Drawer Cash – Closing Count tab:

-
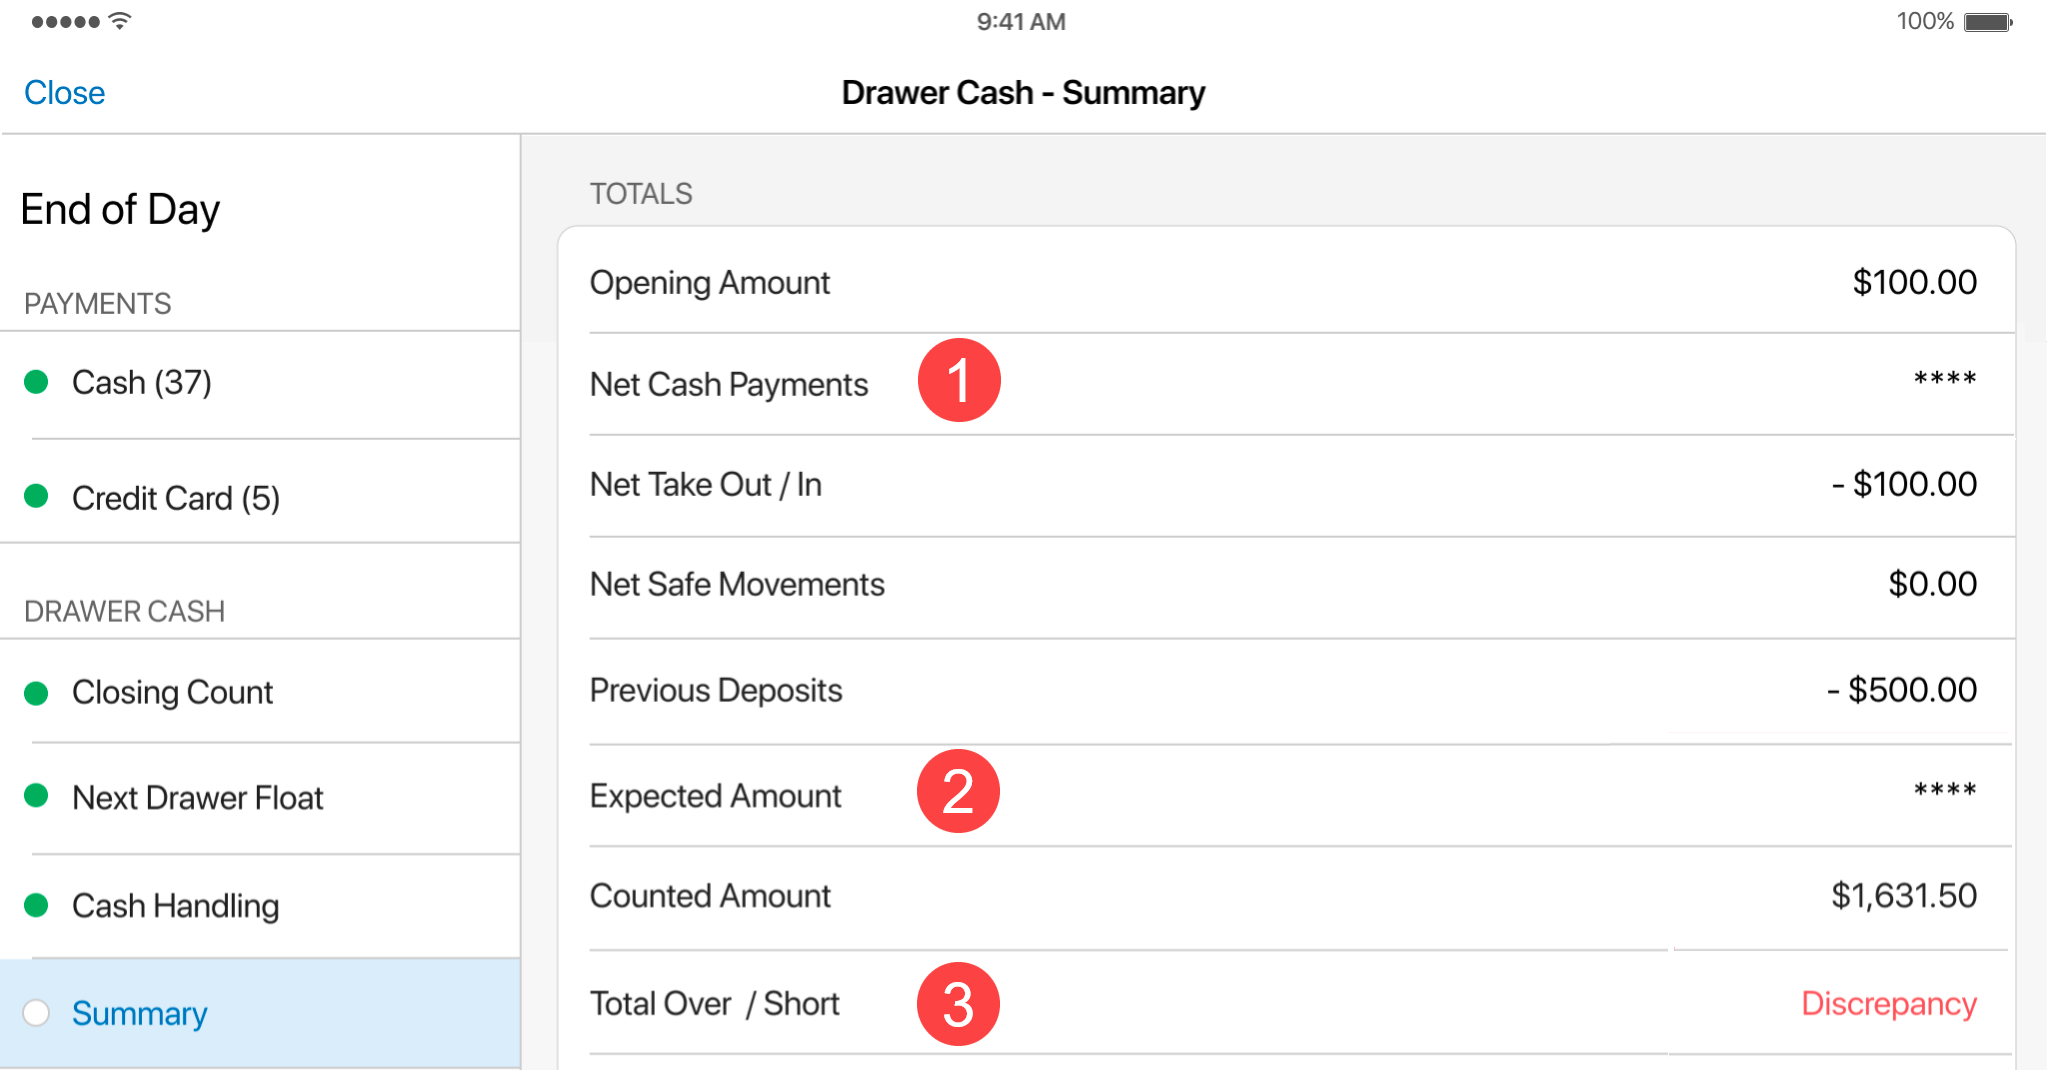
on the Drawer Cash – Summary tab:

Under Drawer Memo > Midday Count, the following values will be hidden:
-
on the Drawer Cash – Midday Count tab:
-
on the COMPLETE – Summary tab:


Notifying when the counted amount doesn’t match the expected amount
When an expected amount is hidden, users will be notified when entering a counted amount that doesn’t match the expected amount. In particular, that applies to the following fields:
- Opening Amount under
Drawer Memo > Start of Day > Drawer Cash – Opening Count - Closing Count under
Drawer Memo > End of Day > Drawer Cash – Closing Count - Midday Amount under
Drawer Memo > Midday Count > Drawer Cash – Midday Count
When the expected and counted amounts don’t match, the Not the Expected Amount dialog appears:
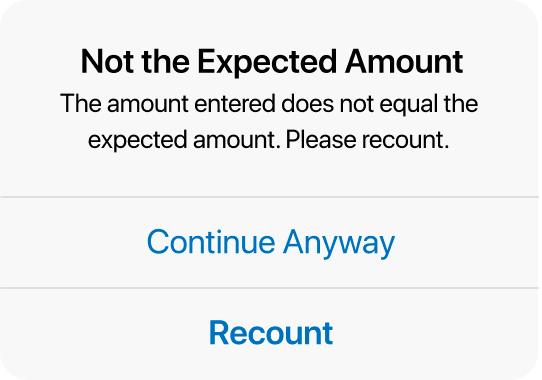 Tapping Recount allows for recounting and entering another amount.
Alternatively, it’s possible to proceed with the entered amount by tapping Continue Anyway.
See also
Drawer Memo: Cash drop notifications
Build 6.34.234: PRO-683
We’ve added the capability to notify users when a cash drop from the store’s drawer or safe is recommended or required by configuring cash drop thresholds.
Purpose
The new feature allows retailers to keep track of balance in the store’s drawer(s) and safe. By setting thresholds, it’s now possible to define at which point money should be moved from the drawer to the safe or deposited at the bank before accepting new payments is possible.
Users can set thresholds for both recommended and required cash drops.
Configuration in CHQ
In CHQ, configuring the thresholds for cash drop is possible:
- at the company level under
settings > drawer management > drawer memo settings >thepossection - at the location level under
settings > location settings > locations / location settings > [selected location] > sales >thecash drawersection. To prioritize the location-level settings over the company-level settings, the use location based cash drop checkbox must be selected
Cash drop notifications for drawer cash
POS Pro notifies the user about a recommended or required cash drop from the drawer when:
- the user starts a new sale
- at the time of sale, the user selects the Cash payment method
The user will also see a notification when the Opening Amount value under Drawer Memo > Start of Day > Drawer Cash – Opening Count or Next Day Float Amount value under Drawer Memo > End of Day > Drawer Cash – Next Drawer Float exceeds the thresholds for the drawer cash.
Notifications on starting a new sale
When the user starts a new sale, the following notification dialogs can now appear:
-
the
A cash drop is recommendeddialog appears when the threshold for cash drop warning is reached: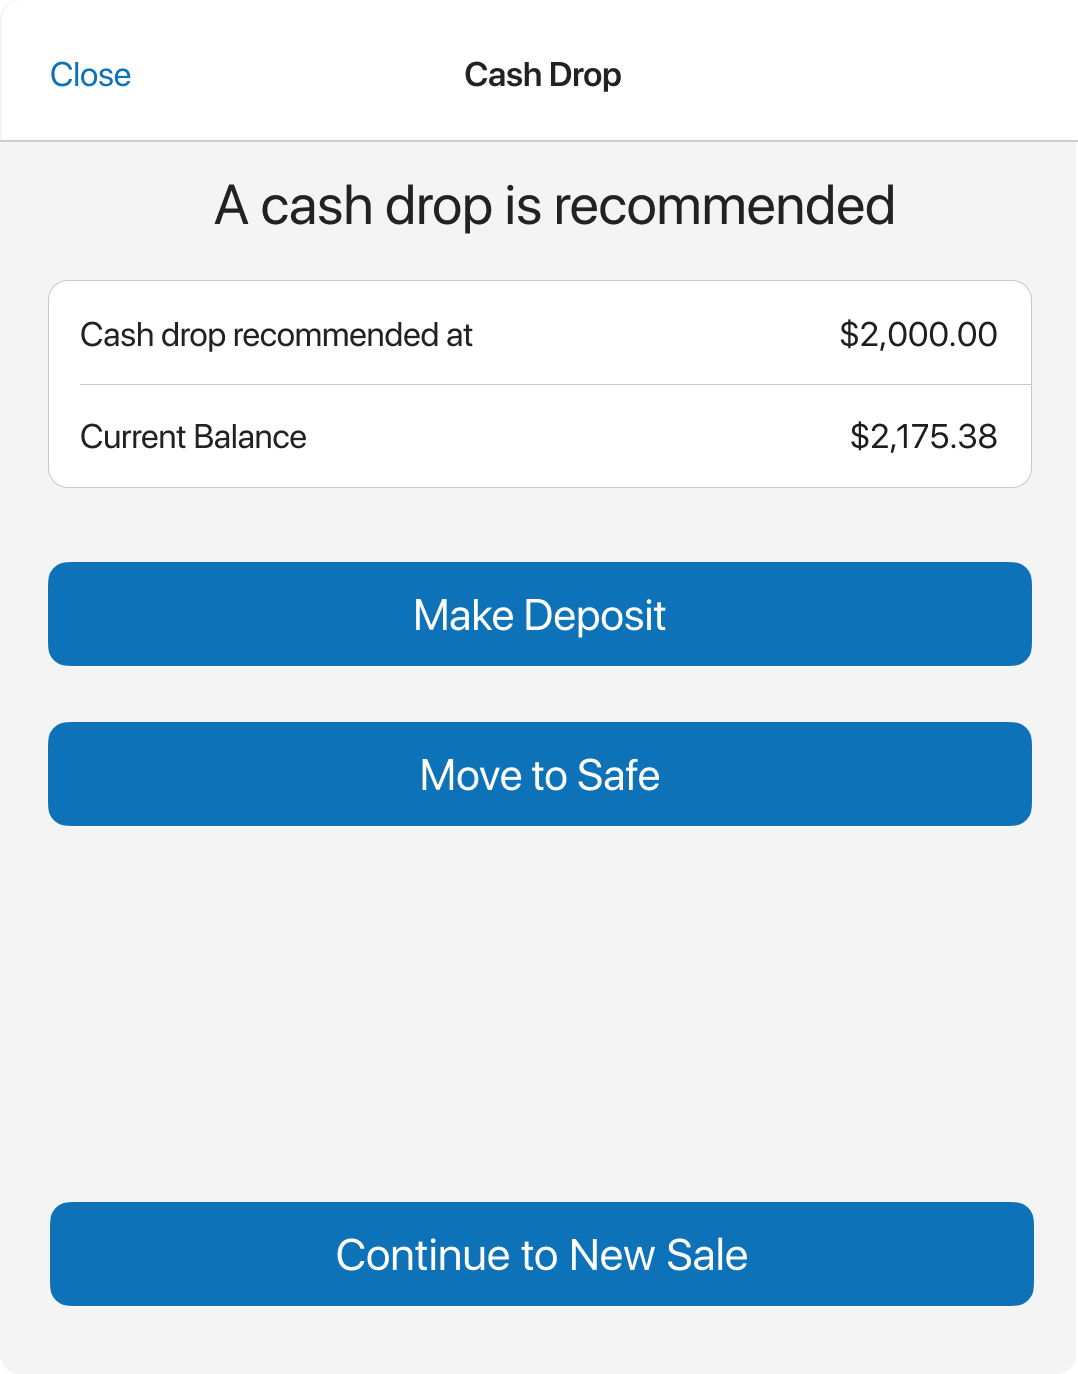
- To create a new Deposit or Move to Safe record, tap Make Deposit or Move to Safe respectively.
- To continue processing the sale, tap Continue to New Sale.
For the Move to Safe option to be available, in CHQ, the safe management checkbox must be selected under
services > device controller > [selected device] > general.
-
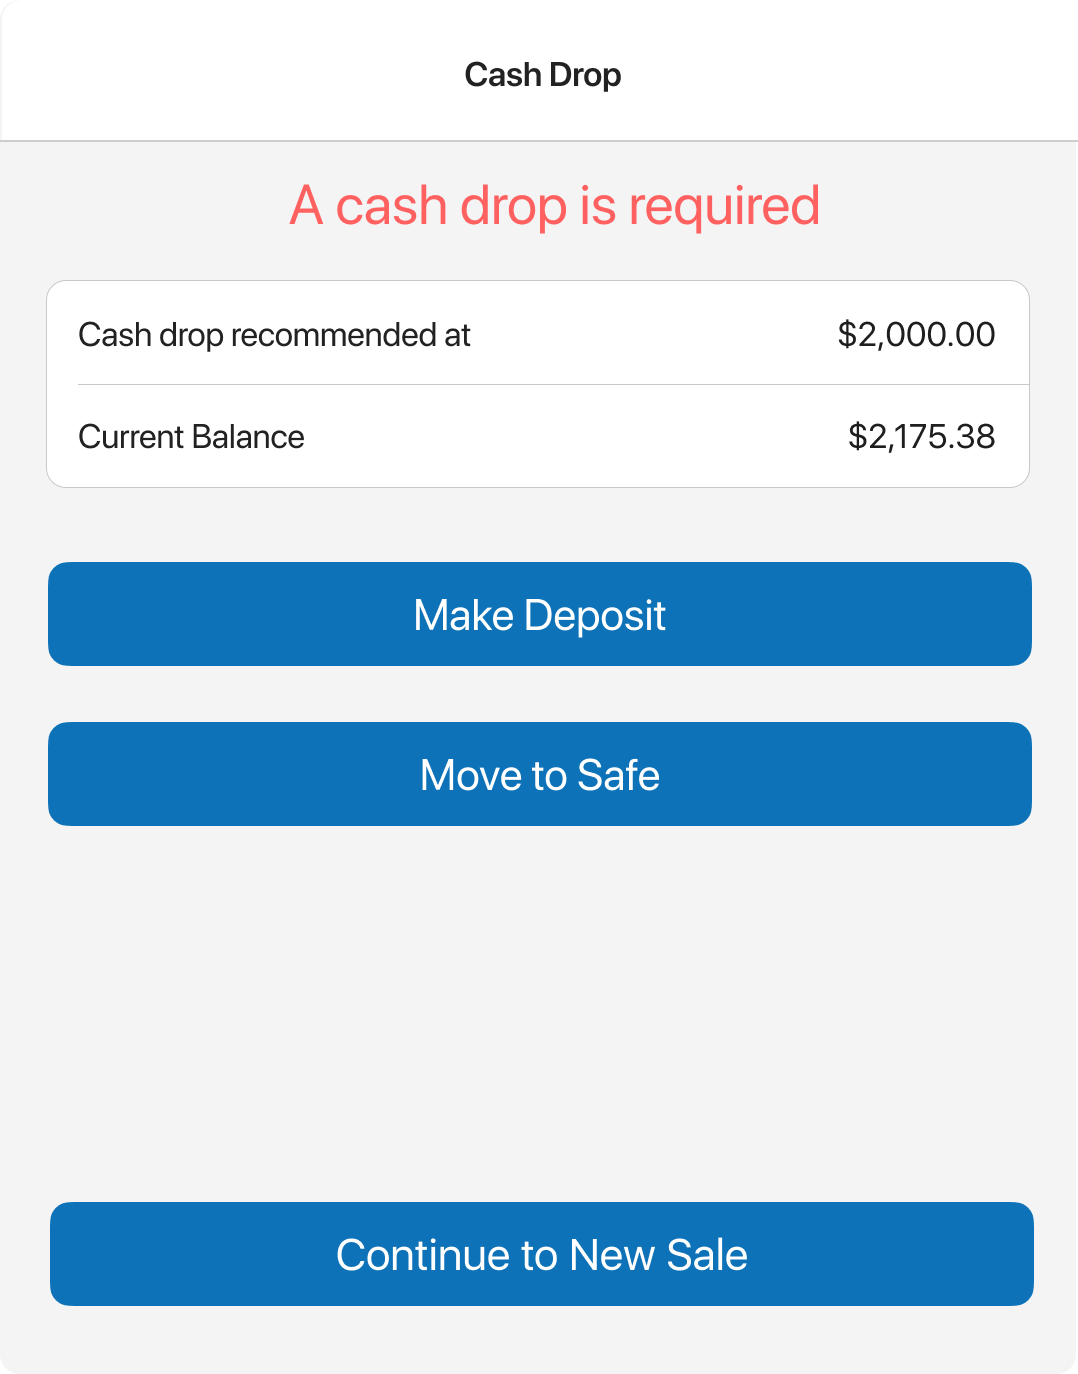
the
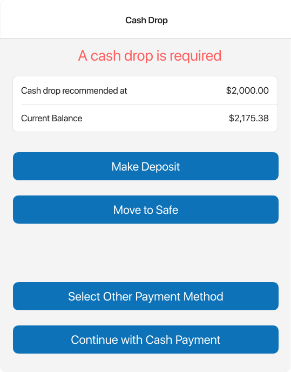
A cash drop is requireddialog appears when the threshold for cash drop requirement is reached:
- To create a new Deposit or Move to Safe record, tap Make Deposit or Move to Safe respectively.
- To continue processing the sale, tap Continue to New Sale. If the Cash payment method is selected at the time of sale, the notification dialog will appear again.

Notifications on selecting the Cash payment method
When at the time of sale the user selects the Cash payment method, the following notifications dialog can appear:
- the
A cash drop is recommendeddialog as described in Notifications on starting a new sale - the
A cash drop is requireddialog appears when the threshold for cash drop requirement is reached:
- To create a new Deposit or Move to Safe record, tap Make Deposit or Move to Safe respectively.
- To choose another payment method, tap Select Other Payment Method.
- If the user has the Sales Receipts – Bypass required cash drop security right, to finalize the cash payment, tap Continue with Cash Payment. If the user doesn’t have that right, on tapping Continue with Cash Payment, manager override is required.
Notifications in the Drawer Memo area
Under Drawer Memo > Start of Day and Drawer Memo > End of Day, the user is now warned when there is a drawer amount that exceeds the configured threshold.
In particular, the Drawer Cash Threshold dialog appears when:
- under
Drawer Memo > Start of Day > Drawer Cash – Opening Count, the Opening Amount value exceeds the threshold, and the user taps Next - under
Drawer Memo > End of Day > Drawer Cash – Next Drawer Float, the Next Day Float Amount value exceeds the threshold, and the user taps Next
In the dialog, it’s possible to:
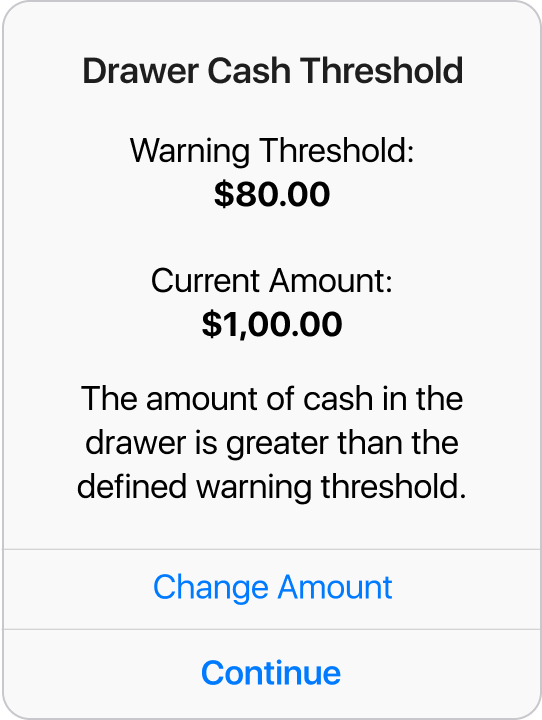
- Tap Change Amount to remain in the area and change the amount.
- Tap Continue to proceed to the next area with the configured amount.
Cash drop notifications for safe cash
Under Drawer Memo > Start of Day and Drawer Memo > End of Day, the user is warned when there is a safe amount that exceeds the configured threshold.
In particular, the Safe Cash Threshold dialog appears when:
- under
Drawer Memo > Start of Day > Safe Cash – Opening Count, the Opening Amount value exceeds the threshold, and the user taps Next - under
Drawer Memo > End of Day > Safe Cash – Closing Count, the Next Safe Float value exceeds the threshold, and the user taps Next
In the dialog, it’s possible to:
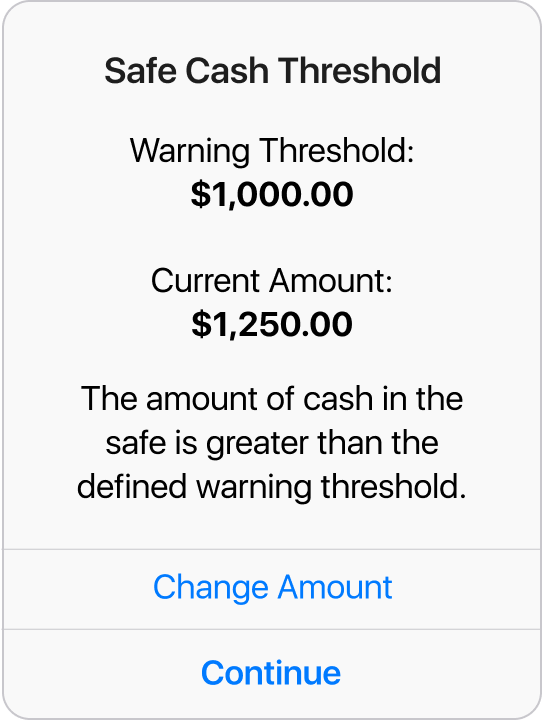
- Tap Change Amount to remain in the area and change the amount.
- Tap Continue to proceed to the next area with the configured amount.
See also
Voiding/reversing Sales Receipts
Build 6.34.234: PRO-931
Starting from version 6.34.78, POS Pro now allows for voiding and reversing finalized Sales Receipts.
Configuration in CHQ
In CHQ, it’s possible to define if a Sales Receipt should be printed when voided/reversed. To do so, configure the printing when void/reversing finalized receipt setting under settings > sales > sales documents.
Restrictions for voiding a Sales Receipt
A Sales Receipt cannot be voided if:
- the user doesn’t have the Sales Receipts – Void/Reverse Sales Receipts security right
- the Receipt exceeds the restrict void/reverse by time limit configured in CHQ under
settings > location settings > locations / location settings > [selected location] > payments >thepayment processing - generalsection - the Receipt was created on another device
- the Drawer Memo associated with the Receipt is not active
- a tax refund voucher was issued for the Receipt
- a ship item was present on the Receipt
- a Gift Card was sold or given as change on the Receipt
- a Credit Memo was given as change on the Receipt
- two or more payment methods were used on the Receipt
- on the Receipt, money was refunded to the customer’s credit card
Starting void/reverse
Voiding/reversing a Sales Receipt is now possible from the following POS Pro areas:
- Device History
- Verified Return
- Finalized Sales Receipt
Voiding/reversing from the Device History area
-
On the Home Screen, tap Sales Receipt.
Depending on your custom settings, the Sales Receipt button can be located in the navigation bar at the bottom or in the More menu. -
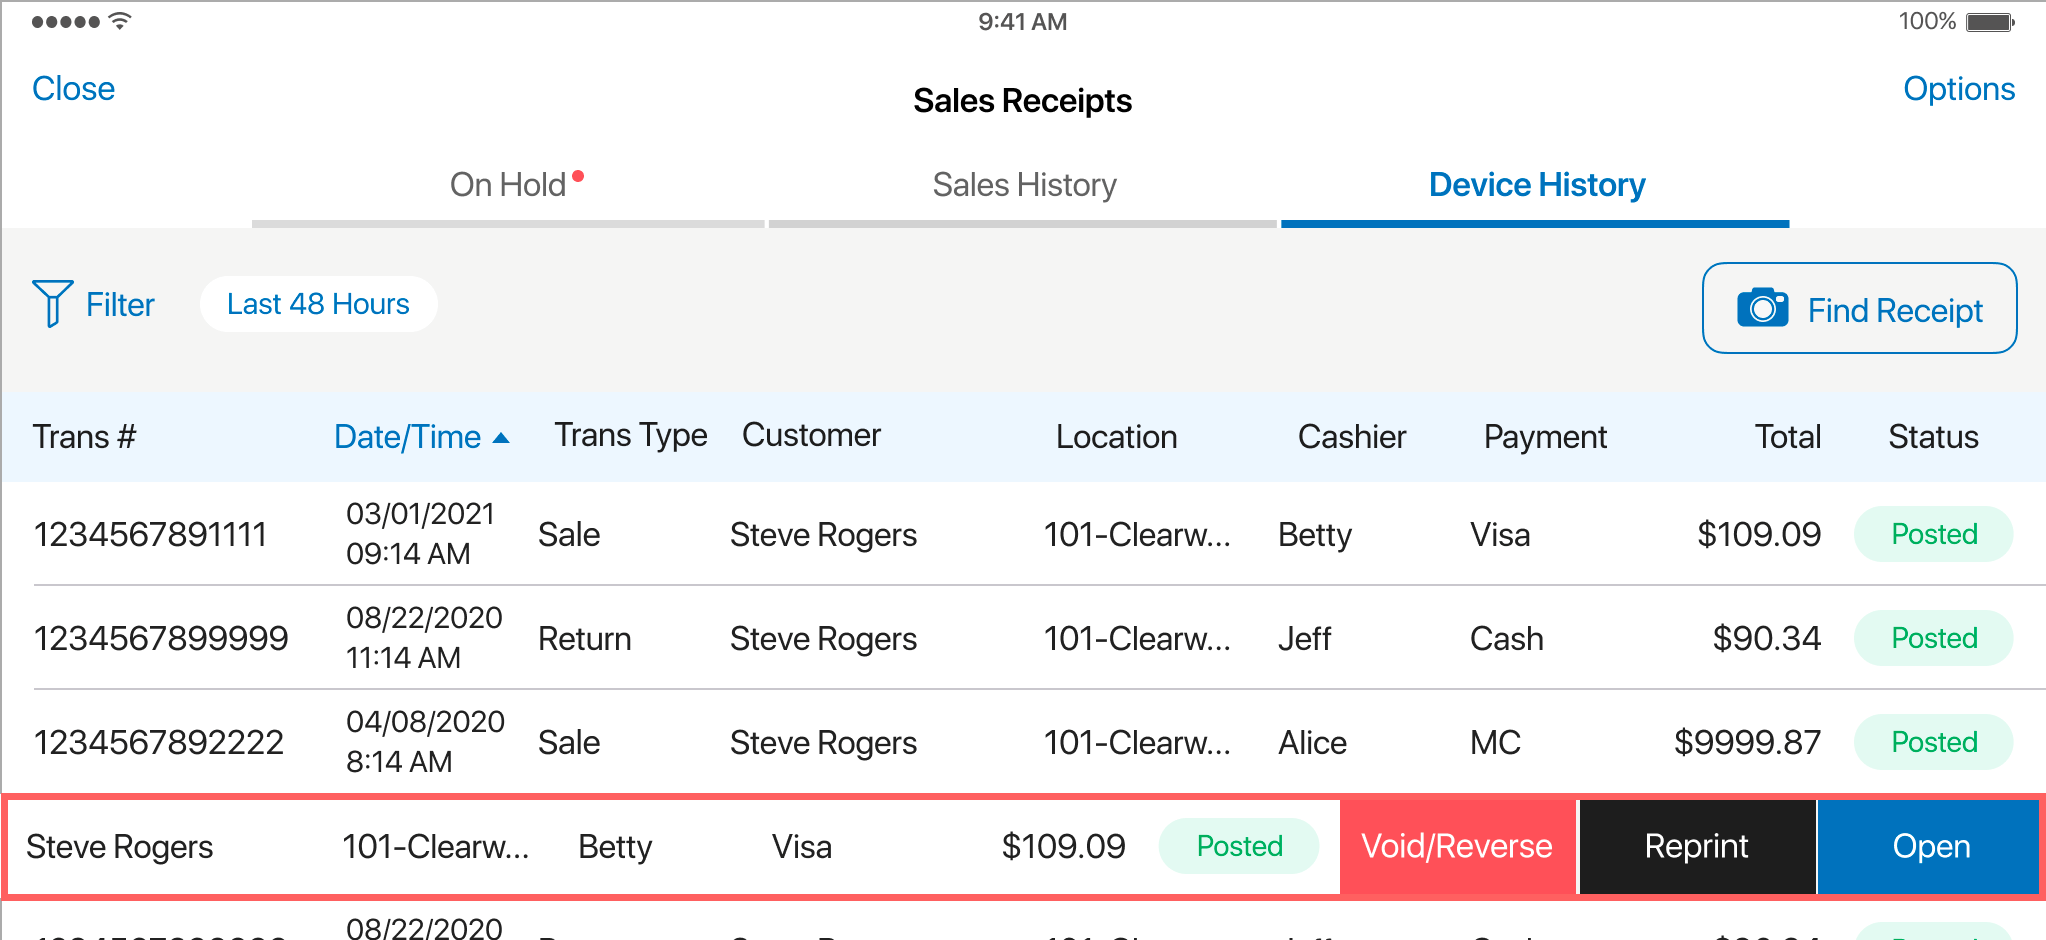
Tap Device History at the top.
-
Swipe left the required Sales Receipt and then tap Void/Reverse:
 Please note that, in Device History, already voided/reversed receipts have the Reversed status. The copy documents that reverse original receipts have the Reversal status
1
:
Please note that, in Device History, already voided/reversed receipts have the Reversed status. The copy documents that reverse original receipts have the Reversal status
1
:

Voiding/reversing is also possible from
Sales Receipt > Sales Historywhere Sales Receipts from all company devices are listed. However, please note that it’s not possible to void/reverse receipts created on another device.

Voiding/reversing from the Verified Return area
-
On the Home Screen, tap Sales Receipt.
Depending on your custom settings, the Sales Receipt button can be located in the navigation bar at the bottom or in the More menu. -
Tap Device History at the top.
-
Tap the required Sales Receipt.
-
At the top-right, tap Void/Reverse:

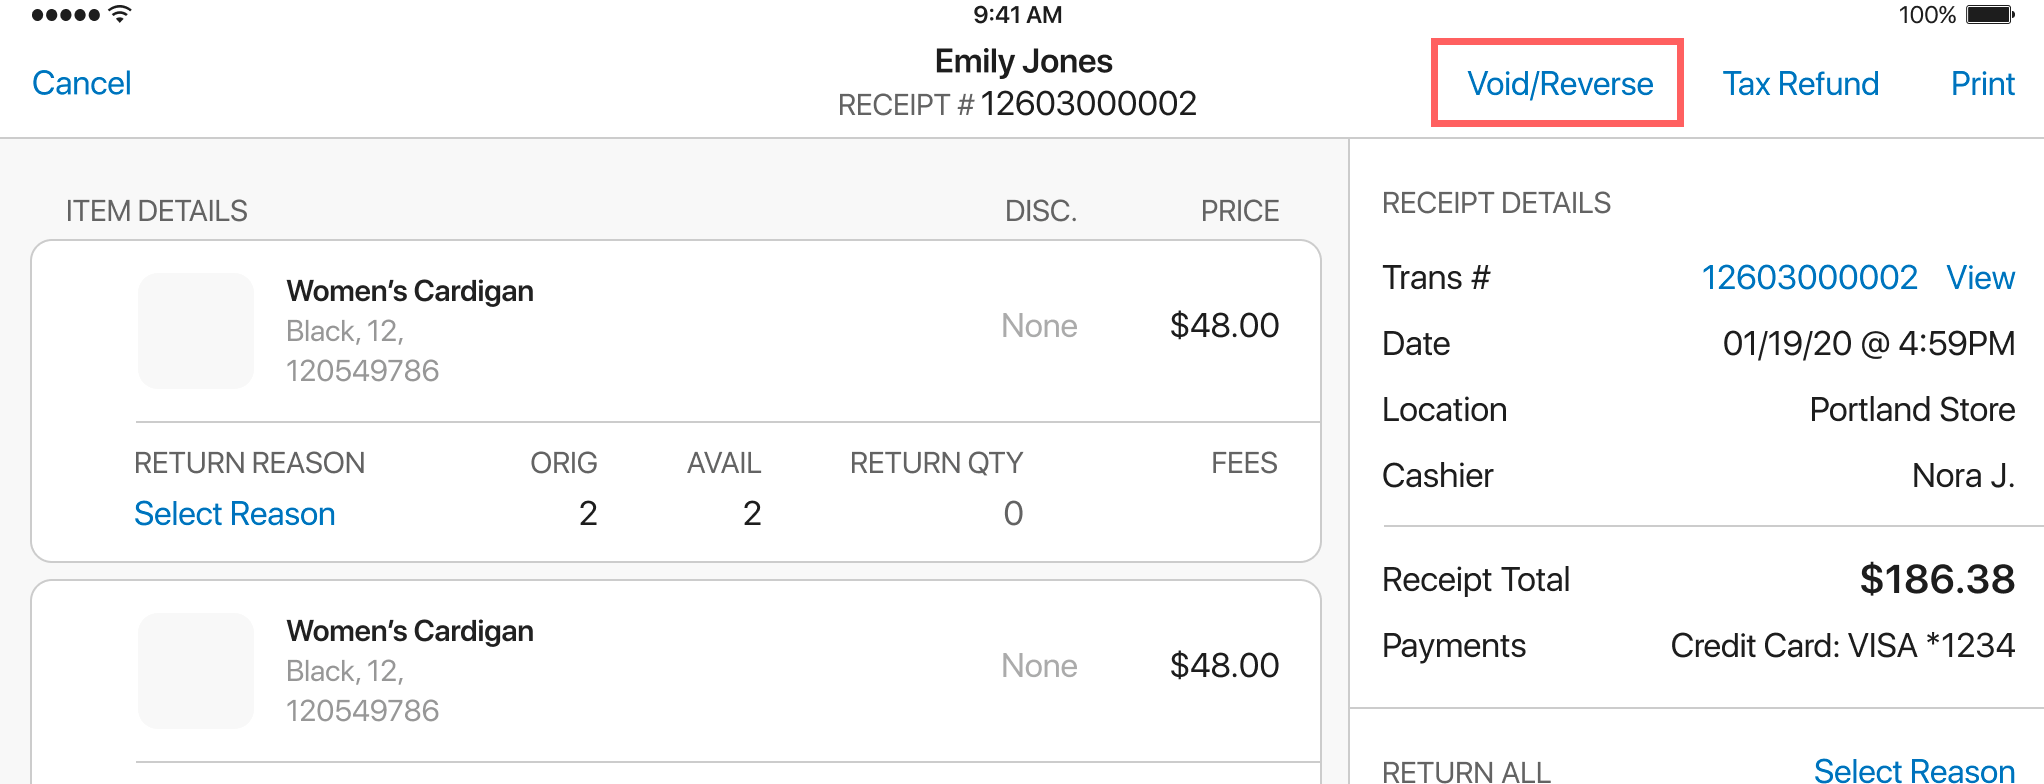
Voiding/reversing from the finalized Sales Receipt
-
On the Home Screen, tap Sales Receipt.
Depending on your custom settings, the Sales Receipt button can be located in the navigation bar at the bottom or in the More menu. -
Tap Device History at the top.
-
Tap the required Sales Receipt.
-
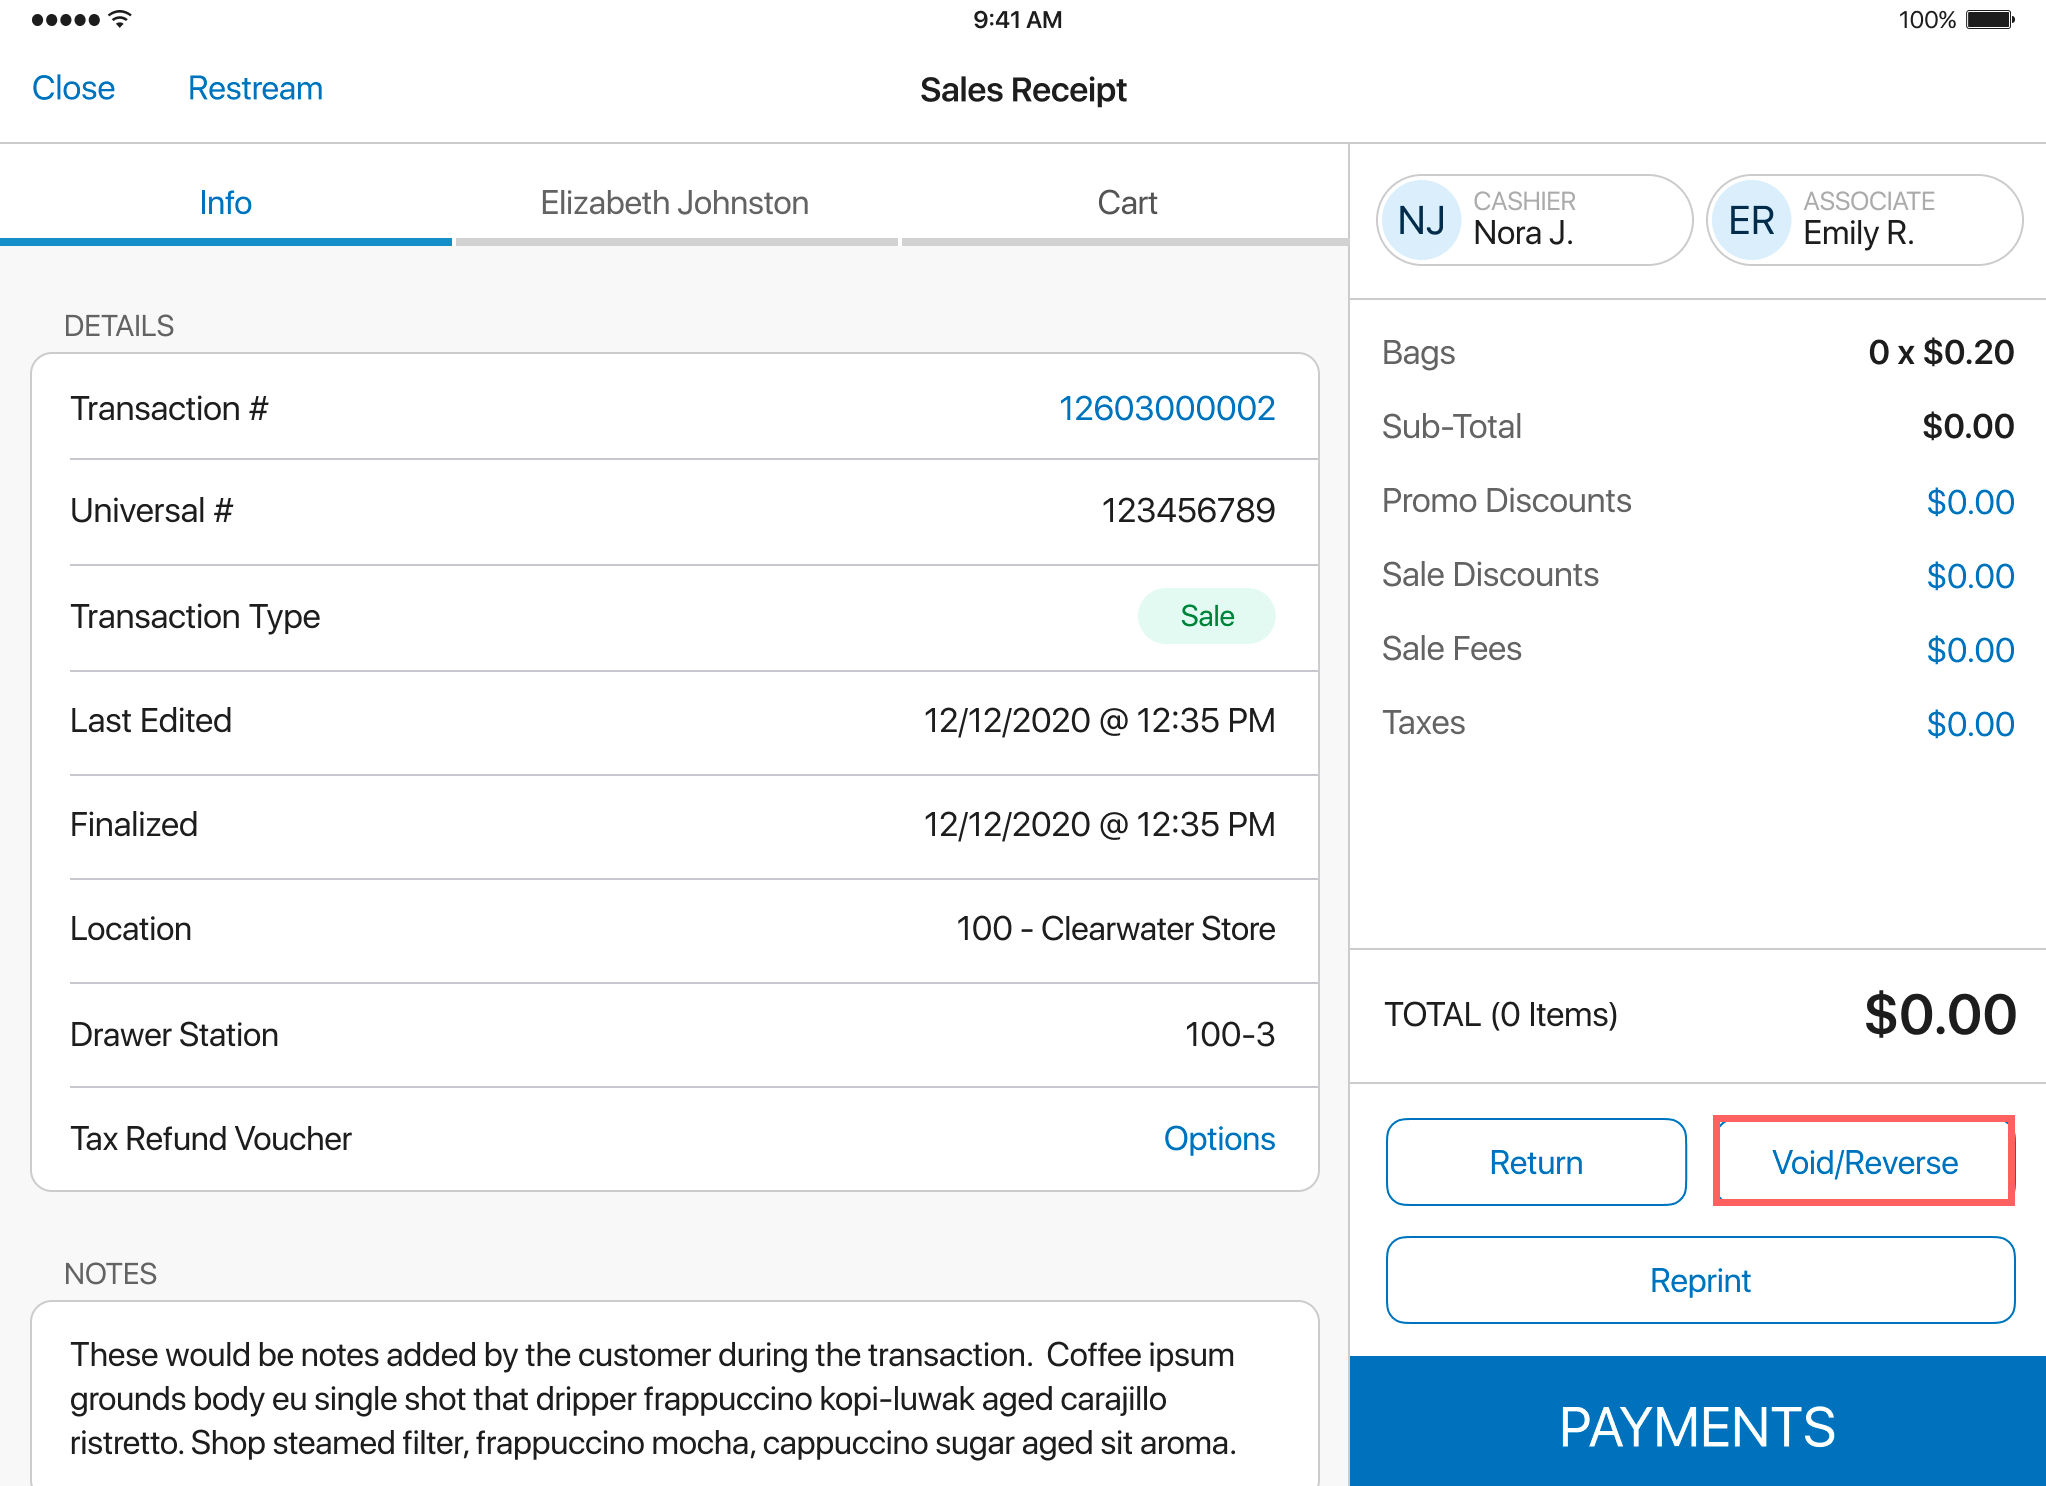
In the area that opens, tap the value in the Trans # field:
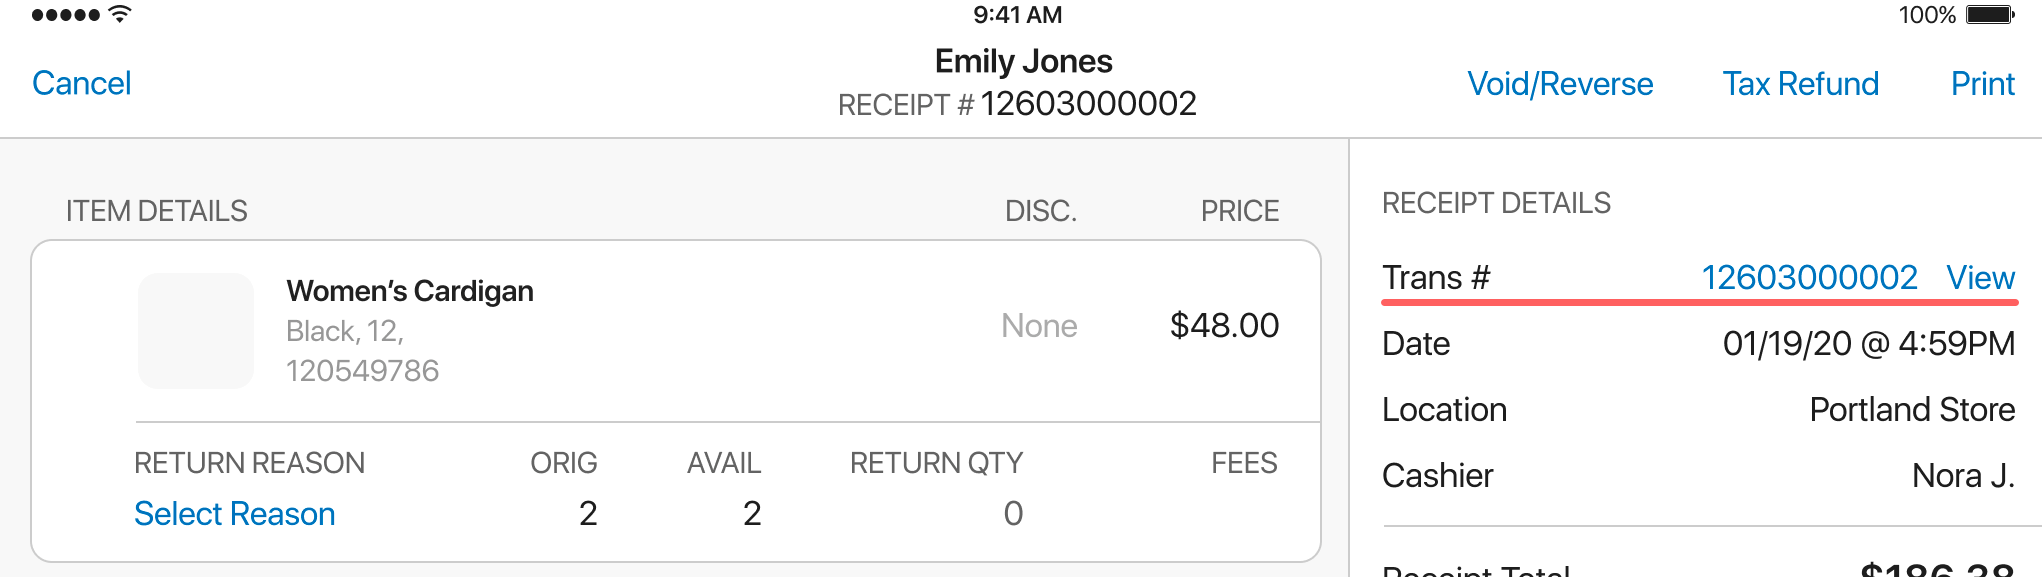
-
Tap Void/Reverse:


Void/Reverse processing
After Void/Reverse is tapped, select Yes in the confirmation dialog.
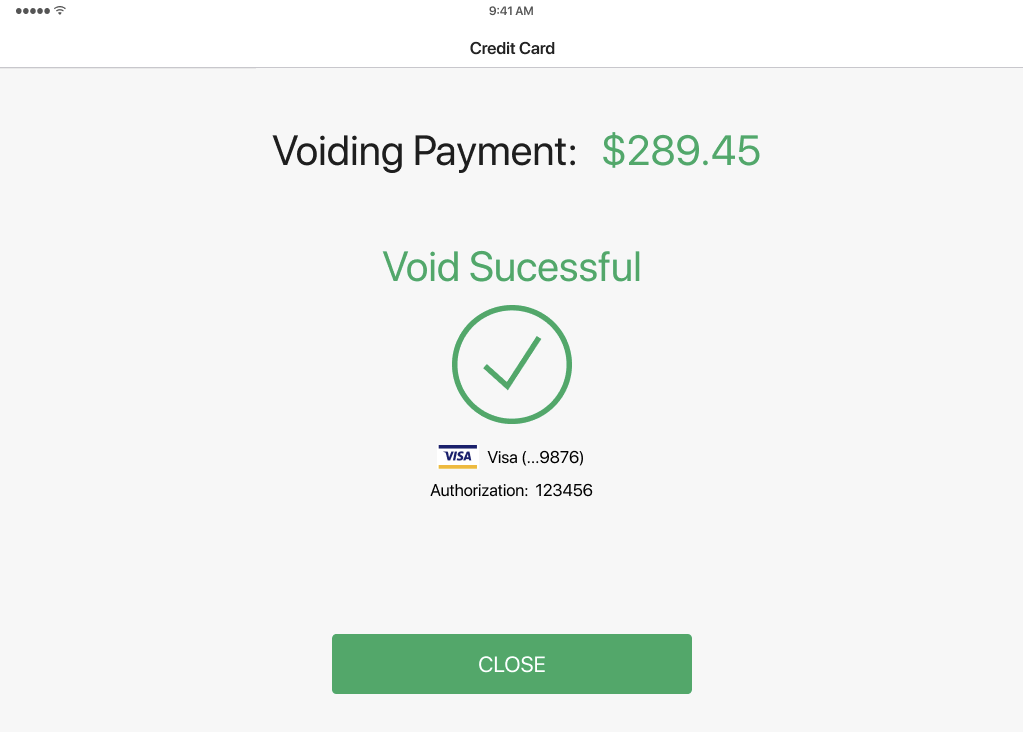
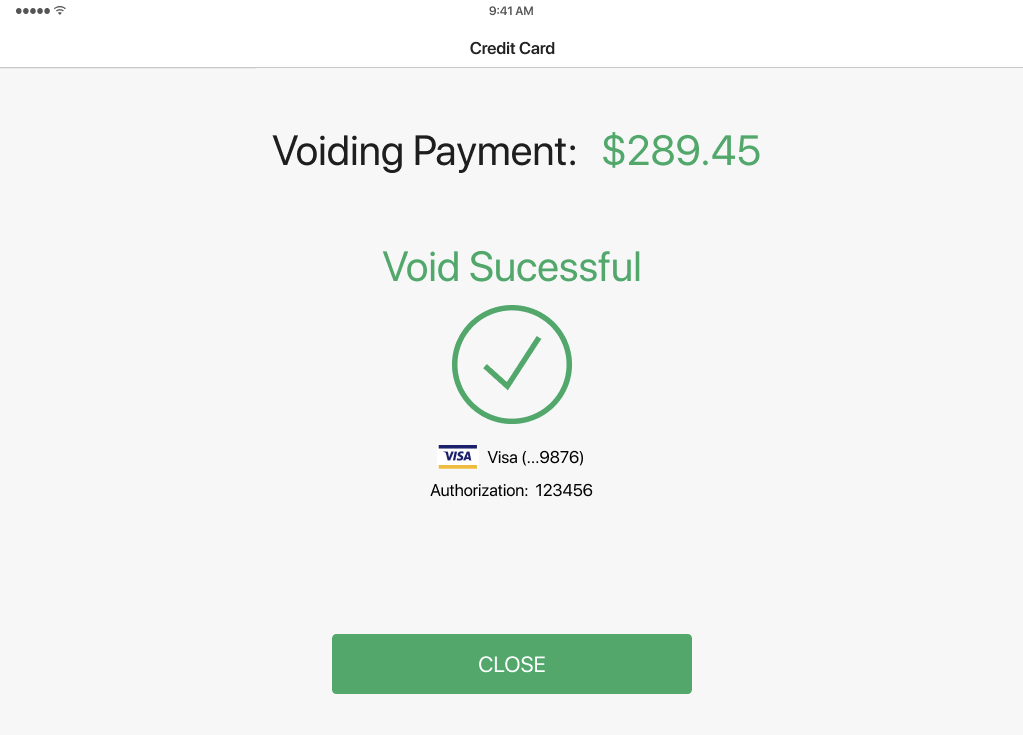
The Voiding Payment area will appear indicating that voiding is in progress:
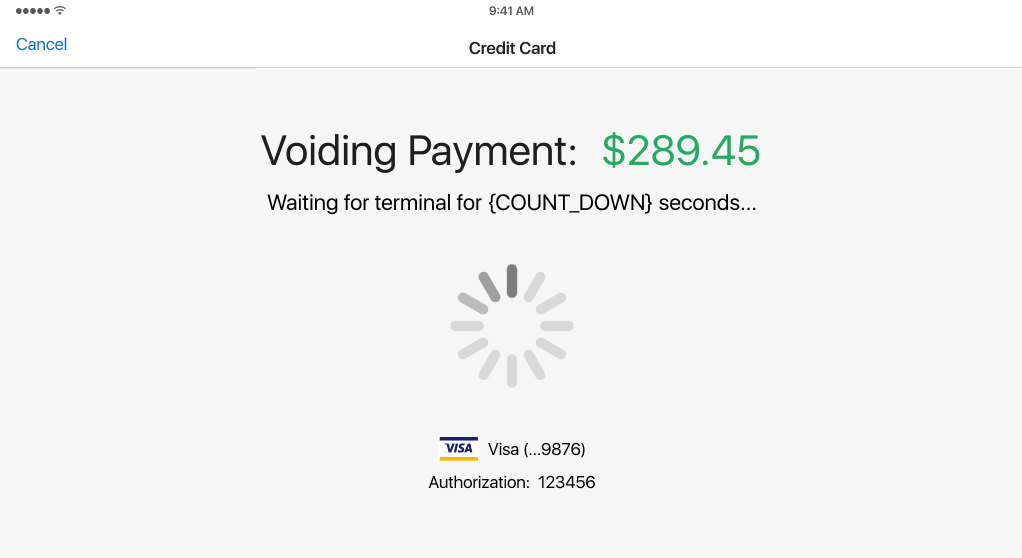 Once the process is completed, the Void Successful icon displays:
 After void/reverse is completed, the Void/Reverse Complete area appears where it’s possible to change the status of RFID tags from the voided Sales Receipt (see Changing the status of RFID tags).
Changing the status of RFID tags
In the Void/Reverse Complete area, all the items from the voided Sales Receipt display in the left-side panel:
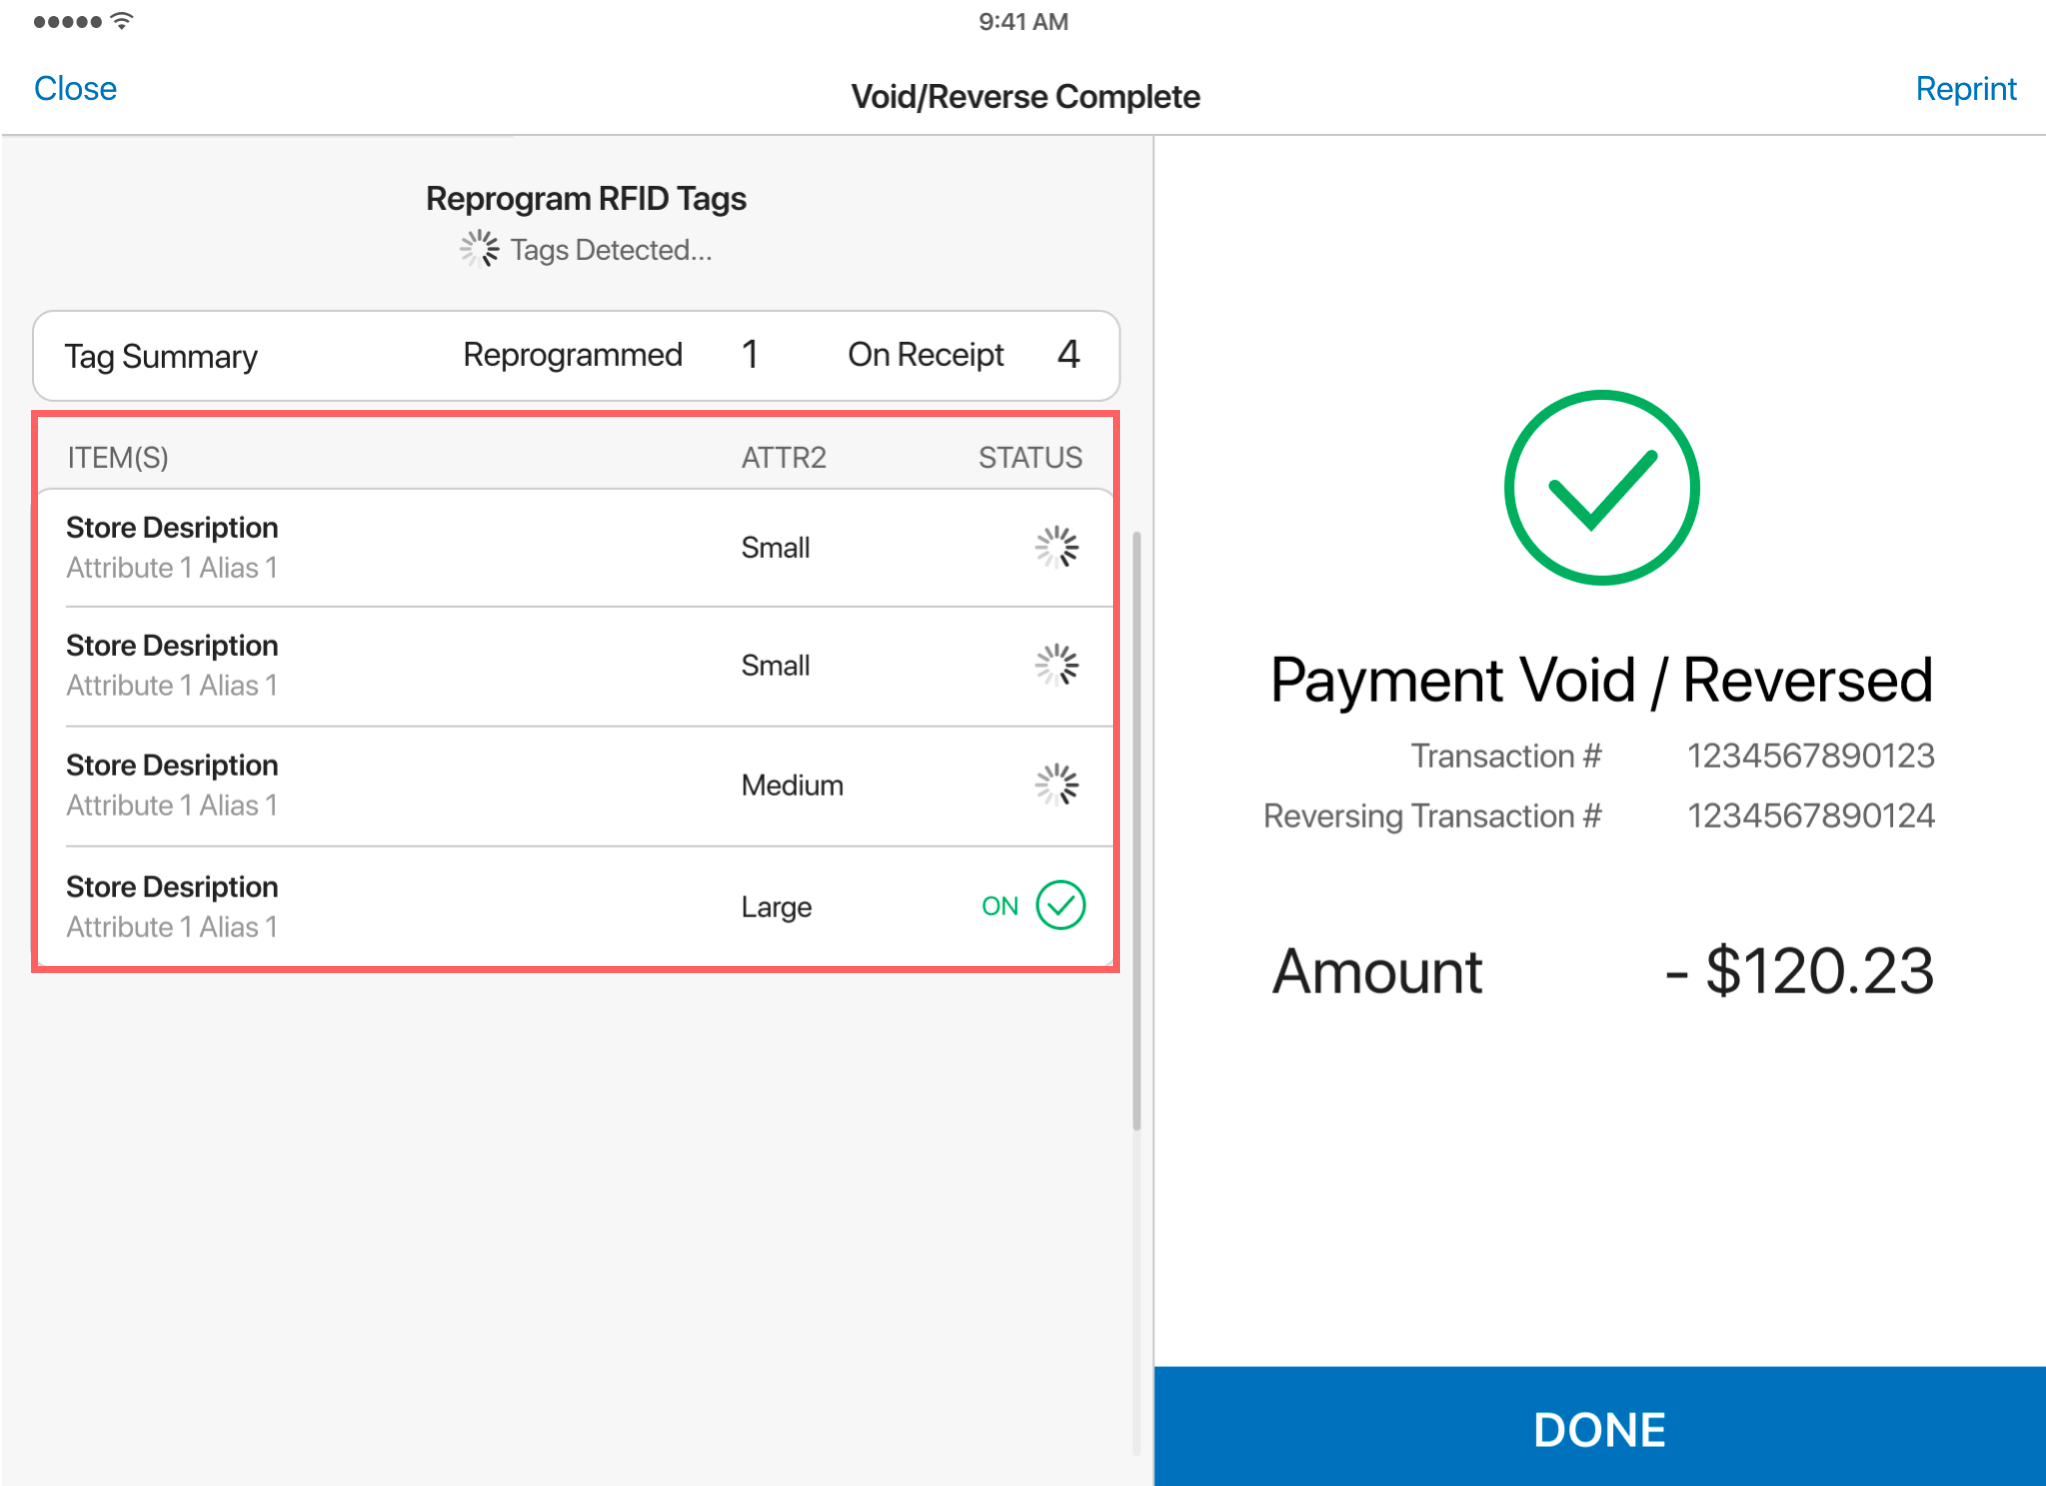 Prior to tag reprogramming, the STATUS column is empty for all items. Also, the Searching for RFID tag(s)… message displays at the top.
It’s only possible to reprogram those item tags that belong to the voided Sales Receipt.
If a tag is detected that doesn’t belong to the receipt, the
To reprogram an item tag, do the following:
-
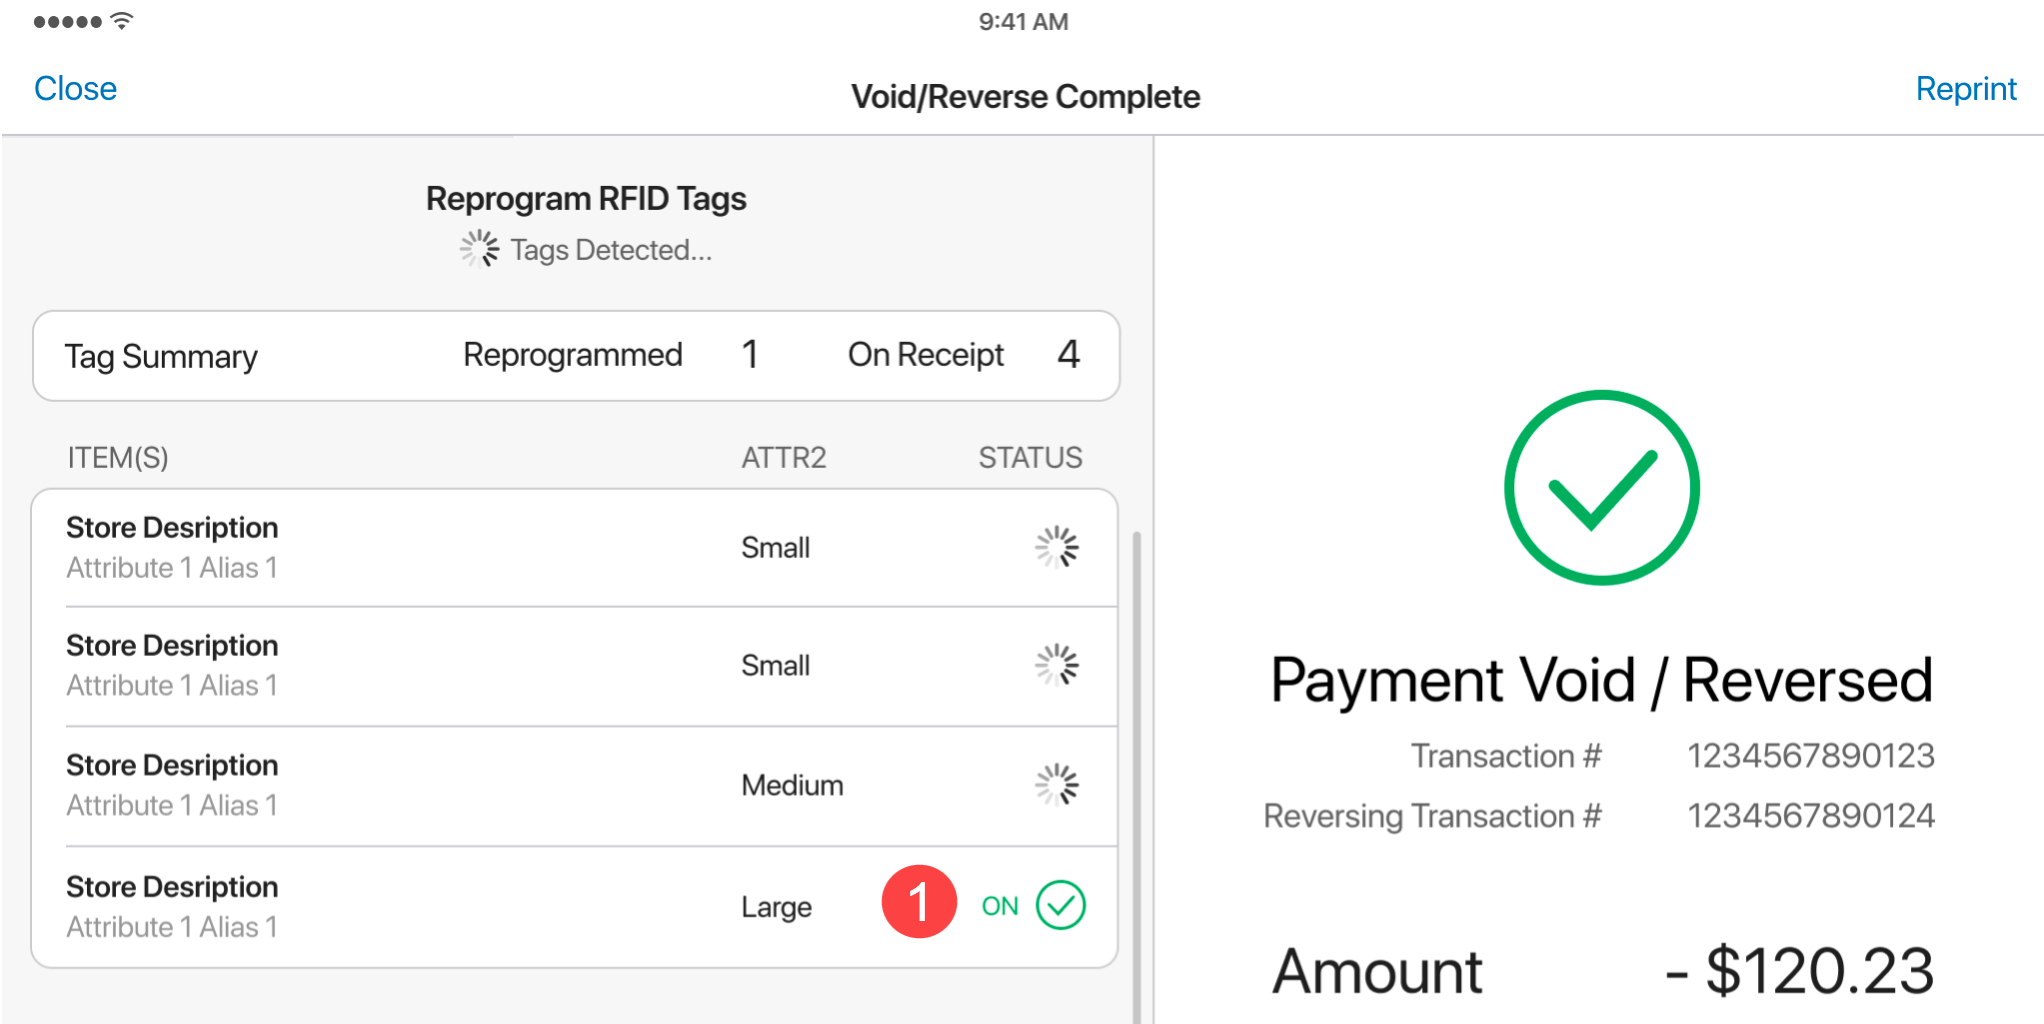
Place the required item on or near the RFID reader. Once placed:
- The detected items are automatically moved to the top of the list. Also, the message at the top changes to Tag(s) detected….
- When reprogramming begins, the Reprogramming Tag(s)… message displays at the top.
- Once a tag is reprogrammed, its new status displays in the STATUS column
1
:
 The following tag statuses are possible:
- OFF: the tag was successfully deactivated (for sale items)
- ON: tag was successfully reactivated (for return items)
- ERROR: the tag could not be reprogrammed
The Error status indicates that the tag might be locked or damaged. In this case, it may be required to do one of the following:
- warn the customer that the tag can trigger the Electronic Article Surveillance (EAS) system at the store exit, or
- manually reprogram the tag under
Sales Receipt > RFID Tag Status
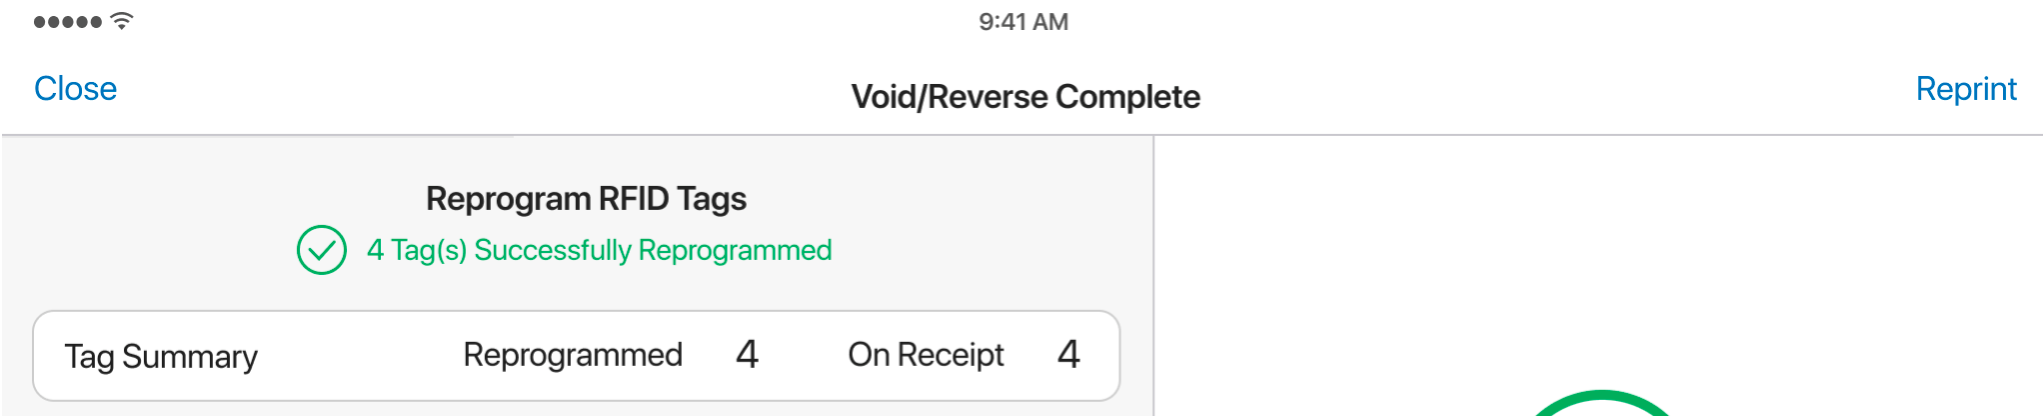
- Additionally, once all tags placed on the RFID reader are reprogrammed, the respective green message displays at the top, for example:
-
Remove the item(s) with the reprogrammed tag(s) from the RFID reader. Once removed, the message at the top changes to Searching for RFID tag(s)… .
-
Repeat steps 1-2 until all the required item tags are reprogrammed.
-
Tap DONE at the bottom-right.

See also
Sales Receipt: Notifying users when the discount requires a customer assigned
Build 6.34.234: PRO-5974
POS Pro now notifies users when the applied discount requires a customer on the Sales Receipt.
Configuration in CHQ
To define if a discount requires a customer assigned to the sale, under chq > settings > sales > discount reasons > [selected discount reason] > general, configure the require customer checkbox.
Notifications about a discount requiring a customer
Now, in the Sales Receipt area of POS Pro, when the user tries to apply a discount that requires a customer, and there is no customer record on the sale, the Customer Required dialog appears:
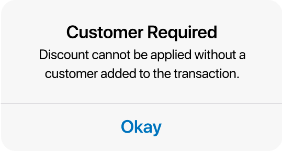
Please note that, after tapping Okay, the discount will NOT be applied. Once the customer is added, it’s required to apply the discount again.
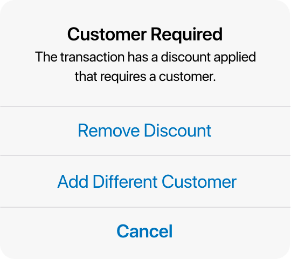 Tapping Remove Discount removes both the customer and the discount from the sale.
Tapping Add Different Customer opens the dialog where it’s possible to search for the required customer record.
See also
Logging discarded Sales Receipts
Build 6.34.234: PRO-6057
Discarding a Sales Receipt in POS Pro is now recorded in the action tracking log.
In CHQ, the action tracking log is available under settings > server tasks > action tracking. Discarded Sales Receipts are logged as DocumentDiscarded actions.
- date
- time
- logged in user
- location
- device ID
Please note that only the Receipts where changes have been made are recorded in the action tracking log. If the user started a new Sales Receipt and then immediately closed the latter, no record is created in the log.
Sales Receipt: Adding a person from the customer’s contacts to the sale
Build 6.34.234: PRO-4904
In POS Pro, it’s now possible to add a person from the customer’s contacts to the sale.
Purpose
The new feature allows users to link a person from the customer’s People contacts to the Sales Receipt. After finalizing the sale, the linked contact is visible on the receipt in the customer’s purchase history.
This may be useful if the customer is buying a gift and wants to be able to review later who it was purchased for.
Configuration in CHQ
For the Select Person field to be available in POS Pro, make sure that in CHQ under settings > company settings > v6 App Designer > Point of Sale v6 > iPad > Sales Receipt > Customer Tab, the Select Person label is placed under layout.
Also, for the Select Person pop-over dialog to automatically display under Sales Receipt > Customer, under chq > settings > sales > sales documents > the sales section, the prompt for person on add customer checkbox must be selected.
Adding a person to the Sales Receipt
Under Sales Receipt > Customer, once a customer record is added to the sale, it becomes possible to link an additional person record.
To add a person, tap Select in the Select Person field
1
:
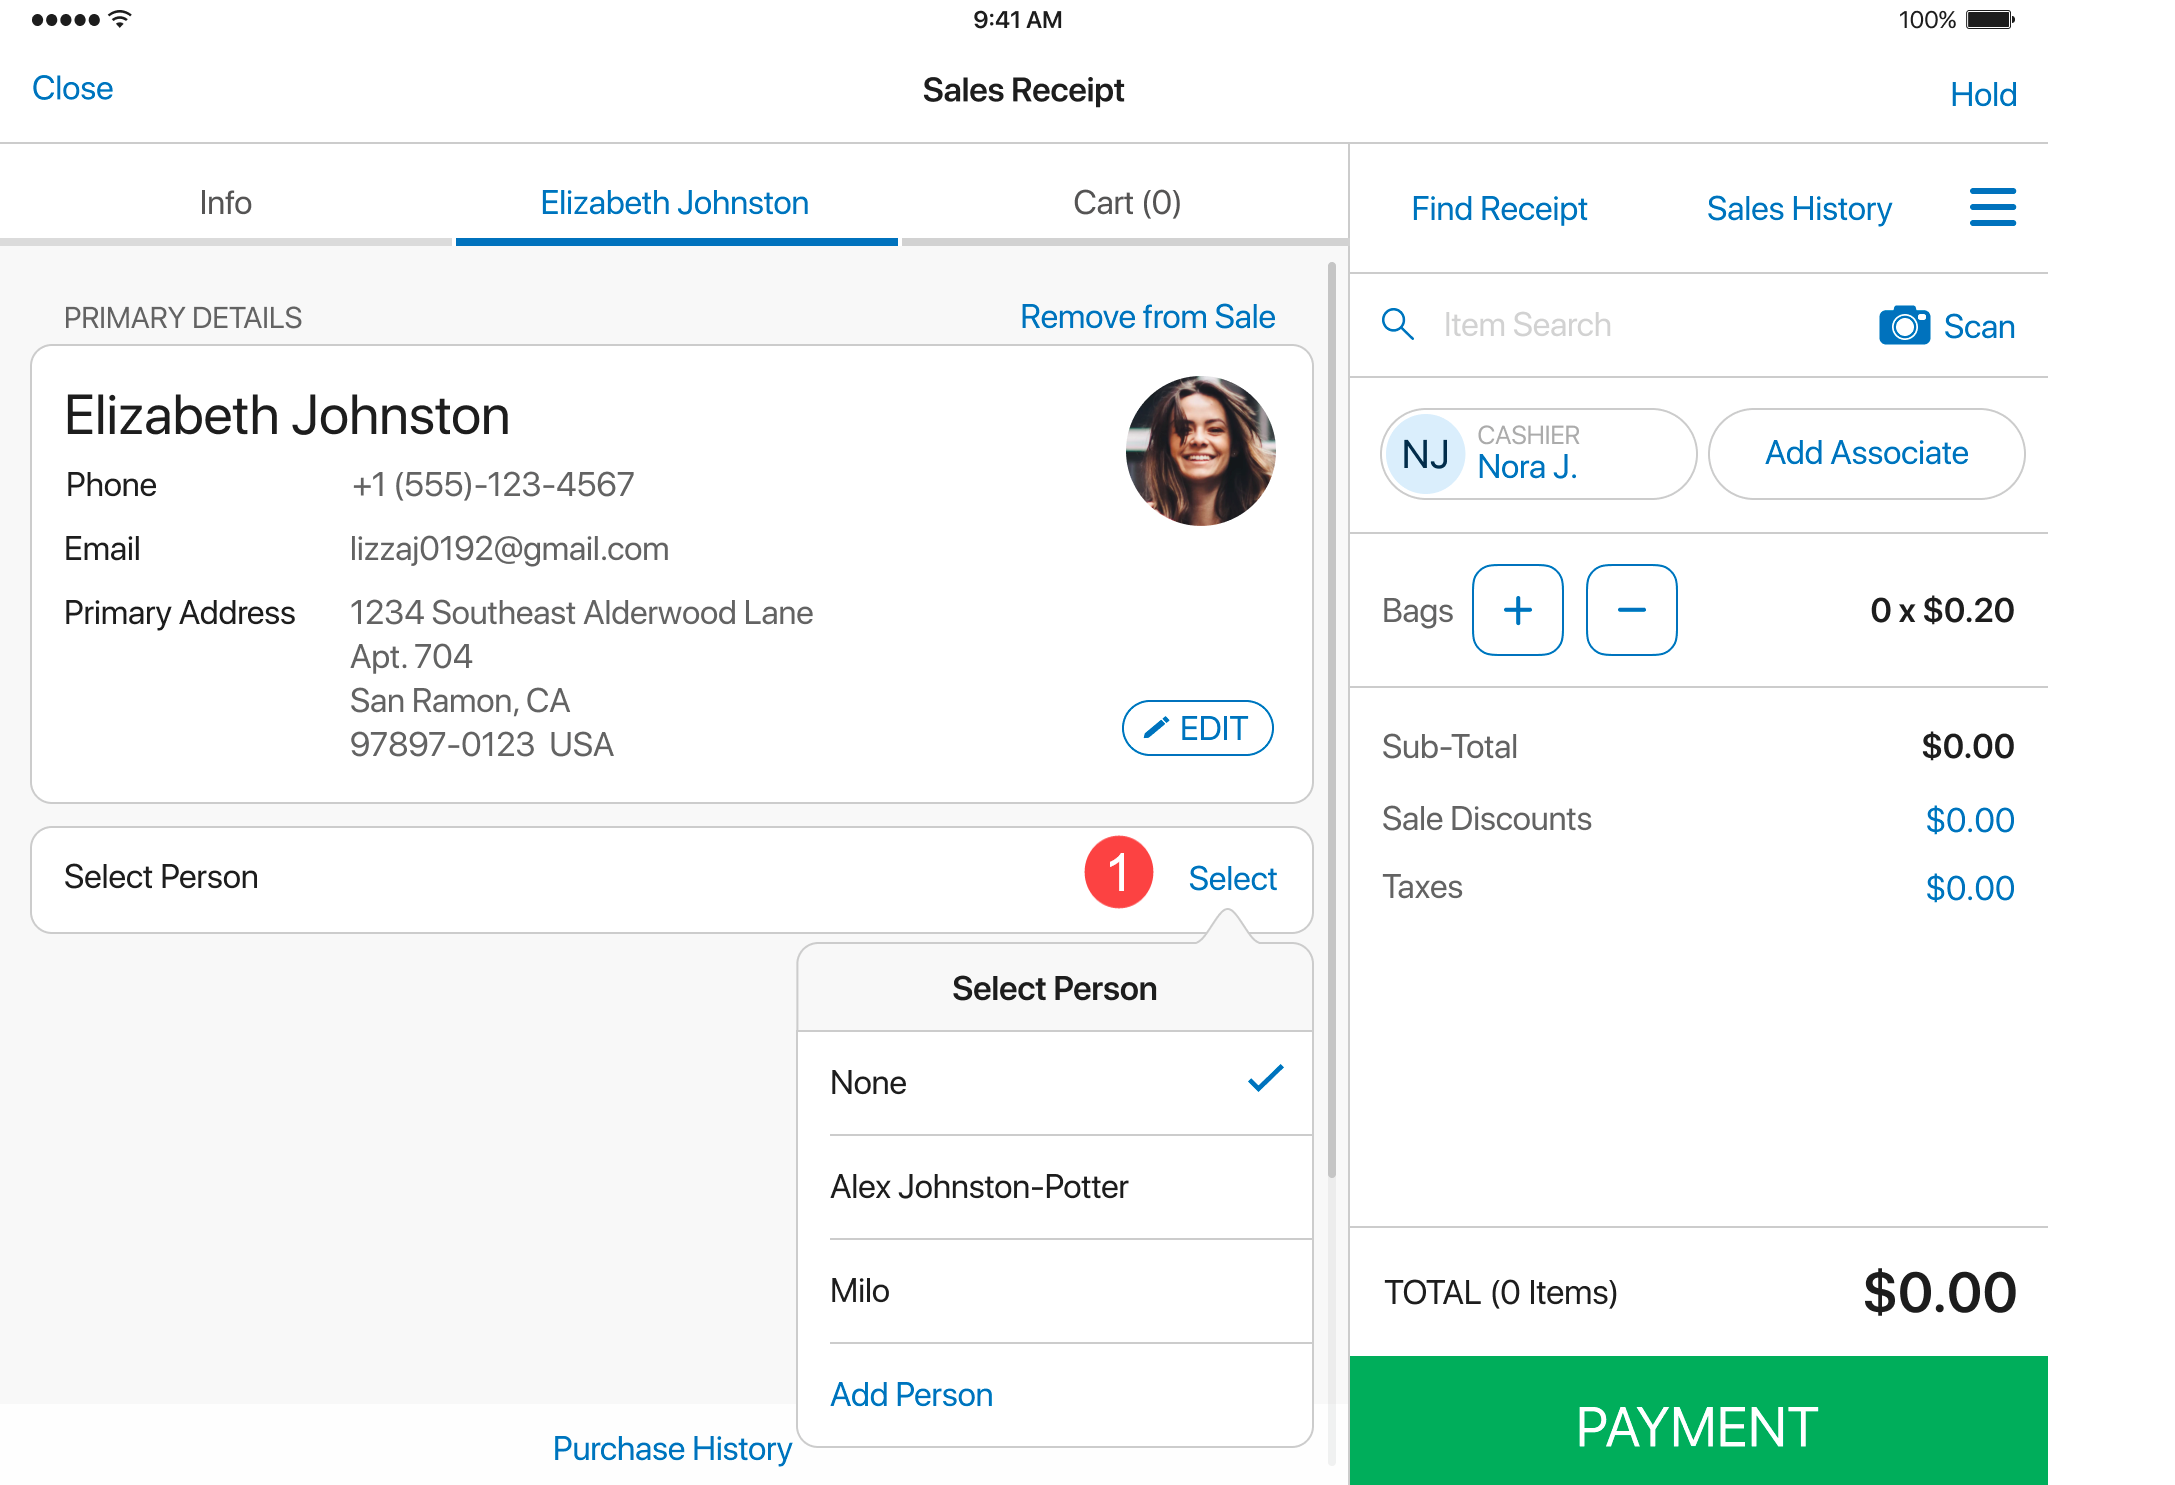
If the prompt for person on add customer checkbox is selected in CHQ under settings > sales > sales documents > the sales section, the Select Person pop-over displays automatically on adding a customer.
- tap None to leave blank and close the dialog
- tap [person name] to add the person from the People section of the customer’s record
- tap Add Person to create a new contact and link it to the receipt. After the sale is finalized, the new contact is saved in the customer’s record
See also
Customer: New Customer Profile Link field
Build 6.34.234: PRO-5442
We’ve made available a new Customer Profile Link field that appears under Customer > [selected customer record] in POS Pro.
Purpose
The Customer Profile Link field contains a link to the webpage with additional customer information.
This may be useful if the retailer uses an external system to store customer information. Now, it is possible to quickly access the web-based customer information from the customer’s record in POS Pro.
Configuration in CHQ
For the Customer Profile Link field to display in POS Pro, it must be configured via v6 App Designer.
In CHQ, make sure that Customer Profile Link is placed under layout in:
settings > company settings > v6 App Designer > Point of Sale v6 > iPad > Customer > Customer Form, and/orsettings > company settings > v6 App Designer > Point of Sale v6 > iPad > Customer > Customer Preview
The Customer Profile Link field in the Customer area
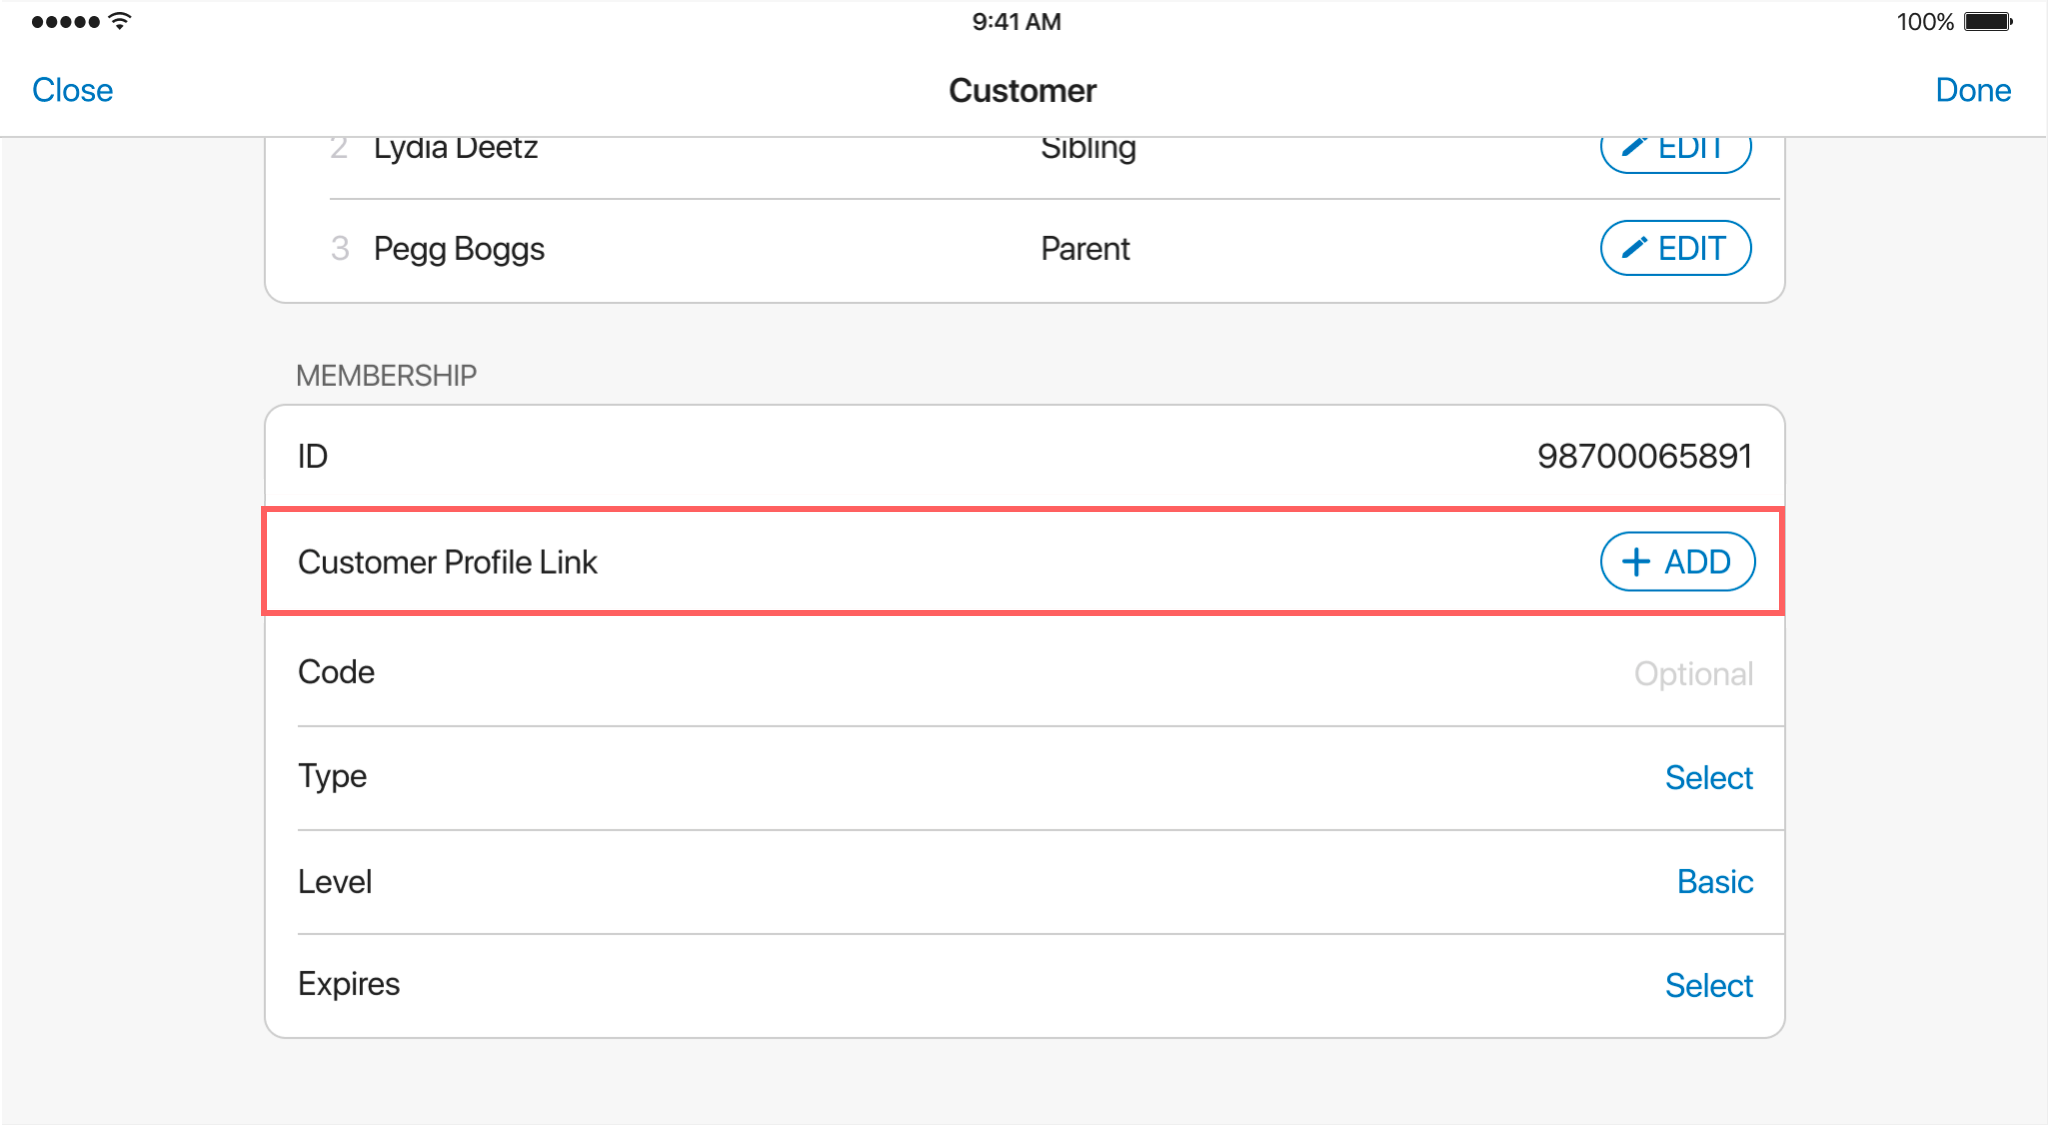
In POS Pro, depending on your custom settings, the Customer Profile Link field can appear:
- in the full customer record under
Customer > [selected customer record] - in the customer preview under
Customer > See More
To add a link to the customer’s webpage, tap ADD in the Customer Profile Link field:
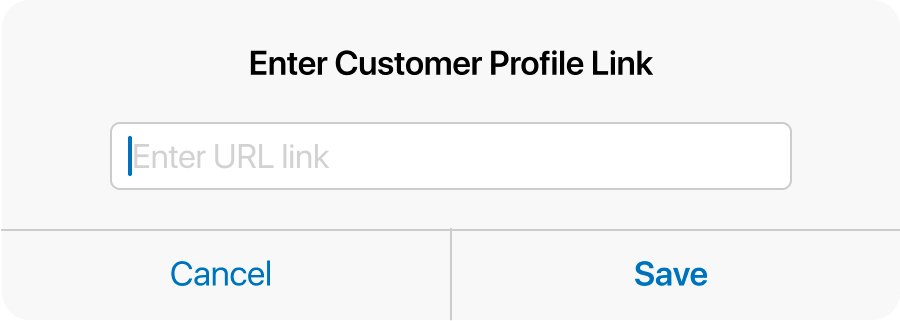
 In the dialog that appears, enter the URL link and then tap Save:
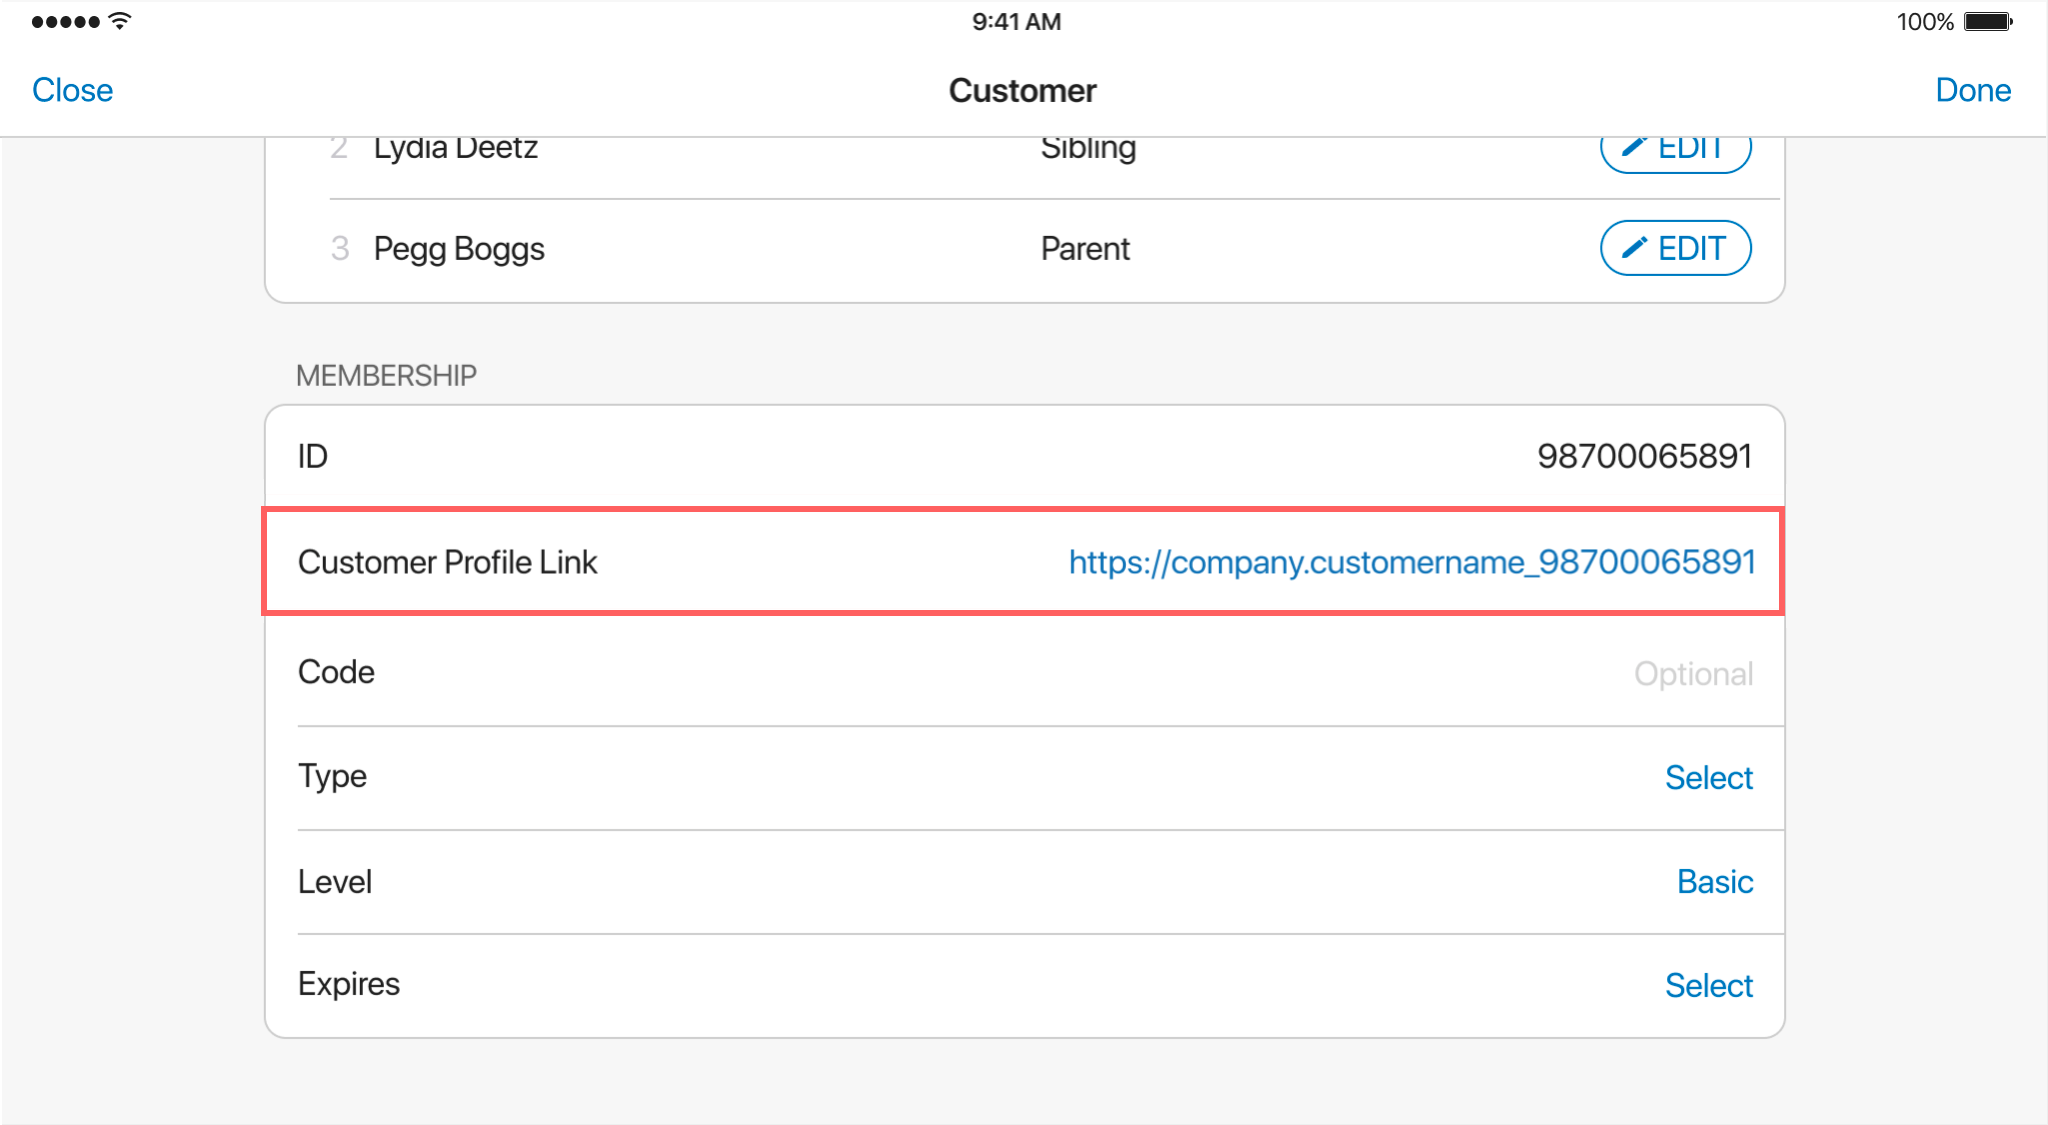
 Once the link is added, it displays in the customer’s record:
 Tapping the link opens the Link Options pop-over from which it’s possible to:
- open the URL
- edit the link
See also
Respecting the company location defined for a price level
Build 6.34.234: PRO-6107
POS Pro now respects the new location setting configured for a price level under chq > settings > inventory / catalog > price levels > [selected price level]. The setting allows users to define a company location for which the prices from that price level should be available.
This update helps optimize the time required for POS Pro initialization and synchronization processes.
Now, if a specific location is defined for a price level, the prices from that price level:
- are not streamed to all the other locations, and
- are not visible in POS Pro for all the other locations
Respecting the regional price level when calculating item prices
Build 6.34.234: PRO-6395
POS Pro now respects the new regional price level setting defined in CHQ under settings > location settings > locations / location settings > [selected location] > details > the details section.
If the regional price level is defined for a location, POS Pro now uses the latter before the company’s base price level for calculation of item prices.
Support of Banorte
Build 6.34.234: PRO-3473
POS Pro now supports credit card payment processing with Banorte.
Configuration in CHQ
In CHQ, the merchant’s credentials for Banorte integration can be defined:
- at the company level under
settings > sales > payment processing >theBanortesection - at the location level under
settings > location settings > locations / location settings > [selected location] > payments >theBanortesection
Also, configuring connection between the POS device and the Banorte terminal is available under services > device controller > [selected device] > app settings > the payment terminal section.
Configuring connection with the Banorte terminal in POS Pro
In POS Pro, to configure connection between your device and the Banorte terminal:
- On the Home Screen, tap More at the bottom-right
1
:

- Tap Settings.
- In the left-side panel, tap Payment Terminals.
- Tap Edit Payment Terminals.
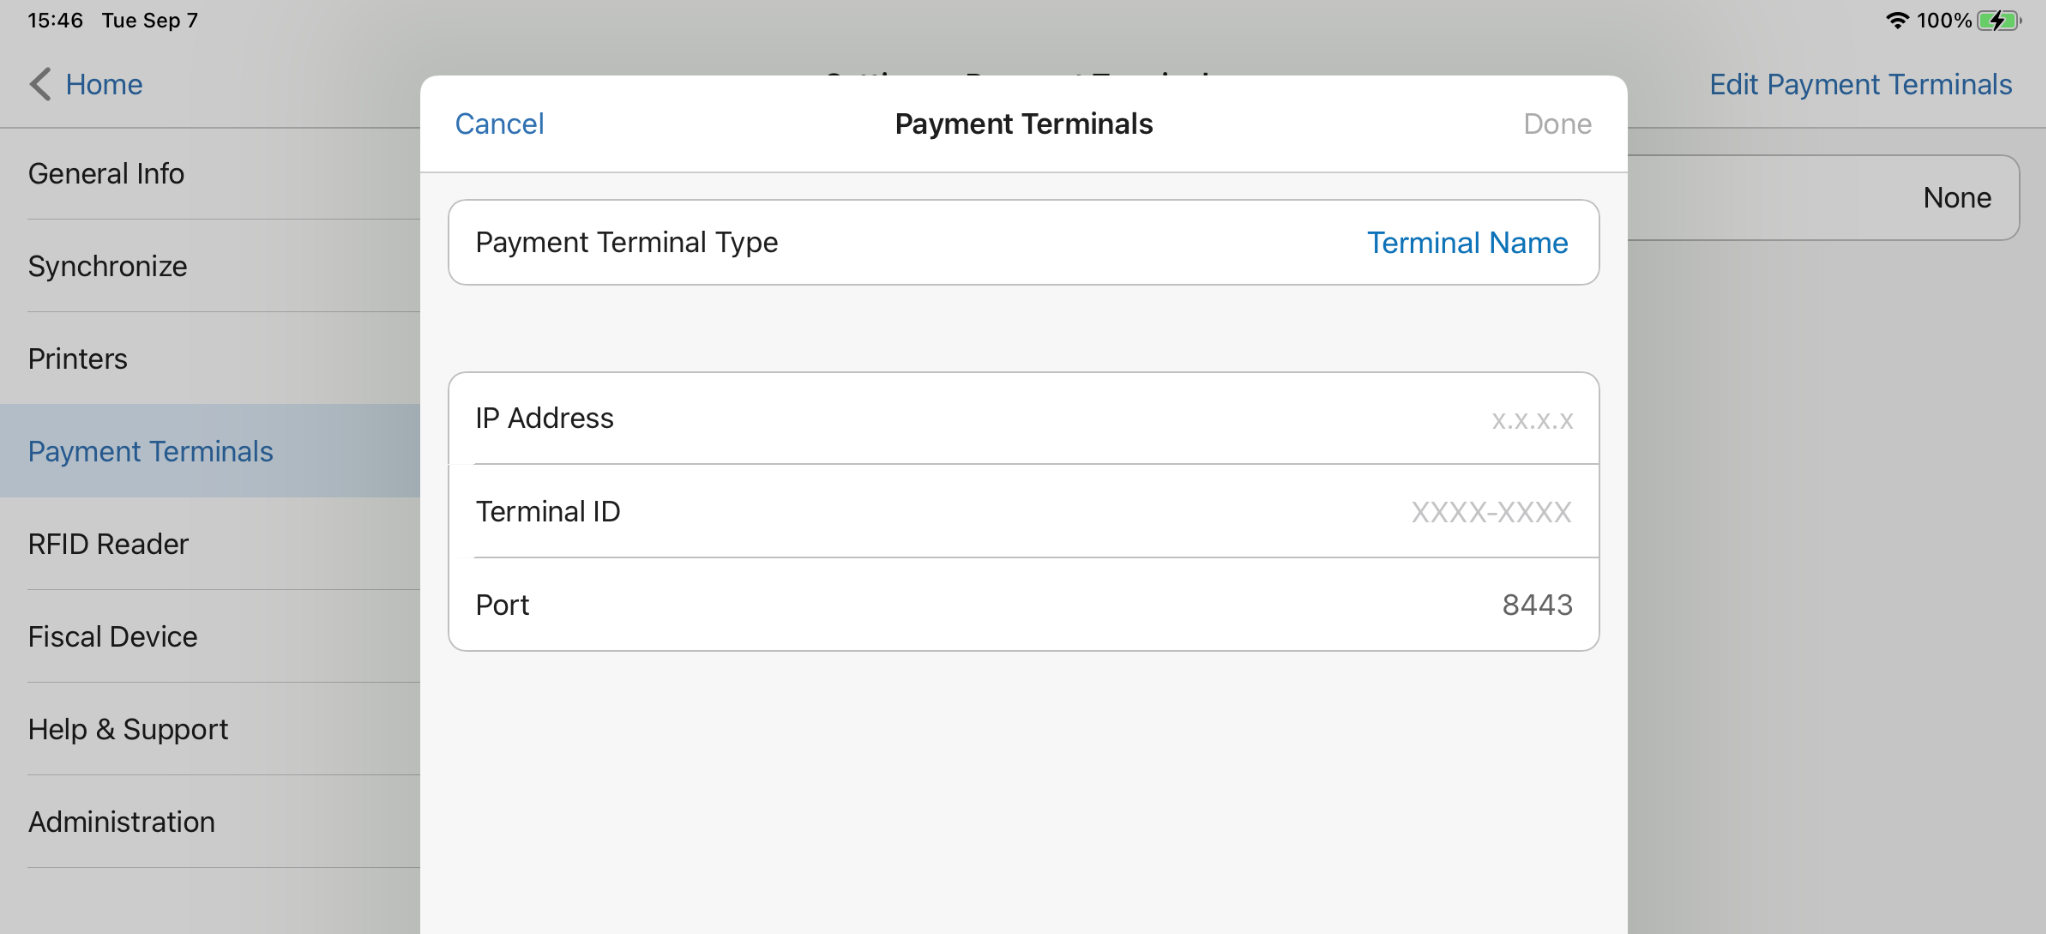
- In the Payment Terminals dialog, in the Payment Terminal Type field, select
Banorte: Then, define the IP Address and Port to connect with your Banorte terminal.
By default, Port is set to
1818. - Tap Done in the upper-right corner.

Configuring tax exemption and tax area for a Sales Receipt
Build 6.34.234: PRO-5556
Users can now define the tax exemption status as well as the tax area of a Sales Receipt for accurate tax calculation.
Configuring the tax exemption status of a Sales Receipt may be necessary when, for example, the customer claims tax exemption on the purchase by providing an appropriate certificate.
Configuration in CHQ
To set a tax area for a company location, under settings > location settings > locations/location settings > [selected location] > details > the details section, define the tax area field. The chosen tax area will appear as default on all POS devices initialized at that location but can be changed by users with appropriate security rights.
Changing the tax exempt status and tax area
To change the exemption status and the tax area of a receipt, when in the Sales Receipt area:
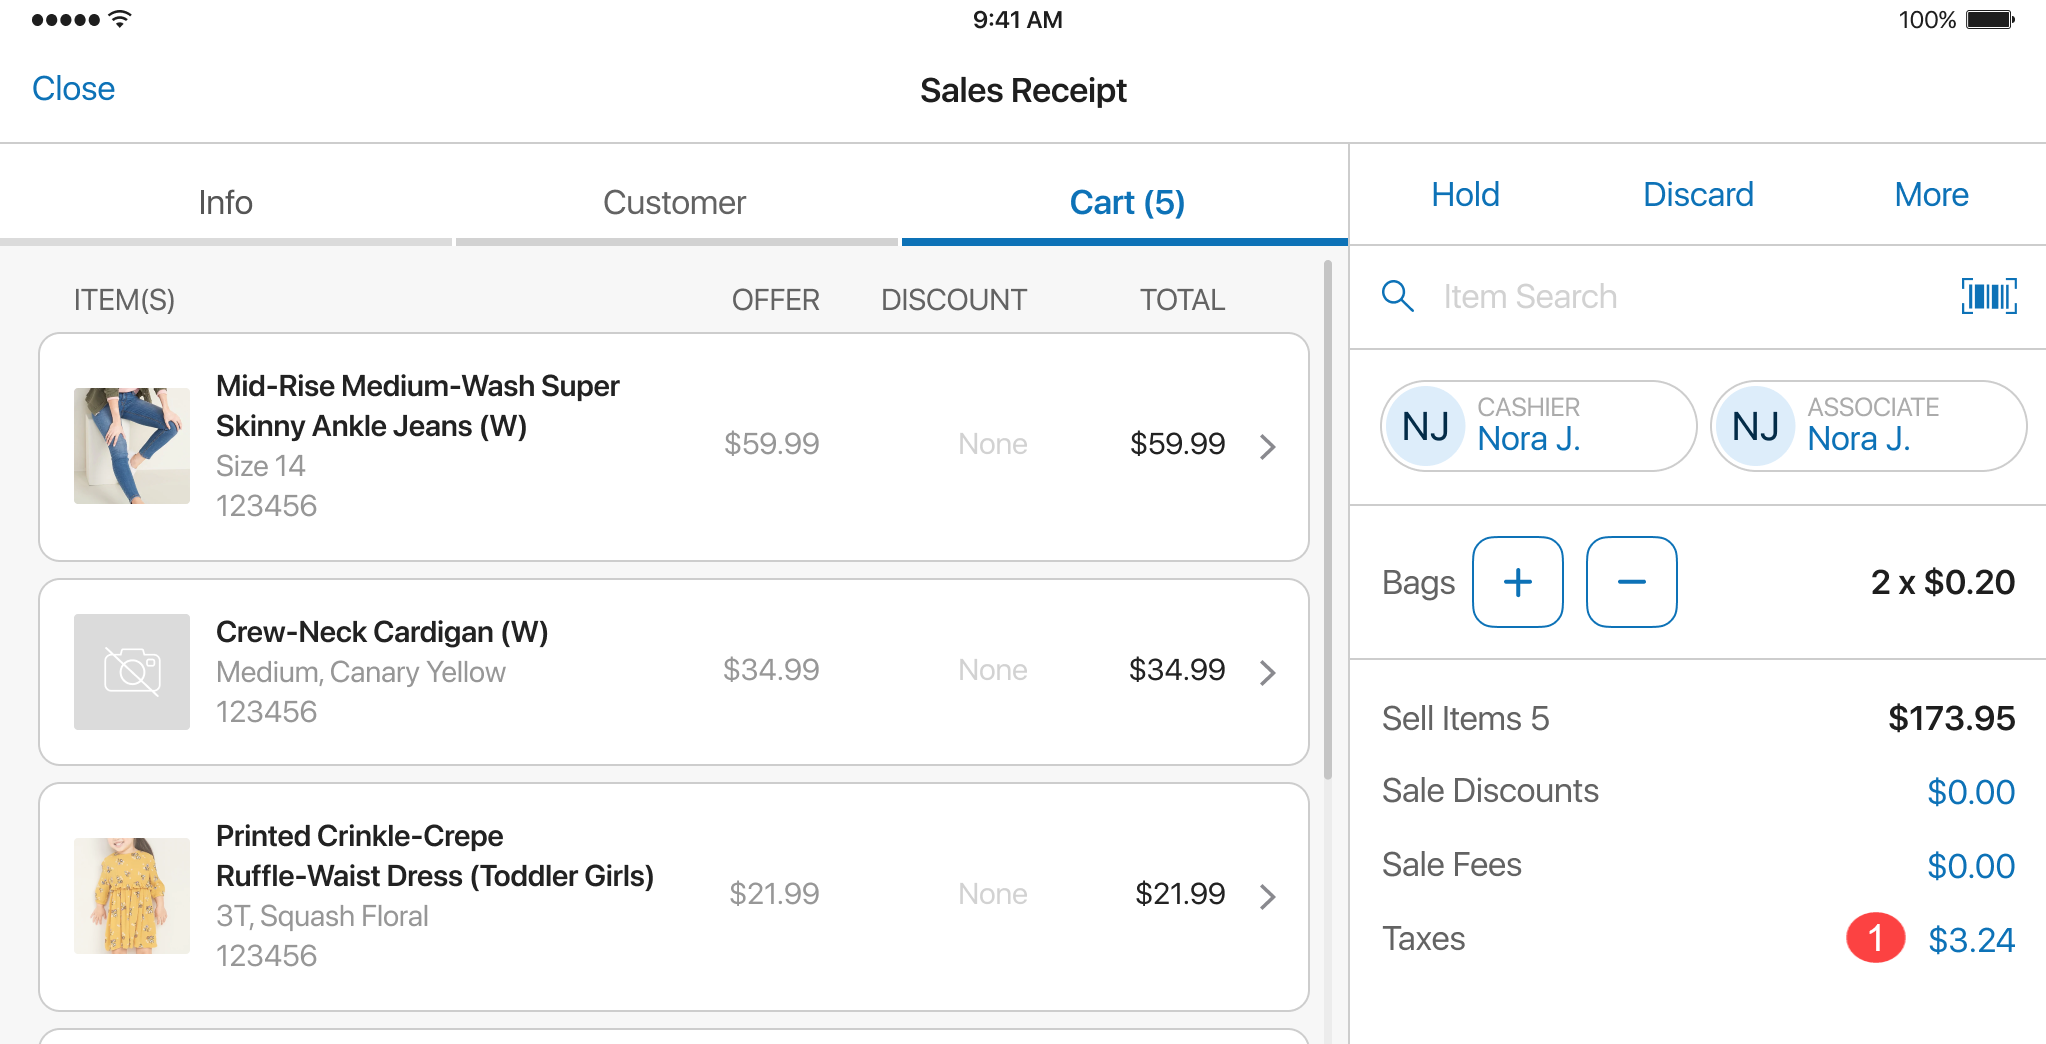
- In the right-side panel, tap the value in the Taxes field
1
:

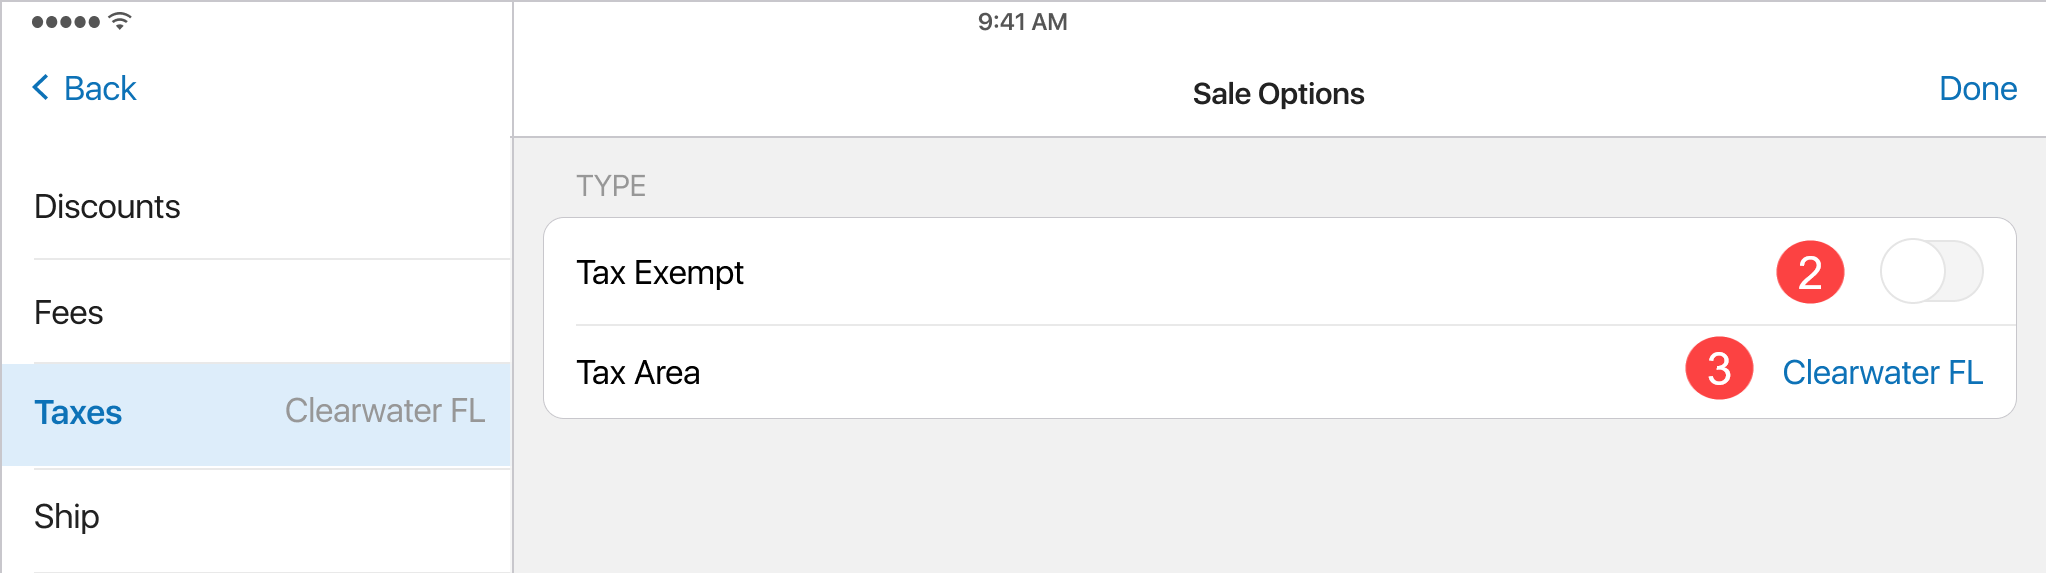
- In the Sale Options area that opens, to define the entire sale as tax exempt, turn on the Tax Exempt switch
2
:
 Please note that to do so, the user must have the Sales – Sales-Chng. Tax Ex. for sales security right.
Additionally, to change the tax area of the receipt, tap the Tax Area field 3 . To do so, the user must have the Sales – Chnge Tax Area for sales security right.If the location’s default tax area (defined under
chq > settings > location settings > locations/location settings > [selected location] > details) is VAT type, in POS Pro, the Tax Area field is not available for configuration.
The type of a tax area is defined when the area is created underchq > settings > company settings > taxes > tax areas. - Tap Done in the upper right corner.
Standard user interface for integrated payment processors
Build 6.34.234: PRO-6785
We’re introducing a standardized user interface for interacting with credit card payment processors in POS Pro V6.
Purpose
This update allows users to interact with integrated payment processors via a standardized workflow in POS Pro. This eliminates the need for special training when using several integrations in the retailer’s environment at the same time. It also may help reduce the possibility of human error.
In particular, the following processes are now similar for all integrated payment processors:
- accepting and processing a payment
- voiding a payment
- voiding/reversing a Sales Receipt
- making a refund to a credit card during a Verified Return
- reviewing completed payments during the End of Day process
Configuration in CHQ
For a payment processor to be available in POS Pro, in CHQ, the following is required:
- at the company level, the payment processor must be configured under
settings > sales > payment processing - at the location level, the payment processor must be configured under
settings > location settings > locations / location settings > [selected location] > payments - a payment method must be set up for the payment processor under
settings > sales > payment methodsand configured for the required location(s) undersettings > sales > payment methods > location settings > [selected location] - for payment processors that require a payment terminal, the terminal connection must be configured under
services > device controller > [selected device] > payment terminalor on the corresponding POS device (see Configuration in POS)
Configuration in POS
If the payment processor requires a connected terminal, in POS Pro, the connection can be configured under Settings > Payment Terminals > Edit Payment Terminals:
Accepting a payment
To take a payment with a payment processor, in POS Pro:
-
On the Home Screen, tap New Sale.
-
Add a customer and items to the sale.
-
Tap PAYMENT at the bottom-right.
-
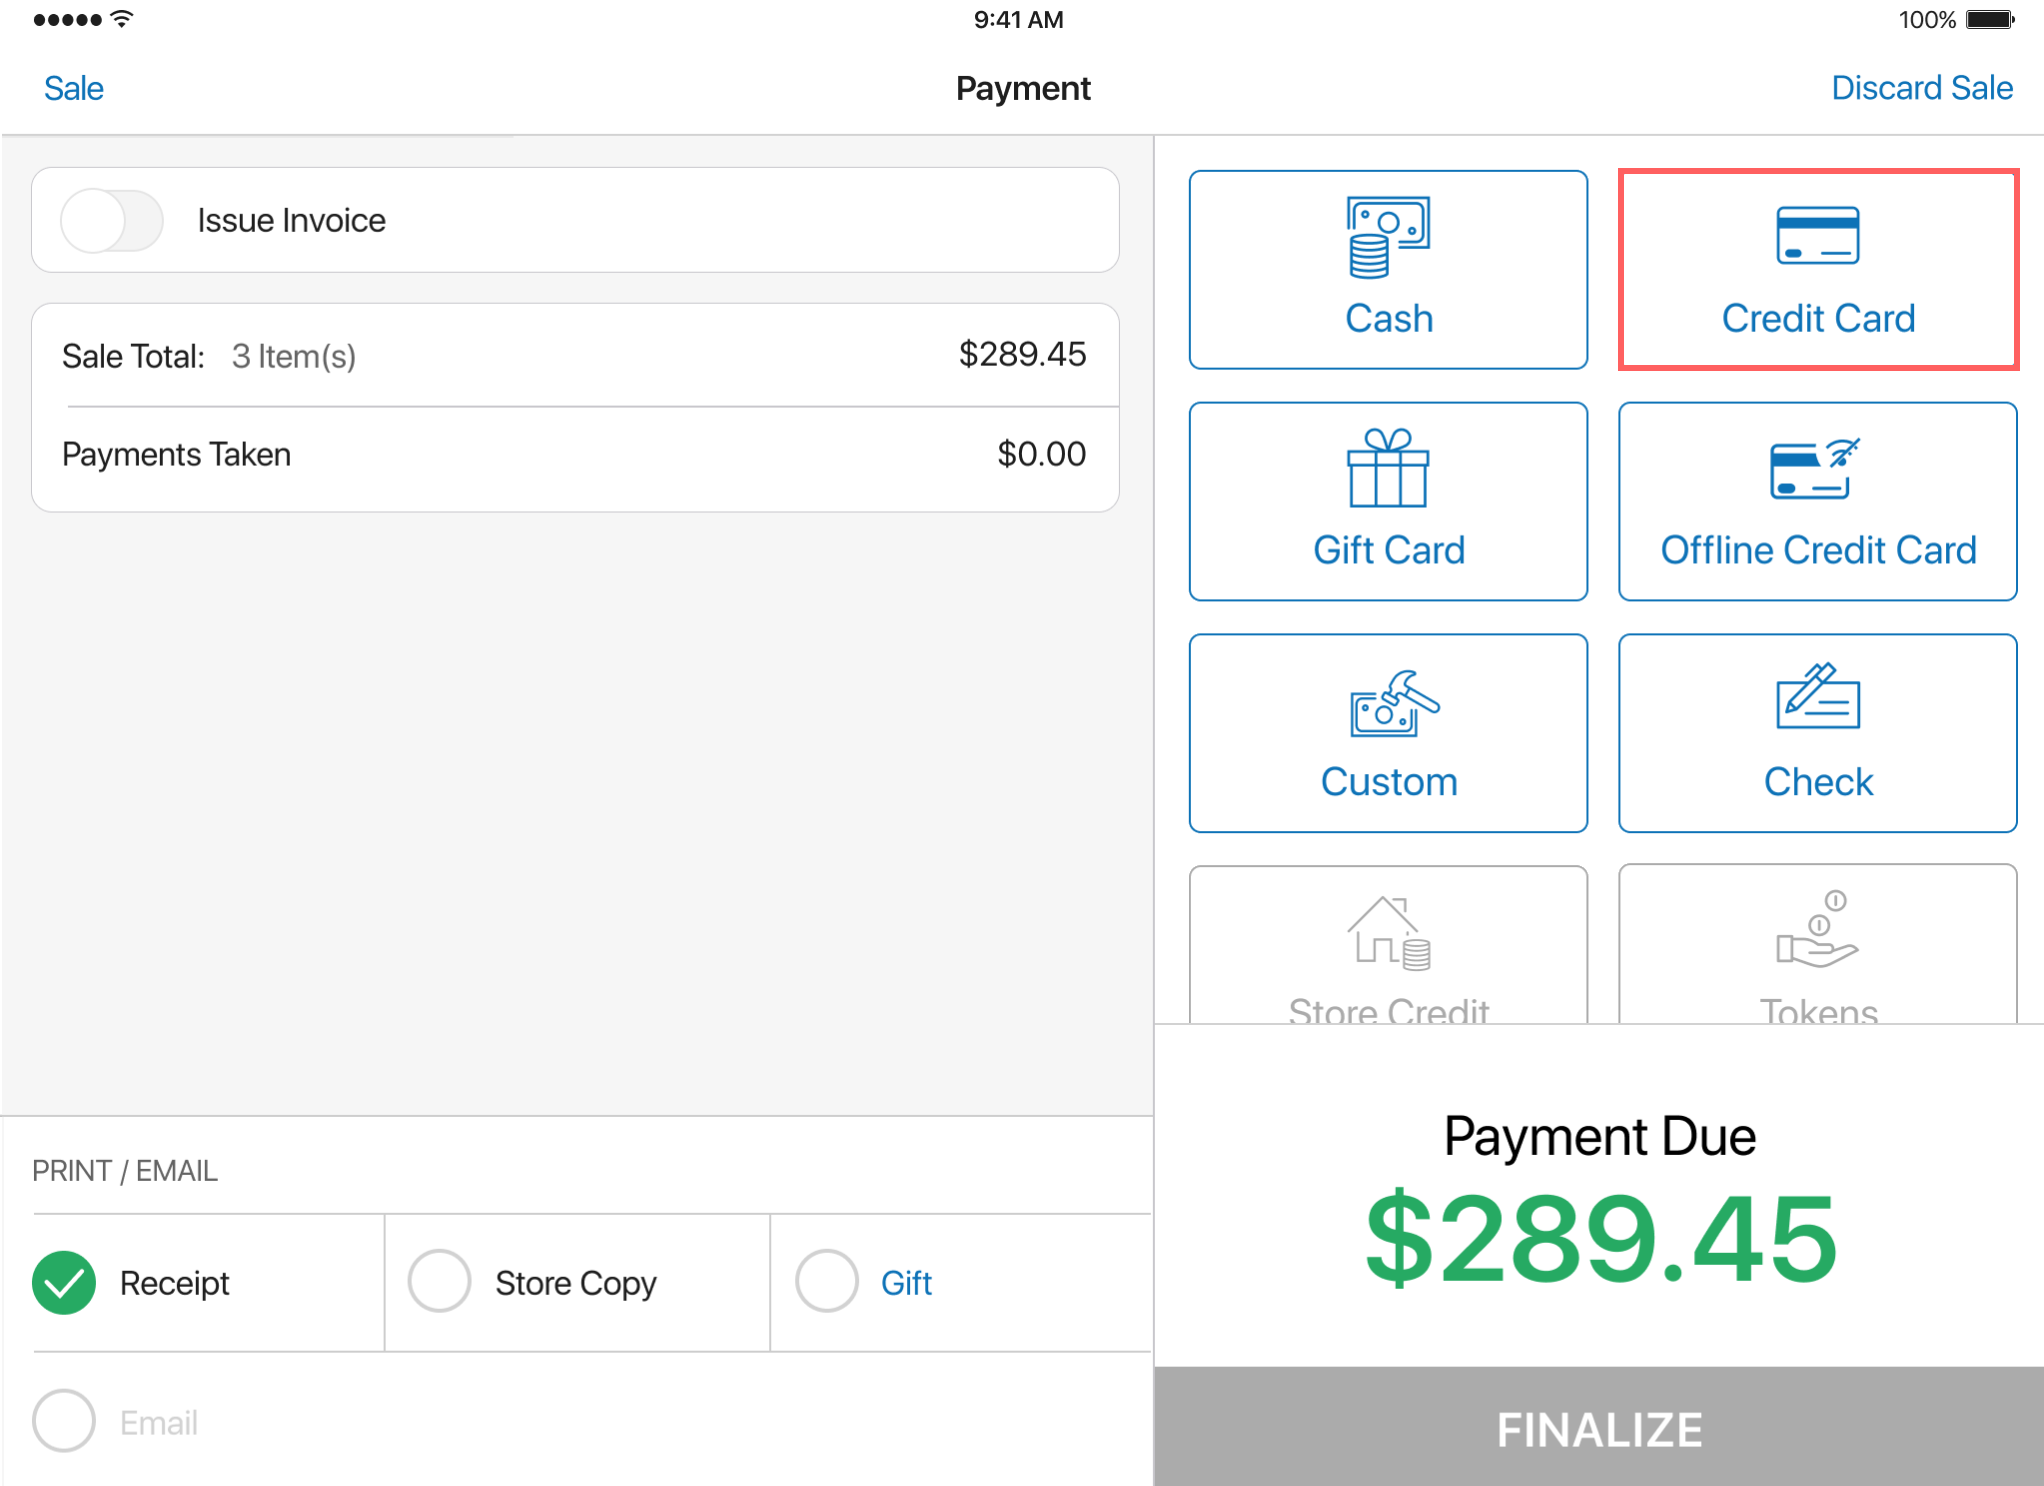
In the Payment area, in the right-side panel, tap the payment method associated with the required payment processor:

To define how a payment method is called in POS Pro, in CHQ under
settings > sales > payment methods > [selected payment method], define the code field. -
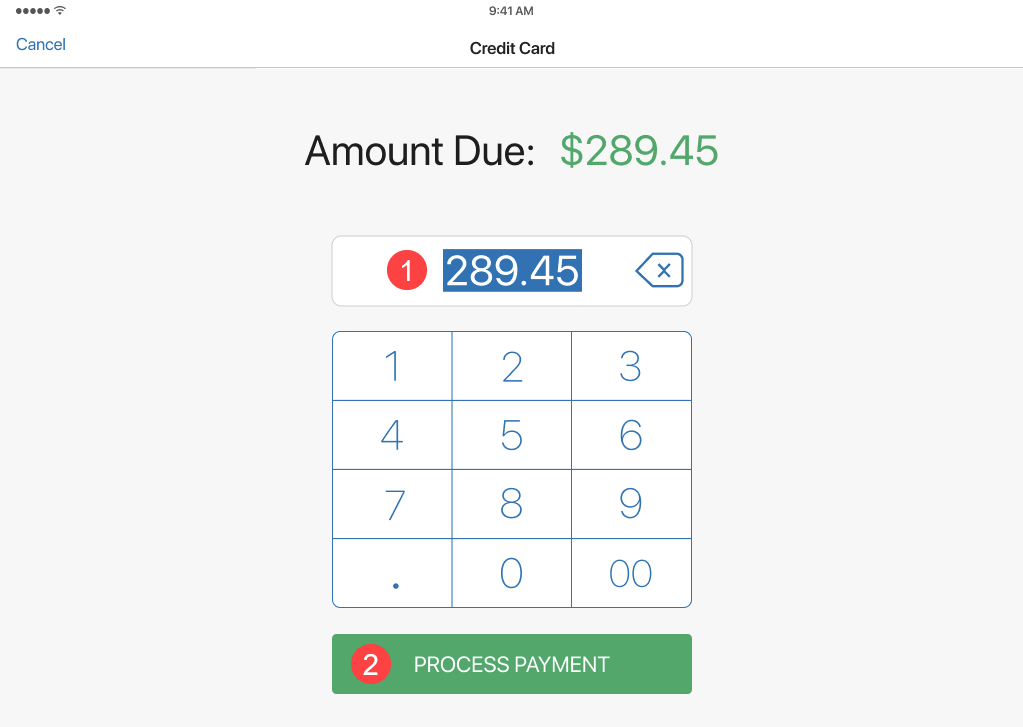
In the area that opens, set the required payment amount 1 and then tap PROCESS PAYMENT 2 :

The payment amount is automatically suggested if in CHQ under
settings > sales > payment methods > location settings > [selected location], the suggested amt. when positive checkbox is selected. -
When the
Waiting for terminal...message appears, have the customer swipe, insert, or touch the terminal with their card as required:
-
Once the approval is received from the payment processor, the
Approvedicon appears: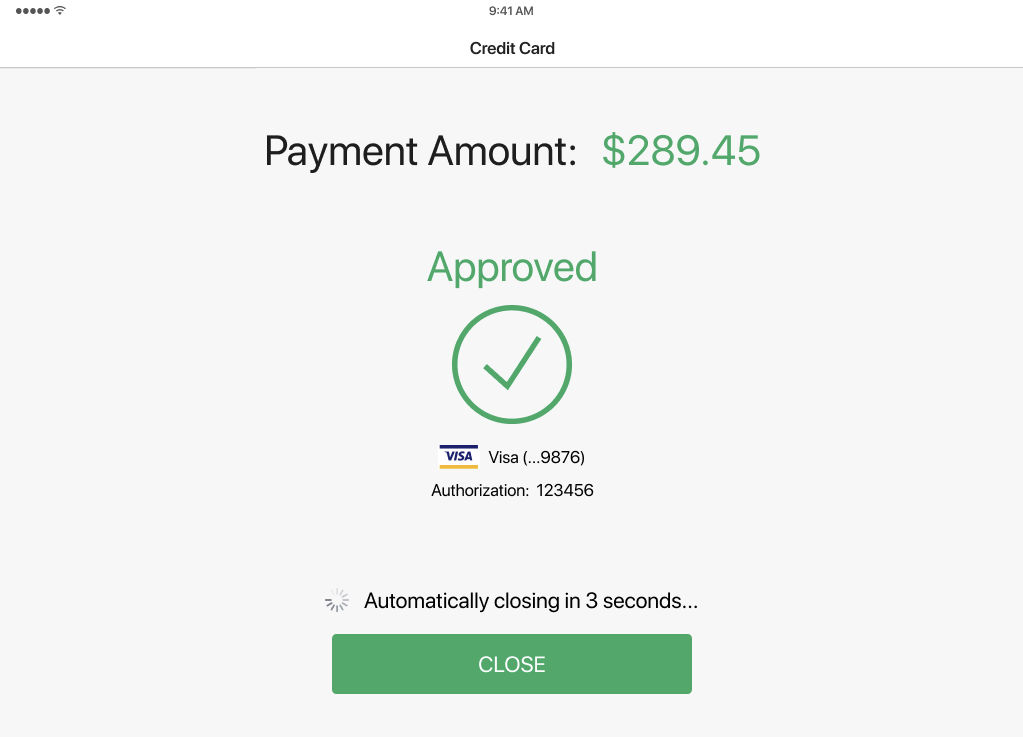 To return to the Payment area, tap CLOSE at the bottom. Otherwise, you will be returned automatically in three seconds.
 -
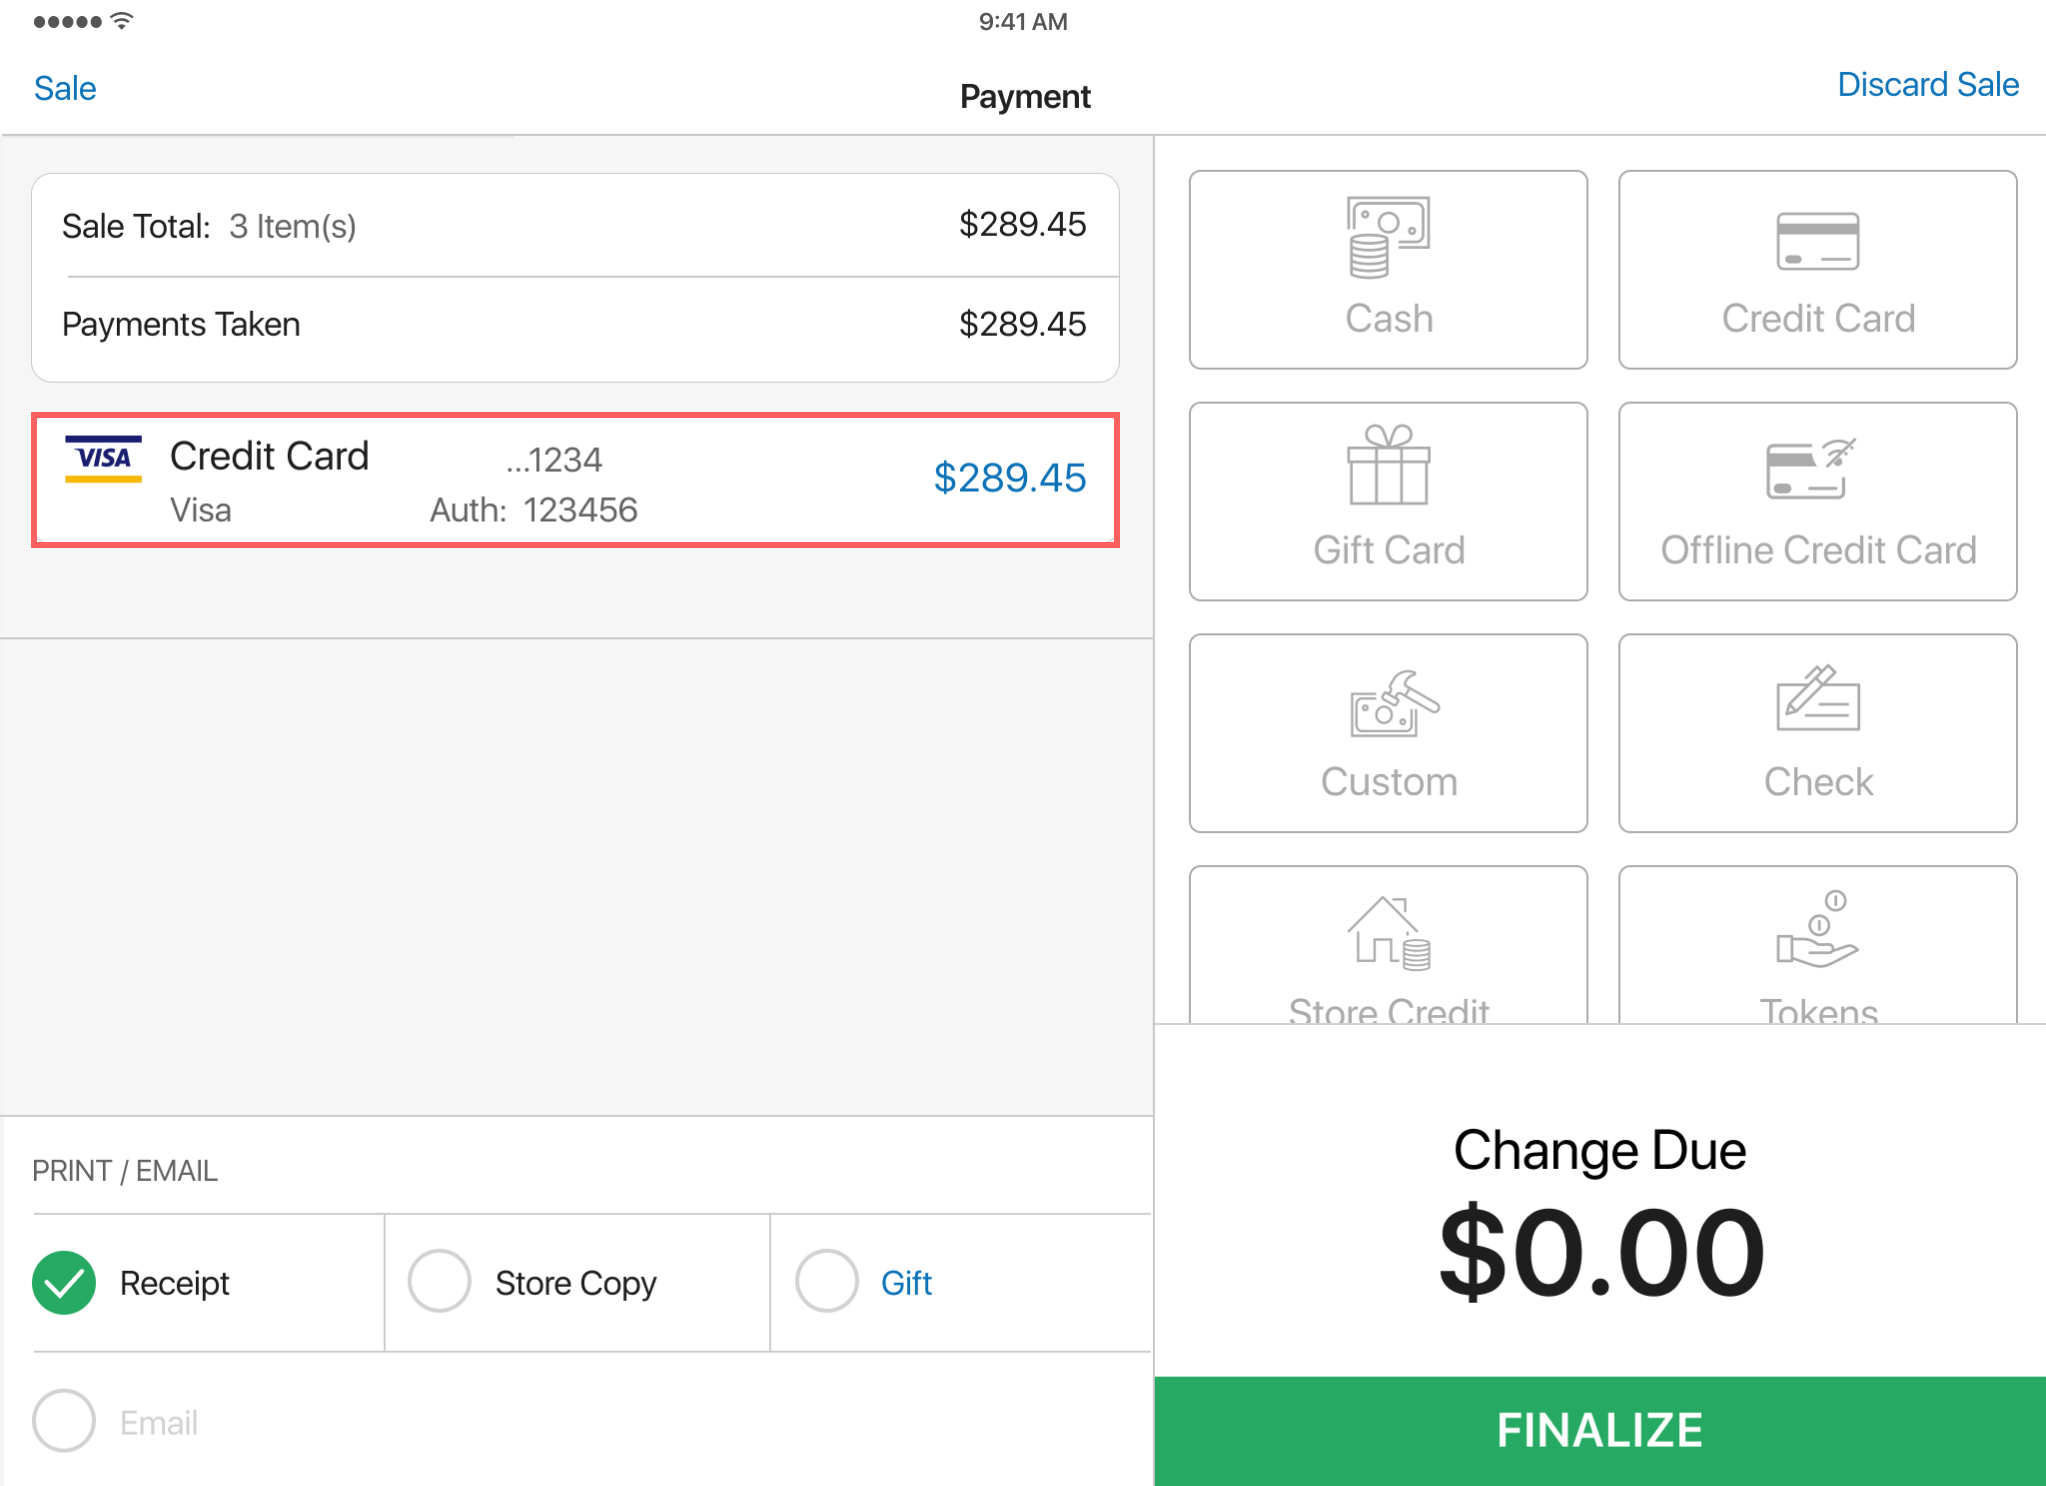
Back in the Payment area, the taken payment appears on the left:
 On swiping the payment left, the following options become available:
- View: see payment details
- Void: void the payment (see Voiding a payment)
-
Tap FINALIZE at the bottom-right.


Voiding a payment
In POS Pro, it’s possible to void a payment when the user is still within the same Sales Receipt.
To do so, under Sales Receipt > Payment:
- Swipe left the required payment:
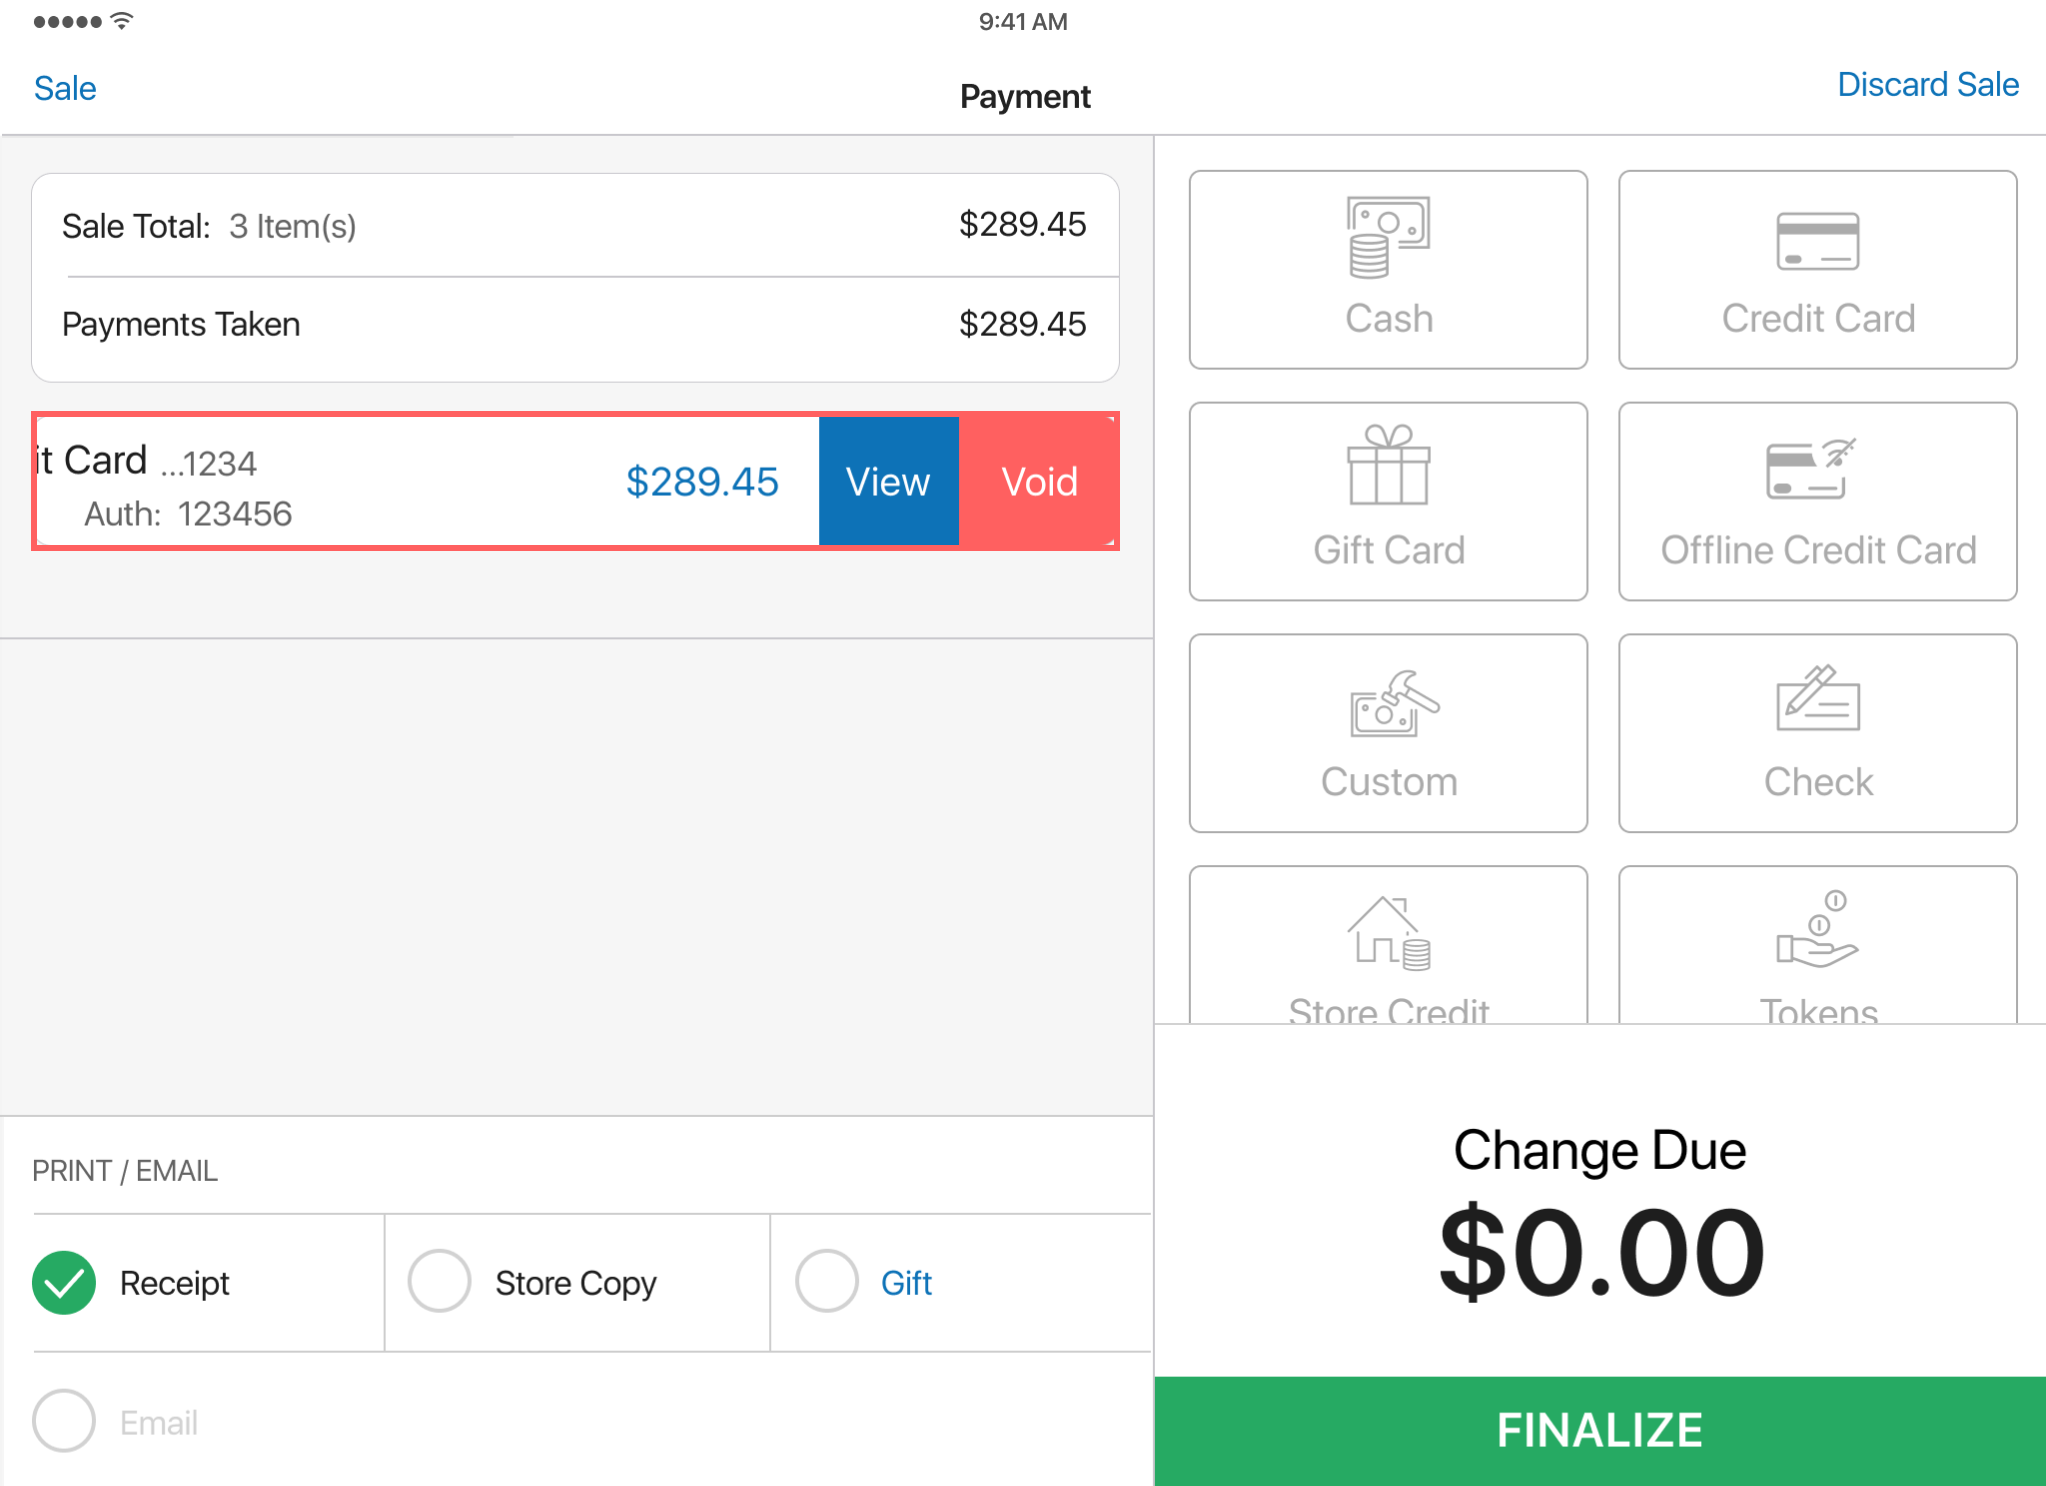
- Tap Void.
- In the confirmation dialog, tap Yes. After tapping, the Voiding Payment screen appears:
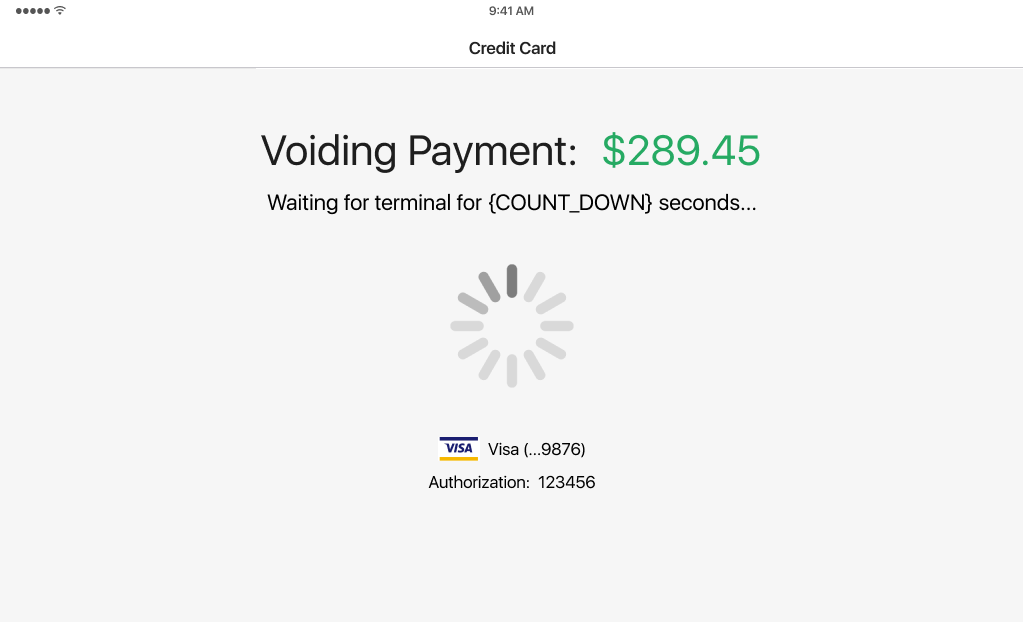
- Once the
Void Successfulicon appears, tap CLOSE at the bottom to return to the Payment area:


Voiding/reversing Sales Receipts
POS Pro allows for voiding and reversing finalized Sales Receipts.
For details, see Voiding/reversing Sales Receipts.
Verified Return: Refunding a single or multiple credit cards
POS Pro allows users to make refunds to customers' credit cards when performing a Verified Return of merchandise.
For details on how to do so, see V6.33 Mobile Release Guide.
Reviewing payments during End of Day
Users can review payments associated with a certain payment processor during the End of Day process.
To do so, under Drawer Memo > End of Day > PAYMENTS, in the left-side panel, tap the section with the required payment method:
 For each payment method, the following tabs are available for reviewing:
- Summary: totals of payments and returns made with that payment method
- Transactions: details of each transaction
- Detached: payments without an associated Sales Receipt in Teamwork. Please note that reviewing detached payments may not be available for some payment processors
See also
- V6.33 Mobile Release Guide
- Mobile Quick Reference Guides
- Adyen credit card processing and troubleshooting in Teamwork Confluence
Integration with Clover
Build 6.34.234: PRO-6785
Starting from version 6.34, integration with the Clover payment processing platform is available in Teamwork Commerce Pro Suite.
It’s now possible to use Clover payment terminals in conjunction with POS Pro to:
- take credit card payments
- make refunds
- void payments
To make Clover available as a payment processor for a company location, in CHQ:
- Go to
settings > sales > payment methods. - Click [your Clover payment method] and then click location settings.
- Double click [your location].
- In the payment processing field, choose
Clover. - Make sure that the visible checkbox is selected.
- Click save twice.
In POS Pro, setting up connection with a Clover payment terminal is possible under Settings > Payment Terminals > Edit Payment Terminals.
Updated Gift Card functionality: Unified processing and support of GiveX
Build 6.34.234: PRO-6318
As of version 6.34 of the software, Teamwork Commerce Pro Suite can support multiple gift card types. This becomes possible via introducing a unified approach to gift card processing.
Also, as a part of this update, in addition to existing Teamwork’s native gift card functionality, we have added integration with the GiveX gift card payment processor.
Purpose
Teamwork native gift cards can now be used along with GiveX gift cards on the same Sales Receipt.
Aligned user interaction
Teamwork and GiveX gift cards will perform with the same user interaction at the mobile level. In POS, it’s just required to select what kind of gift card it is on a payment method. The respective gift card type is then passed to CHQ, and CHQ processes that gift card type accordingly.
Aligned redemption
Teamwork native as well as GiveX gift cards are redeemed in exactly the same way:
-
POS requests a charge amount (for example, $50).
-
If the gift card has the amount requested on the card, the transaction is approved.
-
If the gift card has less than the amount requested, the payment is still approved, but only for the balance remaining on the card (forced redemption).
The payment method is then updated to record the reduced amount as the payment. The remaining sum is captured via a different payment method. -
If the gift card has a zero balance, the payment is rejected.
The update aims at reducing the time required to administer gift card payments.
GiveX features
With this update, it is only possible to redeem GiveX gift cards.
Please be advised that the following functionality is currently NOT supported for GiveX and will be addressed in future versions:
- selling new
- issuing change back to
- reloading the balance of
- refunding to a gift card
Configuration in CHQ
To be able to make use of the integration with GiveX, the respective payment method as well as payment processing settings must be configured in CHQ. For information on how to do so, see Configuring integration with Givex in CHQ Version 6.34 Release Guide.
Taking payments
In Teamwork Commerce POS Pro V6:
-
On the Home Screen, tap New Sale.
-
In the Sales Receipt area, tap Payment.
-
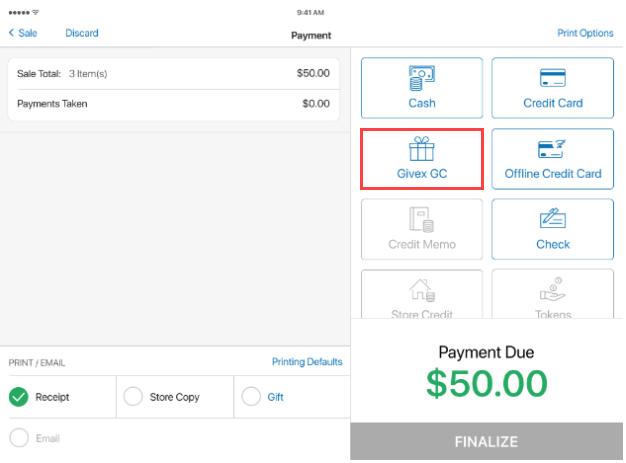
In the Payment area, on the right, select the required gift card payment method, for example,
GiveX.
-
In the area that opens, enter the required amount and then tap ENTER GIFT CARD at the bottom.
-
Scan in your customer’s Gift Card or enter the gift card’s number manually. On scanning/entering a number, POS Pro requests approval of the charge from CHQ.
If the payment is approved, the following dialog displays: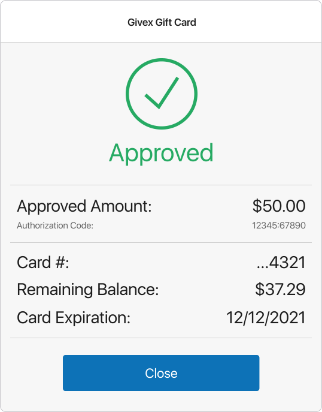
- Approved Amount: the amount of the payment approved, may be less than the requested amount
- Authorization Code: the authorization code that is returned
- Card #: the last four digits of the gift card number (in case of GiveX); for TW native gift cards, masking settings are configured in CHQ
- Remaining Balance: the card’s balance after the approved charge is removed
- Card Expiration: the expiration date returned with the approval

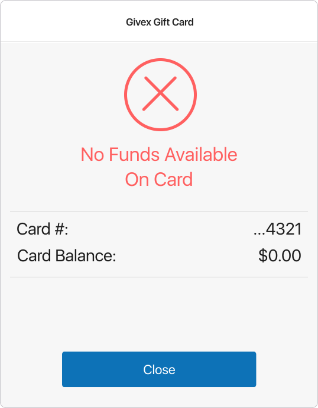
If POS Pro receives a response that the gift card balance is zero, the No Funds Available on Card message displays:
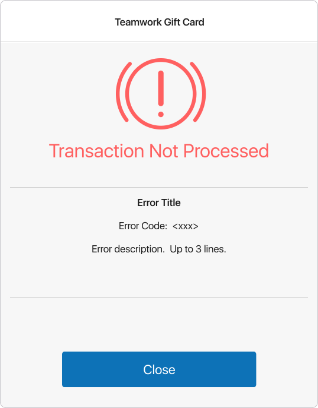
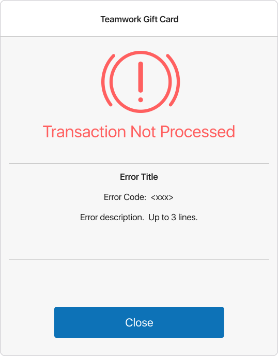
 If POS Pro receives any error, other than insufficient balance, the
 Transaction Not Processed message displays:
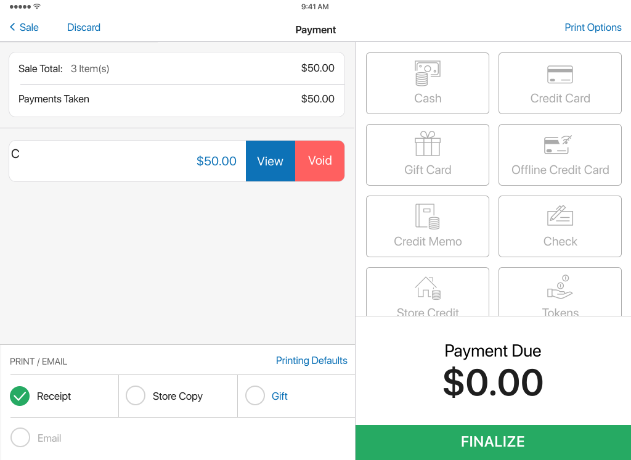
Issuing change due
Issuing change is allowed for Teamwork native gift cards. For GiveX gift cards, issuing change is currently not supported.
For Teamwork native gift cards, if change is due, the payment amount displays first:
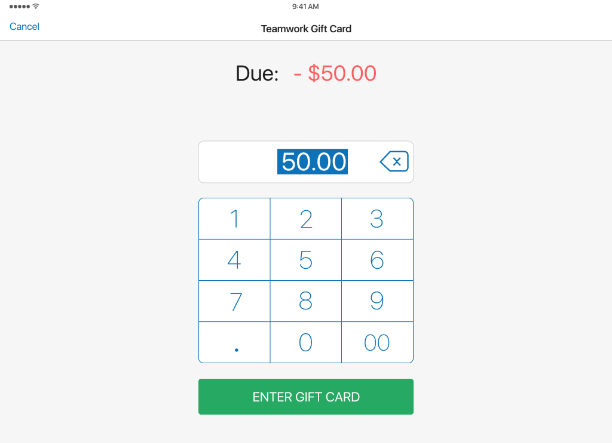 Tapping ENTER GIFT CARD opens the dialog to scan/enter the gift card number. On scanning/entering a number, POS requests approval from CHQ to load the value to the gift card.
If the amount is successfully approved and loaded onto the card, the Approved dialog displays:
 If the value cannot be loaded to the card, the
 Transaction Not Processed dialog displays:
Voiding/Reversing GiveX payments
Gift card payments happen in real-time, when the payment processor is contacted by POS to authorize the payment.
The user can void the gift card payment only before the Sales Receipt is finalized.
Voiding a payment is available via the left-swipe on the Payment tab:
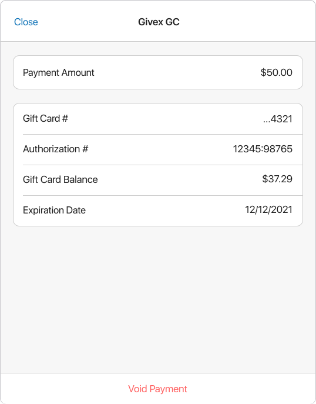
 Also it is possible to tap Void Payment at the bottom of the payment details dialog:
Void/Reverse is unavailable for finalized Sales Receipts selling a gift card or containing gift card payments.
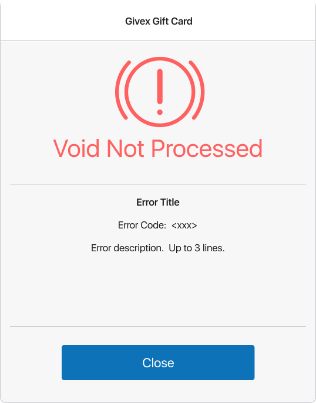
 In case of an error, the
 Void Not Processed message displays:
If the void cannot be processed and POS does not receive confirmation that the void was approved, the payment is not removed from the Sales Receipt. The user has a few choices in this case:
- To force close the app and then to restart. In this case, the user is responsible for contacting the processor (Givex or Teamwork CHQ) to have the payment voided manually.
- Complete the Sales Receipt, then perform a return and refund the customer as per company policy.
Additionally, if a payment is approved and the application crashes, or the user force closes the application, no detached payment processing/auto-voiding on app restart or during EOD is performed. It is the user’s responsibility to recognize this situation and contact the processor to void the payment manually.
Drawer Memo: EOD for GiveX payments
We’ve added a new [Givex GC] tab under the PAYMENTS section of End of Day:
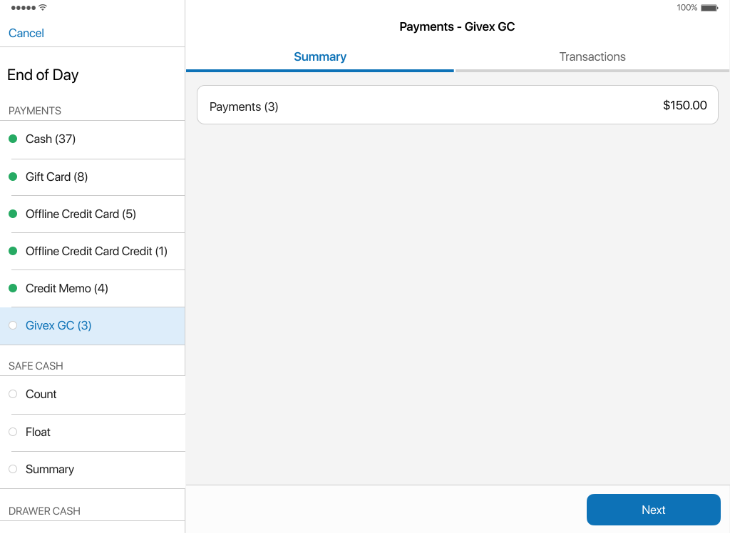
Please note that the name of the tab is based on the name of the respective payment method. The name of the payment method is defined in CHQ under settings > sales > payment methods > [selected payment method] in the code field.
- Summary: displays the number of payments and the total amount
- Transactions: displays information on every GiveX transaction taken, including transaction number, date/time, amount, and the last four digits of the gift card number
See also
Integration with Fortress
Build 6.34.234: PRO-6756
Starting from version 6.34, we’ve made available integration with Fortress.
With this update, it is now possible to:
- accept payments with Fortress gift cards (GCs)
- void Fortress payments before the Sales Receipt is finalized
- return money to Fortress GCs via an Open or Verified Return
- review Fortress payments during the End of Day process
Configuration in CHQ
To make Fortress payments available in POS Pro, in CHQ, the following is required:
- Fortress integration must be configured under
settings > sales > payment processing(company level) orsettings > location settings > locations / location settings > [selected location] > payments >thepayment processing - fortresssection (location level)If all the location-level settings are configured, they are automatically used instead of the company-level settings.
Clients upgrading from Version 4 can use the same URL, Username, and Password already set up for Fortress.
- under
settings > sales > payment methods, a Gift Card payment method must be set up - under
settings > sales > payment methods > location settings > [selected location], in the payment processing field,Fortressmust be selected
Accepting a Fortress GC payment
To accept a Fortress Gift Card payment, in POS Pro:
-
On the Home Screen, tap New Sale.
-
Add a customer and items to the sale.
-
Tap PAYMENT at the bottom-right.
-
In the right-side panel, tap [Fortress GC payment]:

To define how a payment method is called in POS Pro, in CHQ under
settings > sales > payment methods > [selected payment method], define the code field. -
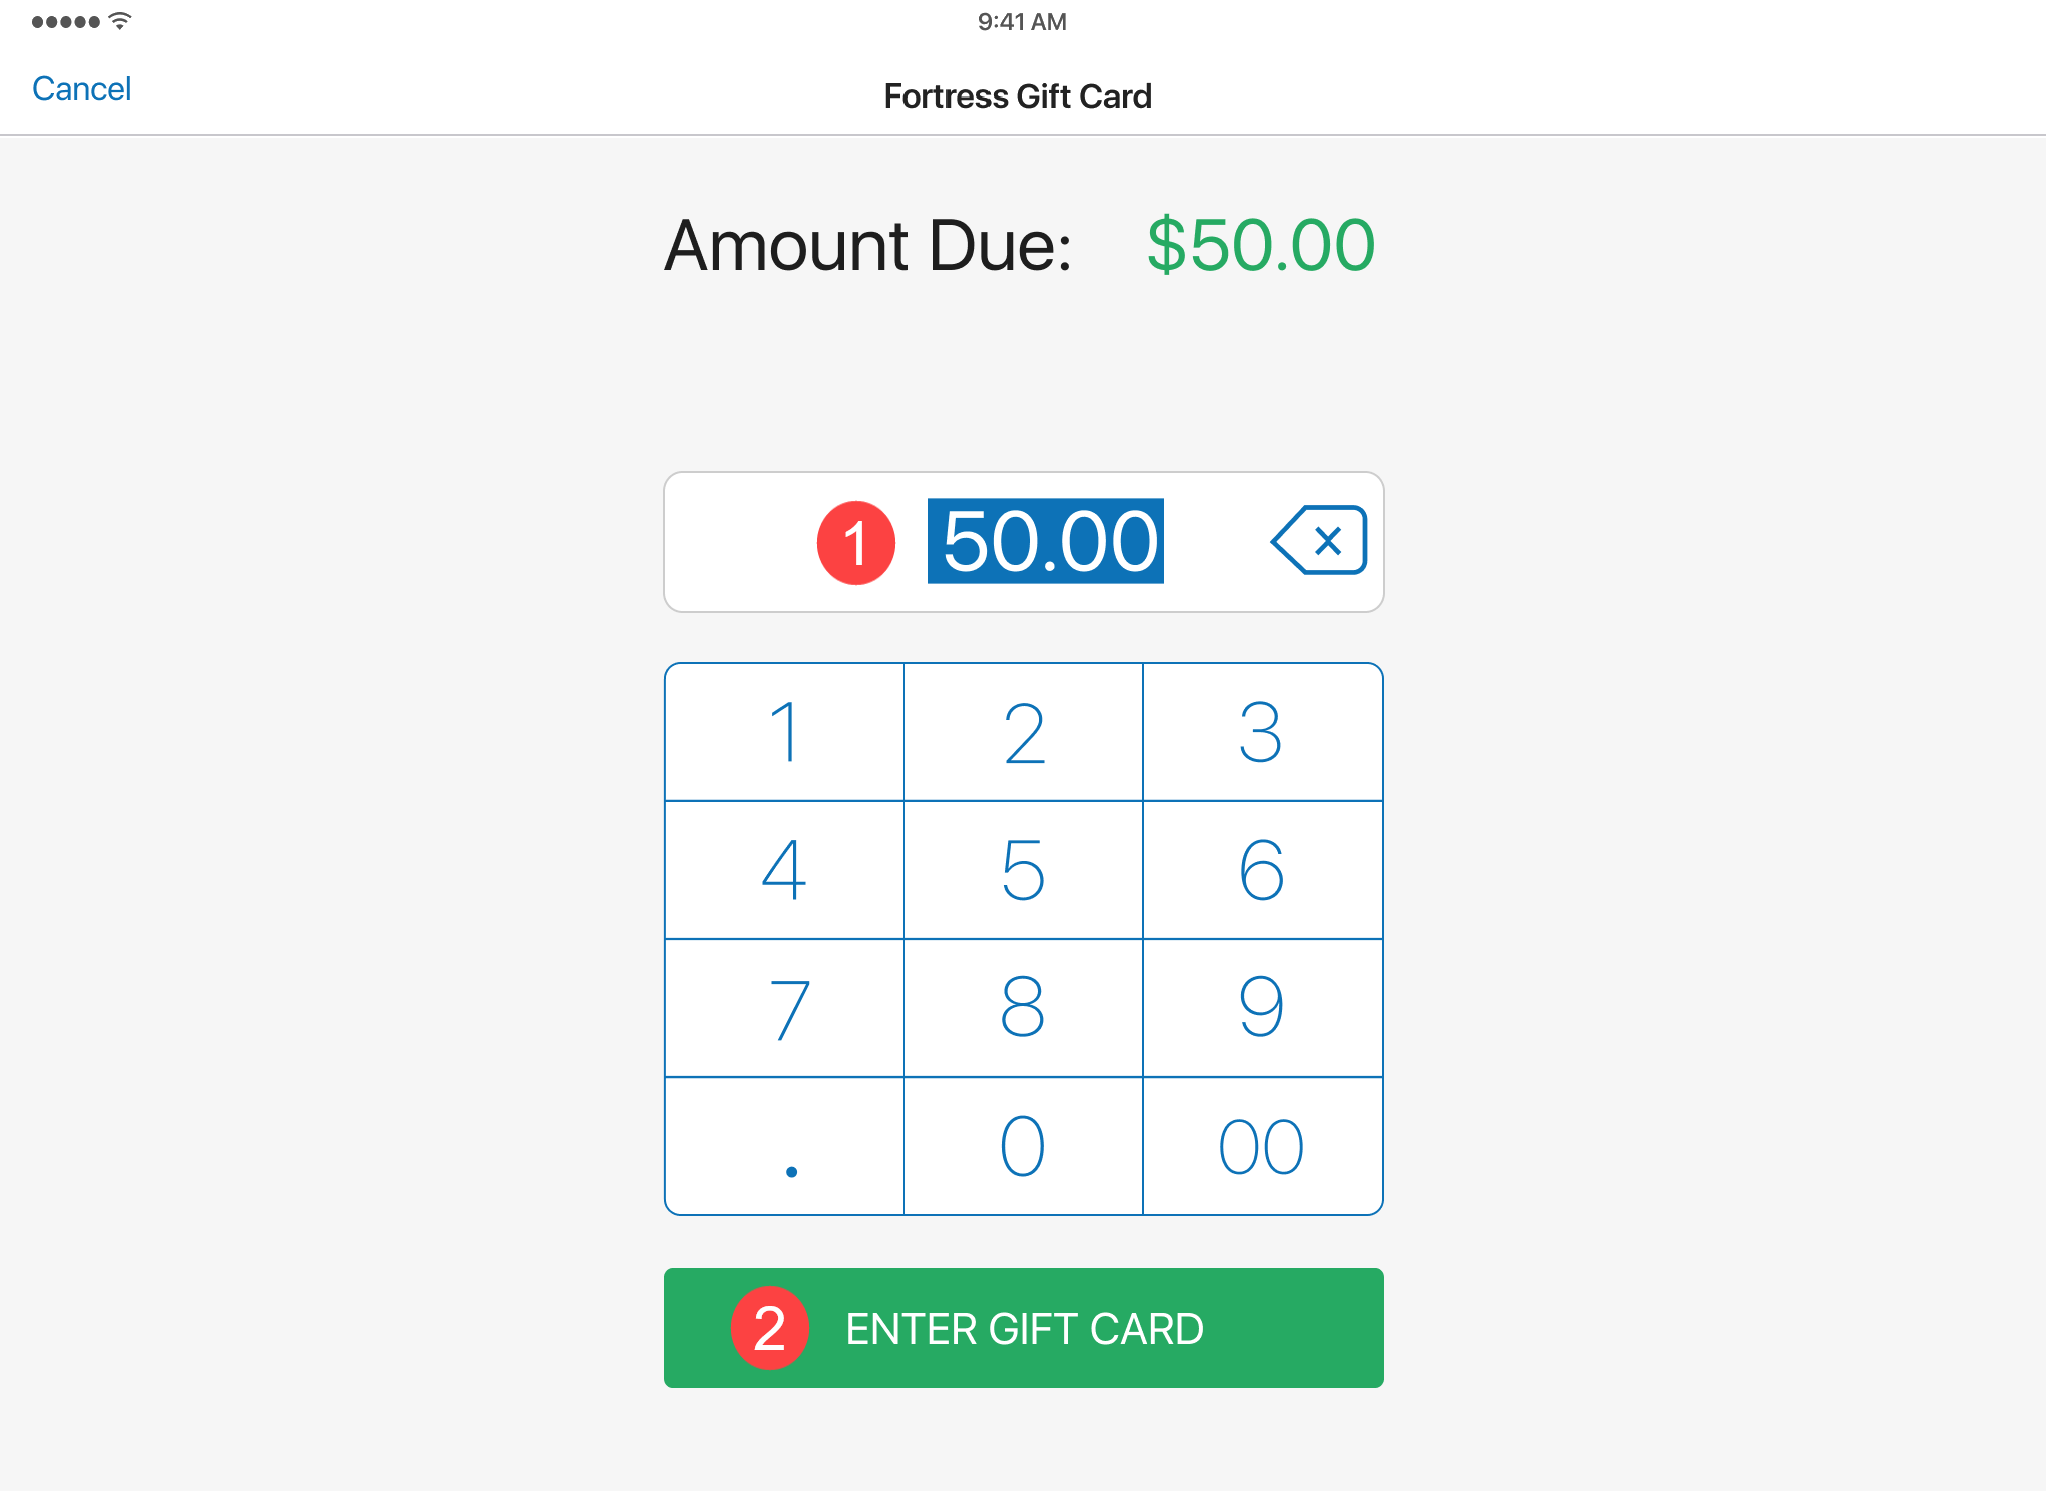
Enter the required amount 1 and then tap ENTER GIFT CARD 2 :

If there are not enough funds on the customer’s gift card, Fortress may automatically charge the customer’s credit card on file. In this case, Teamwork receives the full payment from Fortress.
Alternatively, if Fortress cannot charge the customer’s credit card, the payment will be approved only for the amount available on the gift card, and there will be remaining Payment Due on the receipt. In this case, after completing the GC payment, it’s possible to choose another payment method. -
In the dialog that opens:
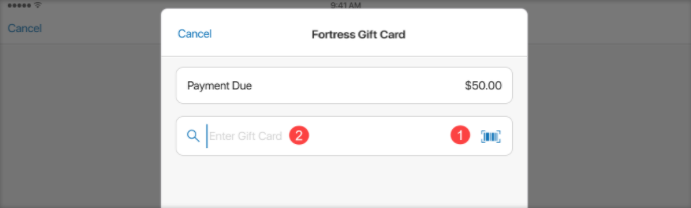
- tap the barcode icon 1 and then scan the GC, or
- in the Enter Gift Card field 2 , enter the GC number manually


The dialog with the Approved icon will appear when the transaction is approved:
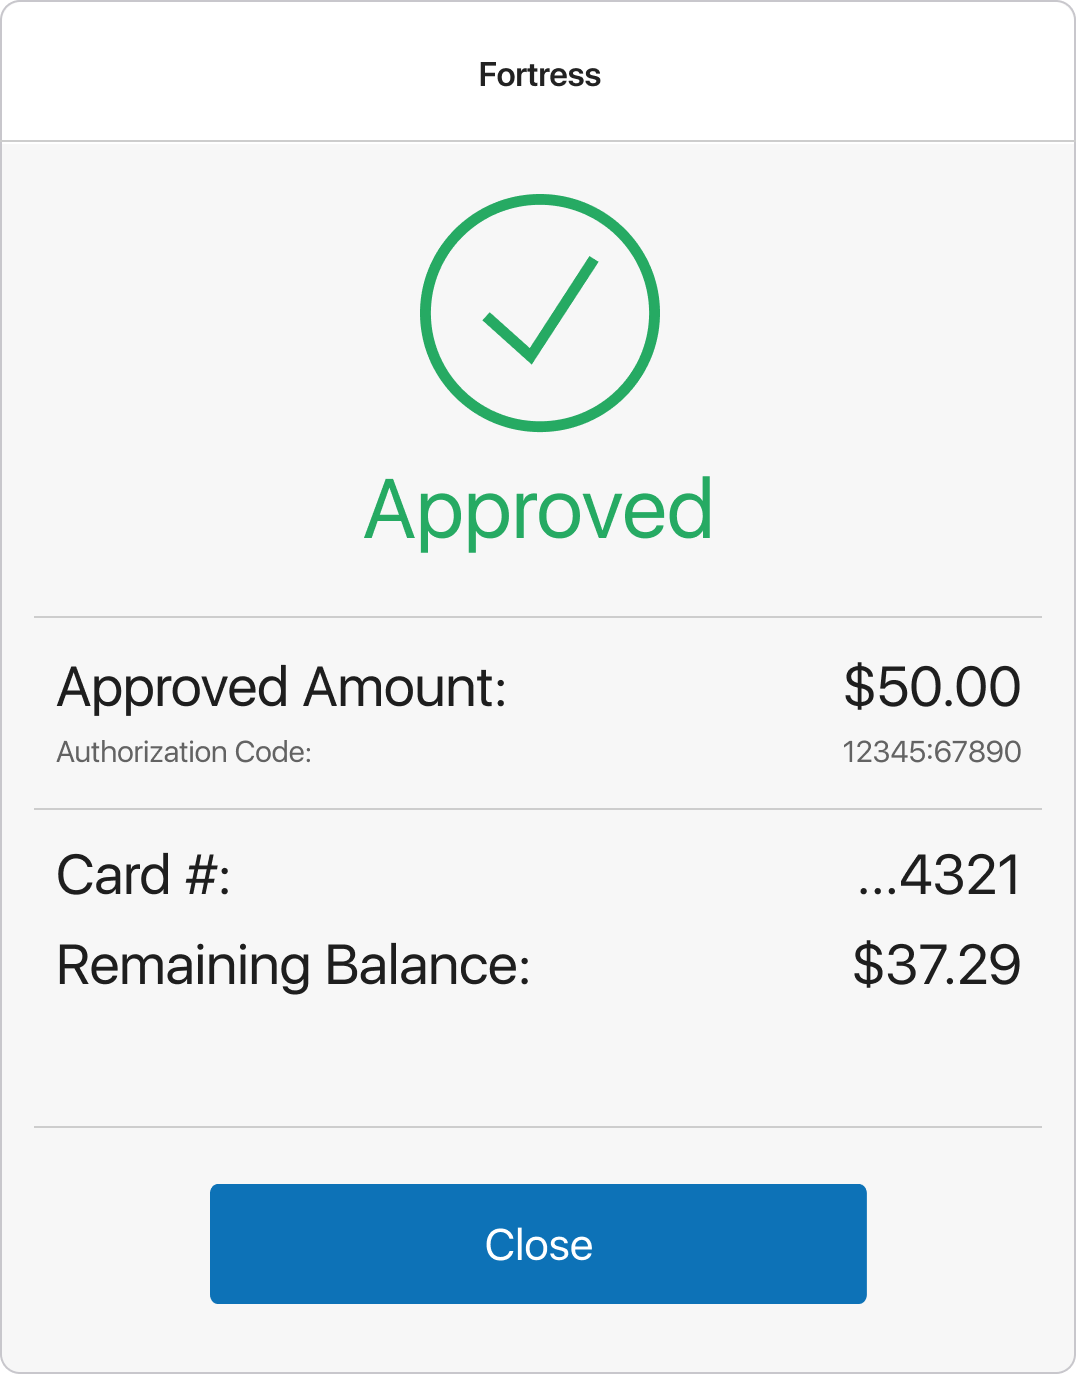
If there is no balance on the GC, the transaction will be declined, and the No Funds Available On Card icon will apear.
- Approved Amount: approved payment amount
- Authorization Code: authorization code returned by Fortress
- Card #: last four digits of the GC number
- Remaining Balance: remaining GC balance
- Tap Close.
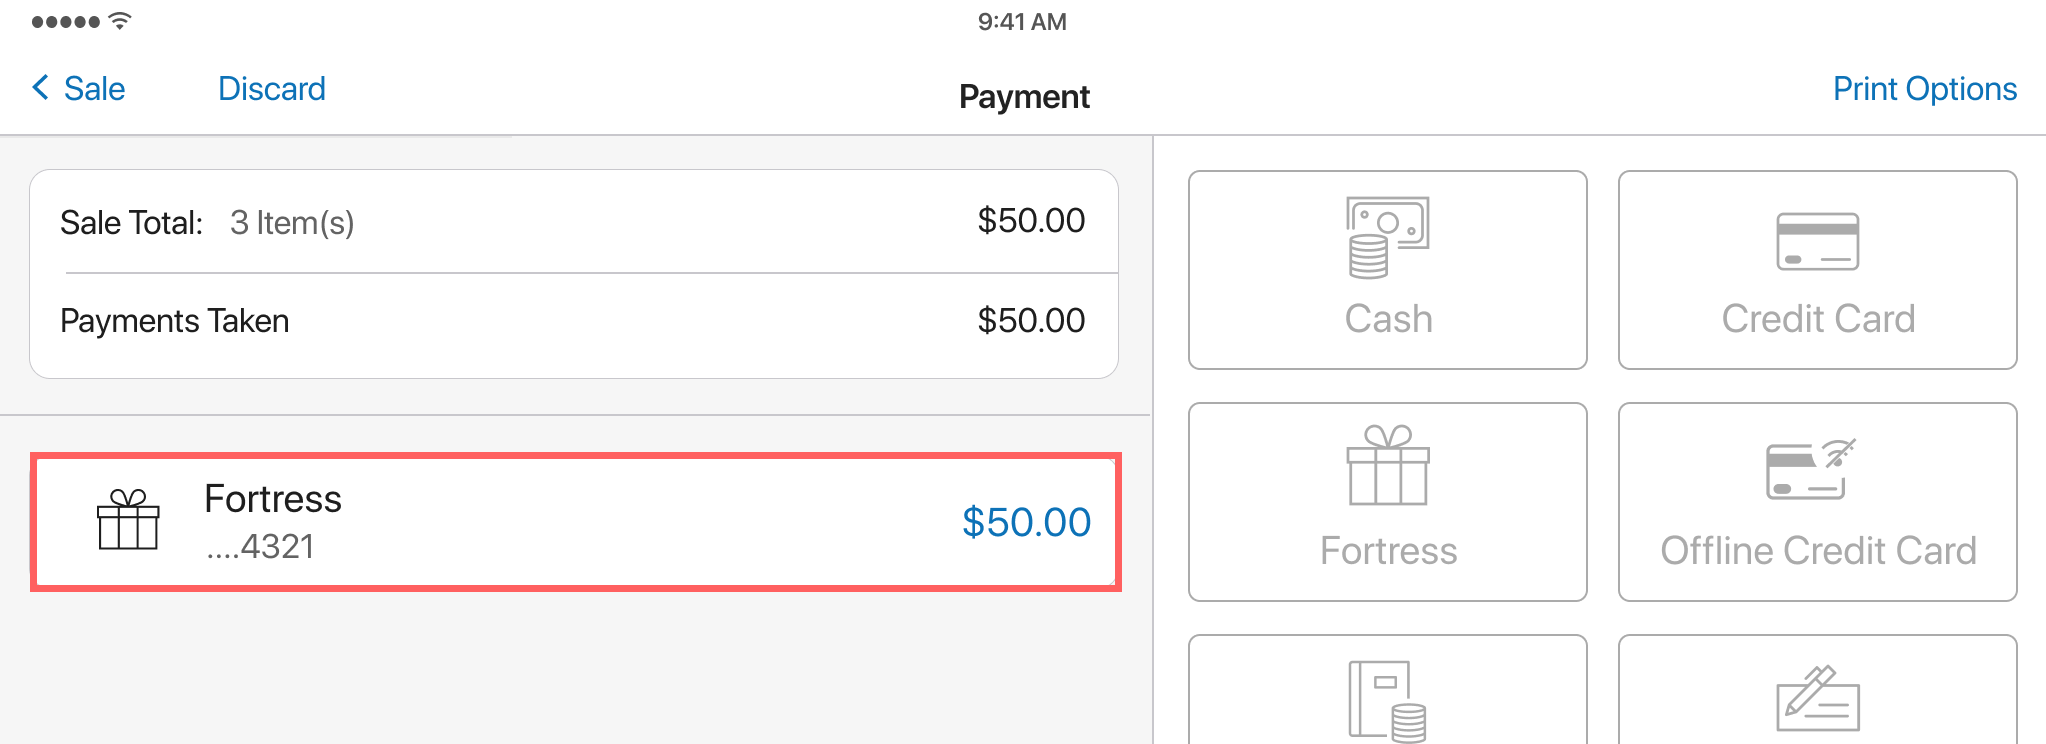
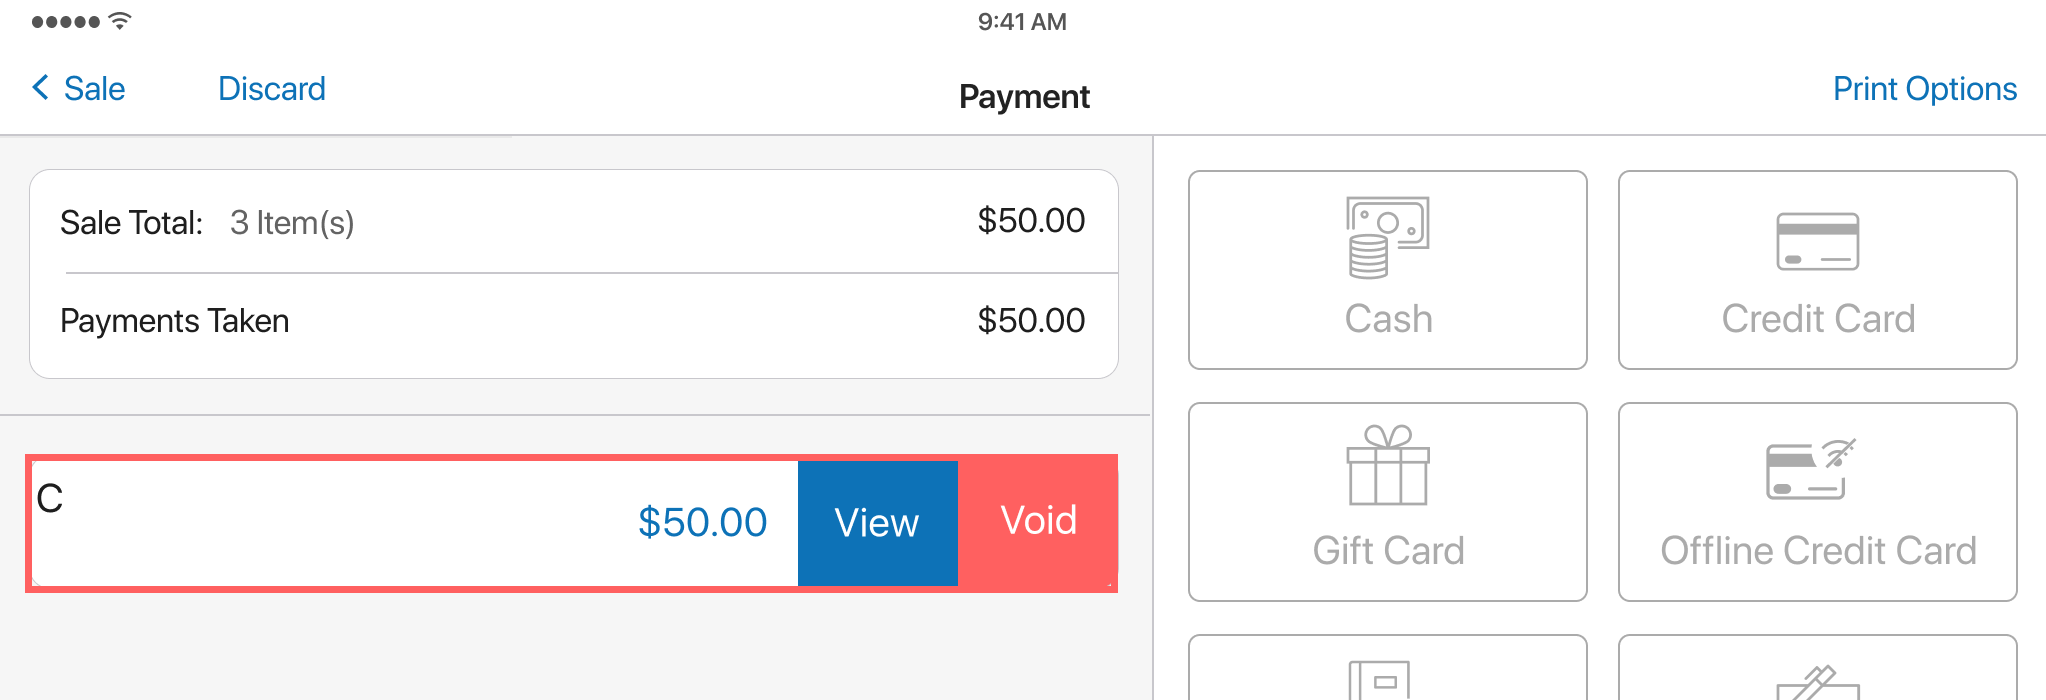
- Back in the Payment area, the Fortress payment appears on the left:
 On swiping the payment left, the following options become available:
- View: view payment details
- Void: void the payment
- Tap FINALIZE at the bottom-right.
Voiding a Fortress GC payment
It is possible to void a Fortress payment if the user is still within the current Sales Receipt.
Please be advised that it’s not possible to void/reverse a finalized Sales Receipt that includes a Gift Card payment.
-
When in the Payment area, swipe left the required payment:

-
Tap Void.
-
In the confirmation dialog, tap Yes.
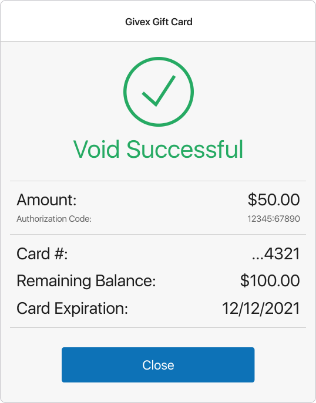
The dialog with theVoid Successfulicon will appear when the voiding transaction is approved: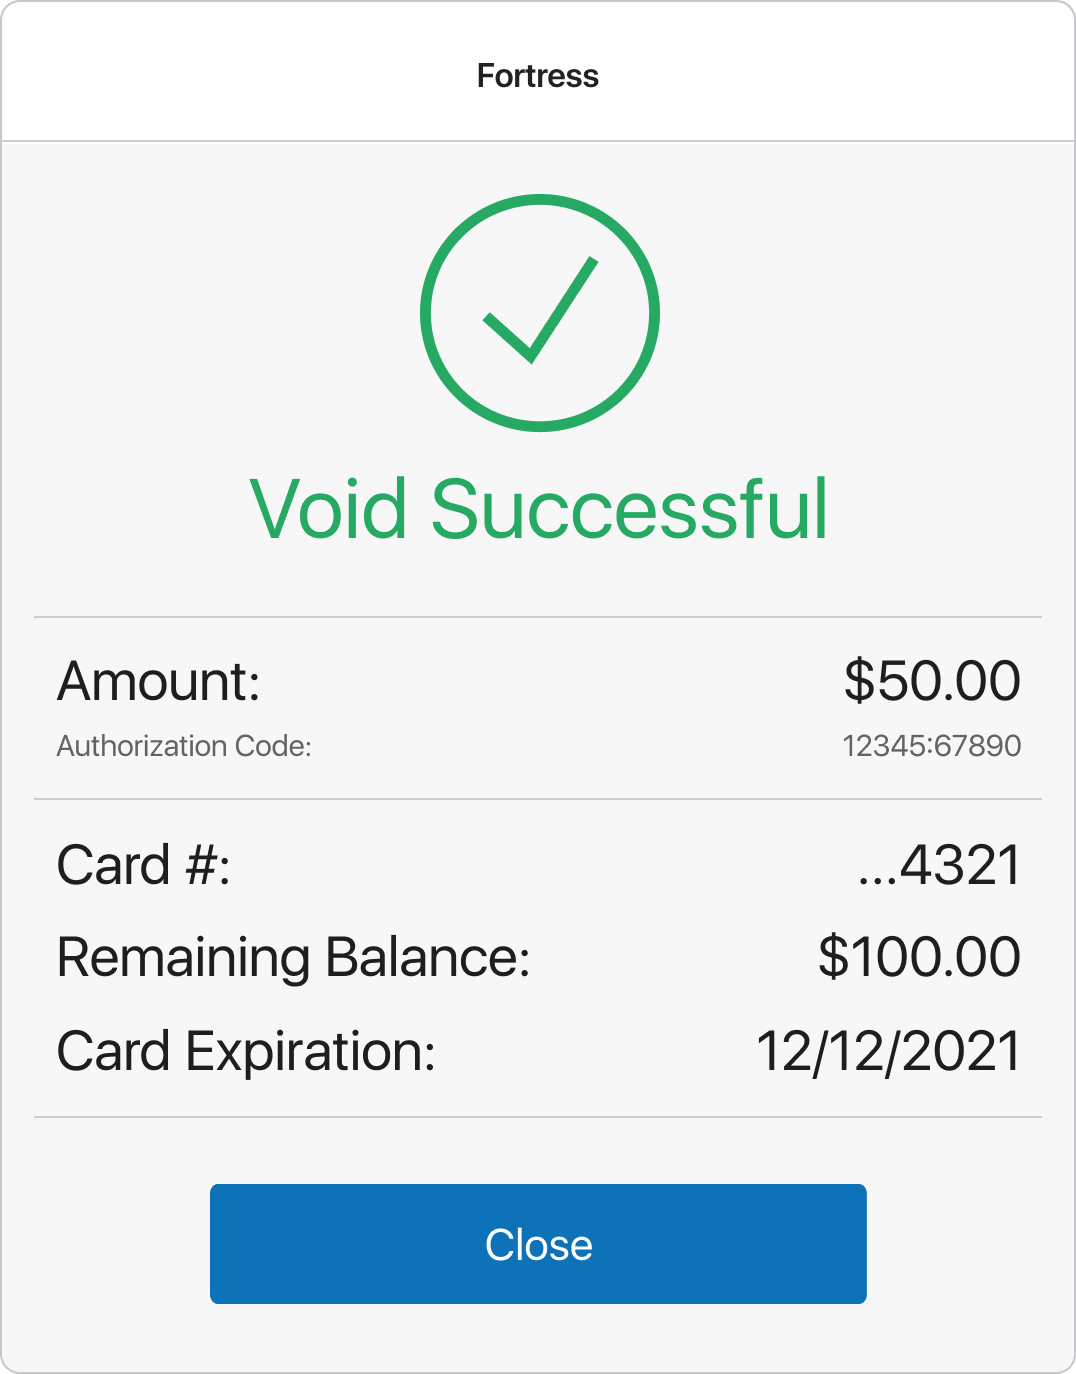 In the dialog, the following information is available:
- Amount: approved void amount
- Authorization Code: authorization code returned by Fortress
- Card #: last four digits of the GC number
- Remaining Balance: remaining GC balance
-
Tap Close.
If the payment cannot be voided, the dialog with the
Void Not Processedicon appears. In this case, the user have the following options:- Force close the app to discard the receipt. It is then required to contact the payment processor to have the payment voided manually.
- Alternatively, complete the receipt by tapping FINALIZE and then perform a return to make a refund via the required payment method.

Verified Return: Making a refund to a Fortress GC
To make a Verified Return with a refund to a Fortress Gift Card, in POS Pro:
-
Find the original sale by:
- using the Find Receipt functionality in the Sales Receipt area, or
- searching under
Sales Receipt > Sales Historyor in the Customer area (see V6.33 Mobile Release Guide for details on how to start a Verified Return)
-
In the Return area, tap the items that the customer is returning.
-
Tap Return Item(s) at the bottom-right.
-
In the Sales Receipt area, tap PAYMENT at the bottom-right.
-
At the top-right, under RETURN VALUE TO, tap Fortress:

-
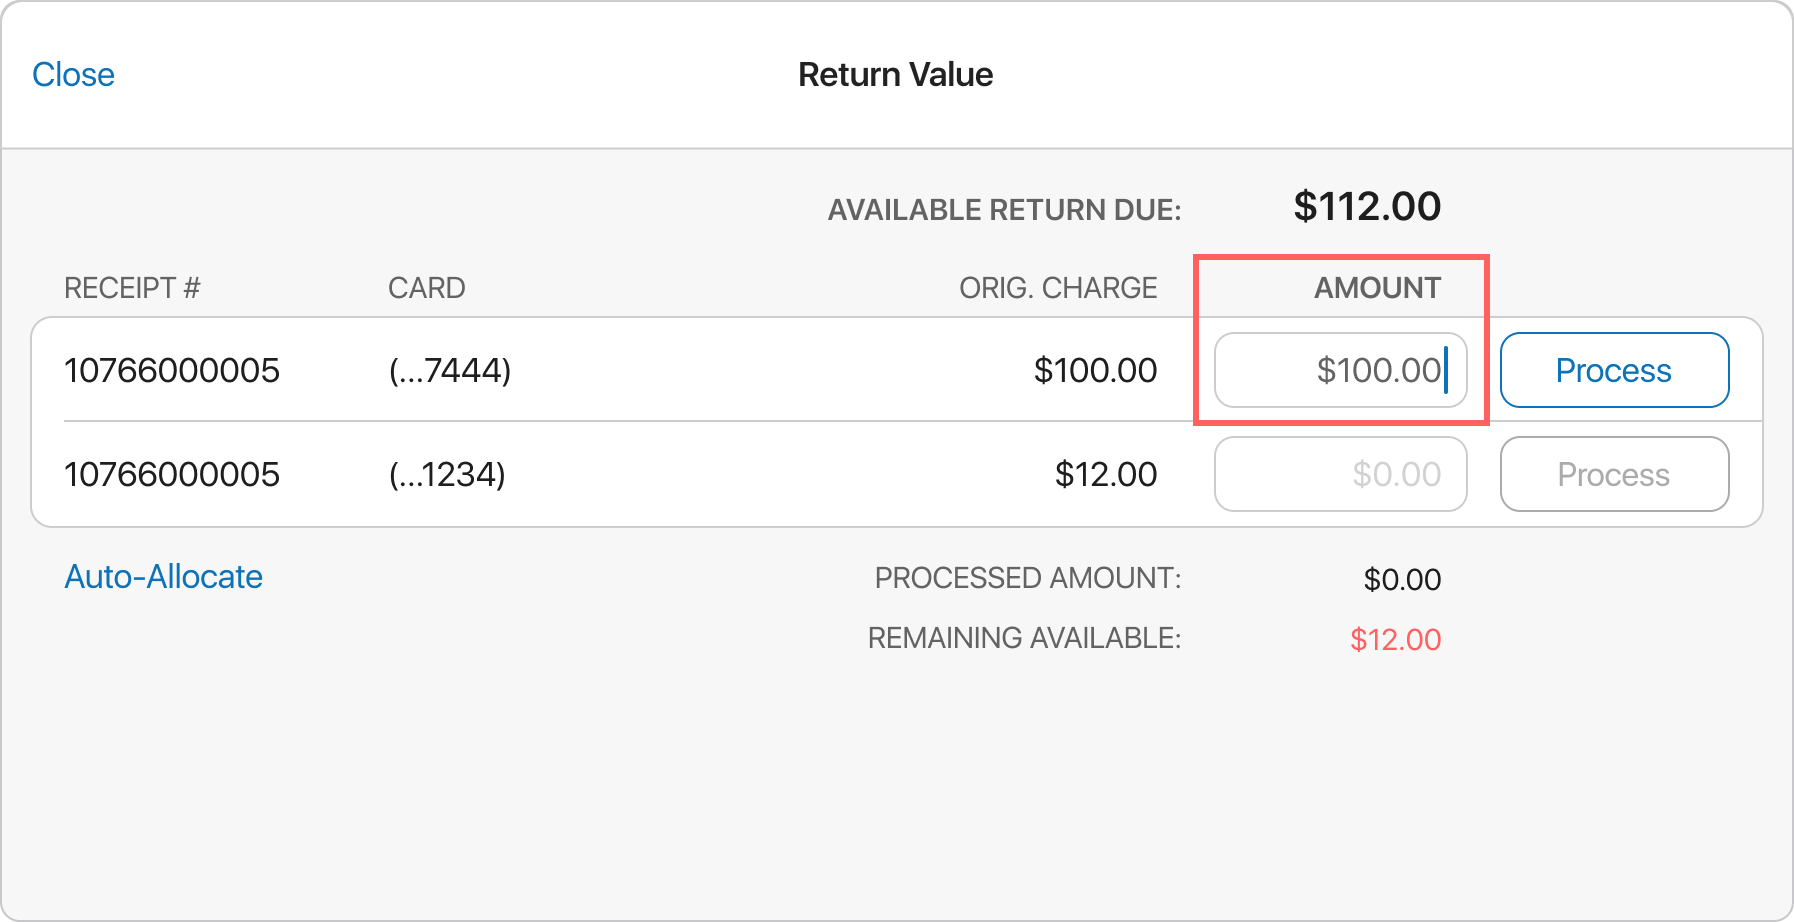
In the Return Value dialog, enter the amount to be returned to the GC:
 If several Fortress Gift Cards were used in the original sale:
- manually define the AMOUNT for each GC, or
- tap Auto-Allocate to automatically distribute the AVAILABLE RETURN DUE amount among the GCs
Please note that the AMOUNT returned to each Gift Card cannot exceed the card’s ORIG. CHARGE value. For example, in the screenshot above, the user cannot return more than 100$ to the
...7444Gift Card.
-
Tap Process next to the required Card. The refund processing screen will appear:

-
After the transaction is approved, tap Close on the Approved screen:

- If there are several Gift Cards on the receipt and the Remaining Available amount is NOT
0, tapping Close returns you to the Return Value dialog where it’s possible to process the remaining cards. - If the Remaining Available amount is
0, tapping Close returns you to the Payment area.
- If there are several Gift Cards on the receipt and the Remaining Available amount is NOT
-
In the Payment area, tap FINALIZE.


Fortress payments in the End of Day area
Under Drawer Memo > End of Day > Payments > [Fortress], it’s possible to review Fortress transactions made against that Drawer Memo.
In the [Fortress] section, the following tabs are available:
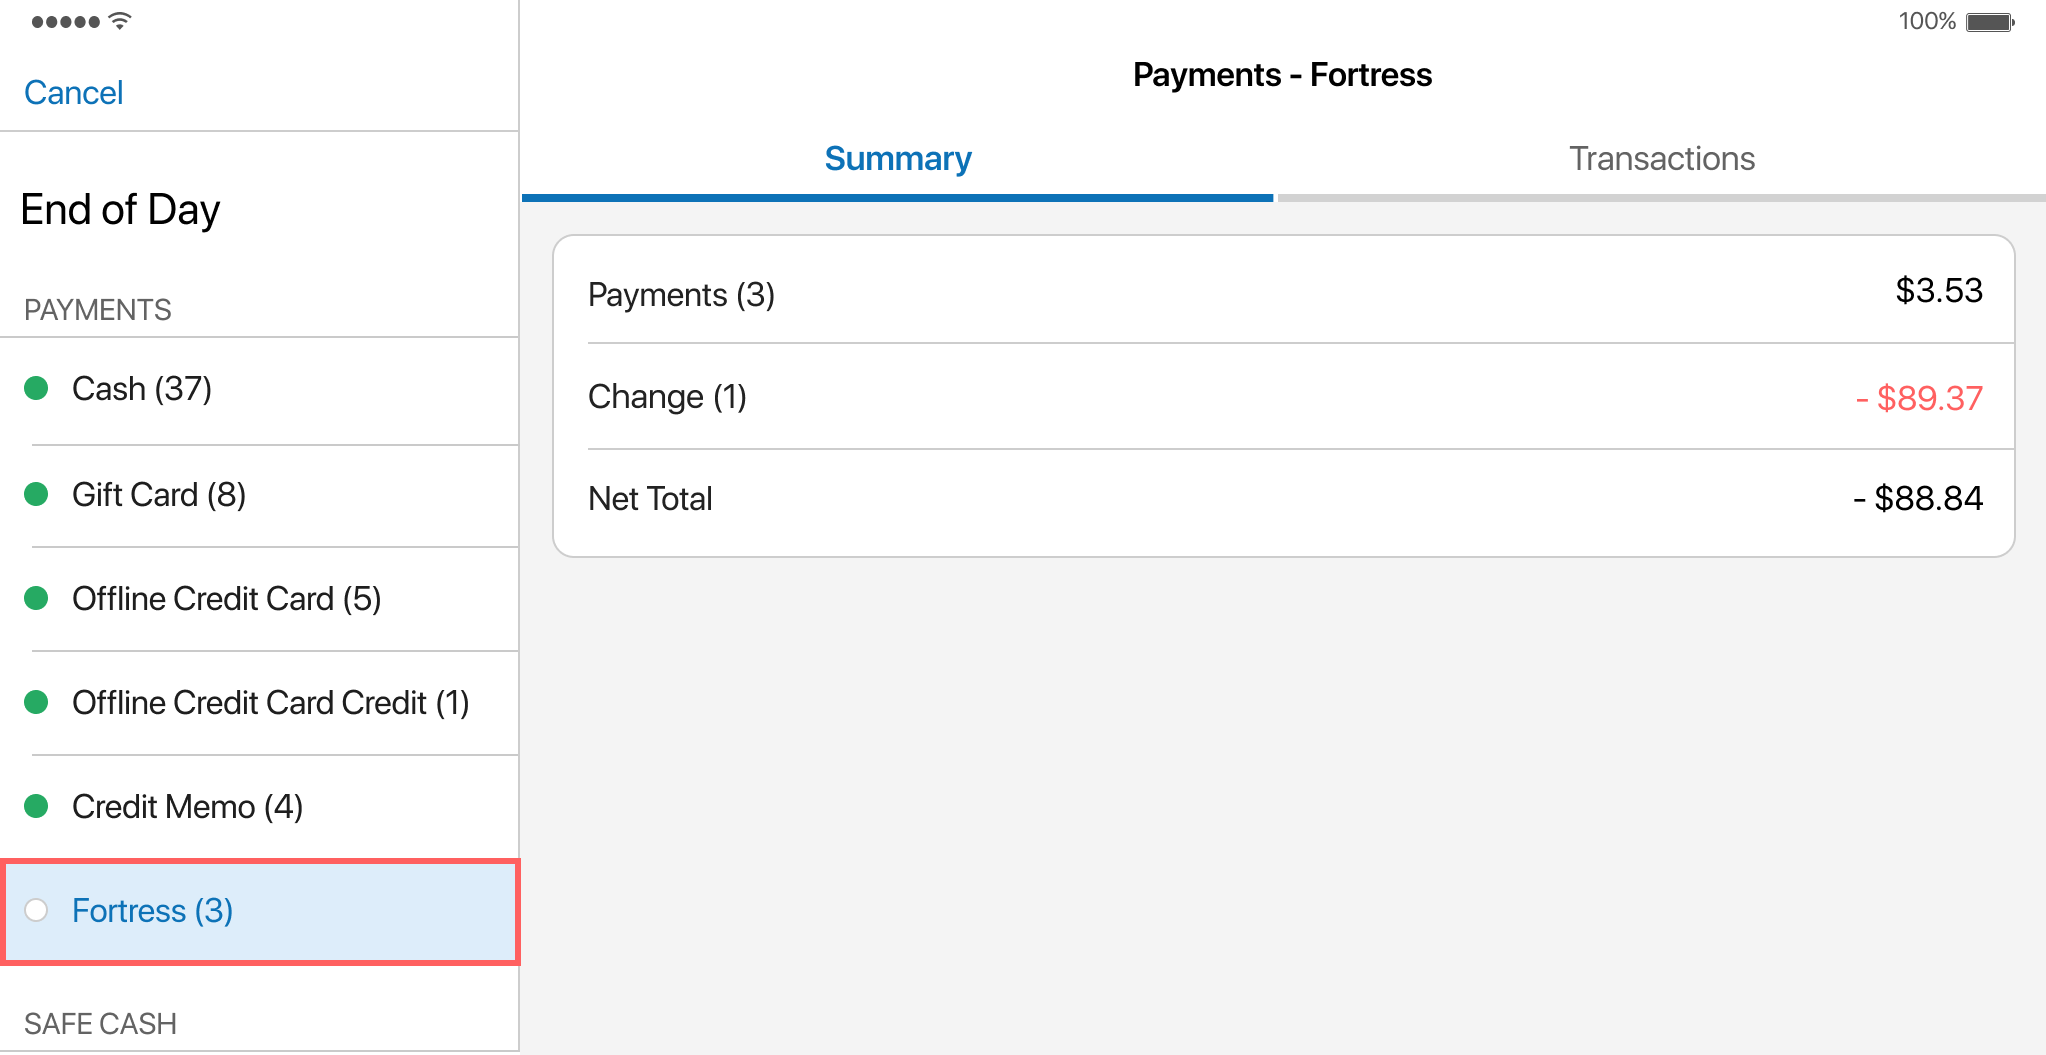
Please note that the name of the [Fortress] section in the End of Day area is defined in CHQ under settings > sales > payment methods > [your Fortress payment method] in the code field.
- Summary
- Transactions
The Summary tab
In the Summary tab, the following information is available:
- Payments: the total amount of Fortress payments
- Change: the total amount of Fortress refunds and/or void/reverse transactions
- Net Total: the difference between the Payments and Change values
The Transactions tab
In the Transactions tab, for each Fortress transaction, the following information is available:
- Trans #: the unique number of the transaction
- Date/Time: the date and time when the transaction was performed
- Last 4: the last four digits of the GC number
- Amount: the amount of the transaction
See also
Sales Receipt: Applying Fortress discounts
Build 6.34.234: PRO-6474
POS Pro V6 can now retrieve customer records from Fortress and apply Fortress discounts to the sale.
Purpose
Fortress is a payment provider commonly used in the stadium space.
With this update, customers that have Fortress gift cards or tickets can have their Fortress records retrieved in POS Pro. That allows for applying the customer’s available discount to the sale.
Configuration in CHQ
For Fortress discounts to be available in POS Pro, Fortress integration must be configured:
- at the company level under
settings > sales > payment processing >thefortresssection, or - at the location level under
settings > location settings > locations / location settings > [selected location] > payments >thepayment processing - fortresssection
Under the locations described above, make sure that the enable customer integration and enable Fortress discounts checkboxes are selected.
Clients upgrading from Version 4 can use the same credentials already set up for Fortress.
Also, please note that if URL, username, and password are defined at the location level, POS Pro uses the location-level settings over the company-level settings.
Applying a Fortress discount to the sale
To apply a Fortress discount, in POS Pro:
-
On the Home Screen, tap New Sale.
-
Add items to the sale. Note that Fortress discounts can be applied before or after adding sale items.
-
Tap the Customer tab at the top. On the Customer tab, the following sections are available:
- Teamwork for searching customers in Teamwork, and
- Fortress for searching Fortress customers
The name of the Fortress section can be changed in CHQ under
settings > sales > payment processing > fortressby defining the search label field. If the field is blank,Fortressdisplays in POS Pro by default.
-
In the Fortress section, search for the required customer by:
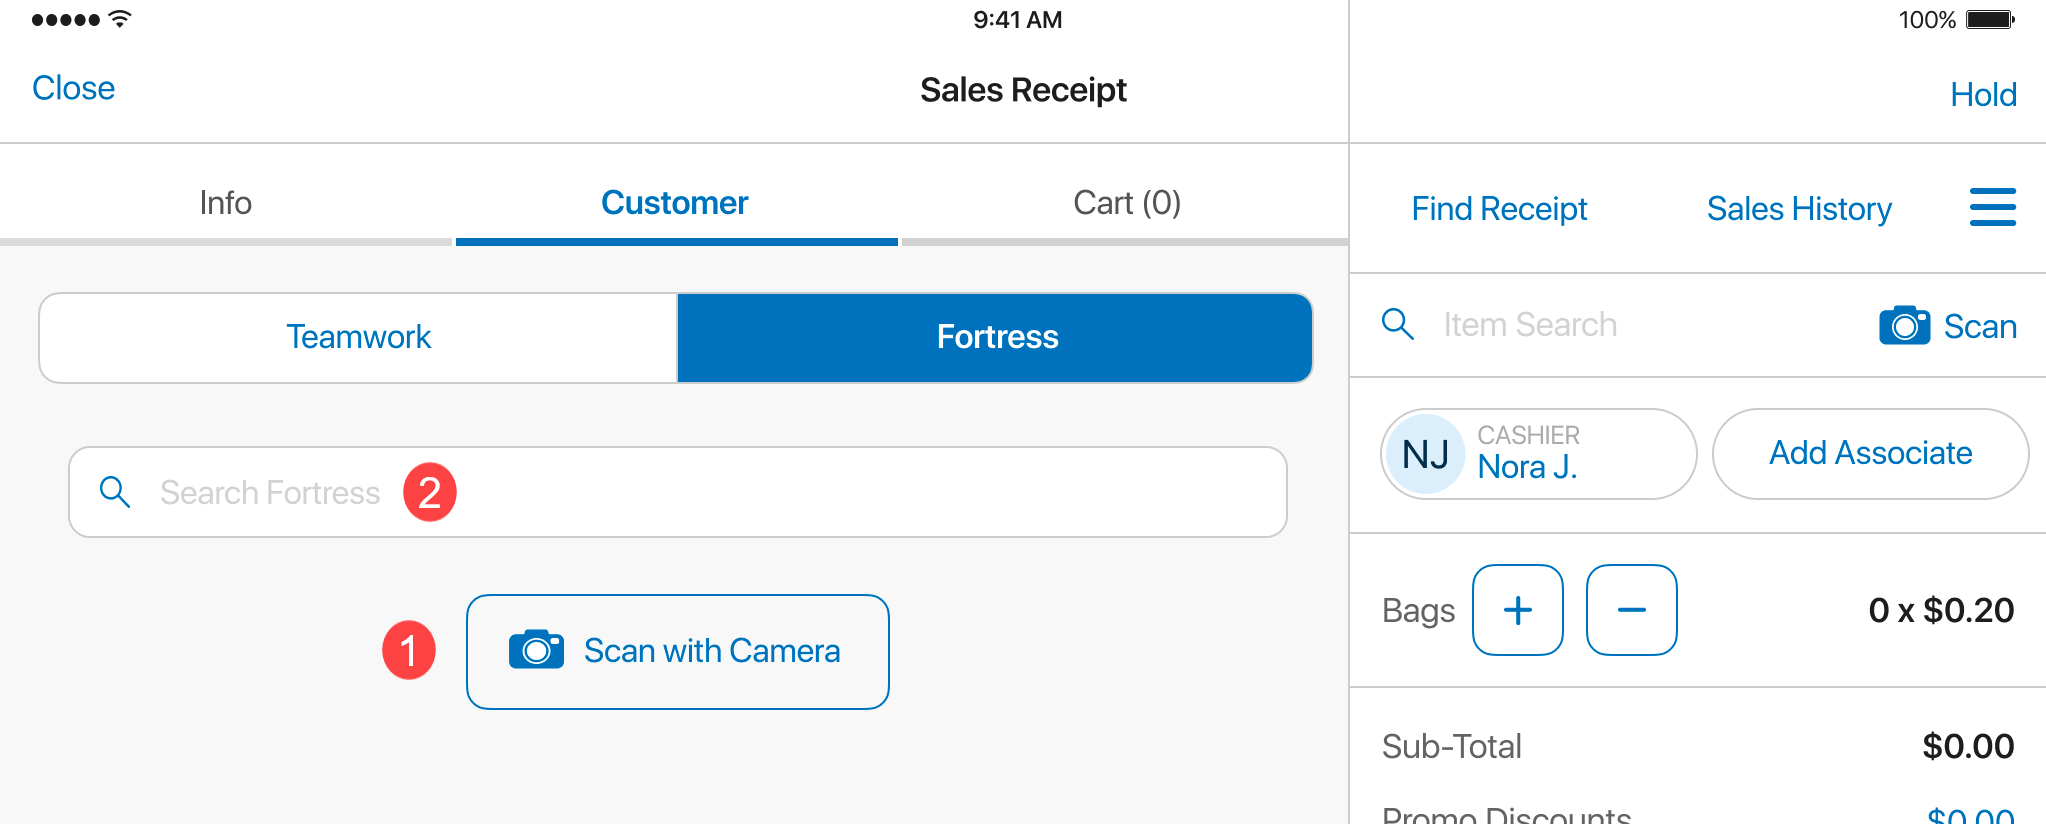
- tapping Scan with Camera 1 and scanning the customer’s card/ticket with the camera, or
- manually entering or scanning the number of the card/ticket into the Search Fortress field 2

Once the customer is found, the following information will be available under FORTRESS CUSTOMER:
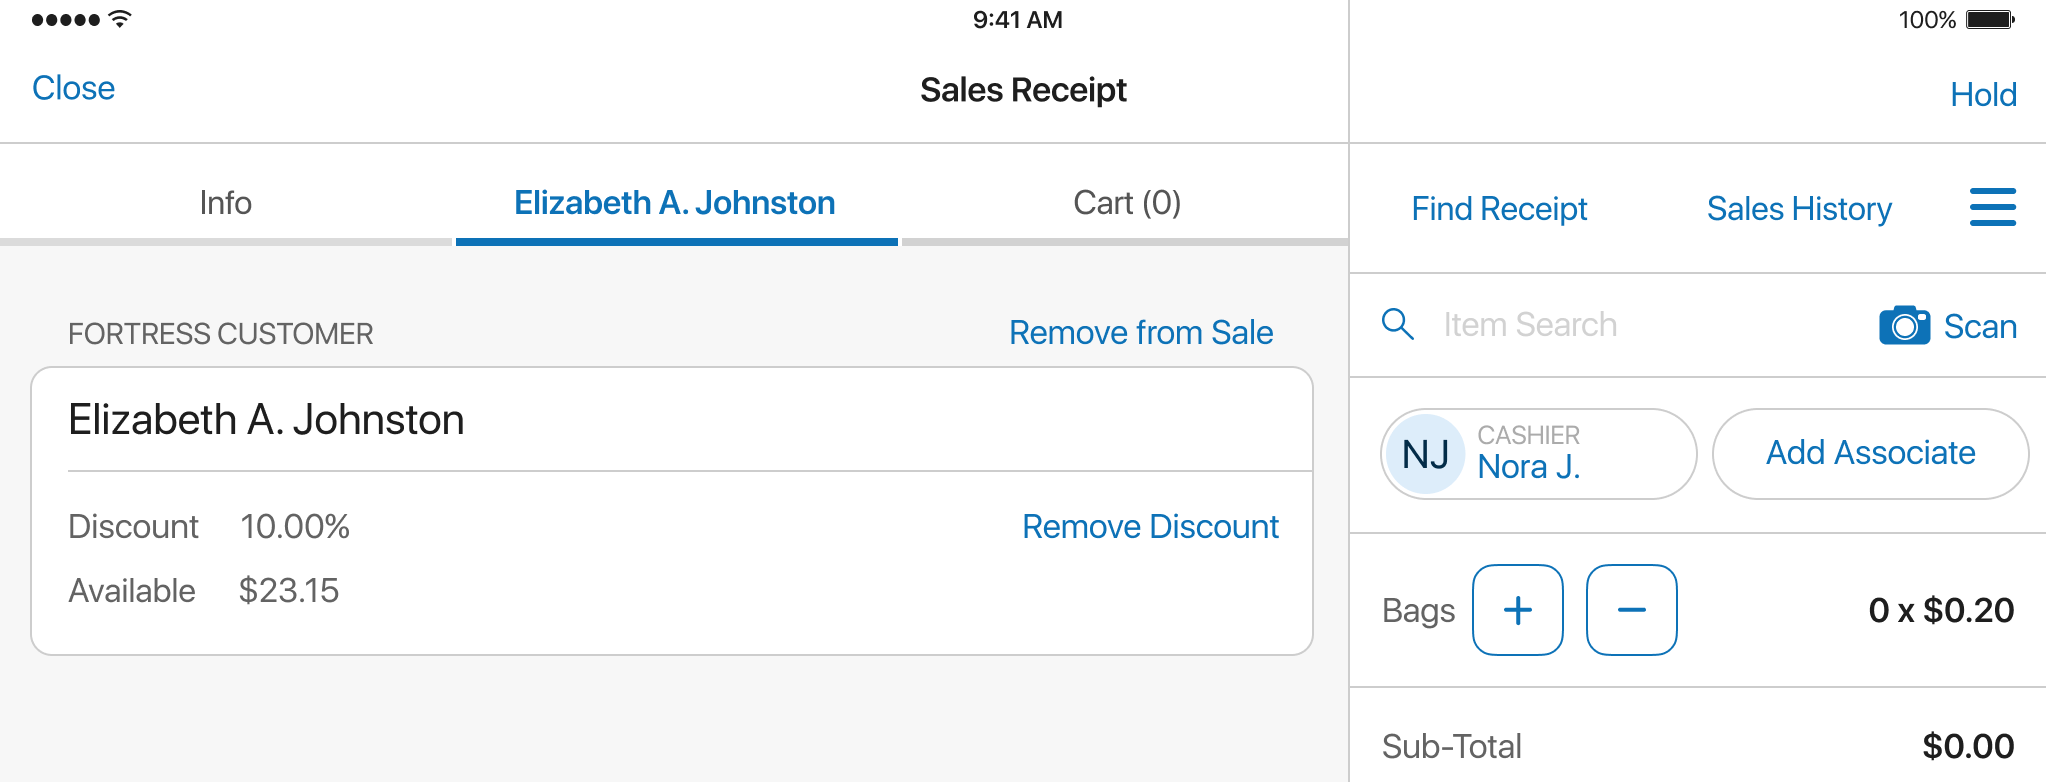
- the customer’s name
- the discount percentage that will be applied to the receipt
- the customer’s balance in Fortress available for spending
Additionally, the user has the following options:
- Remove Discount: remove the discount from the sale, for example, if the customer wants to apply a different Fortress card/ticket
- Remove from Sale: remove the customer record from the sale
Also, in the right-side panel showing totals, the Customer Discount field will appear showing the total Fortress discount:

- Tap PAYMENT at the bottom-right.
- Choose the required payment method and accept the payment.
- Tap FINALIZE.
See also
Synchronizing POS Pro after initialization
Build 6.34.234: PRO-4861
We’ve updated the synchronization process between POS Pro and CHQ. In particular:
- synchronization now begins automatically after every initialization or re-initialization, and
- synchronization includes sending the latest security related information (for example, users' login credentials) to POS
Purpose
This update is helpful in a scenario where POS Pro is deleted from the device shortly after a user’s password was changed. Synchronizing after the initialization allows for sending the updated login credentials to POS. That will allow the user to log in with the new password.
Updated synchronization
In POS Pro, initialization is performed:
- automatically after the POS Pro app is installed
- when triggered manually under
Settings > Administration
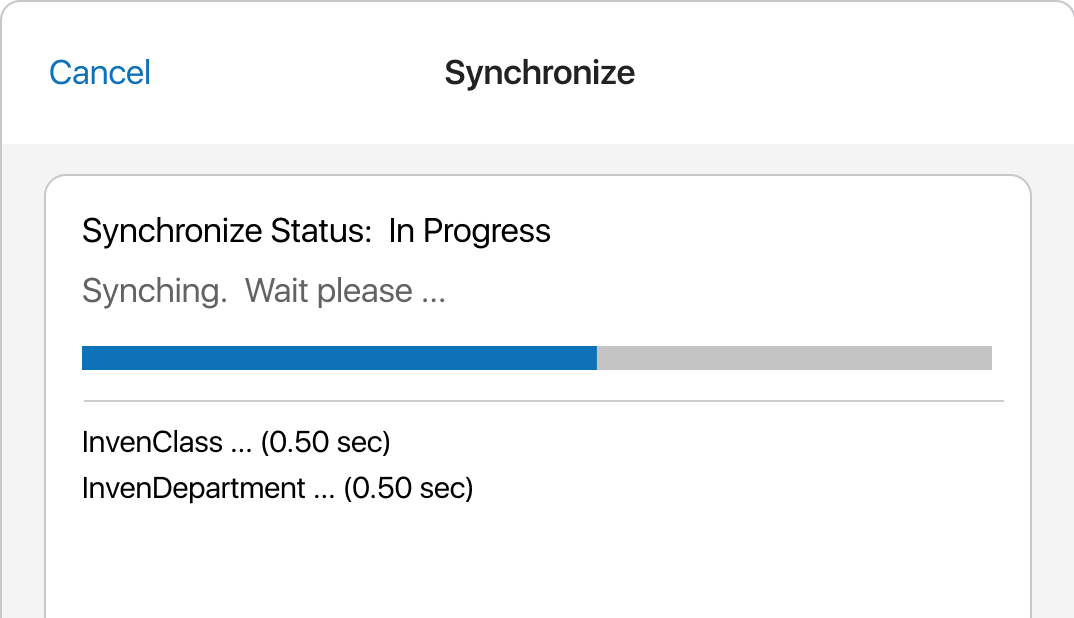
Now, after initialization or re-initialization is complete and the user taps Done, synchronization begins in the Synchronize dialog:
 If the user taps Cancel during synchronization, the Cancel Synchronize dialog appears with the following message:
 Cancelling this process may result in out-of-date login credentials. Are you sure?
Tapping Yes cancels synchronization and opens the user login dialog.
RFID reader: Ignoring RFID tags that do not start with configured EPC prefixes
Build 6.34.234: PRO-7395
POS Pro now respects the RFID allowed prefixes setting configured in CHQ undersettings > sales > POS settings > the general section.
When working in conjunction with an RFID reader, POS Pro now ignores RFID item tags with Electronic Product Codes (EPCs) that do not start with the prefixes defined in the RFID allowed prefixes setting. Please note that if no prefixes are defined, all EPCs are read by POS Pro.
This feature may be useful if the company uses RFID tags that don’t belong to the product catalog (for example, security tags) and shouldn’t appear in POS Pro.
See also
Updated force redemption method for GiveX
Build 6.34.248: PRO-7559
We’ve updated the force redemption method used for GiveX to allow for redeeming if a gift card balance is lower than the payment due.
Updated logic for Fortress integration
Build 6.34.248: PRO-7578
As of version 6.34.248, the call to Fortress to check the gift card balance is made after transaction completion.
Issue Resolutions
The “No take in reasons” message appears when trying to create a Take Out
Build 6.34.234: DS-2177
Issue
When trying to create a Take Out record under Drawer Memo > Take Out/In, the No take IN reasons defined on CHQ error message could appear even if there were Take Out reasons defined.
Resolution
Now, as expected, when trying to create a Take Out:
- if there are Take Out reasons defined in CHQ, a new Take Out record is created
- if there are no Take Out reasons defined in CHQ, the
No take OUT reasons defined on CHQerror message appears
Sales Receipt: The Check payment method doesn’t support decimal numbers
Build 6.34.234: DS-2206
We’ve fixed the issue where, when using the Check payment method under Sales Receipt > Payment, the payment due amount would display incorrectly if the sale total was a decimal number.
RFID Tag Status: Tag information periodically disappears from the screen
Build 6.34.234: DS-2161
Prior to version 6.34.78, when viewing the status of an RFID item tag under Home Screen > RFID Tag Status, the tag information would periodically disappear and then appear on the screen again.
The issue has been fixed. Now, as expected, the tag information is visible on the screen until the tag is removed from the RFID reader.
Sales Receipt: The font size for the email address increased
Build 6.34.234: DS-2288
Under Sales Receipt > Payment, we’ve increased the font size for the customer’s email address to match the standard font size of similar fields.
The Open Return tag incorrectly applied to Verified Return items
Build 6.34.234: DS-2222
Prior to version 6.34, when the user viewed a finalized Verified Return under Sales Receipts > Sales History, the Open Return tag could be incorrectly applied to the return items.
The issue has been fixed. Now, the items are correctly tagged as Verified Return.
Tax amount from Verified Returns not sent to CHQ
Build 6.34.234: DS-2324
We’ve fixed the issue where the tax amount from a finalized Verified Return sometimes wasn’t passed to CHQ. That happened when the Verified Return was performed on the same device where the original sale was finalized.
Sales Receipt: Return reason not saved after finalization
Build 6.34.234: DS-2310
We’ve fixed the issue where the Return Reason applied to a return item sometimes wasn’t saved in the finalized Sales Receipt. Instead, under Sales Receipt > Cart > [item name] - edit dialog > Return, Select would display in the Return Reason field.
Creating a new customer record with invalid Primary Email
Build 6.34.234: DS-2350
Issue
Under Sales Receipt > Customer > New Customer, it was possible to create a new customer record with an invalid Primary Email. In the created record, the Primary Email field would be empty.
Resolution
Now, if the user enters an invalid email address, the Add button is disabled as expected.
Sales Receipt: Search for store pickup locations is case-sensitive
Build 6.34.234: DS-2351
Prior to version 6.34, under Sales Receipt > Cart > [item name] - edit > Ship, search for store pickup locations was case-sensitive.
The issue has been fixed. Now, the search is case-insensitive.
Saved customer record doesn’t appear in the finalized Sales Receipt
Build 6.34.234: DS-2180
Issue
When the user opened a finalized Sales Receipt under Sales Receipts > Sales History, the Customer tab was sometimes empty even if a customer record was saved on the receipt at the time of the sale.
Resolution
The issue has been fixed. Now, if a customer record was saved on the receipt at the time of the sale, that record appears in the finalized Sales Receipt as expected.
Unable to cancel Sales Receipt printing
Build 6.34.234: DS-2242
We’ve fixed the issue where, under Sales Receipt > Sales History > [selected Sales Receipt], when the user tapped Print and then Cancel, the receipt would be printed anyway.
Sales History: The Customer and Payment columns are empty for some Sales Receipts
Build 6.34.234: DS-2348
We’ve fixed the issue where, under Sales Receipts > Sales History, the Customer and Payment columns would be empty for some Sales Receipts created at a different company location.
Performing returns of shipped items
Build 6.34.234: DS-2376
Prior to version 6.34.234, under Sales Receipts > Sales History > [selected Sales Receipt], it was possible to make a Verified Return of an item that was shipped to the customer’s address.
Now, returning shipped items is no longer possible. When the user taps Return Item(s) with a ship item selected, the Return Unavailable error message appears.
Cash drawer is not opening
Build 6.34.234: DS-2388
We’ve fixed the issue where, after the user quickly tapped Open Cash Drawer twice in the Drawer Memo area, the cash drawer would fail to open from the following areas:
Drawer Memo > Start of DayHome Screen > More > Settings > Printers
Verified Return: Incorrect application of the Non-Returnable tag
Build 6.34.234: DS-2358
Prior to version 6.34, when the user scanned a printed Sales Receipt in the Find Receipt area, in the RETURN area that opened, all items were incorrectly tagged as Non-Returnable:
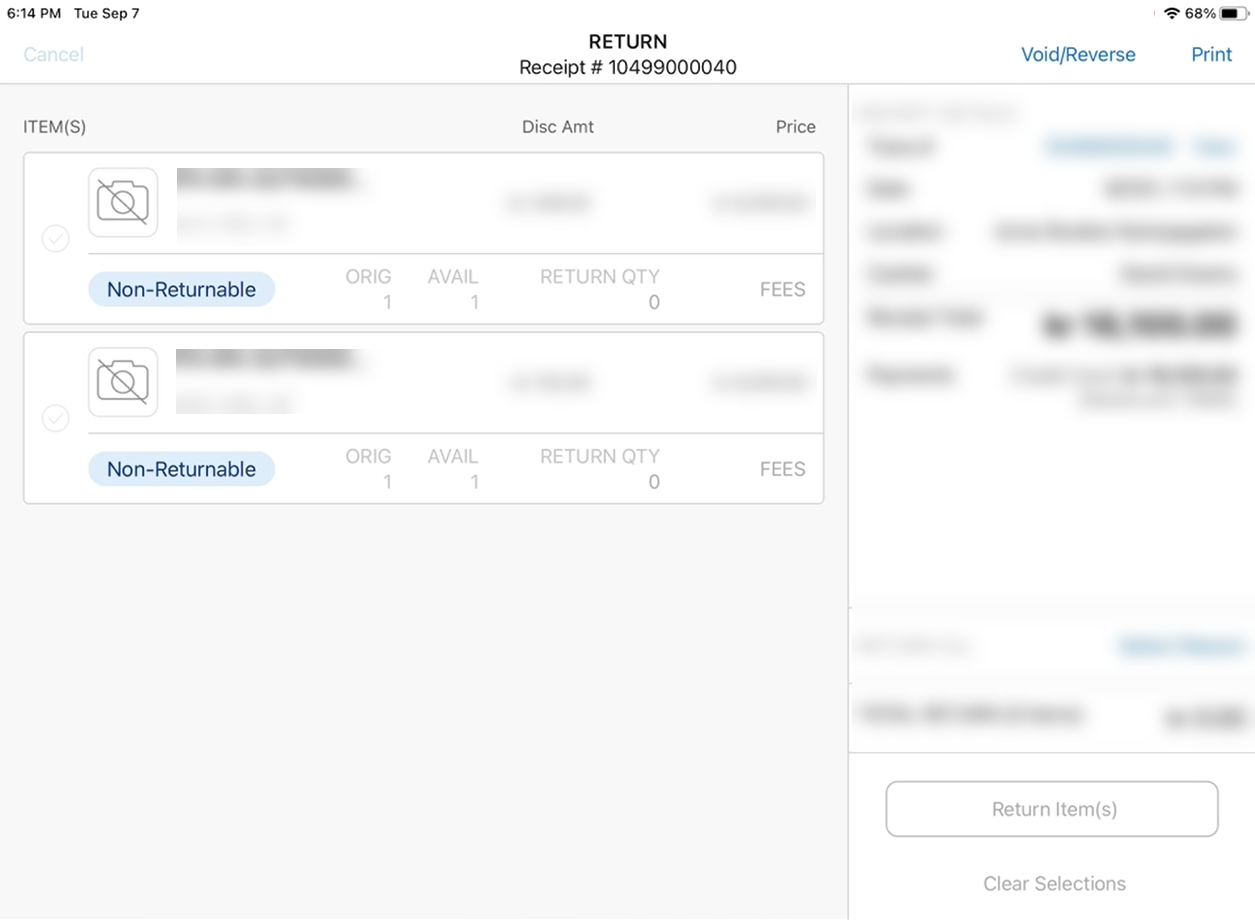 The issue has been fixed. Now, the Non-Returnable tag is only applied to items that cannot be returned.
Applied global discounts display twice in finalized Sales Receipts
Build 6.34.234: DS-2343
Issue
Under Sales Receipts > Sales History > [selected finalized SR] > Sale Options, applied global discounts would incorrectly display twice under the following conditions:
- more than one global discount was applied, and
- the discount percent was edited on adding
Resolution
The issue has been fixed. Now, in the finalized Sales Receipt, global discounts display without duplicates as expected.
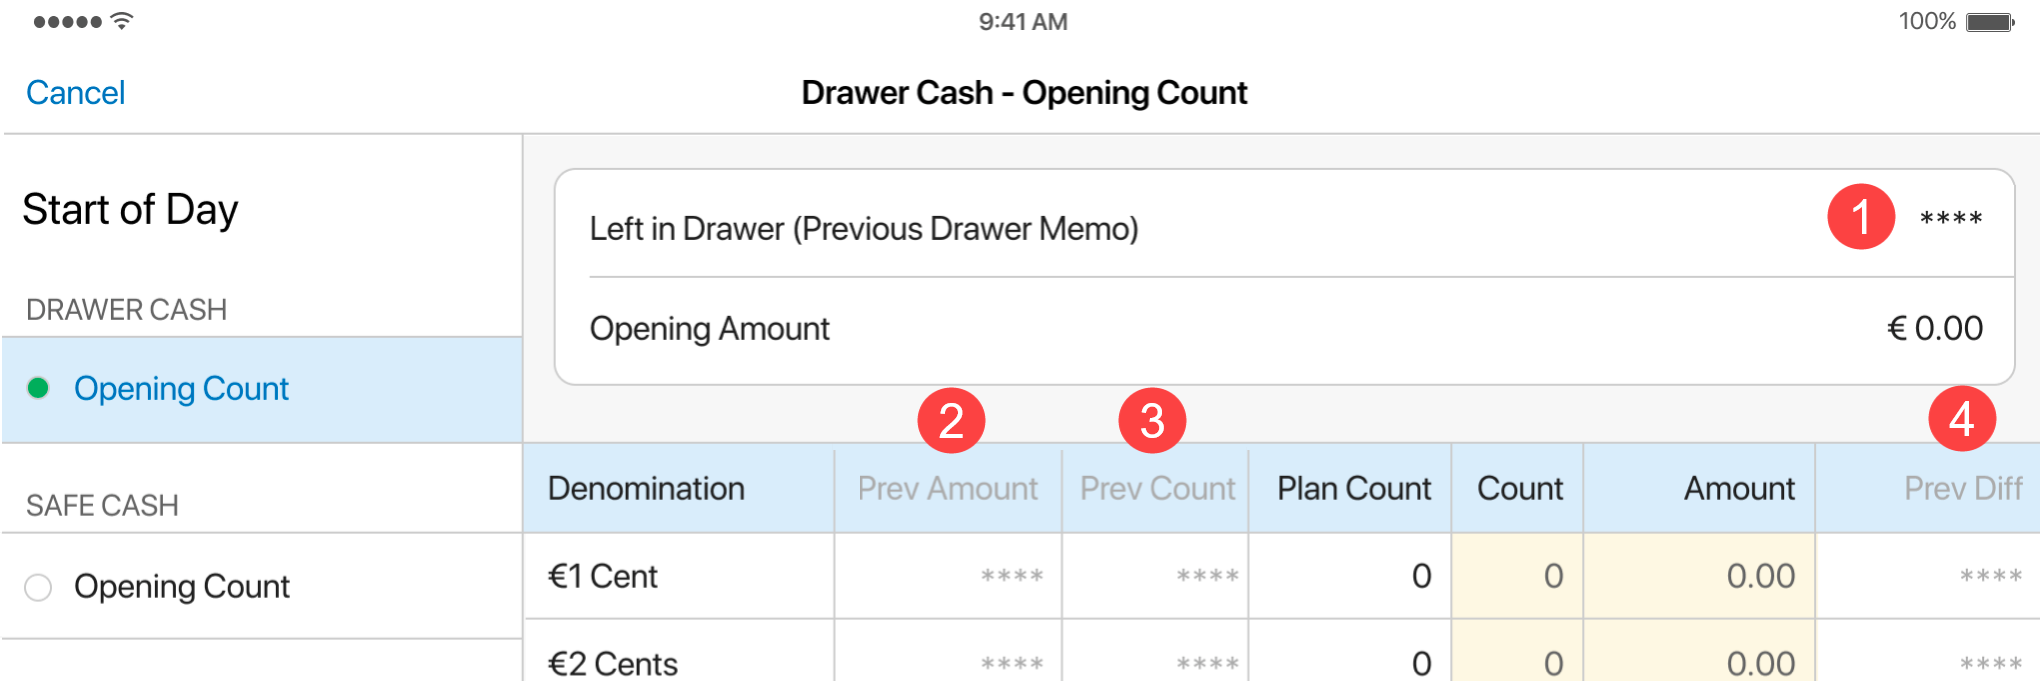
The Prev Count column is not populated in Drawer Memo’s SOD
Build 6.34.248: DS-2468
Prior to version 6.34.248, the Prev Count column under Drawer Memo > Start of Day > Opening Count would not be populated with values from the previous Drawer Memo.
The issue has been fixed. Now, the Prev Count column is populated with the respective values as expected.
Drawer Memo: Incorrect value color for SOD Over/Short discrepancies
Build 6.34.248: DS-2467
We’ve fixed the issue where the value in the SOD Over/Short field in the right-hand section of Drawer Memo would display in black instead of red in case of discrepancy.
Drawer Memo: Currency symbol incorrectly displayed in Prev Count
Build 6.34.248: DS-2469
Prior to version 6.34.248, on the Opening Count tab of the Drawer Memo’s Start of Day, the currency symbol in the Prev Count column would incorrectly display.
The issue has been fixed. In the Prev Count column, the values now display without any currency symbol as expected.
Different line order of Items in Sales and Return Receipts
Build 6.34.248: DS-2474
We’ve fixed the issue where the line order of items in a Verified Return Receipt differed from the original Sales Receipt.